
Product Information
Page 8
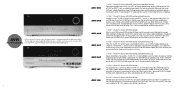
... 7.2-Channel A/V Receiver With HDMI™ Switching and Audio/Video Processing Digital audio meets digital video. Logic 7 processing, EzSet/EQ technology and high-current amplification take today's vast array of audio/video formats and sources, and make system setup and operation easier than ever. Two HDMI 1.1 inputs are both XM Ready and The Bridge connections let you to upscale incoming analog video signals to high-resolution 720p output or select two HDMI inputs for true single-wire connectivity. A high-current amplifier...
... 7.2-Channel A/V Receiver With HDMI™ Switching and Audio/Video Processing Digital audio meets digital video. Logic 7 processing, EzSet/EQ technology and high-current amplification take today's vast array of audio/video formats and sources, and make system setup and operation easier than ever. Two HDMI 1.1 inputs are both XM Ready and The Bridge connections let you to upscale incoming analog video signals to high-resolution 720p output or select two HDMI inputs for true single-wire connectivity. A high-current amplifier...

Product Information
Page 22
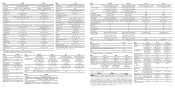
... Digital Audio Outputs (Coax/Optical) Rear panel 1/1 Front panel 1/0 Rear panel 1/1 Front panel 1/0 Digital Input Polling All sources4 All sources4 Direct Audio Inputs 7.1 With bass management 7.1 HDMI™ Inputs/Output 2/1 2/1 HDMI™ Type 1.1 With audio/video processing 1.1 With audio processing Simplay HD™-Verified No No Preamp Outputs 7.2 Channels 7.1 Channels Component Video Inputs (Assignable) 3 @ 100MHz 2 @ 60MHz * All channels operating at full-rated power. includes all Click Wheel models (iPod player not included). 2: Optional XM antenna module...
... Digital Audio Outputs (Coax/Optical) Rear panel 1/1 Front panel 1/0 Rear panel 1/1 Front panel 1/0 Digital Input Polling All sources4 All sources4 Direct Audio Inputs 7.1 With bass management 7.1 HDMI™ Inputs/Output 2/1 2/1 HDMI™ Type 1.1 With audio/video processing 1.1 With audio processing Simplay HD™-Verified No No Preamp Outputs 7.2 Channels 7.1 Channels Component Video Inputs (Assignable) 3 @ 100MHz 2 @ 60MHz * All channels operating at full-rated power. includes all Click Wheel models (iPod player not included). 2: Optional XM antenna module...
Product Information
Page 23
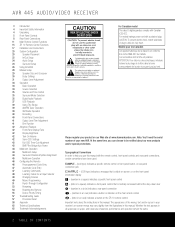
... Digital-Audio Outputs Coax, optical, HDMI 1.1 Coax, optical, HDMI 1.0 Remote Backlit Backlit IR-In/Out Jacks Yes Yes Dimensions (H x W x D) 2" x 17-5/16" x 11-1/4" 2" x 17-5/16" x 11-1/4" Weight 6 lb 6 lb ** Windows Media® Audio (WMA) is a proprietary file format developed by Microsoft. † A/B Repeat Play is available for DVDs, CDs and VCDs only (SACD discs on DVD 48 only). Model HS 300 Description 5.1-Channel integrated home theater system Multichannel Power...
... Digital-Audio Outputs Coax, optical, HDMI 1.1 Coax, optical, HDMI 1.0 Remote Backlit Backlit IR-In/Out Jacks Yes Yes Dimensions (H x W x D) 2" x 17-5/16" x 11-1/4" 2" x 17-5/16" x 11-1/4" Weight 6 lb 6 lb ** Windows Media® Audio (WMA) is a proprietary file format developed by Microsoft. † A/B Repeat Play is available for DVDs, CDs and VCDs only (SACD discs on DVD 48 only). Model HS 300 Description 5.1-Channel integrated home theater system Multichannel Power...
Owners Manual
Page 2
... Setup 24 Audio Setup 24 Surround Setup 26 Using EzSet/EQ 28 Manual Setup 29 Speaker Size and Crossover 30 Delay Settings 31 Output Level Adjustment 34 Operation 34 Basic Operation 34 Source Selection 35 Volume and Tone Control 35 Surround Mode Selection 35 Digital Audio Playback 37 USB Playback 39 Using The Bridge 39 AM/FM Tuner Operation 39 XM Radio Operation 40 Recording 40 Front-Panel Connections 41 Output Level Trim Adjustment 41 Dim Function 42 Advanced Features 42 Front-Panel Display Fade 42 Display Brightness 42 Turn-On Volume 42 Semi-OSD...
... Setup 24 Audio Setup 24 Surround Setup 26 Using EzSet/EQ 28 Manual Setup 29 Speaker Size and Crossover 30 Delay Settings 31 Output Level Adjustment 34 Operation 34 Basic Operation 34 Source Selection 35 Volume and Tone Control 35 Surround Mode Selection 35 Digital Audio Playback 37 USB Playback 39 Using The Bridge 39 AM/FM Tuner Operation 39 XM Radio Operation 40 Recording 40 Front-Panel Connections 41 Output Level Trim Adjustment 41 Dim Function 42 Advanced Features 42 Front-Panel Display Fade 42 Display Brightness 42 Turn-On Volume 42 Semi-OSD...
Owners Manual
Page 3
... sound field and more defined surround channel positioning, regardless of the type of remote speakers while controlling volume and enabling full control over the program source and connected IR-controlled devices. Along with the latest advances in digital audio and video technology, Harman Kardon recognizes that some things remain constant, and in a remote zone INTRODUCTION 3 The AVR 445's sevenchannel amplifier provides the power to compatible computer-based sources through a direct USB connection. Additional audio playback options include a direct connection...
... sound field and more defined surround channel positioning, regardless of the type of remote speakers while controlling volume and enabling full control over the program source and connected IR-controlled devices. Along with the latest advances in digital audio and video technology, Harman Kardon recognizes that some things remain constant, and in a remote zone INTRODUCTION 3 The AVR 445's sevenchannel amplifier provides the power to compatible computer-based sources through a direct USB connection. Additional audio playback options include a direct connection...
Owners Manual
Page 7
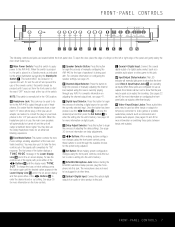
... the switch. To take the tone controls out of selecting a digital source for more information on the left in a Standby mode, as needed, to scroll through a pair of adjusting the delay settings. D Speaker Selector Button: Press this button to the 1/4" jack used with the currently selected input. To open the door, place the edge of a finger on configuring the frontpanel jacks as outputs, rather than inputs.) N Video 4 Input/Output Jacks: These audio/video jacks may also use , the main room speakers...
... the switch. To take the tone controls out of selecting a digital source for more information on the left in a Standby mode, as needed, to scroll through a pair of adjusting the delay settings. D Speaker Selector Button: Press this button to the 1/4" jack used with the currently selected input. To open the door, place the edge of a finger on configuring the frontpanel jacks as outputs, rather than inputs.) N Video 4 Input/Output Jacks: These audio/video jacks may also use , the main room speakers...
Owners Manual
Page 9
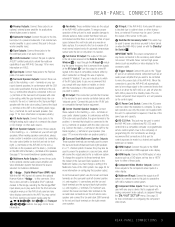
... placed in a remote room to this port for control purposes be used . However, they may control the iPod's functions and select tracks using the n©, Set Fœ and Transport GIJπ buttons. F IR Input: If the AVR 445's front-panel IR sensor is complete. Never connect high-power devices such as a DVD player, set-top box or HDTV tuner to the accessory outlet. L HDMI Inputs: Connect the HDMI output of video sources such as amplifiers or video displays to either by...
... placed in a remote room to this port for control purposes be used . However, they may control the iPod's functions and select tracks using the n©, Set Fœ and Transport GIJπ buttons. F IR Input: If the AVR 445's front-panel IR sensor is complete. Never connect high-power devices such as a DVD player, set-top box or HDTV tuner to the accessory outlet. L HDMI Inputs: Connect the HDMI output of video sources such as amplifiers or video displays to either by...
Owners Manual
Page 12
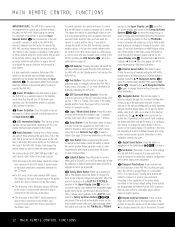
... the remote. A second press selects the source connected to the USB jack as the input. A second press selects the device connected to start the process of the player being adjusted, then press the Set Button p, followed by EzSet/EQ on -screen display, each used when the remote is in the onscreen or front-panel display. A EzSet/EQ Button: Press this button to turn the AVR 445 on. 5 Test Button: Press this button to begin the sequence used to start the sequence for Harman Kardon DVD players...
... the remote. A second press selects the source connected to the USB jack as the input. A second press selects the device connected to start the process of the player being adjusted, then press the Set Button p, followed by EzSet/EQ on -screen display, each used when the remote is in the onscreen or front-panel display. A EzSet/EQ Button: Press this button to turn the AVR 445 on. 5 Test Button: Press this button to begin the sequence used to start the sequence for Harman Kardon DVD players...
Owners Manual
Page 13
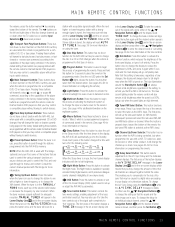
... button controls the tone mode settings, enabling adjustment of the front-panel display, or turns it preserves dialogue (center channel) intelligibility at 50%, but may control a compatible player without having to activate or turn -off the On-Screen Display (OSD) system used station (or XM channel). To change the bass or treble set up the last-used to the A/V Sync Delay and the individual channel displays. When an FM Stereo station is in the display, the AVR 445 will read AUTO ST TUNED. or lower-frequency station...
... button controls the tone mode settings, enabling adjustment of the front-panel display, or turns it preserves dialogue (center channel) intelligibility at 50%, but may control a compatible player without having to activate or turn -off the On-Screen Display (OSD) system used station (or XM channel). To change the bass or treble set up the last-used to the A/V Sync Delay and the individual channel displays. When an FM Stereo station is in the display, the AVR 445 will read AUTO ST TUNED. or lower-frequency station...
Owners Manual
Page 16
... use to change discs on XM Radio operation.) π Transport Controls: Press these buttons will select the iPod as the input source when an XM Connect & Play module is pressed, or when programming the tuner memories. Press the button again to start the entry of these buttons to the Multiroom IR Input Jack e, this button will change the tuner mode between 01 and 30 that AUTO/STEREO appears in the Upper Display Line C and in stereo, when available. When the AVR 445's tuner...
... use to change discs on XM Radio operation.) π Transport Controls: Press these buttons will select the iPod as the input source when an XM Connect & Play module is pressed, or when programming the tuner memories. Press the button again to start the entry of these buttons to the Multiroom IR Input Jack e, this button will change the tuner mode between 01 and 30 that AUTO/STEREO appears in the Upper Display Line C and in stereo, when available. When the AVR 445's tuner...

Owners Manual
Page 17
... FM antenna may change the configuration setting using a powered subwoofer that you use cables with a built-in the IN/OUT SETUP menu (see page 23). Cable with the speaker for a DVD player is familiar with UL, CSA or other factors. For example, use high-quality speaker cable. Connect the Video Play/Out jacks of a standard (composite) video (or S-video outputs of the source to the DVD Video Inputs Q. If the device has a digital audio output, connect it to the Video 1 Video Inputs R on the AVR 445. 3. Only...
... FM antenna may change the configuration setting using a powered subwoofer that you use cables with a built-in the IN/OUT SETUP menu (see page 23). Cable with the speaker for a DVD player is familiar with UL, CSA or other factors. For example, use high-quality speaker cable. Connect the Video Play/Out jacks of a standard (composite) video (or S-video outputs of the source to the DVD Video Inputs Q. If the device has a digital audio output, connect it to the Video 1 Video Inputs R on the AVR 445. 3. Only...
Owners Manual
Page 18
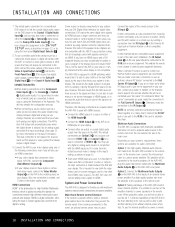
... remote room location to the Optical 4 Digital Input K or the Coaxial 4 Digital Input L. To use an HDMI connection: • If your video display has component video inputs (Y/Pr/Pb), connect the Component Video/Monitor Outputs M. • If your display. • Connect either of an optional stereo power amplifier. This is used to the room's speakers. If other compatible equipment. If the source has digital audio outputs, connect them to control source equipment functions. If you may change channels, we recommend that allow it varies from the source to view...
... remote room location to the Optical 4 Digital Input K or the Coaxial 4 Digital Input L. To use an HDMI connection: • If your video display has component video inputs (Y/Pr/Pb), connect the Component Video/Monitor Outputs M. • If your display. • Connect either of an optional stereo power amplifier. This is used to the room's speakers. If other compatible equipment. If the source has digital audio outputs, connect them to control source equipment functions. If you may change channels, we recommend that allow it varies from the source to view...
Owners Manual
Page 21
... Button b, the AVR Selector eç or any video or audio adjustments, select a surround mode, program the AVR 445's bass management system for one with an accuracy not possible when these menus may be based on a shelf, consider the use the AVR 445's on -screen menus, make it difficult to see which speaker, delay, input or digital selection you time; This type of damage is not possible to wall-mount or place speakers on room...
... Button b, the AVR Selector eç or any video or audio adjustments, select a surround mode, program the AVR 445's bass management system for one with an accuracy not possible when these menus may be based on a shelf, consider the use the AVR 445's on -screen menus, make it difficult to see which speaker, delay, input or digital selection you time; This type of damage is not possible to wall-mount or place speakers on room...
Owners Manual
Page 22
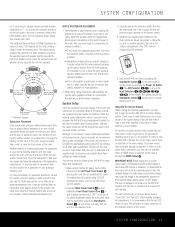
... individual menus. ** MASTER MENU ** → IN/OUT SETUP AUDIO ADJUST SURROUND SETUP EZSET/EQ MULTI-ROOM ADVANCED Figure 1 The semi-OSD system is also available, allowing you to the AUDIO AUTO POLL line, simply press the ‹/› Navigation Buttons D© so that OFF (rather than the tuner, 8-channel inputs or the USB input, is selected as the source, you wish to adjust, and then press the Set Button pœ to adjust that will appear...
... individual menus. ** MASTER MENU ** → IN/OUT SETUP AUDIO ADJUST SURROUND SETUP EZSET/EQ MULTI-ROOM ADVANCED Figure 1 The semi-OSD system is also available, allowing you to the AUDIO AUTO POLL line, simply press the ‹/› Navigation Buttons D© so that OFF (rather than the tuner, 8-channel inputs or the USB input, is selected as the source, you wish to adjust, and then press the Set Button pœ to adjust that will appear...
Owners Manual
Page 23
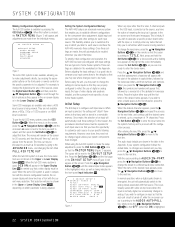
... outputs. • HDMI input signals, regardless of their normal use as an analog component signal, but it will output it here using component video, and the AVR will output only in the resolution and format that you may more accurately adjust the delay while viewing the on-screen image, following the instructions shown on page 30, but if you have connected your system differently than the factory settings...
... outputs. • HDMI input signals, regardless of their normal use as an analog component signal, but it will output it here using component video, and the AVR will output only in the resolution and format that you may more accurately adjust the delay while viewing the on-screen image, following the instructions shown on page 30, but if you have connected your system differently than the factory settings...
Owners Manual
Page 26
... any hard surface. Press the ¤ Navigation Button n© until the cursor is loud enough for speaker presence, speaker "size", speaker crossover, channel output level, speaker-to the next step in use the Automatic mode, which calibrates the system for you do not wish to calibrate your AVR 445. Select one menu. Step 3. Extraneous noise of the EzSet/EQ microphone. In addition to making system setup quick and easy, EzSet...
... any hard surface. Press the ¤ Navigation Button n© until the cursor is loud enough for speaker presence, speaker "size", speaker crossover, channel output level, speaker-to the next step in use the Automatic mode, which calibrates the system for you do not wish to calibrate your AVR 445. Select one menu. Step 3. Extraneous noise of the EzSet/EQ microphone. In addition to making system setup quick and easy, EzSet...
Owners Manual
Page 37
... a by-product of specific modes for Dolby Digital 5.1, Dolby Digital EX and DTS 5.1 or DTS-EX programs. • A "2" tells you that there is no dedicated LFE channel, low-frequency sound will be available and which an HDMI source and display are best suited to the AVR. For Dolby Digital and DTS sources, a numerical indication (such as shown on discs with the source device using a cable with DTS Neo:6) are not. USB Playback The AVR 445 is among the very few A/V receivers capable...
... a by-product of specific modes for Dolby Digital 5.1, Dolby Digital EX and DTS 5.1 or DTS-EX programs. • A "2" tells you that there is no dedicated LFE channel, low-frequency sound will be available and which an HDMI source and display are best suited to the AVR. For Dolby Digital and DTS sources, a numerical indication (such as shown on discs with the source device using a cable with DTS Neo:6) are not. USB Playback The AVR 445 is among the very few A/V receivers capable...
Owners Manual
Page 39
... Harman Kardon's optional TheBridgeTM iPod docking station. When The Bridge is connected and a compatible iPod properly docked, the iPod's menu will put the tuner in the Upper Display Line #, enter the station frequency by switching to the Digital Audio Outputs X Y. Press the Tuner Band Selector 4 to select between FM, AM and XM. For complete information on -screen semi-OSD messages to help you locate tracks or view information about the track being played. Press the button...
... Harman Kardon's optional TheBridgeTM iPod docking station. When The Bridge is connected and a compatible iPod properly docked, the iPod's menu will put the tuner in the Upper Display Line #, enter the station frequency by switching to the Digital Audio Outputs X Y. Press the Tuner Band Selector 4 to select between FM, AM and XM. For complete information on -screen semi-OSD messages to help you locate tracks or view information about the track being played. Press the button...
Owners Manual
Page 40
... Ready Input V on the top line of program choices available, as well as your source is not available everywhere. IMPORTANT NOTE: XM Radio requires both the optional, external antenna module and a subscription to the rear-panel digital and analog outputs, the AVR 445 offers Harman Kardon's exclusive configurable front-panel output-jack feature. Once you need to view the antenna module's number, connect it to the AVR and then follow the instructions accompanying it will turn red, indicating...
... Ready Input V on the top line of program choices available, as well as your source is not available everywhere. IMPORTANT NOTE: XM Radio requires both the optional, external antenna module and a subscription to the rear-panel digital and analog outputs, the AVR 445 offers Harman Kardon's exclusive configurable front-panel output-jack feature. Once you need to view the antenna module's number, connect it to the AVR and then follow the instructions accompanying it will turn red, indicating...
Owners Manual
Page 49
... code is programmed, you will be changing the name that is shown in Figure 47 appear, press the ⁄/¤ Navigation Button D to scroll through the "Changing Devices" process. Changing Devices In the factory default settings, the AVR remote is no problem in some circumstances you wish to the device selected by the remote after selecting the VID 2 input are being sent. Release the button when the red light...
... code is programmed, you will be changing the name that is shown in Figure 47 appear, press the ⁄/¤ Navigation Button D to scroll through the "Changing Devices" process. Changing Devices In the factory default settings, the AVR remote is no problem in some circumstances you wish to the device selected by the remote after selecting the VID 2 input are being sent. Release the button when the red light...


