
Owners Manual
Page 2
AVR 330 AUDIO/VIDEO RECEIVER 3 Introduction 4 Safety Information 4 Unpacking 5 Front-Panel Controls 7 Rear-Panel Connections 10 Main Remote Control Functions 14 Zone II Remote Control Functions 15 Installation and Connections 17 System Configuration 17 Speaker Placement 17 System Setup 18 Input Setup 19 Surround Setup 20 Speaker Setup...Punch-Through 37 Reassigning Device Control Selectors 38 Resetting the Remote Memory 39 Function List 41 Setup Code Tables 52 Troubleshooting Guide 52 Processor Reset 53 Technical Specifications See trademark acknowledgements on the...
AVR 330 AUDIO/VIDEO RECEIVER 3 Introduction 4 Safety Information 4 Unpacking 5 Front-Panel Controls 7 Rear-Panel Connections 10 Main Remote Control Functions 14 Zone II Remote Control Functions 15 Installation and Connections 17 System Configuration 17 Speaker Placement 17 System Setup 18 Input Setup 19 Surround Setup 20 Speaker Setup...Punch-Through 37 Reassigning Device Control Selectors 38 Resetting the Remote Memory 39 Function List 41 Setup Code Tables 52 Troubleshooting Guide 52 Processor Reset 53 Technical Specifications See trademark acknowledgements on the...
Owners Manual
Page 5
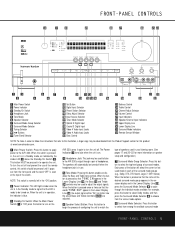
...www.harmankardon.com. 1 Main Power Switch: Press this button to apply power to select from the Product Support section for more information on the AVR 330; STEREO SURR. NOTE: This switch is normally left in the "ON" position. 2 Power Indicator: This LED lights amber when the unit ... When the button is in the Lower Display Line ¯, press the Surround Mode Selector 8 to turn on speaker setup and configuration.) 7 Surround Mode Group Selector: Press this button to the AVR 330. ¸ ˘¯ DIGITAL PRO LOGIC 3 STEREO LOGIC 7 DSP 5 CH. The speakers will select the ...
...www.harmankardon.com. 1 Main Power Switch: Press this button to apply power to select from the Product Support section for more information on the AVR 330; STEREO SURR. NOTE: This switch is normally left in the "ON" position. 2 Power Indicator: This LED lights amber when the unit ... When the button is in the Lower Display Line ¯, press the Surround Mode Selector 8 to turn on speaker setup and configuration.) 7 Surround Mode Group Selector: Press this button to the AVR 330. ¸ ˘¯ DIGITAL PRO LOGIC 3 STEREO LOGIC 7 DSP 5 CH. The speakers will select the ...
Owners Manual
Page 6
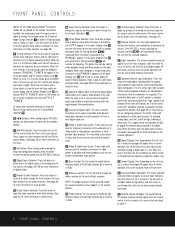
...(See page 29 for more information on the tuner.) @ Set Button: When making choices during the setup and configuration process, press this button to enter the desired setting into the AVR 330's memory. # Digital Input Selector: Press this button to normal operation with a strong signal is selected...this button to switch between the Auto and Manual tuning modes, press the Tuning Mode Selector &. ) ‹/› Buttons: When configuring the AVR 330's settings, use . The center box lights when a "small" speaker is tuned the scan will stop andthe onscreen display and the Lower ...
...(See page 29 for more information on the tuner.) @ Set Button: When making choices during the setup and configuration process, press this button to enter the desired setting into the AVR 330's memory. # Digital Input Selector: Press this button to normal operation with a strong signal is selected...this button to switch between the Auto and Manual tuning modes, press the Tuning Mode Selector &. ) ‹/› Buttons: When configuring the AVR 330's settings, use . The center box lights when a "small" speaker is tuned the scan will stop andthe onscreen display and the Lower ...
Owners Manual
Page 11
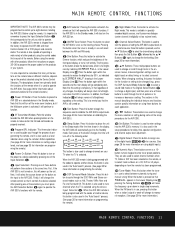
...in use will always remain at low volume levels. Finally, it will operate the AVR 330's functions. After pressing one of these buttons will move the frequency up or down in the setup procedures for the AVR 330. The first press of the button shows the default state, which reduces the ...or to increase or decrease a setting. c Program/SPL Indicator: This three-color indicator is shipped from the factory to operate the AVR 330 and most Harman Kardon CD or DVD players and cassette decks. Press the button again within five seconds and the main display will switch the remote so that...
...in use will always remain at low volume levels. Finally, it will operate the AVR 330's functions. After pressing one of these buttons will move the frequency up or down in the setup procedures for the AVR 330. The first press of the button shows the default state, which reduces the ...or to increase or decrease a setting. c Program/SPL Indicator: This three-color indicator is shipped from the factory to operate the AVR 330 and most Harman Kardon CD or DVD players and cassette decks. Press the button again within five seconds and the main display will switch the remote so that...
Owners Manual
Page 17
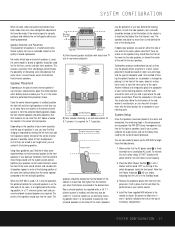
... the front corner of your remote control. 4. If dipole-type speakers are used . System Setup Once the speakers have been placed in the room and connected, the remaining steps in the setup process are to program the AVR 330's bass management system for the rear speakers. To maintain the unit's safety rating, DO NOT...
... the front corner of your remote control. 4. If dipole-type speakers are used . System Setup Once the speakers have been placed in the room and connected, the remaining steps in the setup process are to program the AVR 330's bass management system for the rear speakers. To maintain the unit's safety rating, DO NOT...
Owners Manual
Page 18
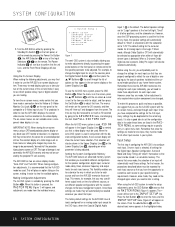
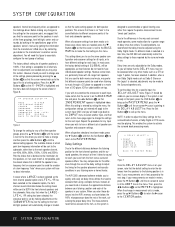
... type of speakers installed and the surround mode specifics of your system. Once you have the AVR 330 memorize those settings. Remember that the MASTER MENU (Figure 1) appears. The Power Indicator 2 will turn blue to make the setup adjustments, press the OSD Button v once so that once the settings are properly configured to...
... type of speakers installed and the surround mode specifics of your system. Once you have the AVR 330 memorize those settings. Remember that the MASTER MENU (Figure 1) appears. The Power Indicator 2 will turn blue to make the setup adjustments, press the OSD Button v once so that once the settings are properly configured to...
Owners Manual
Page 19
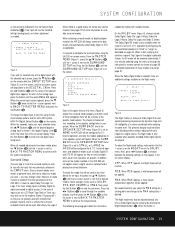
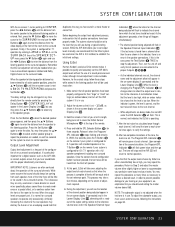
... mode is only available when the system is to set to NONE the AVR 330 will be applied. Press the ‹/› Buttons o until the word ANALOG appears. Surround Setup The next step is set to SMALL or LARGE the AVR 330 will be adjusted directly any time using the full-OSD on -screen display... in the INPUT menu. When the SURR BACK line of the SPEAKER SETUP menu (Figure 5) is on available surround modes. To select the mode that was previously selected in the on the remote. It may also be configured for the AVR 330, it is next to BACK TO MASTER MENU to the DIGITAL...
... mode is only available when the system is to set to NONE the AVR 330 will be applied. Press the ‹/› Buttons o until the word ANALOG appears. Surround Setup The next step is set to SMALL or LARGE the AVR 330 will be adjusted directly any time using the full-OSD on -screen display... in the INPUT menu. When the SURR BACK line of the SPEAKER SETUP menu (Figure 5) is on available surround modes. To select the mode that was previously selected in the on the remote. It may also be configured for the AVR 330, it is next to BACK TO MASTER MENU to the DIGITAL...
Owners Manual
Page 20
... which category describes your system will use . Begin the speaker setup process by a combination of the type of program material in use and whether the 5.1- In either case, the selection of a Logic 7 mode enables Harman Kardon's exclusive Logic 7 processing to create fully enveloping, multichannel surround ...Neo:6 Music mode is available with analog stereo sources and the DTS Neo:6 Cinema mode is required to enter the settings for the AVR 330's Triple Crossover feature, which speakers receive low-frequency (bass) information. When a non-ES DTS disc is selected, low-frequency sounds...
... which category describes your system will use . Begin the speaker setup process by a combination of the type of program material in use and whether the 5.1- In either case, the selection of a Logic 7 mode enables Harman Kardon's exclusive Logic 7 processing to create fully enveloping, multichannel surround ...Neo:6 Music mode is available with analog stereo sources and the DTS Neo:6 Cinema mode is required to enter the settings for the AVR 330's Triple Crossover feature, which speakers receive low-frequency (bass) information. When a non-ES DTS disc is selected, low-frequency sounds...
Owners Manual
Page 22
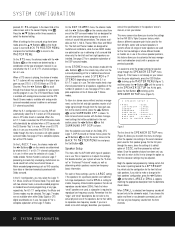
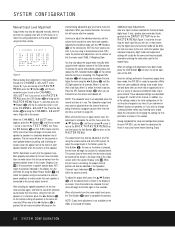
...crossover settings for a specific input, the DELAY ADJUST menu (Figure 7) should you to the listening position is made in Figure 6. ** SPEAKER SETUP ** MODE :X-OVER LEFT/RIGHT:100HZ CENTER :100HZ SURROUND :100HZ SURR BACK :----- Note, also, that when the LARGELFE+L/R setting has been selected,... acceptable for the speaker placement and acoustic conditions in the sound field due to different crossover points at a later time, the AVR 330 will have been made , or in feet, proceed to enter the distances from the front versus surround speakers differs. SYSTEM CONFIGURATION...
...crossover settings for a specific input, the DELAY ADJUST menu (Figure 7) should you to the listening position is made in Figure 6. ** SPEAKER SETUP ** MODE :X-OVER LEFT/RIGHT:100HZ CENTER :100HZ SURROUND :100HZ SURR BACK :----- Note, also, that when the LARGELFE+L/R setting has been selected,... acceptable for the speaker placement and acoustic conditions in the sound field due to different crossover points at a later time, the AVR 330 will have been made , or in feet, proceed to enter the distances from the front versus surround speakers differs. SYSTEM CONFIGURATION...
Owners Manual
Page 23
...Adjust the volume so that it is normal for three seconds. As the adjustment proceeds, a few minutes, depending on the extent of the SPEAKER SETUP menu, press the ¤ Button n again and use the ‹/› Buttons o to enter the distance from a channel other than the ... the AVR 330, as the surround mode. When the output levels are often confused about the operation of any surround sound product. Artificially increasing the volume to the rear speakers may be used when the AVR is first installed, to establish the initial level settings. Using EzSet Harman Kardon's exclusive...
...Adjust the volume so that it is normal for three seconds. As the adjustment proceeds, a few minutes, depending on the extent of the SPEAKER SETUP menu, press the ¤ Button n again and use the ‹/› Buttons o to enter the distance from a channel other than the ... the AVR 330, as the surround mode. When the output levels are often confused about the operation of any surround sound product. Artificially increasing the volume to the rear speakers may be used when the AVR is first installed, to establish the initial level settings. Using EzSet Harman Kardon's exclusive...
Owners Manual
Page 24
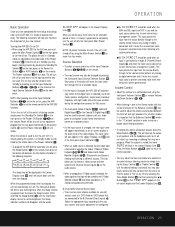
... you add new or different sources or speakers, or if you are not at any ), speaker type and output levels, go back to the INPUT SETUP line on the MASTER MENU (Figure 1) and enter the settings for precise level adjustment, set them to a specific level with the ‹/› Buttons...;/› Buttons o until the LED lights green for the original input. The Program/SPL Indicator c will resume after you are finished to turn the AVR 330 off . When it is amber, the level is circulating, the proper channel position will begin to circulate again in the Lower Display Line ¯. ...
... you add new or different sources or speakers, or if you are not at any ), speaker type and output levels, go back to the INPUT SETUP line on the MASTER MENU (Figure 1) and enter the settings for precise level adjustment, set them to a specific level with the ‹/› Buttons...;/› Buttons o until the LED lights green for the original input. The Program/SPL Indicator c will resume after you are finished to turn the AVR 330 off . When it is amber, the level is circulating, the proper channel position will begin to circulate again in the Lower Display Line ¯. ...
Owners Manual
Page 25
... session by pressing the front-panel Input Source Selector Button ^. OPERATION 25 Select the appropriate input according to the way your new receiver: Turning the AVR 330 On or Off • When using the front-panel Volume Control Ù or remote Volume Up/Down Buttons 38 . • When listening in ...than four weeks. This places the unit in the on . You may be away from home for the first time, you have completed the initial setup and configuration of the Power Indicator 2. To turn the unit off , press the Sleep Button j on the front panel. Each press of the ...
... session by pressing the front-panel Input Source Selector Button ^. OPERATION 25 Select the appropriate input according to the way your new receiver: Turning the AVR 330 On or Off • When using the front-panel Volume Control Ù or remote Volume Up/Down Buttons 38 . • When listening in ...than four weeks. This places the unit in the on . You may be away from home for the first time, you have completed the initial setup and configuration of the Power Indicator 2. To turn the unit off , press the Sleep Button j on the front panel. Each press of the ...
Owners Manual
Page 32
..., press the › Button o so that the on-screen > cursor is next to make certain that the word OFF is shown in effect until the AVR 330 is next to the ADVANCED line. If you will remain in the video display. To change , and the time-out entry will need to the...; Buttons n as needed . Unlike most of on indefinitely. Full-OSD Time-Out Adjustment The FULL OSD menu system is used to simplify the setup and adjustment of the AVR 330, using a series of the other options in your monitor or projector, which might happen if it is changed , even when the unit is...
..., press the › Button o so that the on-screen > cursor is next to make certain that the word OFF is shown in effect until the AVR 330 is next to the ADVANCED line. If you will remain in the video display. To change , and the time-out entry will need to the...; Buttons n as needed . Unlike most of on indefinitely. Full-OSD Time-Out Adjustment The FULL OSD menu system is used to simplify the setup and adjustment of the AVR 330, using a series of the other options in your monitor or projector, which might happen if it is changed , even when the unit is...
Owners Manual
Page 33
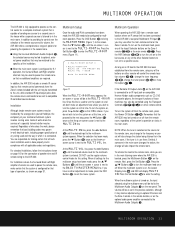
... either remote control. In addition to providing for control over the selection of the remote source and its volume, the AVR 330 offers a comprehensive range of options for the multiroom setup have been made , press the ¤ Button n once so that the › on-screen cursor is next ...the desired input to the AVR 330. When all applicable codes and regulations. Multiroom Operation When operating the AVR 330 from the remote room, press the Power Off Button aå. To turn the system on -screen > cursor is next to an IR Input jack on compatible Harman Kardon audio components such as ...
... either remote control. In addition to providing for control over the selection of the remote source and its volume, the AVR 330 offers a comprehensive range of options for the multiroom setup have been made , press the ¤ Button n once so that the › on-screen cursor is next ...the desired input to the AVR 330. When all applicable codes and regulations. Multiroom Operation When operating the AVR 330 from the remote room, press the Power Off Button aå. To turn the system on -screen > cursor is next to an IR Input jack on compatible Harman Kardon audio components such as ...
Owners Manual
Page 35
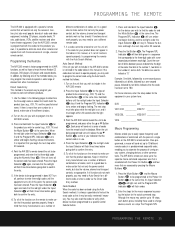
...Input Selector e stays lit and the Program/SPL Indicator c turns amber and begins flashing. If there is more that are used to eliminate most Harman Kardon CD changers, DVD players, CD players and cassette decks. Turn on your system here: DVD CD VID1/VCR __________ VID2/TV __________ VID3/CBL ...work with the Power On Button a and four more than one of the methods below, you wish to program into the AVR 330 remote. 3. For future reference, enter the setup codes for the product you own, it may also read the codes to verify which device has been programmed to five separate...
...Input Selector e stays lit and the Program/SPL Indicator c turns amber and begins flashing. If there is more that are used to eliminate most Harman Kardon CD changers, DVD players, CD players and cassette decks. Turn on your system here: DVD CD VID1/VCR __________ VID2/TV __________ VID3/CBL ...work with the Power On Button a and four more than one of the methods below, you wish to program into the AVR 330 remote. 3. For future reference, enter the setup codes for the product you own, it may also read the codes to verify which device has been programmed to five separate...

Owners Manual
Page 43
Manufacturer/Brand TEKNIKA TELERENT TERA THOMSON TMK TOSHIBA TOTEVISION VIDEO CONCEPTS VIDTECH WARDS YAMAHA YORK YUPITERU ZENITH ZONDA Setup Code Number 045 069 115 123 128 132 069 156 190 191 128 063 129 202 132 160 128 069 128 132 148 123 128 128 045 069 090 122 SETUP CODE TABLE: TV SETUP CODES 43
Manufacturer/Brand TEKNIKA TELERENT TERA THOMSON TMK TOSHIBA TOTEVISION VIDEO CONCEPTS VIDTECH WARDS YAMAHA YORK YUPITERU ZENITH ZONDA Setup Code Number 045 069 115 123 128 132 069 156 190 191 128 063 129 202 132 160 128 069 128 132 148 123 128 128 045 069 090 122 SETUP CODE TABLE: TV SETUP CODES 43

Owners Manual
Page 45
Manufacturer/Brand SALORA SAMSUNG SANSUI SANYO SCOTT SEARS SHARP SONY SOUNDESIGN SYLVANIA SYMPHONIC TANDY TASHICO TATUNG TEAC TEKNIKA THOMAS TiVo TMK TOSHIBA TOTEVISION UNITECH VECTOR RESEARCH VIDEO CONCEPTS VIDEOSONIC WARDS YAMAHA ZENITH Setup Code Number 020 045 051 095 105 109 048 116 147 017 020 110 112 017 020 129 156 080 129 040 040 040 017 040 134 048 040 048 040 040 012 013 112 155 045 045 018 018 040 045 040 045 112 018 040 048 040 050 076 083 SETUP CODE TABLE: VCR SETUP CODES 45
Manufacturer/Brand SALORA SAMSUNG SANSUI SANYO SCOTT SEARS SHARP SONY SOUNDESIGN SYLVANIA SYMPHONIC TANDY TASHICO TATUNG TEAC TEKNIKA THOMAS TiVo TMK TOSHIBA TOTEVISION UNITECH VECTOR RESEARCH VIDEO CONCEPTS VIDEOSONIC WARDS YAMAHA ZENITH Setup Code Number 020 045 051 095 105 109 048 116 147 017 020 110 112 017 020 129 156 080 129 040 040 040 017 040 134 048 040 048 040 040 012 013 112 155 045 045 018 018 040 045 040 045 112 018 040 048 040 050 076 083 SETUP CODE TABLE: VCR SETUP CODES 45

Owners Manual
Page 48
SETUP CODE TABLE: DVD Manufacturer/Brand APEX DIGITAL DENON GE GOLD STAR/LG HARMAN KARDON JVC LG MAGNAVOX MARANTZ MITSUBISHI NAD ONKYO PANASONIC PHILIPS PIONEER PROCEED PROSCAN RCA SAMSUNG SHARP SONY THOMSON TOSHIBA YAMAHA ZENITH Setup Code Number 061 019 051 003 004 005 001 006 005 055 064 066 056 059 023 062 009 048 024 030 044 056 041 065 060 003 004 003 004 053 054 028 043 045 003 004 009 058 067 030 063 005 055 064 48 SETUP CODES
SETUP CODE TABLE: DVD Manufacturer/Brand APEX DIGITAL DENON GE GOLD STAR/LG HARMAN KARDON JVC LG MAGNAVOX MARANTZ MITSUBISHI NAD ONKYO PANASONIC PHILIPS PIONEER PROCEED PROSCAN RCA SAMSUNG SHARP SONY THOMSON TOSHIBA YAMAHA ZENITH Setup Code Number 061 019 051 003 004 005 001 006 005 055 064 066 056 059 023 062 009 048 024 030 044 056 041 065 060 003 004 003 004 053 054 028 043 045 003 004 009 058 067 030 063 005 055 064 48 SETUP CODES

Owners Manual
Page 50
... HITACHI JASCO JERROLD LINDSAY MACOM MAGNAVOX MOVIE TIME NSC OAK PACE PANASONIC PANTHER PHILIPS PIONEER POPULAR MECHANICS PRELUDE PRIMESTAR RADIO SHACK RCA RECOTON REGAL Setup Code Number 001 011 111 212 112 113 033 113 111 085 090 114 186 066 070 039 112 116 001 011 017 096 ... 119 171 209 215 216 116 120 162 111 112 213 053 214 116 056 099 100 101 208 50 SETUP CODES SETUP CODE TABLE: TAPE Manufacturer/Brand HARMAN KARDON Setup Code Number 001 SETUP CODE TABLE: CBL Manufacturer/Brand ABC ALLEGRO AMERICAST ARCHER BELCOR CABLE STAR CITIZEN COLOUR VOICE DIGI EAGLE EASTERN ELECTRICORD EMERSON...
... HITACHI JASCO JERROLD LINDSAY MACOM MAGNAVOX MOVIE TIME NSC OAK PACE PANASONIC PANTHER PHILIPS PIONEER POPULAR MECHANICS PRELUDE PRIMESTAR RADIO SHACK RCA RECOTON REGAL Setup Code Number 001 011 111 212 112 113 033 113 111 085 090 114 186 066 070 039 112 116 001 011 017 096 ... 119 171 209 215 216 116 120 162 111 112 213 053 214 116 056 099 100 101 208 50 SETUP CODES SETUP CODE TABLE: TAPE Manufacturer/Brand HARMAN KARDON Setup Code Number 001 SETUP CODE TABLE: CBL Manufacturer/Brand ABC ALLEGRO AMERICAST ARCHER BELCOR CABLE STAR CITIZEN COLOUR VOICE DIGI EAGLE EASTERN ELECTRICORD EMERSON...

Owners Manual
Page 51
Manufacturer/Brand REMBRANT SAMSUNG SCIENTIFIC ATLANTA SEAM SIGNATURE SPRUCER STARCOM STARGATE TANDY TELECAPATION TEXSCAN TFC TIMELESS TOCOM UNITED CABLE UNIVERSAL VIDEOWAY VIEWSTAR ZENITH ZENTEK Setup Code Number 032 072 186 183 203 221 222 121 001 188 053 081 177 189 002 011 163 120 024 028 036 122 123 170 205 011 033 034 039 042 113 124 211 019 025 086 089 190 065 125 211 219 116 SETUP CODE TABLE: CBL SETUP CODES 51
Manufacturer/Brand REMBRANT SAMSUNG SCIENTIFIC ATLANTA SEAM SIGNATURE SPRUCER STARCOM STARGATE TANDY TELECAPATION TEXSCAN TFC TIMELESS TOCOM UNITED CABLE UNIVERSAL VIDEOWAY VIEWSTAR ZENITH ZENTEK Setup Code Number 032 072 186 183 203 221 222 121 001 188 053 081 177 189 002 011 163 120 024 028 036 122 123 170 205 011 033 034 039 042 113 124 211 019 025 086 089 190 065 125 211 219 116 SETUP CODE TABLE: CBL SETUP CODES 51


