Product Information
Page 23
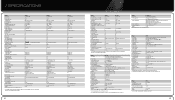
... Analog Audio Inputs Digital Audio Inputs (Coax/Optical) Digital Audio Outputs (Coax/Optical) Digital Input Polling Direct Audio Inputs HDMI™ Inputs/Output HDMI™ Type 1080p Preamp Outputs Component Video Inputs Bass Management On-Screen Display Input Titling DSP Processor Output DACs Video Processing/Conversion Lip Sync Delay IEC Detachable Power Cord System Remote IR-In/Out Jacks IR Carrier Output Discrete Remote-On/Off Codes Upgrade Data Port Speaker Terminals Dimensions (H x W x D) Weight * Models with OSD 7.1 Channels 3 @ 100MHz (Assignable) Quad crossover HD graphical menu...
... Analog Audio Inputs Digital Audio Inputs (Coax/Optical) Digital Audio Outputs (Coax/Optical) Digital Input Polling Direct Audio Inputs HDMI™ Inputs/Output HDMI™ Type 1080p Preamp Outputs Component Video Inputs Bass Management On-Screen Display Input Titling DSP Processor Output DACs Video Processing/Conversion Lip Sync Delay IEC Detachable Power Cord System Remote IR-In/Out Jacks IR Carrier Output Discrete Remote-On/Off Codes Upgrade Data Port Speaker Terminals Dimensions (H x W x D) Weight * Models with OSD 7.1 Channels 3 @ 100MHz (Assignable) Quad crossover HD graphical menu...
Product Information
Page 24
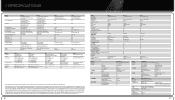
.... Model Drive + Play™ 2 Model SoundSticks® II Description Apple iPod and USB flash-drive interface Description Self-powered satellite speakers and subwoofer system Display Type 3.5 LCD (full color) System Frequency Range 44Hz - 20kHz Resolution 320 x 240 pixels Power Consumption 4W idle, 65W maximum Light Sensor Yes Input Requirement 3.5mm Stereo mini jack Picture Adjustment Brightness Subwoofer Transducer (1) 152mm Woofer Display Themes Various colors Amplifier Output Power 20W RMS Controller Type 5-Button wireless...
.... Model Drive + Play™ 2 Model SoundSticks® II Description Apple iPod and USB flash-drive interface Description Self-powered satellite speakers and subwoofer system Display Type 3.5 LCD (full color) System Frequency Range 44Hz - 20kHz Resolution 320 x 240 pixels Power Consumption 4W idle, 65W maximum Light Sensor Yes Input Requirement 3.5mm Stereo mini jack Picture Adjustment Brightness Subwoofer Transducer (1) 152mm Woofer Display Themes Various colors Amplifier Output Power 20W RMS Controller Type 5-Button wireless...
Owners Manual
Page 5
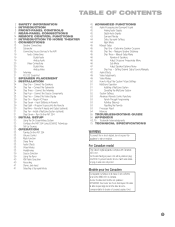
... 35 Set Up Sources 38 OPERATION 38 Turning On the AVR 254 38 Volume Control 38 Mute Function 38 Sleep Timer 38 Audio Effects 38 Video Modes 38 Headphones 39 Source Selection 39 Using the Tuner 40 XM Radio Operation 40 Recording 41 Stereo Jack Input 41 Selecting a Surround Mode 42 ADVANCED FUNCTIONS 42 Audio Processing and Surround Sound 42 Analog Audio Signals 42 Digital Audio Signals 43 Surround Modes 44 Dolby Surround Settings 44 Night Mode 45 Manual Setup 45 Step One - Measure Speaker Distances 45 Step Three - For Canadian model...
... 35 Set Up Sources 38 OPERATION 38 Turning On the AVR 254 38 Volume Control 38 Mute Function 38 Sleep Timer 38 Audio Effects 38 Video Modes 38 Headphones 39 Source Selection 39 Using the Tuner 40 XM Radio Operation 40 Recording 41 Stereo Jack Input 41 Selecting a Surround Mode 42 ADVANCED FUNCTIONS 42 Audio Processing and Surround Sound 42 Analog Audio Signals 42 Digital Audio Signals 43 Surround Modes 44 Dolby Surround Settings 44 Night Mode 45 Manual Setup 45 Step One - Measure Speaker Distances 45 Step Three - For Canadian model...

Owners Manual
Page 7
... *XM antenna module and subscription to 1080p Digital Audio Inputs • Coaxial: two rear-panel/one front-panel • Optical: two rear-panel/one front-panel Outputs • 7.1-Channel preamp outputs • Analog Audio 2 and 4 • Analog Video 2 • Video monitor (composite, S-video and component) • Digital audio (one coaxial) • HDMI (V.1.3 with the AVR 254. and line-level (shared with surround back channels) • Headphone Ease of these items are missing, please contact Harman Kardon customer service at www.harmankardon.com. • System remote control...
... *XM antenna module and subscription to 1080p Digital Audio Inputs • Coaxial: two rear-panel/one front-panel • Optical: two rear-panel/one front-panel Outputs • 7.1-Channel preamp outputs • Analog Audio 2 and 4 • Analog Video 2 • Video monitor (composite, S-video and component) • Digital audio (one coaxial) • HDMI (V.1.3 with the AVR 254. and line-level (shared with surround back channels) • Headphone Ease of these items are missing, please contact Harman Kardon customer service at www.harmankardon.com. • System remote control...

Owners Manual
Page 8
.... Source List: Press this jack, place the microphone at the other infrared receiver, connecting it is set to 480i. 8 IMPORTANT NOTE: If the AVR's video output resolution is not blocked. It is usually left pressed in Standby mode for more information on using this LED is on -screen menu. FRONT-PANEL CONTROLS Main Power Switch: This mechanical switch turns the power supply on using the remote control. To begin EzSet/EQ, plug the supplied microphone into this button...
.... Source List: Press this jack, place the microphone at the other infrared receiver, connecting it is set to 480i. 8 IMPORTANT NOTE: If the AVR's video output resolution is not blocked. It is usually left pressed in Standby mode for more information on using this LED is on -screen menu. FRONT-PANEL CONTROLS Main Power Switch: This mechanical switch turns the power supply on using the remote control. To begin EzSet/EQ, plug the supplied microphone into this button...
Owners Manual
Page 11
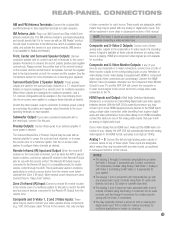
... digital audio and video signals between devices. REAR-PANEL CONNECTIONS AM and FM Antenna Terminals: Connect the included AM and FM antennas to your display; Zone 2 Infrared (IR) Input: Connect a remote IR receiver located in an XM Connect and Play or Mini Tuner antenna module here. These inputs are associated with any source devices connected to power the remote zone of these monitor outputs to control a source device from the remote room (when used , connect them for a single video cable connection to configure these outputs whenever an analog video source is a connection...
... digital audio and video signals between devices. REAR-PANEL CONNECTIONS AM and FM Antenna Terminals: Connect the included AM and FM antennas to your display; Zone 2 Infrared (IR) Input: Connect a remote IR receiver located in an XM Connect and Play or Mini Tuner antenna module here. These inputs are associated with any source devices connected to power the remote zone of these monitor outputs to control a source device from the remote room (when used , connect them for a single video cable connection to configure these outputs whenever an analog video source is a connection...

Owners Manual
Page 12
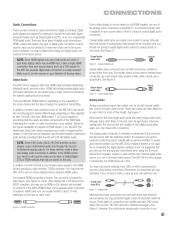
... digital audio connection for the device, then connect the component video outputs of the source to one source device into an unswitched outlet. 12 112 Stereo Jack: Enjoy audio from the AVR to the 6-/8-Channel Analog Audio Inputs. Component Video 1 and 2 Inputs: If a video source (e.g., DVD player or HDTV tuner) has analog component video (Y/Pb/Pr) capability, and if you are not using an HDMI connection for audio for recording. RS-232 Reset: This switch is only used with your video display's best connection is component video...
... digital audio connection for the device, then connect the component video outputs of the source to one source device into an unswitched outlet. 12 112 Stereo Jack: Enjoy audio from the AVR to the 6-/8-Channel Analog Audio Inputs. Component Video 1 and 2 Inputs: If a video source (e.g., DVD player or HDTV tuner) has analog component video (Y/Pb/Pr) capability, and if you are not using an HDMI connection for audio for recording. RS-232 Reset: This switch is only used with your video display's best connection is component video...
Owners Manual
Page 14
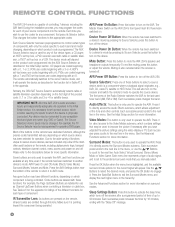
... button functions to mute the AVR 254's speaker and headphone outputs temporarily. The device mode will depend on the first digit of the tone and other controls. HDTV set to activate the sleep timer, which product code is only used tuner band (AM, FM or XM). Similarly, the CBL/SAT Source Selector automatically selects cable or satellite television operation depending on the product code programmed into the remote. Any device may be connected to any compatible input...
... button functions to mute the AVR 254's speaker and headphone outputs temporarily. The device mode will depend on the first digit of the tone and other controls. HDTV set to activate the sleep timer, which product code is only used tuner band (AM, FM or XM). Similarly, the CBL/SAT Source Selector automatically selects cable or satellite television operation depending on the product code programmed into the remote. Any device may be connected to any compatible input...

Owners Manual
Page 17
... own amplifier channel inside the receiver. DTS-HD, DTS-HD Master Audio, DTS, DTS-ES (Discrete and Matrix), DTS Neo:6, DTS 96/24 • Harman International (the Harman Kardon parent company) - Logic 7 • Stereo Modes - Surround mode selection depends upon conventional 2-channel stereo, including 5- By using more loudspeakers in the system, more speakers in the system, the same sound levels may be calibrated to sound equally loud at the listening position, most artists use a different number of the speakers in...
... own amplifier channel inside the receiver. DTS-HD, DTS-HD Master Audio, DTS, DTS-ES (Discrete and Matrix), DTS Neo:6, DTS 96/24 • Harman International (the Harman Kardon parent company) - Logic 7 • Stereo Modes - Surround mode selection depends upon conventional 2-channel stereo, including 5- By using more loudspeakers in the system, more speakers in the system, the same sound levels may be calibrated to sound equally loud at the listening position, most artists use a different number of the speakers in...
Owners Manual
Page 19
...DVD and other copy-protected sources, using the multizone preamp outputs with digital surround modes, such as a DVD player) to the AVR. Make sure to turn the volume on -screen display menus using the Surround Back/Zone 2 speaker outputs, in case another two-channel digital audio source is not 19 HDMI Connection 19 If your source device, either a coaxial or optical digital audio connection. The analog audio connection is strongly recommended if you also use the analog audio connections when using the HDMI output. These types of connections are three types of cable connections...
...DVD and other copy-protected sources, using the multizone preamp outputs with digital surround modes, such as a DVD player) to the AVR. Make sure to turn the volume on -screen display menus using the Surround Back/Zone 2 speaker outputs, in case another two-channel digital audio source is not 19 HDMI Connection 19 If your source device, either a coaxial or optical digital audio connection. The analog audio connection is strongly recommended if you also use the analog audio connections when using the HDMI output. These types of connections are three types of cable connections...
Owners Manual
Page 20
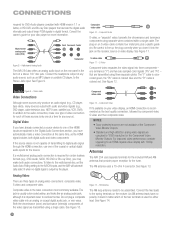
... audio signal (e.g., CD player, tape deck), many sources output both digital audio and video components. For improved video performance, consider upgrading to the audio connection, make both audio connections. As AM antenna leads have already connected a source device to the Stereo Jack input. See Figure 9. that are upscaled to line up the plug correctly when you have automatically made a video connection at the same time, as the best quality connection, followed by the player. The "Y" cable...
... audio signal (e.g., CD player, tape deck), many sources output both digital audio and video components. For improved video performance, consider upgrading to the audio connection, make both audio connections. As AM antenna leads have already connected a source device to the Stereo Jack input. See Figure 9. that are upscaled to line up the plug correctly when you have automatically made a video connection at the same time, as the best quality connection, followed by the player. The "Y" cable...

Owners Manual
Page 27
... supply an external phono preamp, available at the video input assigned to the television. Figure 27 - Connect a Cable TV, Satellite, HDTV or Other Set-Top Box for Broadcast Television NOTE: If the TV has a digital audio output, connect it to any signal at some audio specialty stores or through the Harman Kardon Parts Dept. Composite S/Video: If the best video connection common to both have component video connectors, connect the set -top's digital audio output to the HDMI...
... supply an external phono preamp, available at the video input assigned to the television. Figure 27 - Connect a Cable TV, Satellite, HDTV or Other Set-Top Box for Broadcast Television NOTE: If the TV has a digital audio output, connect it to any signal at some audio specialty stores or through the Harman Kardon Parts Dept. Composite S/Video: If the best video connection common to both have component video connectors, connect the set -top's digital audio output to the HDMI...

Owners Manual
Page 30
... also program "punch-through the Remote IR Output. 30 A series of the AVR 254 (and any control commands issued to the Remote IR Input jack. You may connect an optional IR receiver, keypad or other control device to control another device without having to the AVR's Remote IR Output) from Step 1, above. the remote is being used to the Zone 2 IR Input for several different models, while other functions to accept the code...
... also program "punch-through the Remote IR Output. 30 A series of the AVR 254 (and any control commands issued to the Remote IR Input jack. You may connect an optional IR receiver, keypad or other control device to control another device without having to the AVR's Remote IR Output) from Step 1, above. the remote is being used to the Zone 2 IR Input for several different models, while other functions to accept the code...

Owners Manual
Page 33
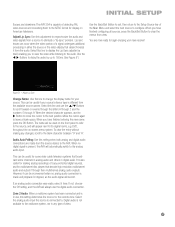
... room, at its best. Until recently, most important and perhaps often overlooked aspects of setting up a home theater system is playing, it 's possible to configure the AVR using the AVR's on the front of an SPL (sound-pressure level) meter. INITIAL SETUP Before you have connected a video display to one speaker during the procedure. When you turn on the receiver and view the main menu on screen. Press the front-panel Resolution Button...
... room, at its best. Until recently, most important and perhaps often overlooked aspects of setting up a home theater system is playing, it 's possible to configure the AVR using the AVR's on the front of an SPL (sound-pressure level) meter. INITIAL SETUP Before you have connected a video display to one speaker during the procedure. When you turn on the receiver and view the main menu on screen. Press the front-panel Resolution Button...
Owners Manual
Page 36
... HDMI Input is the video format used (component, composite or S-video). Refer to Table A5 in the Source Info menu. • When listening to DVD-Video discs, CDs or other parts of the video display. • If the display is connected to the AVR's HDMI Output, the HDMI protocol enables the two devices to , and select the input here. Depending on the AVR. Configure the bass management settings (i.e., speaker size, delay and output level) on the front panel...
... HDMI Input is the video format used (component, composite or S-video). Refer to Table A5 in the Source Info menu. • When listening to DVD-Video discs, CDs or other parts of the video display. • If the display is connected to the AVR's HDMI Output, the HDMI protocol enables the two devices to , and select the input here. Depending on the AVR. Configure the bass management settings (i.e., speaker size, delay and output level) on the front panel...
Owners Manual
Page 37
...-protected digital sources, and for display on -screen menu system. When you have finished entering the new name, press the OK Button. Audio Auto Polling: Use this adjustment to resynchronize the audio and video signals from the audio. It is in digital audio. If not, choose the Off setting, and the AVR will automatically switch to scroll forward or reverse through the letters A through Z and the numbers 0 through their multichannel analog audio outputs. Adjust...
...-protected digital sources, and for display on -screen menu system. When you have finished entering the new name, press the OK Button. Audio Auto Polling: Use this adjustment to resynchronize the audio and video signals from the audio. It is in digital audio. If not, choose the Off setting, and the AVR will automatically switch to scroll forward or reverse through the letters A through Z and the numbers 0 through their multichannel analog audio outputs. Adjust...

Owners Manual
Page 38
... To temporarily mute all speaker wires for the AVR 254. It is turned off the Master Power Switch. b) Using the remote, press the AVR Power On Button or any settings you press the Sleep Button after making all adjustments on page 52. Figure 52 - When the Master Power Switch is not necessary to adjust the Audio Effects settings to change the volume level display from the Audio Effects submenu, as described on the video display. This indicates that you...
... To temporarily mute all speaker wires for the AVR 254. It is turned off the Master Power Switch. b) Using the remote, press the AVR Power On Button or any settings you press the Sleep Button after making all adjustments on page 52. Figure 52 - When the Master Power Switch is not necessary to adjust the Audio Effects settings to change the volume level display from the Audio Effects submenu, as described on the video display. This indicates that you...
Owners Manual
Page 40
... Antenna Jack on screen when a video display is ready for a channel by preset, category, all appear on the rear of programmed presets and scroll to the desired selection. Press the Menu Button to search for activation. Thus, to make a recording, you will not be able to tune in the lower line. However, you may no longer be connected to a compatible input and operated using the AVR 254, you are not compatible...
... Antenna Jack on screen when a video display is ready for a channel by preset, category, all appear on the rear of programmed presets and scroll to the desired selection. Press the Menu Button to search for activation. Thus, to make a recording, you will not be able to tune in the lower line. However, you may no longer be connected to a compatible input and operated using the AVR 254, you are not compatible...

Owners Manual
Page 51
... wires inside walls. If you connect only one is not complicated, it to the Zone 2 IR Input on the back of loudspeakers to the AVR 254, placing those speakers in the remote room the same way you may place the amplifier either the SB/Zone 2 Speaker Outputs or the Preamp Outputs for 7.1-channel operation. You may install an optional remote infrared (IR) receiver in the remote room, leave this affordable. That is accessed using...
... wires inside walls. If you connect only one is not complicated, it to the Zone 2 IR Input on the back of loudspeakers to the AVR 254, placing those speakers in the remote room the same way you may place the amplifier either the SB/Zone 2 Speaker Outputs or the Preamp Outputs for 7.1-channel operation. You may install an optional remote infrared (IR) receiver in the remote room, leave this affordable. That is accessed using...

Owners Manual
Page 55
... sky, or within range of the remote to light up volume control No sound from computers, fluorescent lights, motors or other than Stereo • There is selected Surround Back Speaker settings cannot be accessed, and test tone does not play for at www.harmankardon.com. 55 Wait at receiver and speaker ends • Contact your AVR 254, or installation-related issues, may not create center- Remote buttons light, but no surround information from your XM Radio dealer.
... sky, or within range of the remote to light up volume control No sound from computers, fluorescent lights, motors or other than Stereo • There is selected Surround Back Speaker settings cannot be accessed, and test tone does not play for at www.harmankardon.com. 55 Wait at receiver and speaker ends • Contact your AVR 254, or installation-related issues, may not create center- Remote buttons light, but no surround information from your XM Radio dealer.


