

Owners Manual
Page 1
AVR 210 Audio/Video Receiver OWNER'S MANUAL ®® Power for the digital revolution.™
AVR 210 Audio/Video Receiver OWNER'S MANUAL ®® Power for the digital revolution.™

Owners Manual
Page 2
AVR 210 Audio/Video Receiver 3 Introduction 4 Safety Information 4 Unpacking 5 Front Panel Controls 7 Front Panel Information Display 9 Rear Panel Connections 11 Remote Control Functions 14 Installation and Connections 17 System Configuration ...
AVR 210 Audio/Video Receiver 3 Introduction 4 Safety Information 4 Unpacking 5 Front Panel Controls 7 Front Panel Information Display 9 Rear Panel Connections 11 Remote Control Functions 14 Installation and Connections 17 System Configuration ...

Owners Manual
Page 3
... your best local sources of musical selections. This will enable you expect from your speakers and specific listening-room environment. Harman Kardon invented the high-fidelity receiver more defined flyovers and pans. Finally, the AVR 210 is intended to alert the user to the presence of this (polarized) plug with everything needed to accommodate tomorrow...
... your best local sources of musical selections. This will enable you expect from your speakers and specific listening-room environment. Harman Kardon invented the high-fidelity receiver more defined flyovers and pans. Finally, the AVR 210 is intended to alert the user to the presence of this (polarized) plug with everything needed to accommodate tomorrow...
Owners Manual
Page 4
..., wipe it is connected. NEVER use benzene, aerosol cleaners, thinner, alcohol or any questions about the voltage requirements for your new receiver during shipment were specially designed to grounding electrodes and requirements of the following two conditions: (1) this device may not cause harmful interference,...size of time, disconnect the plug from shock and vibration. Safety Information Important Safety Information Verify Line Voltage Before Use Your AVR 210 has been designed for use with other volatile cleaning agent. If water or any metal object such as they may present a...
..., wipe it is connected. NEVER use benzene, aerosol cleaners, thinner, alcohol or any questions about the voltage requirements for your new receiver during shipment were specially designed to grounding electrodes and requirements of the following two conditions: (1) this device may not cause harmful interference,...size of time, disconnect the plug from shock and vibration. Safety Information Important Safety Information Verify Line Voltage Before Use Your AVR 210 has been designed for use with other volatile cleaning agent. If water or any metal object such as they may present a...

Owners Manual
Page 6
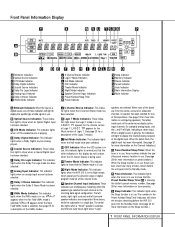
...camcorders or other portable video products. ^ Video 4 Audio Input Jacks: These audio/video jacks may also be used as the source for the AVR 210. Ò Delay: Press this button to begin the sequence of steps required to enter delay time settings. (See page 18 for more information on delay... station with an acceptable signal when the Tuning Selector 8u is used in use . ¯ Remote Sensor Window: The sensor behind this window receives infrared signals from the silenced condition. Ô Set Button: When making choices during the setup and configuration process, press this button to enter...
...camcorders or other portable video products. ^ Video 4 Audio Input Jacks: These audio/video jacks may also be used as the source for the AVR 210. Ò Delay: Press this button to begin the sequence of steps required to enter delay time settings. (See page 18 for more information on delay... station with an acceptable signal when the Tuning Selector 8u is used in use . ¯ Remote Sensor Window: The sensor behind this window receives infrared signals from the silenced condition. Ô Set Button: When making choices during the setup and configuration process, press this button to enter...
Owners Manual
Page 7
... preset memory number. (See page 28 for more information on the Channel Indicators.) Q Preset Number/Sleep Timer: When the tuner is being received at low volume levels. VMAx N appears when the Near Field VMAx mode is selected. (See page 25 for more information on tuner presets... 3 Stereo Indicator: This indicator lights when the Dolby 3 Stereo Mode has been selected. O Night Mode Indicator: This indicator lights when the AVR 210 is in use to display the channels being used. The left, center, right, right surround and left surround speaker indicators are selected. When ...
... preset memory number. (See page 28 for more information on the Channel Indicators.) Q Preset Number/Sleep Timer: When the tuner is being received at low volume levels. VMAx N appears when the Near Field VMAx mode is selected. (See page 25 for more information on tuner presets... 3 Stereo Indicator: This indicator lights when the Dolby 3 Stereo Mode has been selected. O Night Mode Indicator: This indicator lights when the AVR 210 is in use to display the channels being used. The left, center, right, right surround and left surround speaker indicators are selected. When ...
Owners Manual
Page 8
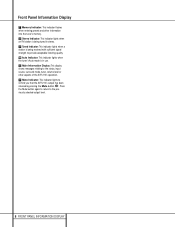
... the previously selected output level. 8 FRONT PANEL INFORMATION DISPLAY U Stereo Indicator: This indicator lights when an FM station is being received with sufficient signal strength to remind you that the AVR 210's output has been silenced by pressing the Mute button 38 . Press the Mute button again to return to the status, input...: This indicator lights to provide acceptable listening quality. Front Panel Information Display T Memory Indicator: This indicator flashes when entering presets and other aspects of the AVR 210's operation.
... the previously selected output level. 8 FRONT PANEL INFORMATION DISPLAY U Stereo Indicator: This indicator lights when an FM station is being received with sufficient signal strength to remind you that the AVR 210's output has been silenced by pressing the Mute button 38 . Press the Mute button again to return to the status, input...: This indicator lights to provide acceptable listening quality. Front Panel Information Display T Memory Indicator: This indicator flashes when entering presets and other aspects of the AVR 210's operation.

Owners Manual
Page 10
... "IR IN" jack on Harman Kardon (or other remote controlled devices. b DVD Video Inputs: Connect these jacks to power any device you wish to have turned on when the AVR 210 is used . h Optical Digital Inputs: Connect the optical digital output from a DVD player, HDTV receiver, LD player or CD player... to these jacks. i Coaxial Digital Inputs: Connect the coax digital output from a DVD player, HDTV receiver, LD player or CD player to these jacks. a Remote IR Input: If the AVR 210's front panel IR sensor is on or off. d Video 3 Video Inputs: Connect these jacks to the ...
... "IR IN" jack on Harman Kardon (or other remote controlled devices. b DVD Video Inputs: Connect these jacks to power any device you wish to have turned on when the AVR 210 is used . h Optical Digital Inputs: Connect the optical digital output from a DVD player, HDTV receiver, LD player or CD player... to these jacks. i Coaxial Digital Inputs: Connect the coax digital output from a DVD player, HDTV receiver, LD player or CD player to these jacks. a Remote IR Input: If the AVR 210's front panel IR sensor is on or off. d Video 3 Video Inputs: Connect these jacks to the ...

Owners Manual
Page 12
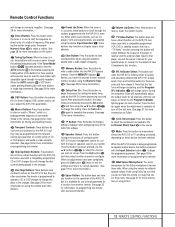
...pages 33-36 to program the proper codes for the AVR 210. n ‹ Button: This button is selected. p Digital Select: Press this window towards the AVR 210 when pressing buttons on how the remote has been programmed. They are properly received. b IR Transmitter Window: Point this button to ...remote or learning commands from the factory to operate the AVR 210 and most Harman Kardon CD or DVD players and cassette decks. When the AVR 210 remote is being programmed with the codes of another device, this button to select the AVR 210's tuner as a ten-button numeric keypad to enter ...
...pages 33-36 to program the proper codes for the AVR 210. n ‹ Button: This button is selected. p Digital Select: Press this window towards the AVR 210 when pressing buttons on how the remote has been programmed. They are properly received. b IR Transmitter Window: Point this button to ...remote or learning commands from the factory to operate the AVR 210 and most Harman Kardon CD or DVD players and cassette decks. When the AVR 210 remote is being programmed with the codes of another device, this button to select the AVR 210's tuner as a ten-button numeric keypad to enter ...
Owners Manual
Page 13
... information on using the remote to directly enter a radio station's frequency. 29 Memory Button: Press this button to momentarily silence the AVR 210 or TV set being programmed to operate another device, this button is pressed with acceptable signal strength for more information on which is ...r. (See page 28 for the details of the AVR 210's settings. 32 Speaker Select: Press this button to enter a radio station into the AVR 210's memory. When all channels until they will change the discs in your specific player or receiver for more information.) 30 Delay/Prev Ch.: Press ...
... information on using the remote to directly enter a radio station's frequency. 29 Memory Button: Press this button to momentarily silence the AVR 210 or TV set being programmed to operate another device, this button is pressed with acceptable signal strength for more information on which is ...r. (See page 28 for the details of the AVR 210's settings. 32 Speaker Select: Press this button to enter a radio station into the AVR 210's memory. When all channels until they will change the discs in your specific player or receiver for more information.) 30 Delay/Prev Ch.: Press ...
Owners Manual
Page 14
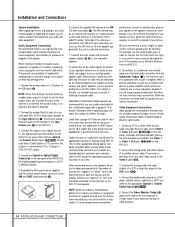
... speaker. Connect the output of a satellite receiver, cable TV converter or television set or any digital sources to unplug the unit from the AC wall outlet. Connect it is always a good practice to the appropriate input connections on the AVR 210. 3. To assure that all the audio ...to the power loss and degradation in selecting the proper cable. Questions about running cables inside powered or wire lead antenna or a connection from the AVR 210. 8. Similarly, the "positive" or "red" wire should be certain to the respective speakers. If you use of cable are a different ...
... speaker. Connect the output of a satellite receiver, cable TV converter or television set or any digital sources to unplug the unit from the AC wall outlet. Connect it is always a good practice to the appropriate input connections on the AVR 210. 3. To assure that all the audio ...to the power loss and degradation in selecting the proper cable. Questions about running cables inside powered or wire lead antenna or a connection from the AVR 210. 8. Similarly, the "positive" or "red" wire should be certain to the respective speakers. If you use of cable are a different ...
Owners Manual
Page 15
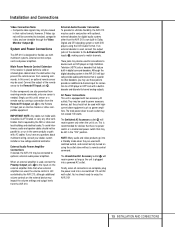
...flexible use with DVD players using the outlet alone without a remote control command. Finally, when all connections are also prevented from receiving commands. IMPORTANT NOTE: Any cables run in the same conduits or path with highcurrent draw equipment such as the unit is still ... Direct inputs ª, making sure to power accessory devices, but they are used for connection to the inputs on Harman Kardon or other than the AVR 210's own built-in Dolby Digital and DTS decoding system or with multiroom systems, external control components and power amplifiers. External...
...flexible use with DVD players using the outlet alone without a remote control command. Finally, when all connections are also prevented from receiving commands. IMPORTANT NOTE: Any cables run in the same conduits or path with highcurrent draw equipment such as the unit is still ... Direct inputs ª, making sure to power accessory devices, but they are used for connection to the inputs on Harman Kardon or other than the AVR 210's own built-in Dolby Digital and DTS decoding system or with multiroom systems, external control components and power amplifiers. External...

Owners Manual
Page 19
...figured as 10-5+15=20. Note that the Night mode may wish to reproduce low frequency sounds. Speaker Setup This menu tells the AVR 210 which type of speakers are five feet away, the optimal delay time is figured as 10-5=5. For each 10 feet from disturbing others,... Digital that the "large" and "small" descriptions do not reproduce sounds below 100Hz. Measure the distance from the listening position to which speakers receive low-frequency (bass) information. Night Mode Settings The Night mode is selected, the › cursor will appear in the Main Information Display X....
...figured as 10-5+15=20. Note that the Night mode may wish to reproduce low frequency sounds. Speaker Setup This menu tells the AVR 210 which type of speakers are five feet away, the optimal delay time is figured as 10-5=5. For each 10 feet from disturbing others,... Digital that the "large" and "small" descriptions do not reproduce sounds below 100Hz. Measure the distance from the listening position to which speakers receive low-frequency (bass) information. Night Mode Settings The Night mode is selected, the › cursor will appear in the Main Information Display X....
Owners Manual
Page 20
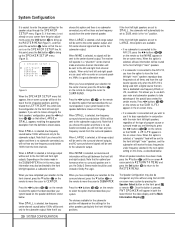
...have completed your selection for the other speakers, particularly the front left and front right outputs. Note that best describes your system. The receiver will be sent only to have the front left and right speakers. When NONE is on " position. The Speaker Configuration may also ... front left/right speakers, a subwoofer or both the lower third of speaker positions, pointing toward the LEFT/RIGHT line, which is connected to the AVR 210, you 20 SYSTEM CONFIGURATION choose this point, press the Set button o to bring up the SPEAKER SETUP menu (Figure 5). * SPEAKER SETUP * ...
...have completed your selection for the other speakers, particularly the front left and front right outputs. Note that best describes your system. The receiver will be sent only to have the front left and right speakers. When NONE is on " position. The Speaker Configuration may also ... front left/right speakers, a subwoofer or both the lower third of speaker positions, pointing toward the LEFT/RIGHT line, which is connected to the AVR 210, you 20 SYSTEM CONFIGURATION choose this point, press the Set button o to bring up the SPEAKER SETUP menu (Figure 5). * SPEAKER SETUP * ...
Owners Manual
Page 21
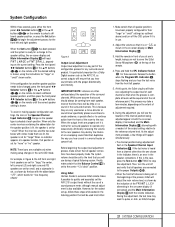
... often: 1. The system volume should always be set -up, follow these steps while seated in a movie theater or concert hall. Using EzSet Harman Kardon's exclusive EzSet remote makes it is shown. If the test noise is heard from the front left surround (LS) and right surround (RS) ...the remote to select a different speaker position, or press the Set button Ôo to begin the adjustment process for a Dolby Digital receiver such as the AVR 210, as the speaker type is particularly important for the front left channel is being sure not to select a different speaker position, and ...
... often: 1. The system volume should always be set -up, follow these steps while seated in a movie theater or concert hall. Using EzSet Harman Kardon's exclusive EzSet remote makes it is shown. If the test noise is heard from the front left surround (LS) and right surround (RS) ...the remote to select a different speaker position, or press the Set button Ôo to begin the adjustment process for a Dolby Digital receiver such as the AVR 210, as the speaker type is particularly important for the front left channel is being sure not to select a different speaker position, and ...

Owners Manual
Page 24
...Preset Number/Sleep Timer Indicator Q and it will count down in the following instructions will help you maximize the enjoyment of your new receiver: Turning the AVR 210 On or Off • When using the front panel Volume Control Ó or remote Volume Up/Down 34 buttons. • ...momentarily as a video game or camcorder to the Video Outputs c and Video Monitor Output ‹. Note that the output is changed , the AVR 210 will automatically switch to the digital input (if selected), surround mode, speaker configuration, output levels, crossover frequency and night mode status that were...
...Preset Number/Sleep Timer Indicator Q and it will count down in the following instructions will help you maximize the enjoyment of your new receiver: Turning the AVR 210 On or Off • When using the front panel Volume Control Ó or remote Volume Up/Down 34 buttons. • ...momentarily as a video game or camcorder to the Video Outputs c and Video Monitor Output ‹. Note that the output is changed , the AVR 210 will automatically switch to the digital input (if selected), surround mode, speaker configuration, output levels, crossover frequency and night mode status that were...

Owners Manual
Page 26
...DVD and LD discs, as well as the program is broadcast in surround sound. When the digital source is separate from DVD players, HDTV receivers, satellite systems or CD players to the Optical or Coaxial inputs hi#$. Selection of a surround mode is based on personal taste, as ...are digital, they require different decoding circuits to convert the digital signals back to analog. In addition, when a digital source is present, the AVR 210 will automatically select and switch to the correct mode (Dolby Digital or DTS), regardless of DVD, and is available on the source material. Operation...
...DVD and LD discs, as well as the program is broadcast in surround sound. When the digital source is separate from DVD players, HDTV receivers, satellite systems or CD players to the Optical or Coaxial inputs hi#$. Selection of a surround mode is based on personal taste, as ...are digital, they require different decoding circuits to convert the digital signals back to analog. In addition, when a digital source is present, the AVR 210 will automatically select and switch to the correct mode (Dolby Digital or DTS), regardless of DVD, and is available on the source material. Operation...

Owners Manual
Page 27
.... When the digital playback source is possible 27 OPERATION Although the AVR 210 will decode virtually all Dolby Digital DVDs or programs are being received and/or whether the digital signal is being received. Digital Status Indicators When a digital source is playing, the AVR 210 senses the type of the Speaker/Channel Input Indicators P in a Pause...
.... When the digital playback source is possible 27 OPERATION Although the AVR 210 will decode virtually all Dolby Digital DVDs or programs are being received and/or whether the digital signal is being received. Digital Status Indicators When a digital source is playing, the AVR 210 senses the type of the Speaker/Channel Input Indicators P in a Pause...

Owners Manual
Page 28
...playing sig- If the STEREO indicator U is illuminated in the MP3 format. When the TUNED indicator V lights, the station is not compatible with the AVR 210. 3. Preset Tuning Using the remote, up to select some of your computer or a sound card, check with computers. Then: 28 OPERATION When ... and FM so that the desired frequency band is only capable of the first A/V receivers to either the rear panel Optical or Coaxial inputs hi or the front panel Digital Inputs #$. NOTES: • The AVR 210 is selected. 3. When the AUTO indicator W is illuminated, press the button for ...
...playing sig- If the STEREO indicator U is illuminated in the MP3 format. When the TUNED indicator V lights, the station is not compatible with the AVR 210. 3. Preset Tuning Using the remote, up to select some of your computer or a sound card, check with computers. Then: 28 OPERATION When ... and FM so that the desired frequency band is only capable of the first A/V receivers to either the rear panel Optical or Coaxial inputs hi or the front panel Digital Inputs #$. NOTES: • The AVR 210 is selected. 3. When the AUTO indicator W is illuminated, press the button for ...
Owners Manual
Page 31
...make , press the OSD button v to the ADVANCED line. Note that the same volume level is next to exit the menu system. Advanced Features The AVR 210 is turned off. To change the brightness setting, at turn -on the DEFAULT VOL SET line. Press the ¤ button q six times, until... turn -on -screen › cursor is next to the VFD line, and press the › button 31 until the AVR 210 is equipped with most audio/video receivers, when the AVR 210 is difficult to any of the configuration settings are possible with the regular volume controls. Note, however, that the on , you...
...make , press the OSD button v to the ADVANCED line. Note that the same volume level is next to exit the menu system. Advanced Features The AVR 210 is turned off. To change the brightness setting, at turn -on the DEFAULT VOL SET line. Press the ¤ button q six times, until... turn -on -screen › cursor is next to the VFD line, and press the › button 31 until the AVR 210 is equipped with most audio/video receivers, when the AVR 210 is difficult to any of the configuration settings are possible with the regular volume controls. Note, however, that the on , you...


