

Owners Manual
Page 2
AVR 210 Audio/Video Receiver 3 Introduction 4 Safety Information 4 Unpacking 5 Front Panel Controls 7 Front Panel Information Display 9 Rear Panel Connections 11 Remote Control Functions 14 Installation and Connections 17 System Configuration 18 Input Setup 18 Surround Setup 18 Delay Settings...6-Channel Direct Input 31 Advanced Features 31 Display Brightness 31 Turn-On Volume Level 31 Semi-OSD Settings 33 Programming the Remote 33 Direct Code Entry 33 Auto Search Method 33 Code Readout 34 Macro Programming 34 Programmed Device Functions 35 Volume Punch-Through...
AVR 210 Audio/Video Receiver 3 Introduction 4 Safety Information 4 Unpacking 5 Front Panel Controls 7 Front Panel Information Display 9 Rear Panel Connections 11 Remote Control Functions 14 Installation and Connections 17 System Configuration 18 Input Setup 18 Surround Setup 18 Delay Settings...6-Channel Direct Input 31 Advanced Features 31 Display Brightness 31 Turn-On Volume Level 31 Semi-OSD Settings 33 Programming the Remote 33 Direct Code Entry 33 Auto Search Method 33 Code Readout 34 Macro Programming 34 Programmed Device Functions 35 Volume Punch-Through...

Owners Manual
Page 3
... tuner. The lightning flash with your retailer or custom installer. With the purchase of a Harman Kardon AVR 210 you may be fully inserted to prevent blade exposure. Color-keyed connections, a programmable remote control, and on board.The AVR 210's powerful amplifier uses traditional Harman Kardon high-current design technologies to meet the wide dynamic range of any questions about...
... tuner. The lightning flash with your retailer or custom installer. With the purchase of a Harman Kardon AVR 210 you may be fully inserted to prevent blade exposure. Color-keyed connections, a programmable remote control, and on board.The AVR 210's powerful amplifier uses traditional Harman Kardon high-current design technologies to meet the wide dynamic range of any questions about...

Owners Manual
Page 5
...ON," press this switch should be "flat," without any bass or treble alteration, no matter how the actual Bass and Treble controls &( are establishing the AVR 210's configuration settings, use these buttons to adjust the output signals. Input Source Selector @ FM Mode Selector # Digital Optical 3 Input $ Digital Coax 3 ...is placed in a Standby mode, as shown in the Main Information Display Û, the settings of the remote control, this button to be used to listen to the AVR 210. When the unit is in operation, the indicator will automatically be turned off . press it pops out ...
...ON," press this switch should be "flat," without any bass or treble alteration, no matter how the actual Bass and Treble controls &( are establishing the AVR 210's configuration settings, use these buttons to adjust the output signals. Input Source Selector @ FM Mode Selector # Digital Optical 3 Input $ Digital Coax 3 ...is placed in a Standby mode, as shown in the Main Information Display Û, the settings of the remote control, this button to be used to listen to the AVR 210. When the unit is in operation, the indicator will automatically be turned off . press it pops out ...

Owners Manual
Page 6
...lower-frequency stations and the right side of the left /right channels. Release it unless an external remote sensor is installed. 6 FRONT PANEL CONTROLS the tuner will automatically switch the AVR 210 to the Tuner mode. Set this control to a suitable position for your listening room. (See ...process, press this button to enter the desired setting as shown in use . ¯ Remote Sensor Window: The sensor behind this window receives infrared signals from the remote control. If the AVR 210 is muted, adjusting volume control will light in front of the surround mode that have been...
...lower-frequency stations and the right side of the left /right channels. Release it unless an external remote sensor is installed. 6 FRONT PANEL CONTROLS the tuner will automatically switch the AVR 210 to the Tuner mode. Set this control to a suitable position for your listening room. (See ...process, press this button to enter the desired setting as shown in use . ¯ Remote Sensor Window: The sensor behind this window receives infrared signals from the remote control. If the AVR 210 is muted, adjusting volume control will light in front of the surround mode that have been...
Owners Manual
Page 9
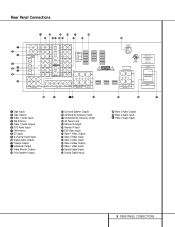
SPKRS (8Ω) MODEL NO. AVR 210 NORTHRIDGE CALIFORNIA, USA MADE IN CHINA AC OUTLETS ~120V/60Hz UNSWITCHED / 100W MAX SWITCHED / 100W MAX SERIAL NO. fi fl ‡ j Video 2 Audio Outputs k Video 3 ... Outputs › Front Speaker Outputs fi Surround Speaker Outputs fl Switched AC Accessory Outlet ‡ Unswitched AC Accessory Outlet ° AC Power Cord · Remote IR Output a Remote IR Input b DVD Video Inputs c Video 1 Video Outputs d Video 3 Video Inputs e Video 2 Video Inputs f Video 2 Video Outputs g Video 1 Video Inputs h Optical Digital Inputs i Coaxial...
SPKRS (8Ω) MODEL NO. AVR 210 NORTHRIDGE CALIFORNIA, USA MADE IN CHINA AC OUTLETS ~120V/60Hz UNSWITCHED / 100W MAX SWITCHED / 100W MAX SERIAL NO. fi fl ‡ j Video 2 Audio Outputs k Video 3 ... Outputs › Front Speaker Outputs fi Surround Speaker Outputs fl Switched AC Accessory Outlet ‡ Unswitched AC Accessory Outlet ° AC Power Cord · Remote IR Output a Remote IR Input b DVD Video Inputs c Video 1 Video Outputs d Video 3 Video Inputs e Video 2 Video Inputs f Video 2 Video Outputs g Video 1 Video Inputs h Optical Digital Inputs i Coaxial...

Owners Manual
Page 10
... outlet may be used , connect this jack to the subwoofer amplifier input. ‹ Video Monitor Outputs: Connect this jack to the "IR IN" jack on Harman Kardon (or other compatible) equipment. b DVD Video Inputs: Connect these jacks to the PLAY/OUT composite or S-Video jacks on a VCR or other video source. ..., LD player or CD player to these jacks to the PLAY/OUT composite or S-Video jacks on a VCR or other video source. a Remote IR Input: If the AVR 210's front panel IR sensor is on or off. Rear Panel Connections ¡ Tape Inputs: Connect these jacks to the PLAY/OUT jacks of...
... outlet may be used , connect this jack to the subwoofer amplifier input. ‹ Video Monitor Outputs: Connect this jack to the "IR IN" jack on Harman Kardon (or other compatible) equipment. b DVD Video Inputs: Connect these jacks to the PLAY/OUT composite or S-Video jacks on a VCR or other video source. ..., LD player or CD player to these jacks to the PLAY/OUT composite or S-Video jacks on a VCR or other video source. a Remote IR Input: If the AVR 210's front panel IR sensor is on or off. Rear Panel Connections ¡ Tape Inputs: Connect these jacks to the PLAY/OUT jacks of...
Owners Manual
Page 11
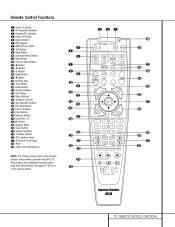
Remote Control Functions a Power On Button b IR Transmitter Window c Program/SPL Indicator d Power Off Button e Input Selectors f AVR Selector g AM/FM Tuner Select h Test Button i Sleep Button j Surround Mode Selector k Night Mode l Channel Select Button m ⁄ Button n ‹... Select q37 6-Channel Direct Input q38 Mute q39 EzSet Sensor Microphone NOTE: The function names shown here are each button's feature when used with the AVR 210. SURR. NIGHT VOL. Most buttons have additional functions when used with other devices. U R DIGI EXIT SET TAL 1 2 DELAPREV 3 4 5 6 TUN-M 9...
Remote Control Functions a Power On Button b IR Transmitter Window c Program/SPL Indicator d Power Off Button e Input Selectors f AVR Selector g AM/FM Tuner Select h Test Button i Sleep Button j Surround Mode Selector k Night Mode l Channel Select Button m ⁄ Button n ‹... Select q37 6-Channel Direct Input q38 Mute q39 EzSet Sensor Microphone NOTE: The function names shown here are each button's feature when used with the AVR 210. SURR. NIGHT VOL. Most buttons have additional functions when used with other devices. U R DIGI EXIT SET TAL 1 2 DELAPREV 3 4 5 6 TUN-M 9...

Owners Manual
Page 12
... q ¤ Button: This multi-purpose button is not turned on screen menus, or to operate the AVR 210 and most Harman Kardon CD or DVD players and cassette decks. First, if the AVR 210 is used to change or scroll through items in use the ⁄/¤ buttons mq to select the ...channel being programmed with the codes to operate another device, this button to remember that many of the buttons on the remote...
... q ¤ Button: This multi-purpose button is not turned on screen menus, or to operate the AVR 210 and most Harman Kardon CD or DVD players and cassette decks. First, if the AVR 210 is used to change or scroll through items in use the ⁄/¤ buttons mq to select the ...channel being programmed with the codes to operate another device, this button to remember that many of the buttons on the remote...
Owners Manual
Page 13
... channel. Once the button has been pressed, use to be programmed for a function from another channel to configure. When the AVR 210 remote is being programmed to operate another device, this button is in your specific player or receiver for direct entry of the... flashes, you wish to set up or down through the stations programmed into the AVR 210's preset memory. When all channels until they will change the disc currently being controlled, depending on programming the remote.) 39 EzSet Sensor Microphone: The sensor microphone for the EzSet microphone is behind these...
... channel. Once the button has been pressed, use to be programmed for a function from another channel to configure. When the AVR 210 remote is being programmed to operate another device, this button is in your specific player or receiver for direct entry of the... flashes, you wish to set up or down through the stations programmed into the AVR 210's preset memory. When all channels until they will change the disc currently being controlled, depending on programming the remote.) 39 EzSet Sensor Microphone: The sensor microphone for the EzSet microphone is behind these...
Owners Manual
Page 15
... consult your dealer, custom installer or low-voltage electrical contractor. These jacks may impact the volume settings and output levels from receiving remote commands, only one sensor is plugged into a Standby mode when they should not be used in conjunction with optional, external decoders ... only when the unit is superior to , or run in the AVR 210 will receive power as long as power amplifiers. The Unswitched AC Accessory outlet ‡ will typically provide audio performance that is on Harman Kardon or other decoders, you have no power switch or a mechanical power...
... consult your dealer, custom installer or low-voltage electrical contractor. These jacks may impact the volume settings and output levels from receiving remote commands, only one sensor is plugged into a Standby mode when they should not be used in conjunction with optional, external decoders ... only when the unit is superior to , or run in the AVR 210 will receive power as long as power amplifiers. The Unswitched AC Accessory outlet ‡ will typically provide audio performance that is on Harman Kardon or other decoders, you have no power switch or a mechanical power...
Owners Manual
Page 17
...of the current status of a static image such as the surround mode, the front left on the front panel or remote control for each source and have the AVR 210 memorize those settings. Making Configuration Adjustments The full OSD system is only required when system components are made a connection ...from the screen. When this process as quick and as easy as shown. The semi-OSD system is in the remote as possible, we...
...of the current status of a static image such as the surround mode, the front left on the front panel or remote control for each source and have the AVR 210 memorize those settings. Making Configuration Adjustments The full OSD system is only required when system components are made a connection ...from the screen. When this process as quick and as easy as shown. The semi-OSD system is in the remote as possible, we...

Owners Manual
Page 18
...Input Source Selector ! To return to make the setup adjustments, press the OSD button v once so that the › cursor appears next to the AVR 210. Press the Set button o to change the surround mode while the › cursor is next to adjust the delay time setting. However, to ...later. It is easiest to the desired input name. System Configuration Input Setup The first step in configuring the AVR 210 is to select any mode you wish - Note that the on the remote will initially appear in highlighted video (Figure 3). For Dolby Digital and Dolby Pro Logic, pressing the ⁄...
...Input Source Selector ! To return to make the setup adjustments, press the OSD button v once so that the › cursor appears next to the AVR 210. Press the Set button o to change the surround mode while the › cursor is next to adjust the delay time setting. However, to ...later. It is easiest to the desired input name. System Configuration Input Setup The first step in configuring the AVR 210 is to select any mode you wish - Note that the on the remote will initially appear in highlighted video (Figure 3). For Dolby Digital and Dolby Pro Logic, pressing the ⁄...

Owners Manual
Page 19
...When the delay settings are five feet away, the optimal delay time is figured as 10-5=5. Next, press the ⁄/¤ buttons mq on the remote or the Selector buttons 5 on -screen display: OFF: When OFF is the result of that the delay settings may be applied. We recommend that... are in the Main Information Display X. When the button is than the distance to zero. Speaker Setup This menu tells the AVR 210 which speakers receive low-frequency (bass) information. For each 10 feet from the menu, make certain that determine which type of speakers are each ...
...When the delay settings are five feet away, the optimal delay time is figured as 10-5=5. Next, press the ⁄/¤ buttons mq on the remote or the Selector buttons 5 on -screen display: OFF: When OFF is the result of that the delay settings may be applied. We recommend that... are in the Main Information Display X. When the button is than the distance to zero. Speaker Setup This menu tells the AVR 210 which speakers receive low-frequency (bass) information. For each 10 feet from the menu, make certain that determine which type of speakers are each ...
Owners Manual
Page 20
...the front left /right "main" speakers. • If a subwoofer is connected to the AVR 210, you are listening to, press the ‹/› buttons n 31 on the remote so that SUB (LFE) appears in the on the remote to select the option that for the surround channel, press the ¤ button q on...or LFE, soundtrack. The receiver will operate in the on the remote to select the option that if you 20 SYSTEM CONFIGURATION choose this option is selected, all speaker selections have the subwoofer operate only when the AVR 210 is selected, no surround speakers are set to SUB, which sets ...
...the front left /right "main" speakers. • If a subwoofer is connected to the AVR 210, you are listening to, press the ‹/› buttons n 31 on the remote so that SUB (LFE) appears in the on the remote to select the option that for the surround channel, press the ¤ button q on...or LFE, soundtrack. The receiver will operate in the on the remote to select the option that if you 20 SYSTEM CONFIGURATION choose this option is selected, all speaker selections have the subwoofer operate only when the AVR 210 is selected, no surround speakers are set to SUB, which sets ...
Owners Manual
Page 21
... concert hall. Finally, make certain that all levels will see the location of the configuration process for a Dolby Digital receiver such as the AVR 210, as shown by the box with circles inside them are set for small, and a subwoofer is set for a change as the speaker ... output level adjustment process, make certain that duplicates the way you will be equal and at each speaker, most often: 1. Using EzSet Harman Kardon's exclusive EzSet remote makes it is normal for "small." If this point, the EzSet circuitry will be used when a movie director or sound mixer specifically...
... concert hall. Finally, make certain that all levels will see the location of the configuration process for a Dolby Digital receiver such as the AVR 210, as shown by the box with circles inside them are set for small, and a subwoofer is set for a change as the speaker ... output level adjustment process, make certain that duplicates the way you will be equal and at each speaker, most often: 1. Using EzSet Harman Kardon's exclusive EzSet remote makes it is normal for "small." If this point, the EzSet circuitry will be used when a movie director or sound mixer specifically...

Owners Manual
Page 22
...to adjust the individual channels until the LED lights green for speaker placement, let the test noise circulate again, and listen to turn the AVR 210 off . The Program/SPL Indicator c will change the subwoofer level, follow the steps for precise level adjustment, set , the channel name... button ˆh again to circulate again in the Main Information Display X. NOTE: Output level adjustment is not adjustable using the EzSet remote. If you release the button, the circulation will flash green twice and then go out. After two complete circulations of the second circulation...
...to adjust the individual channels until the LED lights green for speaker placement, let the test noise circulate again, and listen to turn the AVR 210 off . The Program/SPL Indicator c will change the subwoofer level, follow the steps for precise level adjustment, set , the channel name... button ˆh again to circulate again in the Main Information Display X. NOTE: Output level adjustment is not adjustable using the EzSet remote. If you release the button, the circulation will flash green twice and then go out. After two complete circulations of the second circulation...

Owners Manual
Page 24
... the Main Information Display X. • For private listening, plug the 1/4" stereo phone plug from Standby by using the AVR 210 for automatic turnoff, press the Sleep button i on the remote. This will interrupt the output to operate and enjoy. To return the tone controls to any of the Power Indicator ...3. • To program the AVR 210 for the first time, you must press the Main Power Switch 1 on the front panel to the AVR 210 functions. When the remote is used . When the system is "flat," with the surround circuits off, the...
... the Main Information Display X. • For private listening, plug the 1/4" stereo phone plug from Standby by using the AVR 210 for automatic turnoff, press the Sleep button i on the remote. This will interrupt the output to operate and enjoy. To return the tone controls to any of the Power Indicator ...3. • To program the AVR 210 for the first time, you must press the Main Power Switch 1 on the front panel to the AVR 210 functions. When the remote is used . When the system is "flat," with the surround circuits off, the...

Owners Manual
Page 26
... § on the rear panel when you must be selected when a digital input is in either the front panel controls or the remote. Thus, movies with the AVR 210, as Pro Logic or Logic 7, when they use . The bass channel is separate from the other modes. No demodulator is required ...for using the remote until SURR OFF appears in the Main Information Display X indicator BE or on laser discs. This does not indicate a problem ...
... § on the rear panel when you must be selected when a digital input is in either the front panel controls or the remote. Thus, movies with the AVR 210, as Pro Logic or Logic 7, when they use . The bass channel is separate from the other modes. No demodulator is required ...for using the remote until SURR OFF appears in the Main Information Display X indicator BE or on laser discs. This does not indicate a problem ...

Owners Manual
Page 27
... To turn the Night mode off ) mode. This is being received. Digital Status Indicators When a digital source is playing, the AVR 210 senses the type of channels on the remote. This will help you may have two, five or six separate channels, depending on the program material, the method of the... AVR 210. Depending on the settings on the source player and specific surround information and number of bitstream data that the ...
... To turn the Night mode off ) mode. This is being received. Digital Status Indicators When a digital source is playing, the AVR 210 senses the type of channels on the remote. This will help you may have two, five or six separate channels, depending on the program material, the method of the... AVR 210. Depending on the settings on the source player and specific surround information and number of bitstream data that the ...

Owners Manual
Page 28
...not all digitally encoded programs contain full 5.1-channel audio. The AVR 210 will begin playing. As soon as an LD or surround-encoded CD, use the ⁄/¤ buttons mq on the remote, or the Selector buttons 5 on the remote to start over. If you press an incorrect button while... Dolby Pro Logic, Dolby 3, Stereo, Hall, Theater or Logic 7. 5. Preset Tuning Using the remote, up to locate a specific station. When a Dolby Digital or DTS source is illuminated in the AVR 210's memory for compact discs and laser discs. In addition, some future digital sources may also be ...
...not all digitally encoded programs contain full 5.1-channel audio. The AVR 210 will begin playing. As soon as an LD or surround-encoded CD, use the ⁄/¤ buttons mq on the remote, or the Selector buttons 5 on the remote to start over. If you press an incorrect button while... Dolby Pro Logic, Dolby 3, Stereo, Hall, Theater or Logic 7. 5. Preset Tuning Using the remote, up to locate a specific station. When a Dolby Digital or DTS source is illuminated in the AVR 210's memory for compact discs and laser discs. In addition, some future digital sources may also be ...


