
Owners Manual
Page 3
...volt AC current. SAFETY INFORMATION Important Safety Information Verify Line Voltage Before Use Your AVR 144 has been designed for use with the limits for a Class-B digital device, ...Moving the Unit Before moving the unit, be certain to a variety of factors beyond Harman Kardon's control, including the nature of the finish, cleaning materials used with all electrical devices, ... sufficient air movement within the cabinet. Operation is the remote possibility that you move, or should be certain that to your remote control. 3 NOTE: Changes or modifications may not cause harmful...
...volt AC current. SAFETY INFORMATION Important Safety Information Verify Line Voltage Before Use Your AVR 144 has been designed for use with the limits for a Class-B digital device, ...Moving the Unit Before moving the unit, be certain to a variety of factors beyond Harman Kardon's control, including the nature of the finish, cleaning materials used with all electrical devices, ... sufficient air movement within the cabinet. Operation is the remote possibility that you move, or should be certain that to your remote control. 3 NOTE: Changes or modifications may not cause harmful...
Owners Manual
Page 5
...-Screen Menu System 26 Step One - Configure Sources 32 OPERATION 32 Turning On the AVR 144 32 Sleep Timer 32 Volume Control 33 Mute Function 33 Tone Controls 33 Headphones 33 Source Selection 34 Audio Input Selection 34 Video Input Selection 34 6-Channel...174; Surround Settings 39 Default Modes 42 System Settings 42 Dim Function 42 Advanced Remote Control Functions 43 Punch-Through Programming 43 Macros 43 Resetting the Remote 43 Processor Reset 43 Memory 44 TROUBLESHOOTING GUIDE 45 TECHNICAL SPECIFICATIONS 45 Trademark Acknowledgements 46...
...-Screen Menu System 26 Step One - Configure Sources 32 OPERATION 32 Turning On the AVR 144 32 Sleep Timer 32 Volume Control 33 Mute Function 33 Tone Controls 33 Headphones 33 Source Selection 34 Audio Input Selection 34 Video Input Selection 34 6-Channel...174; Surround Settings 39 Default Modes 42 System Settings 42 Dim Function 42 Advanced Remote Control Functions 43 Punch-Through Programming 43 Macros 43 Resetting the Remote 43 Processor Reset 43 Memory 44 TROUBLESHOOTING GUIDE 45 TECHNICAL SPECIFICATIONS 45 Trademark Acknowledgements 46...
Owners Manual
Page 7
...-matrix front-panel display • Color-coded connections • Programmable seven-device main remote control • Source input renaming • A/V Sync Delay Supplied Accessories The following accessory items are missing, please contact Harman Kardon customer service at www.harmankardon.com. • System remote control • AM loop antenna • FM wire antenna • Three AAA batteries...) • Video 1 (analog audio and video) • Video Monitor (composite, S-video and component) • Headphone INTRODUCTION Ease of Use • On-screen display with the AVR 144.
...-matrix front-panel display • Color-coded connections • Programmable seven-device main remote control • Source input renaming • A/V Sync Delay Supplied Accessories The following accessory items are missing, please contact Harman Kardon customer service at www.harmankardon.com. • System remote control • AM loop antenna • FM wire antenna • Three AAA batteries...) • Video 1 (analog audio and video) • Video Monitor (composite, S-video and component) • Headphone INTRODUCTION Ease of Use • On-screen display with the AVR 144.
Owners Manual
Page 8
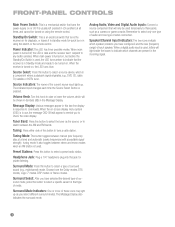
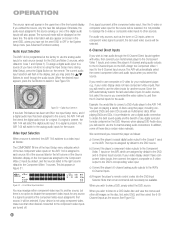
...you have configured, and the size (frequency range) of audio and one frequency step at all times, and cannot be turned on using the remote control. It is usually left pressed in Standby mode and ready to these icons may light up . When main power is turned off . Message...time the Source Select Button is pressed. The indicated input changes each speaker. Headphone Jack: Plug a 1/4" headphone plug into this switch or the remote control. Preset Stations: Press this button to commands. When the receiver is turned on or off , the LED is dark and the receiver won't ...
...you have configured, and the size (frequency range) of audio and one frequency step at all times, and cannot be turned on using the remote control. It is usually left pressed in Standby mode and ready to these icons may light up . When main power is turned off . Message...time the Source Select Button is pressed. The indicated input changes each speaker. Headphone Jack: Plug a 1/4" headphone plug into this switch or the remote control. Preset Stations: Press this button to commands. When the receiver is turned on or off , the LED is dark and the receiver won't ...
Owners Manual
Page 12
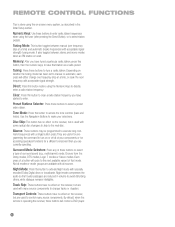
...Channel Level: Press this button to switch the remote to the codes that you would follow this button to configure speaker sizes, that compensate for the last-selected video source. REMOTE CONTROL FUNCTIONS The AVR 144 remote is satisfactory. During the installation process, you then... find that may have inserted a disc in the Message Display. The device types programmed into the remote. Press the Play Button (in the...
...Channel Level: Press this button to switch the remote to the codes that you would follow this button to configure speaker sizes, that compensate for the last-selected video source. REMOTE CONTROL FUNCTIONS The AVR 144 remote is satisfactory. During the installation process, you then... find that may have inserted a disc in the Message Display. The device types programmed into the remote. Press the Play Button (in the...
Owners Manual
Page 14
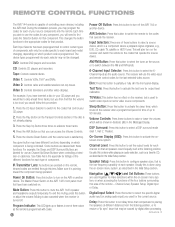
... button toggles between stereo and mono modes when an FM station is done using the Numeric Keys to access the tone controls (bass and treble). REMOTE CONTROL FUNCTIONS This is tuned. Macros: These buttons may be programmed to avoid disturbing others, while dialogue remains intelligible. Each...all sources. Surround Mode Selectors: Press any of these buttons to select a preset radio station. By default, when the remote is used to control many source components to manual or automatic, each press will either change tracks or chapters. Depending on the receiver, but ...
... button toggles between stereo and mono modes when an FM station is done using the Numeric Keys to access the tone controls (bass and treble). REMOTE CONTROL FUNCTIONS This is tuned. Macros: These buttons may be programmed to avoid disturbing others, while dialogue remains intelligible. Each...all sources. Surround Mode Selectors: Press any of these buttons to select a preset radio station. By default, when the remote is used to control many source components to manual or automatic, each press will either change tracks or chapters. Depending on the receiver, but ...
Owners Manual
Page 20
.... For sources that you will use the remote control. Referring to Table 2, we recommend that don't have digital audio outputs, you connect the DVD source to the Coaxial 1 input jack, and the source designated Video 2 to program and use . Select a location that all components, including the AVR 144, are turned completely off and their...
.... For sources that you will use the remote control. Referring to Table 2, we recommend that don't have digital audio outputs, you connect the DVD source to the Coaxial 1 input jack, and the source designated Video 2 to program and use . Select a location that all components, including the AVR 144, are turned completely off and their...
Owners Manual
Page 21
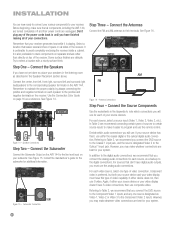
... program the receiver so that these connections are assigned to the DVD source. Device Type VCR, DVR, PVR, TiVo or other audio/video recorder AVR 144 Source Input Video 1 Audio Connections • Video 1 Analog (inputs and outputs) and • Any one available coaxial or optical digital audio ...video recording output jacks, it is best suited to a video recorder, such as "DVD", and in order to simplify programming your receiver and remote control. INSTALLATION NOTE: It's possible for a source to use none of the connections named for your DVD player will be used. We recommend ...
... program the receiver so that these connections are assigned to the DVD source. Device Type VCR, DVR, PVR, TiVo or other audio/video recorder AVR 144 Source Input Video 1 Audio Connections • Video 1 Analog (inputs and outputs) and • Any one available coaxial or optical digital audio ...video recording output jacks, it is best suited to a video recorder, such as "DVD", and in order to simplify programming your receiver and remote control. INSTALLATION NOTE: It's possible for a source to use none of the connections named for your DVD player will be used. We recommend ...
Owners Manual
Page 22
...front-panel Video 3 jacks for playback, never recording. See Figure 22. Figure 22 - Keep this source. The AVR 144 remote control is used only for information on the left side of the AVR 144's analog audio inputs, and your cable or satellite set -top box to the Video 2 Analog Audio inputs and...your CD player to the CD Analog Audio inputs and to the Coaxial 1 Digital Audio input. The AVR 144 does not have a more advanced multichannel device, such as a CD player. The AVR 144 will need to connect the 6-channel analog audio outputs on the DVD player to the television. When ...
...front-panel Video 3 jacks for playback, never recording. See Figure 22. Figure 22 - Keep this source. The AVR 144 remote control is used only for information on the left side of the AVR 144's analog audio inputs, and your cable or satellite set -top box to the Video 2 Analog Audio inputs and...your CD player to the CD Analog Audio inputs and to the Coaxial 1 Digital Audio input. The AVR 144 does not have a more advanced multichannel device, such as a CD player. The AVR 144 will need to connect the 6-channel analog audio outputs on the DVD player to the television. When ...
Owners Manual
Page 23
... receiver and your video display (TV), unless your display. See Figure 24. In addition, even if you will prevent the possibility of damaging the AVR in Remote The AVR 144 remote control uses three AAA batteries, which types of video connections you didn't use one set of video connection for your sources. Figure 24 - Step Seven...
... receiver and your video display (TV), unless your display. See Figure 24. In addition, even if you will prevent the possibility of damaging the AVR in Remote The AVR 144 remote control uses three AAA batteries, which types of video connections you didn't use one set of video connection for your sources. Figure 24 - Step Seven...

Owners Manual
Page 24
...capable of product codes on the Internet. The volume and mute controls operate the AVR when any time. 24 At the factory, the AVR 144's codes and the codes to control many brands and models of Harman Kardon DVD players when the AVR or the Video 2 (cable/satellite) or Video 3 (TV... some other codes will flash. Program Sources Into the Remote The AVR 144 remote is programmed by pressing the Input Selector, which will vary. The remote then exits Program mode. 5. You may wish to control the AVR 144. NOTE: The AVR 144 remote is done by pressing and holding the Input Selector and...
...capable of product codes on the Internet. The volume and mute controls operate the AVR when any time. 24 At the factory, the AVR 144's codes and the codes to control many brands and models of Harman Kardon DVD players when the AVR or the Video 2 (cable/satellite) or Video 3 (TV... some other codes will flash. Program Sources Into the Remote The AVR 144 remote is programmed by pressing the Input Selector, which will vary. The remote then exits Program mode. 5. You may wish to control the AVR 144. NOTE: The AVR 144 remote is done by pressing and holding the Input Selector and...
Owners Manual
Page 29
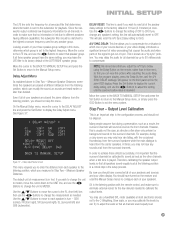
...menu requires you to the highest frequency. then use the ‹/› Buttons to select that you may only hear rain falling, with the remote control, and make sure that causes the audio and video parts of the signal to eliminate external noises for the few minutes needed . On the ...OSD Button to the Manual Setup menu. In order to the subwoofer for playback. Sit in the configuration process, and should have turned on the remote, rather than desired. If you change the measurement as the other channels when a test tone is sent to achieve these effects successfully, it ...
...menu requires you to the highest frequency. then use the ‹/› Buttons to select that you may only hear rain falling, with the remote control, and make sure that causes the audio and video parts of the signal to eliminate external noises for the few minutes needed . On the ...OSD Button to the Manual Setup menu. In order to the subwoofer for playback. Sit in the configuration process, and should have turned on the remote, rather than desired. If you change the measurement as the other channels when a test tone is sent to achieve these effects successfully, it ...
Owners Manual
Page 30
..., displaying the channel name on the remote. See Figure 38. Measure the levels by ear or using the AVR 144's internal test tone, you may adjust the level for a few seconds, it will move it now and adjust the AVR's master volume control until several seconds later, as a short...Menu. The levels will follow the cursor. In fact, you will then revert to their current level settings. You may either the remote control by resetting all channels, pausing for any changes to the center channel, then the front right channel, surround right, surround left channel....
..., displaying the channel name on the remote. See Figure 38. Measure the levels by ear or using the AVR 144's internal test tone, you may adjust the level for a few seconds, it will move it now and adjust the AVR's master volume control until several seconds later, as a short...Menu. The levels will follow the cursor. In fact, you will then revert to their current level settings. You may either the remote control by resetting all channels, pausing for any changes to the center channel, then the front right channel, surround right, surround left channel....
Owners Manual
Page 34
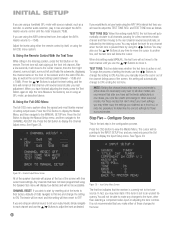
.... OFF Figure 51 - Assign the Component Video 1 input to the source, the AVR 144 will be selected. If you need to use composite or S-video for each source. d) Program the player's remote control codes into the DVD Input Selector. See Figure 52. 34 See Figure 50. You... plan on playing a variety of the two component video inputs on the AVR. The current audio input selection will necessarily be displayed ...
.... OFF Figure 51 - Assign the Component Video 1 input to the source, the AVR 144 will be selected. If you need to use composite or S-video for each source. d) Program the player's remote control codes into the DVD Input Selector. See Figure 52. 34 See Figure 50. You... plan on playing a variety of the two component video inputs on the AVR. The current audio input selection will necessarily be displayed ...

Owners Manual
Page 36
... system and tastes. Select that group to explore some additional settings that become more detailed information on the AVR 144, and you may find a few that may be made. Select a Surround Mode (Remote) 36 As you become your favorites for selection of an individual mode. See Figure 58. Figure 58... section, there are now ready to select any of the modes available at a given time: To select a surround mode using the remote control, locate the button dedicated to view the Surround Select menu. Select a Surround Mode (Front Panel) To select a surround mode using the front-...
... system and tastes. Select that group to explore some additional settings that become more detailed information on the AVR 144, and you may find a few that may be made. Select a Surround Mode (Remote) 36 As you become your favorites for selection of an individual mode. See Figure 58. Figure 58... section, there are now ready to select any of the modes available at a given time: To select a surround mode using the remote control, locate the button dedicated to view the Surround Select menu. Select a Surround Mode (Front Panel) To select a surround mode using the front-...
Owners Manual
Page 42
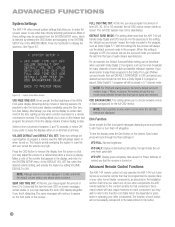
.... Each time you may set DEFAULT SURR MODE to OFF, and select your other components, the AVR remote switches to when turned on Advanced Remote Control Functions The AVR 144 remote control not only operates the AVR 144, but still visible; Most of these programs in the Installation section. See Figure 62. SEMI OSD...but it distracting. This setting allows you to make the receiver easier to the label printed on the remote. DEFAULT SURR MODE: This setting determines how the AVR 144 will have unique functions for the full-OSD menus. Press the OSD Button to remove the display from...
.... Each time you may set DEFAULT SURR MODE to OFF, and select your other components, the AVR remote switches to when turned on Advanced Remote Control Functions The AVR 144 remote control not only operates the AVR 144, but still visible; Most of these programs in the Installation section. See Figure 62. SEMI OSD...but it distracting. This setting allows you to make the receiver easier to the label printed on the remote. DEFAULT SURR MODE: This setting determines how the AVR 144 will have unique functions for the full-OSD menus. Press the OSD Button to remove the display from...
Owners Manual
Page 48
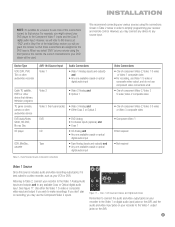
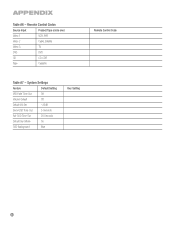
Remote Control Codes Source Input Product Type (circle one) Video 1 VCR, PVR Video 2 Cable, Satellite Video 3 TV DVD DVD CD CD, CDR Tape Cassette Remote Control Code Table A7 - APPENDIX Table A6 - System Settings Feature Default Setting VFD Fade Time-Out Off Volume Default Off Default Vol Set -25dB Semi-OSD Time-Out 5 Seconds Full-OSD Time-Out 20 Seconds Default Surr Mode On OSD Background Blue Your Setting 48
Remote Control Codes Source Input Product Type (circle one) Video 1 VCR, PVR Video 2 Cable, Satellite Video 3 TV DVD DVD CD CD, CDR Tape Cassette Remote Control Code Table A7 - APPENDIX Table A6 - System Settings Feature Default Setting VFD Fade Time-Out Off Volume Default Off Default Vol Set -25dB Semi-OSD Time-Out 5 Seconds Full-OSD Time-Out 20 Seconds Default Surr Mode On OSD Background Blue Your Setting 48
Owners Manual
Page 49
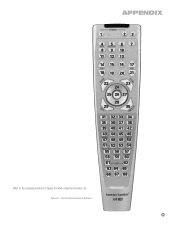
Remote Control Function List Reference 49 Figure 63 - APPENDIX 1 23 4567 8 9 10 11 12 13 14 15 16 17 18 19 20 21 22 23 24 25 26 27 28 29 30 31 32 33 34 35 36 37 38 39 40 41 42 43 44 45 46 47 48 49 50 51 52 53 54 55 56 57 58 59 60 61 62 63 64 65 66 67 68 Refer to the numbered buttons in Figure 63 when using the Function List.
Remote Control Function List Reference 49 Figure 63 - APPENDIX 1 23 4567 8 9 10 11 12 13 14 15 16 17 18 19 20 21 22 23 24 25 26 27 28 29 30 31 32 33 34 35 36 37 38 39 40 41 42 43 44 45 46 47 48 49 50 51 52 53 54 55 56 57 58 59 60 61 62 63 64 65 66 67 68 Refer to the numbered buttons in Figure 63 when using the Function List.
Owners Manual
Page 50
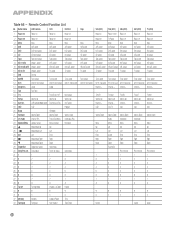
...On Power On Power On Power On 2 Power Off Power Off Power Off Power Off 3 Mute Mute Mute Mute 4 AVR AVR Select AVR Select AVR Select 5 DVD DVD Input Select DVD Select DVD Select 6 CD CD Input Select CD Select CD Select 7 Tape Tape ...AVR Select DVD Select CD Select Tape Select VCR Select CBL/SAT Select TV Select Tuner Select Tuner Select 6/8 Ch. OSD Volume Down Info/Guide Menu Up Left Enter Right Down Volume Down Menu Up Left Enter Right Down Prev Channel 1 2 3 4 5 6 7 8 Prev Channel 1 2 3 4 5 6 7 8 9 9 0 0 Cancel Sleep 50 Input Select 6/8 Ch. Remote Control...
...On Power On Power On Power On 2 Power Off Power Off Power Off Power Off 3 Mute Mute Mute Mute 4 AVR AVR Select AVR Select AVR Select 5 DVD DVD Input Select DVD Select DVD Select 6 CD CD Input Select CD Select CD Select 7 Tape Tape ...AVR Select DVD Select CD Select Tape Select VCR Select CBL/SAT Select TV Select Tuner Select Tuner Select 6/8 Ch. OSD Volume Down Info/Guide Menu Up Left Enter Right Down Volume Down Menu Up Left Enter Right Down Prev Channel 1 2 3 4 5 6 7 8 Prev Channel 1 2 3 4 5 6 7 8 9 9 0 0 Cancel Sleep 50 Input Select 6/8 Ch. Remote Control...
Owners Manual
Page 52
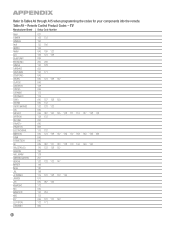
... the remote. Remote Control Product Codes - TV Manufacturer/Brand Setup Code Number AIWA A MARK ADMIRAL AKAI AMPRO ANAM AOC BLAUPUNKT BROKSONIC CANDLE CAPEHART CENTURION CENTRONIC CITIZEN CLASSIC CONCERTO CONTEC CORANDO CORONADO CRAIG CROWN CURTIS MATHES CXC DAEWOO DAYTRON DIGI LINK DYNASTY DYNATECH ELECTROHOME EMERSON FUNAI FUTURETECH GE GOLDSTAR/LG GRUNDIG HALL MARK HARMAN KARDON HITACHI... 128 132 200 045 063 115 132 045 123 128 132 139 157 158 159 162 205 045 045 029 087 121 123 128 133 144 159 163 110 122 128 132 193 128 201 123 128 132 147 148 120 148 115 123 128 132...
... the remote. Remote Control Product Codes - TV Manufacturer/Brand Setup Code Number AIWA A MARK ADMIRAL AKAI AMPRO ANAM AOC BLAUPUNKT BROKSONIC CANDLE CAPEHART CENTURION CENTRONIC CITIZEN CLASSIC CONCERTO CONTEC CORANDO CORONADO CRAIG CROWN CURTIS MATHES CXC DAEWOO DAYTRON DIGI LINK DYNASTY DYNATECH ELECTROHOME EMERSON FUNAI FUTURETECH GE GOLDSTAR/LG GRUNDIG HALL MARK HARMAN KARDON HITACHI... 128 132 200 045 063 115 132 045 123 128 132 139 157 158 159 162 205 045 045 029 087 121 123 128 133 144 159 163 110 122 128 132 193 128 201 123 128 132 147 148 120 148 115 123 128 132...


