
User Manual
Page 3
... or Off 5 Unlocking the Touch Screen 6 Turning the Sound On or Off 6 Accessories 7 Charging the Tablet 7 Chapter 2: Getting to Know Your Tablet 8 Features of the Tablet 8 Front View 9 Side View 10 Panel and Display Layout 11 Panel Display 11 Navigation 12 Home Screen 12 Browser Screen 15 Book Screen 16 Chapter 3: ...
... or Off 5 Unlocking the Touch Screen 6 Turning the Sound On or Off 6 Accessories 7 Charging the Tablet 7 Chapter 2: Getting to Know Your Tablet 8 Features of the Tablet 8 Front View 9 Side View 10 Panel and Display Layout 11 Panel Display 11 Navigation 12 Home Screen 12 Browser Screen 15 Book Screen 16 Chapter 3: ...
User Manual
Page 5
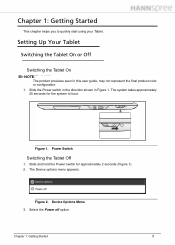
...the final product color or configuration. 1. Figure 1. The Device options menu appears. Figure 2. Setting Up Your Tablet 0 Switching the Tablet On or Off 0 Switching the Tablet On 0 NOTE: NOTE: The product previews seen in Figure 1. Chapter 1: Getting Started 5 The system takes ... 25 seconds for approximately 2 seconds (Figure 1). 2. Power Switch Switching the Tablet Off 0 1. Device Options Menu 3. Slide and hold the Power switch for the system to quickly start using your Tablet. Select the Power off option. Chapter 1: Getting Started This chapter helps you...
...the final product color or configuration. 1. Figure 1. The Device options menu appears. Figure 2. Setting Up Your Tablet 0 Switching the Tablet On or Off 0 Switching the Tablet On 0 NOTE: NOTE: The product previews seen in Figure 1. Chapter 1: Getting Started 5 The system takes ... 25 seconds for approximately 2 seconds (Figure 1). 2. Power Switch Switching the Tablet Off 0 1. Device Options Menu 3. Slide and hold the Power switch for the system to quickly start using your Tablet. Select the Power off option. Chapter 1: Getting Started This chapter helps you...
User Manual
Page 6
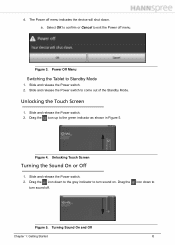
... sound off. Drag the icon down to the grey indicator to the green indicator as shown in Figure 5. icon down . Power Off Menu Switching the Tablet to Figure 5. Slide and release the Power switch to exit the Power off menu indicates the device will shut down to Standby Mode 0 1. Slide and...
... sound off. Drag the icon down to the grey indicator to the green indicator as shown in Figure 5. icon down . Power Off Menu Switching the Tablet to Figure 5. Slide and release the Power switch to exit the Power off menu indicates the device will shut down to Standby Mode 0 1. Slide and...
User Manual
Page 7
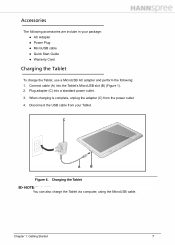
... Guide Warranty Card Charging the Tablet 0 To charge the Tablet, use a MicroUSB AC adapter and perform the following accessories are include in your Tablet. Charging the Tablet NOTE: NOTE: You can also charge the Tablet via computer, using the MicroUSB cable. Accessories... 0 The following : 1. Plug adapter (C) into the Tablet's MicroUSB slot (B) (Figure 1). 2. C AA B Figure ...
... Guide Warranty Card Charging the Tablet 0 To charge the Tablet, use a MicroUSB AC adapter and perform the following accessories are include in your Tablet. Charging the Tablet NOTE: NOTE: You can also charge the Tablet via computer, using the MicroUSB cable. Accessories... 0 The following : 1. Plug adapter (C) into the Tablet's MicroUSB slot (B) (Figure 1). 2. C AA B Figure ...
User Manual
Page 8
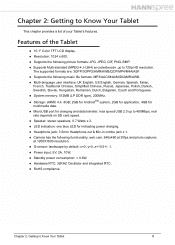
...61548;Hardware RTC: 32KHZ Oscillator and integrated RTC. RoHS compliance. Chapter 2: Getting to 720p HD resolution. Features of your Tablet's features. The supported formats are: 3GPP/3GPP2/AMR/AWB/QCP/MP4/M4A/ASF Supports the following picture formats: JPG, JPEG,... GIF, PNG, BMP. Supports Multi-standard (MPEG-4, H.264) encode/decode ,up to Know Your Tablet This chapter provides a list of the Tablet 0 10.1" Color TFT LCD display. Resolution: 1024 x 600. Supports the following...
...61548;Hardware RTC: 32KHZ Oscillator and integrated RTC. RoHS compliance. Chapter 2: Getting to 720p HD resolution. Features of your Tablet's features. The supported formats are: 3GPP/3GPP2/AMR/AWB/QCP/MP4/M4A/ASF Supports the following picture formats: JPG, JPEG,... GIF, PNG, BMP. Supports Multi-standard (MPEG-4, H.264) encode/decode ,up to Know Your Tablet This chapter provides a list of the Tablet 0 10.1" Color TFT LCD display. Resolution: 1024 x 600. Supports the following...
User Manual
Page 9
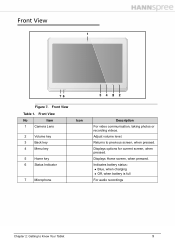
Front View No Item 1 Camera Lens Icon 2 Volume key 3 Back key 4 Menu key 5 Home key 6 Status Indicator 7 Microphone 53 46 35 24 Description For video communication, taking photos or recording videos. Displays Home screen, when pressed. Front View 0 1 7 62 Figure 7. Displays options for current screen, when pressed. Indicates battery status: Blue, when charging Off, when battery is full For audio recordings Chapter 2: Getting to previous screen, when pressed. Adjust volume level. Front View Table 1. Returns to Know Your Tablet 9
Front View No Item 1 Camera Lens Icon 2 Volume key 3 Back key 4 Menu key 5 Home key 6 Status Indicator 7 Microphone 53 46 35 24 Description For video communication, taking photos or recording videos. Displays Home screen, when pressed. Front View 0 1 7 62 Figure 7. Displays options for current screen, when pressed. Indicates battery status: Blue, when charging Off, when battery is full For audio recordings Chapter 2: Getting to previous screen, when pressed. Adjust volume level. Front View Table 1. Returns to Know Your Tablet 9
User Manual
Page 10
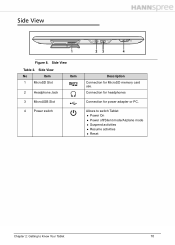
Connection for headphones Connection for MicroSD memory card use. Side View Table 2. Side View 0 1 23 4 Figure 8. Allows to switch Tablet: Power On Power off/Silent mode/Airplane mode Suspend activities Resume activities Reset Chapter 2: Getting to Know Your Tablet 10 Side View No Item 1 MicroSD Slot Item 2 Headphone Jack 3 MicroUSB Slot 4 Power switch Description Connection for power adapter or PC.
Connection for headphones Connection for MicroSD memory card use. Side View Table 2. Side View 0 1 23 4 Figure 8. Allows to switch Tablet: Power On Power off/Silent mode/Airplane mode Suspend activities Resume activities Reset Chapter 2: Getting to Know Your Tablet 10 Side View No Item 1 MicroSD Slot Item 2 Headphone Jack 3 MicroUSB Slot 4 Power switch Description Connection for power adapter or PC.
User Manual
Page 11
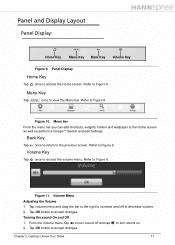
... 0 Panel Display: 0 Home Key Menu Key Back Key Volume Key Figure 9. Chapter 2: Getting to view the Menu bar. Menu Key 0 Tap once to Know Your Tablet 11 Figure 10. Volume Key 0 Tap once to access the volume menu. Figure 11.
... 0 Panel Display: 0 Home Key Menu Key Back Key Volume Key Figure 9. Chapter 2: Getting to view the Menu bar. Menu Key 0 Tap once to Know Your Tablet 11 Figure 10. Volume Key 0 Tap once to access the volume menu. Figure 11.
User Manual
Page 12
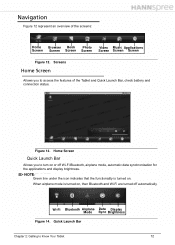
... off Wi-Fi Bluetooth, airplane mode, automatic data synchronization for the applications and display brightness. Home Screen Quick Launch Bar 0 Allows you to Know Your Tablet 12 NOTE: NOTE: Green line under the icon indicates that the functionality is turned on . Navigation 0 Figure 12 represent an overview of the...
... off Wi-Fi Bluetooth, airplane mode, automatic data synchronization for the applications and display brightness. Home Screen Quick Launch Bar 0 Allows you to Know Your Tablet 12 NOTE: NOTE: Green line under the icon indicates that the functionality is turned on . Navigation 0 Figure 12 represent an overview of the...
User Manual
Page 13
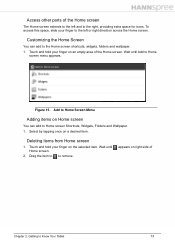
... or right direction across the Home screen. Touch and hold your finger on right side of the Home screen. Wait until Add to Know Your Tablet 13 Add to Home Screen Menu Adding items on a desired item.
... or right direction across the Home screen. Touch and hold your finger on right side of the Home screen. Wait until Add to Know Your Tablet 13 Add to Home Screen Menu Adding items on a desired item.
User Manual
Page 14
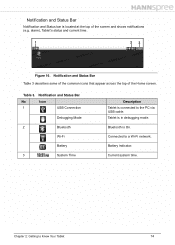
alarm), Tablet's status and current time. 1 23 Figure 16. Notification and Status Bar Table 3 describes some of the common icons that appear across the top of the ... (e.g. Bluetooth is in debugging mode. Current system time. Notification and Status Bar No Icon 1 USB Connection Debugging Mode 2 Bluetooth Wi-Fi Battery 3 System Time Description Tablet is connected to a Wi-Fi network. Connected to the PC via USB cable. Battery indicator. Table 3. Notification and Status Bar 0 Notification and Status bar is...
alarm), Tablet's status and current time. 1 23 Figure 16. Notification and Status Bar Table 3 describes some of the common icons that appear across the top of the ... (e.g. Bluetooth is in debugging mode. Current system time. Notification and Status Bar No Icon 1 USB Connection Debugging Mode 2 Bluetooth Wi-Fi Battery 3 System Time Description Tablet is connected to a Wi-Fi network. Connected to the PC via USB cable. Battery indicator. Table 3. Notification and Status Bar 0 Notification and Status bar is...
User Manual
Page 15
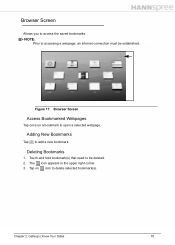
NOTE: NOTE: Prior to accessing a webpage, an Internet connection must be deleted. 2. The icon appears in the upper right corner. 3. Browser Screen Access Bookmarked Webpages 0 Tap once on icon to Know Your Tablet 15 Deleting Bookmarks 0 1. Adding New Bookmarks 0 Tap to open a selected webpage. Chapter 2: Getting to delete selected bookmark(s). Touch and hold bookmark(s) that need to access the saved bookmarks. Tap on a bookmark to add a new bookmark. Figure 17. Browser Screen 0 Allows you to be established.
NOTE: NOTE: Prior to accessing a webpage, an Internet connection must be deleted. 2. The icon appears in the upper right corner. 3. Browser Screen Access Bookmarked Webpages 0 Tap once on icon to Know Your Tablet 15 Deleting Bookmarks 0 1. Adding New Bookmarks 0 Tap to open a selected webpage. Chapter 2: Getting to delete selected bookmark(s). Touch and hold bookmark(s) that need to access the saved bookmarks. Tap on a bookmark to add a new bookmark. Figure 17. Browser Screen 0 Allows you to be established.
User Manual
Page 16
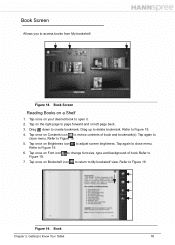
... menu. Tap again to access books from My bookshelf. Tap again to create bookmark. Drag down to close menu. Figure 18. Refer to Know Your Tablet 16 Book Chapter 2: Getting to Figure 19. 4.
... menu. Tap again to access books from My bookshelf. Tap again to create bookmark. Drag down to close menu. Figure 18. Refer to Know Your Tablet 16 Book Chapter 2: Getting to Figure 19. 4.
User Manual
Page 17
... books by bookshelf, name, author, time and delete books (Figure 18). Changing Shelf Name 0 1. Tap OK to confirm name change or Cancel to Know Your Tablet 17
... books by bookshelf, name, author, time and delete books (Figure 18). Changing Shelf Name 0 1. Tap OK to confirm name change or Cancel to Know Your Tablet 17
User Manual
Page 18
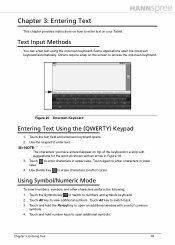
... keyboard. Figure 20 Onscreen Keyboard Entering Text Using the (QWERTY) Keypad 0 1. Use the keypad to numbers and symbols keyboard. 2. Touch to enter text on your Tablet. Using Symbol/Numeric Mode 0 To insert numbers, symbols and other characters perform the following: 1. Chapter 3: Entering Text This chapter provides instructions on how to enter...
... keyboard. Figure 20 Onscreen Keyboard Entering Text Using the (QWERTY) Keypad 0 1. Use the keypad to numbers and symbols keyboard. 2. Touch to enter text on your Tablet. Using Symbol/Numeric Mode 0 To insert numbers, symbols and other characters perform the following: 1. Chapter 3: Entering Text This chapter provides instructions on how to enter...
User Manual
Page 19
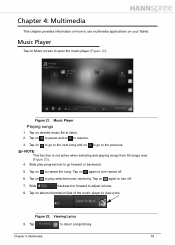
Chapter 4: Multimedia This chapter provides information on how to use multimedia applications on again to turn off . 6. Tap on your Tablet. Tap on again to the previous. Figure 21. Tap on to go to the next song and on to play progress bar to go to ...
Chapter 4: Multimedia This chapter provides information on how to use multimedia applications on again to turn off . 6. Tap on your Tablet. Tap on again to the previous. Figure 21. Tap on to go to the next song and on to play progress bar to go to ...
User Manual
Page 24
... Wi-Fi on and the that it is turned on and off . To configure Bluetooth settings, refer to Virtual Private Network (VPN). Tap on your Tablet. Tap on Auto-rotate screen to turn this functionality on or off.The indicates that Auto-rotate selection is turned off from Home screen-> Quick...
... Wi-Fi on and the that it is turned on and off . To configure Bluetooth settings, refer to Virtual Private Network (VPN). Tap on your Tablet. Tap on Auto-rotate screen to turn this functionality on or off.The indicates that Auto-rotate selection is turned off from Home screen-> Quick...
User Manual
Page 26
... card causes the data on Use 24-hour format to configure the keyboard settings. Tap on SD card to the current date. 2. You can view Tablet's Model number, Android version, Kernel version and Build number. 2. Tap on keypress, Auto-capitalization, Input languages, Quick fixes, Show suggestions and Auto-complete. 4. Tap on... address and Up time. 3. Language and Keyboard 0 Tap on Status to view and configure the following functions: 1. ! Tap on Legal information to Features of the Tablet. 2.
... card causes the data on Use 24-hour format to configure the keyboard settings. Tap on SD card to the current date. 2. You can view Tablet's Model number, Android version, Kernel version and Build number. 2. Tap on keypress, Auto-capitalization, Input languages, Quick fixes, Show suggestions and Auto-complete. 4. Tap on... address and Up time. 3. Language and Keyboard 0 Tap on Status to view and configure the following functions: 1. ! Tap on Legal information to Features of the Tablet. 2.
User Manual
Page 27
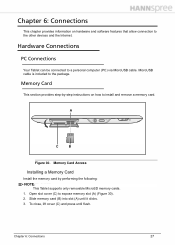
...card. Open slot cover (C) to the other devices and the Internet. Memory Card 0 This section provides step-by performing the following: NOTE: NOTE: This Tablet supports only removable MicroSD memory cards. 1. Slide memory card (B) into slot (A) until flush. AA CA BA Figure 30. Memory Card Access Installing a ... (Figure 30). 2. MicroUSB cable is included to a personal computer (PC) via MicroUSB cable. Chapter 6: Connections 0 27 Hardware Connections 0 PC Connections 0 Your Tablet can be connected to the package. To close, lift cover (C) and press until it clicks. 3.
...card. Open slot cover (C) to the other devices and the Internet. Memory Card 0 This section provides step-by performing the following: NOTE: NOTE: This Tablet supports only removable MicroSD memory cards. 1. Slide memory card (B) into slot (A) until flush. AA CA BA Figure 30. Memory Card Access Installing a ... (Figure 30). 2. MicroUSB cable is included to a personal computer (PC) via MicroUSB cable. Chapter 6: Connections 0 27 Hardware Connections 0 PC Connections 0 Your Tablet can be connected to the package. To close, lift cover (C) and press until it clicks. 3.

User Manual
Page 28
Open slot cover (C) to the audio programming. Pull memory card from slot. 4. Accessories Connections 0 Headphones 0 Your Tablet has a headphone jack that allows you to connect headphones to the device for listening to expose memory slot (A). (Figure 30) 2. ...CAUTION: Removing the memory card while saving data may cause loss of data and damage to your Tablet, perform the following : 1. Press memory card (B) to release it from the device. ! Insert headphones connector (A) into the headphone jack (B) (Figure 31). 2. ...
Open slot cover (C) to the audio programming. Pull memory card from slot. 4. Accessories Connections 0 Headphones 0 Your Tablet has a headphone jack that allows you to connect headphones to the device for listening to expose memory slot (A). (Figure 30) 2. ...CAUTION: Removing the memory card while saving data may cause loss of data and damage to your Tablet, perform the following : 1. Press memory card (B) to release it from the device. ! Insert headphones connector (A) into the headphone jack (B) (Figure 31). 2. ...


