
User Manual
Page 3
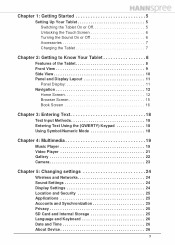
... Home Screen 12 Browser Screen 15 Book Screen 16 Chapter 3: Entering Text 18 Text Input Methods 18 Entering Text Using the (QWERTY) Keypad 18 Using Symbol/Numeric Mode 18 Chapter 4: Multimedia 19 Music Player 19 Video Player 21 Gallery 22 Camera 23 Chapter 5: Changing settings 24 Wireless and Networks 24 Sound Settings 24 Display Settings 24 Location and Security 25 Applications 25 Accounts and Synchronization 25 Privacy 25 SD Card and Internal Storage 25 Language and Keyboard 26 Date and Time 26 About Device...
... Home Screen 12 Browser Screen 15 Book Screen 16 Chapter 3: Entering Text 18 Text Input Methods 18 Entering Text Using the (QWERTY) Keypad 18 Using Symbol/Numeric Mode 18 Chapter 4: Multimedia 19 Music Player 19 Video Player 21 Gallery 22 Camera 23 Chapter 5: Changing settings 24 Wireless and Networks 24 Sound Settings 24 Display Settings 24 Location and Security 25 Applications 25 Accounts and Synchronization 25 Privacy 25 SD Card and Internal Storage 25 Language and Keyboard 26 Date and Time 26 About Device...
User Manual
Page 5
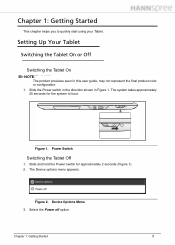
... Tablet. Figure 1. Select the Power off option. Device Options Menu 3. The Device options menu appears. Slide the Power switch in the direction shown in this user guide, may not represent the final product color or configuration. 1. Setting Up Your Tablet 0 Switching the Tablet On or Off 0 Switching the Tablet On 0 NOTE: NOTE: The product previews seen in Figure 1. Power Switch Switching the Tablet Off 0 1. Chapter 1: Getting Started This chapter helps you to boot...
... Tablet. Figure 1. Select the Power off option. Device Options Menu 3. The Device options menu appears. Slide the Power switch in the direction shown in this user guide, may not represent the final product color or configuration. 1. Setting Up Your Tablet 0 Switching the Tablet On or Off 0 Switching the Tablet On 0 NOTE: NOTE: The product previews seen in Figure 1. Power Switch Switching the Tablet Off 0 1. Chapter 1: Getting Started This chapter helps you to boot...
User Manual
Page 8
...-language user interface: UK English, US English, German, Spanish, Italian, French, Traditional Chinese, Simplified Chinese, Russia, Japanese, Polish, Danish, Swedish, Slovak, Hungarian, Romanian, Dutch, Bulgarian, Czech and Portuguese. System memory: 512MB (LP DDR type), 200MHz. Storage: eMMC 4.4, 8GB; 2GB for AndroidTM system, 2GB for application, 4GB for multimedia data. MicroUSB port for charging and data...
...-language user interface: UK English, US English, German, Spanish, Italian, French, Traditional Chinese, Simplified Chinese, Russia, Japanese, Polish, Danish, Swedish, Slovak, Hungarian, Romanian, Dutch, Bulgarian, Czech and Portuguese. System memory: 512MB (LP DDR type), 200MHz. Storage: eMMC 4.4, 8GB; 2GB for AndroidTM system, 2GB for application, 4GB for multimedia data. MicroUSB port for charging and data...
User Manual
Page 9
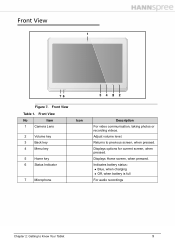
Front View Table 1. Front View No Item 1 Camera Lens Icon 2 Volume key 3 Back key 4 Menu key 5 Home key 6 Status Indicator 7 Microphone 53 46 35 24 Description For video communication, taking photos or recording videos. Displays options for current screen, when pressed. Displays Home screen, when pressed. Adjust volume level. Returns to Know Your Tablet 9 Indicates battery status: Blue, when charging Off, when battery is full For audio recordings Chapter 2: Getting to previous screen, when pressed. Front View 0 1 7 62 Figure 7.
Front View Table 1. Front View No Item 1 Camera Lens Icon 2 Volume key 3 Back key 4 Menu key 5 Home key 6 Status Indicator 7 Microphone 53 46 35 24 Description For video communication, taking photos or recording videos. Displays options for current screen, when pressed. Displays Home screen, when pressed. Adjust volume level. Returns to Know Your Tablet 9 Indicates battery status: Blue, when charging Off, when battery is full For audio recordings Chapter 2: Getting to previous screen, when pressed. Front View 0 1 7 62 Figure 7.
User Manual
Page 10
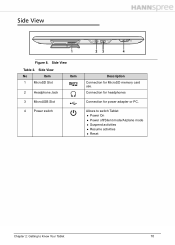
Side View Table 2. Side View No Item 1 MicroSD Slot Item 2 Headphone Jack 3 MicroUSB Slot 4 Power switch Description Connection for power adapter or PC. Connection for headphones Connection for MicroSD memory card use. Side View 0 1 23 4 Figure 8. Allows to switch Tablet: Power On Power off/Silent mode/Airplane mode Suspend activities Resume activities Reset Chapter 2: Getting to Know Your Tablet 10
Side View Table 2. Side View No Item 1 MicroSD Slot Item 2 Headphone Jack 3 MicroUSB Slot 4 Power switch Description Connection for power adapter or PC. Connection for headphones Connection for MicroSD memory card use. Side View 0 1 23 4 Figure 8. Allows to switch Tablet: Power On Power off/Silent mode/Airplane mode Suspend activities Resume activities Reset Chapter 2: Getting to Know Your Tablet 10
User Manual
Page 11
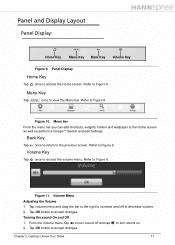
... accept changes. Tap OK button to accept changes. Menu Key 0 Tap once to the previous screen. Back Key 0 Tap once to return to view the Menu bar. Turning the sound On and Off 1. From the Volume menu Tap to turn sound off and tap 2. to turn sound on. Menu bar From the menu bar you can add shortcuts, widgets, folders and wallpaper to access the Home screen. Volume Menu Adjusting the Volume 1. Panel Display Home Key 0 Tap once to the Home screen...
... accept changes. Tap OK button to accept changes. Menu Key 0 Tap once to the previous screen. Back Key 0 Tap once to return to view the Menu bar. Turning the sound On and Off 1. From the Volume menu Tap to turn sound off and tap 2. to turn sound on. Menu bar From the menu bar you can add shortcuts, widgets, folders and wallpaper to access the Home screen. Volume Menu Adjusting the Volume 1. Panel Display Home Key 0 Tap once to the Home screen...
User Manual
Page 16
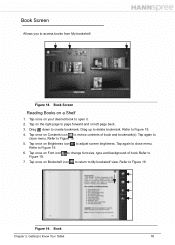
.... 6. Tap again to open it. 2. Refer to create bookmark. Tap once on your desired book to close menu. Book Chapter 2: Getting to access books from My bookshelf. Book Screen 0 Allows you to Know Your Tablet 16 Tap on the right page to page forward and on Contents icon to review contents of book.Refer to My bookshelf view. Tap once on left...
.... 6. Tap again to open it. 2. Refer to create bookmark. Tap once on your desired book to close menu. Book Chapter 2: Getting to access books from My bookshelf. Book Screen 0 Allows you to Know Your Tablet 16 Tap on the right page to page forward and on Contents icon to review contents of book.Refer to My bookshelf view. Tap once on left...
User Manual
Page 17
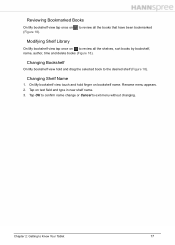
... and type in new shelf name. 3. Changing Bookshelf 0 On My bookshelf view hold finger on (Figure 18). On My bookshelf view touch and hold and drag the selected book to review all the shelves, sort books by bookshelf, name, author, time and delete books (Figure 18). Tap on to the desired shelf (Figure 18). Rename menu appears. 2. Reviewing Bookmarked Books 0 On My bookshelf view tap...
... and type in new shelf name. 3. Changing Bookshelf 0 On My bookshelf view hold finger on (Figure 18). On My bookshelf view touch and hold and drag the selected book to review all the shelves, sort books by bookshelf, name, author, time and delete books (Figure 18). Tap on to the desired shelf (Figure 18). Rename menu appears. 2. Reviewing Bookmarked Books 0 On My bookshelf view tap...
User Manual
Page 18
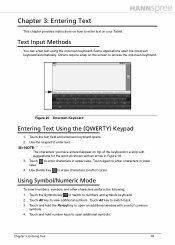
Chapter 3: Entering Text This chapter provides instructions on how to enter text on the screen to access the onscreen keyboard. Figure 20 Onscreen Keyboard Entering Text Using the (QWERTY) Keypad 0 1. Touch the text field and onscreen keyboard opens. 2. Use Delete key to erase characters to left of common symbols. 4. Touch Alt key to switch back. 3. Text Input Methods 0 You can enter text using the onscreen keyboard. Touch Alt key to view additional symbols. Some applications open additional...
Chapter 3: Entering Text This chapter provides instructions on how to enter text on the screen to access the onscreen keyboard. Figure 20 Onscreen Keyboard Entering Text Using the (QWERTY) Keypad 0 1. Touch the text field and onscreen keyboard opens. 2. Use Delete key to erase characters to left of common symbols. 4. Touch Alt key to switch back. 3. Text Input Methods 0 You can enter text using the onscreen keyboard. Touch Alt key to view additional symbols. Some applications open additional...
User Manual
Page 19
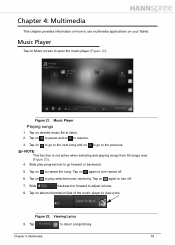
... songs library. Slide play selected music randomly. Tap on your Tablet. Chapter 4: Multimedia This chapter provides information on how to use multimedia applications on desired music file to listen. 2. Music Player 0 Tap on to go to the next song and on Music screen to the previous. Tap on to go to open the music player (Figure 12). Figure...
... songs library. Slide play selected music randomly. Tap on your Tablet. Chapter 4: Multimedia This chapter provides information on how to use multimedia applications on desired music file to listen. 2. Music Player 0 Tap on to go to the next song and on Music screen to the previous. Tap on to go to open the music player (Figure 12). Figure...
User Manual
Page 23
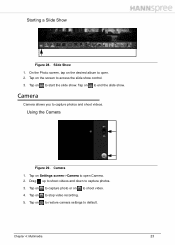
Tap on the screen to start the slide show control. 3. Camera 1. Slide Show 1. Tap on to access the slide show . Tap on to restore camera settings to stop video recording. 5. Tap on to default. Drag up to shoot videos and down to shoot video. 4. Using the Camera 0 Figure 29. Tap on to capture photo or on to open . 2. Tap on to capture photos. 3. Tap on the...
Tap on the screen to start the slide show control. 3. Camera 1. Slide Show 1. Tap on to access the slide show . Tap on to restore camera settings to stop video recording. 5. Tap on to default. Drag up to shoot videos and down to shoot video. 4. Using the Camera 0 Figure 29. Tap on to capture photo or on to open . 2. Tap on to capture photos. 3. Tap on the...
User Manual
Page 24
... adjust manually Media and Alarm volume. Tap on Audible selection to play sound when making screen selection. The available selection includes: 15 seconds, 30 seconds, 1 minute, 2 minutes, 10 minutes and 30 minutes. Tap on Volume to Configuring the Bluetooth 6. Tap on Screen lock sounds to play sounds when locking and unlocking the screen. Wireless and Networks 0 Tap on Wireless & networks to Wi-Fi. 3. You can also turn Bluetooth on or off , refer to view...
... adjust manually Media and Alarm volume. Tap on Audible selection to play sound when making screen selection. The available selection includes: 15 seconds, 30 seconds, 1 minute, 2 minutes, 10 minutes and 30 minutes. Tap on Volume to Configuring the Bluetooth 6. Tap on Screen lock sounds to play sounds when locking and unlocking the screen. Wireless and Networks 0 Tap on Wireless & networks to Wi-Fi. 3. You can also turn Bluetooth on or off , refer to view...
User Manual
Page 25
... or Password. 2. Tap on Clear storage to lock screen with a pattern, or password. Applications 0 Tap on Set up screen lock to clear credential storage of the internal storage. 2. Tap on or off . 3. You can turn it is turned off . Chapter 5: Changing settings 25 Tap Add account to view and configure the following functionality: 1. You can view Total and Available space of the SD card and Available space of all data on Install from SD card to install...
... or Password. 2. Tap on Clear storage to lock screen with a pattern, or password. Applications 0 Tap on Set up screen lock to clear credential storage of the internal storage. 2. Tap on or off . 3. You can turn it is turned off . Chapter 5: Changing settings 25 Tap Add account to view and configure the following functionality: 1. You can view Total and Available space of the SD card and Available space of all data on Install from SD card to install...
User Manual
Page 26
... Use 24-hour format to review Open source licenses. Tap on StylusIME to view the user dictionary. Chapter 5: Changing settings 26 Tap on Legal information to show the time in 24-hour format. Tap on About device to change the current language. About Device 0 Tap on Select time zone to make adjustments to view and configure the following functions: 1. Tap on the Android keyboard to Features of the Tablet...
... Use 24-hour format to review Open source licenses. Tap on StylusIME to view the user dictionary. Chapter 5: Changing settings 26 Tap on Legal information to show the time in 24-hour format. Tap on About device to change the current language. About Device 0 Tap on Select time zone to make adjustments to view and configure the following functions: 1. Tap on the Android keyboard to Features of the Tablet...
User Manual
Page 27
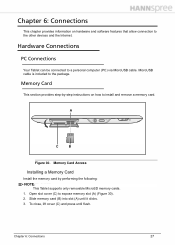
...This Tablet supports only removable MicroSD memory cards. 1. Open slot cover (C) to a personal computer (PC) via MicroUSB cable. Memory Card Access Installing a Memory Card Install the memory card by -step instructions on hardware and software features that allow connection to the package. To close, lift cover (C) and press until it clicks. 3. Chapter 6: Connections 0 27 Hardware Connections 0 PC Connections 0 Your Tablet can be connected to expose memory slot (A) (Figure 30). 2. AA CA BA Figure 30. Slide memory card (B) into slot (A) until flush. MicroUSB cable is...
...This Tablet supports only removable MicroSD memory cards. 1. Open slot cover (C) to a personal computer (PC) via MicroUSB cable. Memory Card Access Installing a Memory Card Install the memory card by -step instructions on hardware and software features that allow connection to the package. To close, lift cover (C) and press until it clicks. 3. Chapter 6: Connections 0 27 Hardware Connections 0 PC Connections 0 Your Tablet can be connected to expose memory slot (A) (Figure 30). 2. AA CA BA Figure 30. Slide memory card (B) into slot (A) until flush. MicroUSB cable is...

User Manual
Page 28
... press until flush. Open slot cover (C) to release it from the device. ! Insert headphones connector (A) into the headphone jack (B) (Figure 31). 2. To connect headphones to your Tablet, perform the following : 1. CAUTION: Removing the memory card while saving data may cause loss of data and damage to your memory card. From the Home Screen, press the Menu Key-> Settings-> SD card and & internal storage-> Unmount SD card. 1. Accessories Connections 0 Headphones 0 Your Tablet has a headphone jack that...
... press until flush. Open slot cover (C) to release it from the device. ! Insert headphones connector (A) into the headphone jack (B) (Figure 31). 2. To connect headphones to your Tablet, perform the following : 1. CAUTION: Removing the memory card while saving data may cause loss of data and damage to your memory card. From the Home Screen, press the Menu Key-> Settings-> SD card and & internal storage-> Unmount SD card. 1. Accessories Connections 0 Headphones 0 Your Tablet has a headphone jack that...
User Manual
Page 31
... settings to view or modify settings on the Home key -> Applications screen to view all media files in one place Image Update, tap to access all applications. Chapter 7: Applications This chapter provides information on available applications on your tablet. Refer to Figure 12 Here is a list of the applications: Adobe Reader, tap to record sounds. Follow the onscreen instructions Music, tap to Using...
... settings to view or modify settings on the Home key -> Applications screen to view all media files in one place Image Update, tap to access all applications. Chapter 7: Applications This chapter provides information on available applications on your tablet. Refer to Figure 12 Here is a list of the applications: Adobe Reader, tap to record sounds. Follow the onscreen instructions Music, tap to Using...
User Manual
Page 32
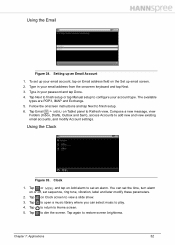
... set up your password and tap Done. 4. Using the Clock 0 Figure 35. Tap on Add alarm to Home screen. 5. Using the Email 0 Figure 34. Clock 1. To set an alarm. Tap to view a slide show. 3. Type in your email account, tap on Email address field on or off, set the time, turn alarm on the Set up an Email Account 1. Tap Next to finish setup or tap Manual setup to play. 4. Tap to restore screen brightness. Tap again to open...
... set up your password and tap Done. 4. Using the Clock 0 Figure 35. Tap on Add alarm to Home screen. 5. Using the Email 0 Figure 34. Clock 1. To set an alarm. Tap to view a slide show. 3. Type in your email account, tap on Email address field on or off, set the time, turn alarm on the Set up an Email Account 1. Tap Next to finish setup or tap Manual setup to play. 4. Tap to restore screen brightness. Tap again to open...
User Manual
Page 33
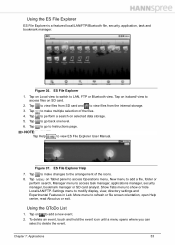
... level. 6. Tap to add a new event. 2. Settings menu to make changes to view files from SD card and to the arrangement of the files. 4. Tap on selected data storage. 5. Figure 37. Show Tabs menu to refresh or file screen orientation, open Help center, read About us or exit. Chapter 7: Applications 33 Using the QToDo List 0 1. Figure 36. Tap to go to access task manager, applications manager, security manager, bookmark manager...
... level. 6. Tap to add a new event. 2. Settings menu to make changes to view files from SD card and to the arrangement of the files. 4. Tap on selected data storage. 5. Figure 37. Show Tabs menu to refresh or file screen orientation, open Help center, read About us or exit. Chapter 7: Applications 33 Using the QToDo List 0 1. Figure 36. Tap to go to access task manager, applications manager, security manager, bookmark manager...
User Manual
Page 36
... Tablet shuts down. From the Home Screen, press the Menu Key-> Settings-> SD card and & internal storage-> Unmount SD card. 2. Chapter 9: Frequently Asked Questions 36 Chapter 9: Frequently Asked Questions This chapter provides a list of your audio files are supported on HANNSpad. Make sure the volume is switched On. Q: What can 't I do if the system halts? Refer to Features of the Tablet. Q: Why can I access the Internet from the device...
... Tablet shuts down. From the Home Screen, press the Menu Key-> Settings-> SD card and & internal storage-> Unmount SD card. 2. Chapter 9: Frequently Asked Questions 36 Chapter 9: Frequently Asked Questions This chapter provides a list of your audio files are supported on HANNSpad. Make sure the volume is switched On. Q: What can 't I do if the system halts? Refer to Features of the Tablet. Q: Why can I access the Internet from the device...


