
User Manual
Page 2
...15 of the following two conditions﹕ (1) this device may not cause harmful interference﹔ and (2) this manual thoroughly. User's Manual Before operating the monitor, please read this device must accept any interference received, including interference that may cause undesired operations. This... manual should be accessible. 2 The device complies with the limits for future reference. CANADA This Class B digital apparatus meets...
...15 of the following two conditions﹕ (1) this device may not cause harmful interference﹔ and (2) this manual thoroughly. User's Manual Before operating the monitor, please read this device must accept any interference received, including interference that may cause undesired operations. This... manual should be accessible. 2 The device complies with the limits for future reference. CANADA This Class B digital apparatus meets...

User Manual
Page 3
Model: HZ251 & HZ281 User's Manual Congratulations! Products certified to TCO´06 Media Displays are specifically designed for high quality reproduction of certified products can be certified to TCO'06 ...
Model: HZ251 & HZ281 User's Manual Congratulations! Products certified to TCO´06 Media Displays are specifically designed for high quality reproduction of certified products can be certified to TCO'06 ...

User Manual
Page 4
..., which can be re-decomposed and re-integrated into brand-new marvels. On the contrary, other material can be classified to recycle this product. User's Manual RECYCLING INFORMATION We, the Hanns.G care very much about our environment protection strategy and firmly believe that it helps us have healthier earth via appropriate...
..., which can be re-decomposed and re-integrated into brand-new marvels. On the contrary, other material can be classified to recycle this product. User's Manual RECYCLING INFORMATION We, the Hanns.G care very much about our environment protection strategy and firmly believe that it helps us have healthier earth via appropriate...

User Manual
Page 5
TABLE OF CONTENTS User's Manual SAFETY NOTICE 6 PRECAUTIONS 6 SPECIAL NOTES ON LCD MONITORS 7 BEFORE YOU OPERATE THE MONITOR 8 FEATURES...8 CHECKING THE CONTENTS OF THE PACKAGE 8 INSTALLATION INSTRUCTIONS 9 POWER...9 MAKING CONNECTIONS 10 ADJUSTING THE VIEWING ANGLE 11 OPERATING INSTRUCTIONS 12 GENERAL INSTRUCTIONS 12 FRONT PANEL CONTROL 13 HOW TO ADJUST A SETTINGS 15 PLUG AND PLAY 18 TECHNICAL SUPPORT (FAQ 19 Q & A FOR GENERAL PROBLEMS 19 ERROR MESSAGE & POSSIBLE SOLUTIONS 21 APPENDIX ...23 SPECIFICATIONS 23 5
TABLE OF CONTENTS User's Manual SAFETY NOTICE 6 PRECAUTIONS 6 SPECIAL NOTES ON LCD MONITORS 7 BEFORE YOU OPERATE THE MONITOR 8 FEATURES...8 CHECKING THE CONTENTS OF THE PACKAGE 8 INSTALLATION INSTRUCTIONS 9 POWER...9 MAKING CONNECTIONS 10 ADJUSTING THE VIEWING ANGLE 11 OPERATING INSTRUCTIONS 12 GENERAL INSTRUCTIONS 12 FRONT PANEL CONTROL 13 HOW TO ADJUST A SETTINGS 15 PLUG AND PLAY 18 TECHNICAL SUPPORT (FAQ 19 Q & A FOR GENERAL PROBLEMS 19 ERROR MESSAGE & POSSIBLE SOLUTIONS 21 APPENDIX ...23 SPECIFICATIONS 23 5
User Manual
Page 6
... power strips and extension cords. Do not place the monitor near water, e.g. If you mount the monitor on an unstable cart, stand, or table. User's Manual SAFETY NOTICE 1. PRECAUTIONS • Do not use a mounting kit approved by the manufacturer and follow the kit instructions. • Slots and openings in fire or...
... power strips and extension cords. Do not place the monitor near water, e.g. If you mount the monitor on an unstable cart, stand, or table. User's Manual SAFETY NOTICE 1. PRECAUTIONS • Do not use a mounting kit approved by the manufacturer and follow the kit instructions. • Slots and openings in fire or...

User Manual
Page 7
User's Manual SPECIAL NOTES ON LCD MONITORS The following symptoms are normal with LCD monitor and do not indicate a problem. • Due to the nature of 99....
User's Manual SPECIAL NOTES ON LCD MONITORS The following symptoms are normal with LCD monitor and do not indicate a problem. • Due to the nature of 99....
User Manual
Page 8
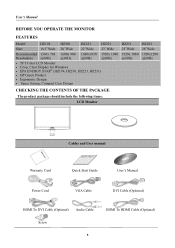
User's Manual BEFORE YOU OPERATE THE MONITOR FEATURES Model: HZ194 HZ201 HZ221 HZ231 Size: 18.5"Wide 20"Wide 22"Wide 23"Wide Recommended 1366x 768 1600x 900 ... HZ281 28"Wide 1920x1200 @60Hz CHECKING THE CONTENTS OF THE PACKAGE The product package should include the following items: LCD Monitor Cables and User manual Warranty Card Quick Start Guide User's Manual Power Cord VGA Cable DVI Cable (Optional) HDMI To DVI Cable (Optional) Audio Cable Screw 8 HDMI To HDMI Cable (Optional)
User's Manual BEFORE YOU OPERATE THE MONITOR FEATURES Model: HZ194 HZ201 HZ221 HZ231 Size: 18.5"Wide 20"Wide 22"Wide 23"Wide Recommended 1366x 768 1600x 900 ... HZ281 28"Wide 1920x1200 @60Hz CHECKING THE CONTENTS OF THE PACKAGE The product package should include the following items: LCD Monitor Cables and User manual Warranty Card Quick Start Guide User's Manual Power Cord VGA Cable DVI Cable (Optional) HDMI To DVI Cable (Optional) Audio Cable Screw 8 HDMI To HDMI Cable (Optional)
User Manual
Page 9
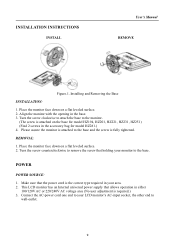
.... 3. POWER POWER SOURCE: 1. This LCD monitor has an Internal universal power supply that the power cord is attached to wall-outlet. 9 INSTALLATION INSTRUCTIONS INSTALL User's Manual REMOVE Figure.1. Installing and Removing the Base INSTALLATION: 1.
.... 3. POWER POWER SOURCE: 1. This LCD monitor has an Internal universal power supply that the power cord is attached to wall-outlet. 9 INSTALLATION INSTRUCTIONS INSTALL User's Manual REMOVE Figure.1. Installing and Removing the Base INSTALLATION: 1.

User Manual
Page 10
... to the back of the AC power cord to the LCD monitor's AC input socket, and the other end to the computer's DVI-D port. 3. User's Manual MAKING CONNECTIONS CONNECTING TO A PC Turn off your monitor and computer. HZ231D; Connecting to Wall outlet. 6. HZ231H; Connect the audio cable between the monitor's audio...
... to the back of the AC power cord to the LCD monitor's AC input socket, and the other end to the computer's DVI-D port. 3. User's Manual MAKING CONNECTIONS CONNECTING TO A PC Turn off your monitor and computer. HZ231D; Connecting to Wall outlet. 6. HZ231H; Connect the audio cable between the monitor's audio...
User Manual
Page 11
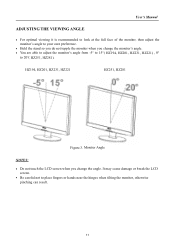
... the LCD screen. • Be careful not to place fingers or hands near the hinges when tilting the monitor, otherwise pinching can result. 11 User's Manual ADJUSTING THE VIEWING ANGLE • For optimal viewing it is recommended to look at the full face of the monitor, then adjust the monitor's angle...
... the LCD screen. • Be careful not to place fingers or hands near the hinges when tilting the monitor, otherwise pinching can result. 11 User's Manual ADJUSTING THE VIEWING ANGLE • For optimal viewing it is recommended to look at the full face of the monitor, then adjust the monitor's angle...

User Manual
Page 12
.../ Enter 《Analog Input Models》 Input source change/ Enter 《Digital Input Models》 Power Button Figure.4. The power indicator will light up. User's Manual OPERATING INSTRUCTIONS GENERAL INSTRUCTIONS Press the power button to turn the monitor on or off. By changing these settings, the picture can be adjusted to...
.../ Enter 《Analog Input Models》 Input source change/ Enter 《Digital Input Models》 Power Button Figure.4. The power indicator will light up. User's Manual OPERATING INSTRUCTIONS GENERAL INSTRUCTIONS Press the power button to turn the monitor on or off. By changing these settings, the picture can be adjusted to...
User Manual
Page 13
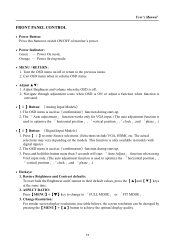
... below), the screen resolution can be changed by pressing the【MENU button to switch ON/OFF of monitor's power. • Power Indicator: Green - User's Manual FRONT PANEL CONTROL • Power Button: Press this button more than 3 seconds will start -up . 3. Navigate through adjustment icons when OSD is ON or adjust...
... below), the screen resolution can be changed by pressing the【MENU button to switch ON/OFF of monitor's power. • Power Indicator: Green - User's Manual FRONT PANEL CONTROL • Power Button: Press this button more than 3 seconds will start -up . 3. Navigate through adjustment icons when OSD is ON or adjust...

User Manual
Page 14
User's Manual Resolution 640x400@70Hz ↔ 720x400@70Hz 640x400@85Hz ↔ 720x400@85Hz 640x480@60Hz ↔ 720x480@60Hz 1024x768@70Hz ↔ 1280x768@70Hz 1280x768@60Hz ↔1360x768@...
User's Manual Resolution 640x400@70Hz ↔ 720x400@70Hz 640x400@85Hz ↔ 720x400@85Hz 640x480@60Hz ↔ 720x480@60Hz 1024x768@70Hz ↔ 1280x768@70Hz 1280x768@60Hz ↔1360x768@...

User Manual
Page 15
... the proportion of this function depends upon the selected model] 15 To adjust the red, enter the「R」option and adjust the level. 2. User's Manual HOW TO ADJUST A SETTINGS BRIGHTNESS/ CONTRAST BRIGHTNESS Adjust the brightness value of the image are automatically detected, and the contrast is enhanced to provide a clearer...
... the proportion of this function depends upon the selected model] 15 To adjust the red, enter the「R」option and adjust the level. 2. User's Manual HOW TO ADJUST A SETTINGS BRIGHTNESS/ CONTRAST BRIGHTNESS Adjust the brightness value of the image are automatically detected, and the contrast is enhanced to provide a clearer...
User Manual
Page 16
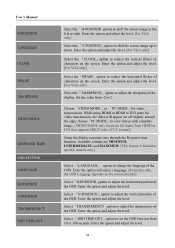
... the transparency of the OSD. choose「PC MODE」to DVI ports for video transmission. Enter the option and adjust the level. 16 User's Manual H-POSITION V-POSITION CLOCK PHASE SHARPNESS VIDEO MODE RESPONSE TIME OSD SETTING LANGUAGE H-POSITION V-POSITION TRANSPARENCY OSD TIME-OUT Select the「H-POSITION」option to...
... the transparency of the OSD. choose「PC MODE」to DVI ports for video transmission. Enter the option and adjust the level. 16 User's Manual H-POSITION V-POSITION CLOCK PHASE SHARPNESS VIDEO MODE RESPONSE TIME OSD SETTING LANGUAGE H-POSITION V-POSITION TRANSPARENCY OSD TIME-OUT Select the「H-POSITION」option to...

User Manual
Page 17
... function depends upon the selected model. This will erase the current settings. OSD COLOR SYSTEM AUDIO INPUT VOLUME MUTE DDC/CI FACTORY RESET INFORMATION User's Manual To choose the color combination of hearing damage exists. While transferring via the HDMI port, it is recommended to select AUDIO INPUT as PC, and...
... function depends upon the selected model. This will erase the current settings. OSD COLOR SYSTEM AUDIO INPUT VOLUME MUTE DDC/CI FACTORY RESET INFORMATION User's Manual To choose the color combination of hearing damage exists. While transferring via the HDMI port, it is recommended to select AUDIO INPUT as PC, and...
User Manual
Page 18
User's Manual PLUG AND PLAY Plug & Play DDC2B Feature This monitor is a bidirectional data channel based on the I²C protocol. THIS MONITOR WILL APPEAR TO BE NON-...
User's Manual PLUG AND PLAY Plug & Play DDC2B Feature This monitor is a bidirectional data channel based on the I²C protocol. THIS MONITOR WILL APPEAR TO BE NON-...

User Manual
Page 19
... the monitor's video cable and make sure none of the primary colors (RED, GREEN, or BLUE) Screen image is ON (orange) but no picture. User's Manual TECHNICAL SUPPORT (FAQ) Q & A FOR GENERAL PROBLEMS PROBLEM & QUESTION Power LED is not on the keyboard while observing the CAPS LOCK LED.
... the monitor's video cable and make sure none of the primary colors (RED, GREEN, or BLUE) Screen image is ON (orange) but no picture. User's Manual TECHNICAL SUPPORT (FAQ) Q & A FOR GENERAL PROBLEMS PROBLEM & QUESTION Power LED is not on the keyboard while observing the CAPS LOCK LED.

User Manual
Page 20
User's Manual INPUT as a PC option, and make sure PC audio output cable is connected to monitor's LINE IN port(or AUDIO IN port). [For HDMI Input only] 20
User's Manual INPUT as a PC option, and make sure PC audio output cable is connected to monitor's LINE IN port(or AUDIO IN port). [For HDMI Input only] 20
User Manual
Page 21
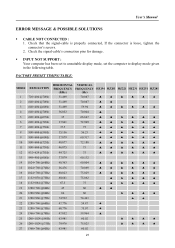
.... ƒ INPUT NOT SUPPORT : Your computer has been set to unsuitable display mode, set the computer to display mode given in the following table. User's Manual ERROR MESSAGE & POSSIBLE SOLUTIONS ƒ CABLE NOT CONNECTED : 1.
.... ƒ INPUT NOT SUPPORT : Your computer has been set to unsuitable display mode, set the computer to display mode given in the following table. User's Manual ERROR MESSAGE & POSSIBLE SOLUTIONS ƒ CABLE NOT CONNECTED : 1.