
User Manual
Page 2
... can be determined by turning the equipment off and on, the user is subject to correct the interference by one or more of the FCC Rules. User's Manual OSD[4.39] Before operating the monitor, please read this device must accept any interference received, including interference... that may cause undesired operations. These limits are designed to radio communications. This manual should be accessible. 2 Increase the ...
... can be determined by turning the equipment off and on, the user is subject to correct the interference by one or more of the FCC Rules. User's Manual OSD[4.39] Before operating the monitor, please read this device must accept any interference received, including interference... that may cause undesired operations. These limits are designed to radio communications. This manual should be accessible. 2 Increase the ...
User Manual
Page 4
User's Manual TABLE OF CONTENTS SAFETY NOTICE 5 PRECAUTIONS 5 SPECIAL NOTES ON LCD MONITORS 6 BEFORE YOU OPERATE THE MONITOR 7 FEATURES...7 CHECKING THE CONTENTS OF THE PACKAGE 7 INSTALLATION INSTRUCTIONS 8 POWER...8 SETTING THE MONITOR ON THE WALL 9 MAKING CONNECTIONS 10 DJUSTING THE VIEWING ANGLE 11 OPERATING INSTRUCTIONS 13 GENERAL INSTRUCTIONS 13 FRONT PANEL CONTROL 14 HOW TO ADJUST A SETTINGS 16 PLUG AND PLAY 19 TECHNICAL SUPPORT (FAQ 20 Q & A FOR GENERAL PROBLEMS 20 ERROR MESSAGE & POSSIBLE SOLUTIONS 22 APPENDIX ...24 SPECIFICATIONS 24 4
User's Manual TABLE OF CONTENTS SAFETY NOTICE 5 PRECAUTIONS 5 SPECIAL NOTES ON LCD MONITORS 6 BEFORE YOU OPERATE THE MONITOR 7 FEATURES...7 CHECKING THE CONTENTS OF THE PACKAGE 7 INSTALLATION INSTRUCTIONS 8 POWER...8 SETTING THE MONITOR ON THE WALL 9 MAKING CONNECTIONS 10 DJUSTING THE VIEWING ANGLE 11 OPERATING INSTRUCTIONS 13 GENERAL INSTRUCTIONS 13 FRONT PANEL CONTROL 14 HOW TO ADJUST A SETTINGS 16 PLUG AND PLAY 19 TECHNICAL SUPPORT (FAQ 20 Q & A FOR GENERAL PROBLEMS 20 ERROR MESSAGE & POSSIBLE SOLUTIONS 22 APPENDIX ...24 SPECIFICATIONS 24 4

User Manual
Page 5
...it can expose you are not sure of the type of the user to the appliance. Do not place the monitor in order to power surges. • Do not overload power strips and extension cords. User's Manual SAFETY NOTICE 1. The changes or modifications not expressly approved by the... emission limits. 3. The manufacturer is not responsible for compliance could short circuit parts causing a fire or electric shock. Only use the monitor near the equipment and shall be used in a bookcase or cabinet unless proper ventilation is the responsibilities of power supplied to qualified service ...
...it can expose you are not sure of the type of the user to the appliance. Do not place the monitor in order to power surges. • Do not overload power strips and extension cords. User's Manual SAFETY NOTICE 1. The changes or modifications not expressly approved by the... emission limits. 3. The manufacturer is not responsible for compliance could short circuit parts causing a fire or electric shock. Only use the monitor near the equipment and shall be used in a bookcase or cabinet unless proper ventilation is the responsibilities of power supplied to qualified service ...
User Manual
Page 6
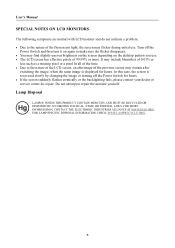
... the screen is displayed for repair. FOR MORE INFORMATION, CONTACT THE ELECTRONIC INDUSTRIES ALLIANCE AT WWW.EIAE.ORG. User's Manual SPECIAL NOTES ON LCD MONITORS The following symptoms are normal with LCD monitor and do not indicate a problem. • Due to the nature of 99.99% or more. Do ... screen has effective pixels of the fluorescent light, the screen may find slightly uneven brightness on the screen depending on again to repair the monitor yourself. FOR LAMP SPECIFIC DISPOSAL INFORMATION CHECK WWW.LAMPRECYCLE.ORG. 6 It may include blemishes of 0.01% or less such as a missing...
... the screen is displayed for repair. FOR MORE INFORMATION, CONTACT THE ELECTRONIC INDUSTRIES ALLIANCE AT WWW.EIAE.ORG. User's Manual SPECIAL NOTES ON LCD MONITORS The following symptoms are normal with LCD monitor and do not indicate a problem. • Due to the nature of 99.99% or more. Do ... screen has effective pixels of the fluorescent light, the screen may find slightly uneven brightness on the screen depending on again to repair the monitor yourself. FOR LAMP SPECIFIC DISPOSAL INFORMATION CHECK WWW.LAMPRECYCLE.ORG. 6 It may include blemishes of 0.01% or less such as a missing...
User Manual
Page 7
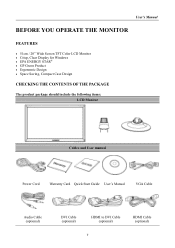
User's Manual BEFORE YOU OPERATE THE MONITOR FEATURES • 51cm / 20" Wide Screen TFT Color LCD Monitor • Crisp, Clear Display for Windows • EPA ENERGY STAR® • GP Green Product • Ergonomic Design • Space Saving, Compact Case Design CHECKING THE CONTENTS OF THE PACKAGE The product package should include the following items: LCD Monitor Cables and User manual Power Cord Warranty Card Quick Start Guide User's Manual VGA Cable Audio Cable (optional) DVI Cable (optional) HDMI to DVI Cable (optional) 7 HDMI Cable (optional)
User's Manual BEFORE YOU OPERATE THE MONITOR FEATURES • 51cm / 20" Wide Screen TFT Color LCD Monitor • Crisp, Clear Display for Windows • EPA ENERGY STAR® • GP Green Product • Ergonomic Design • Space Saving, Compact Case Design CHECKING THE CONTENTS OF THE PACKAGE The product package should include the following items: LCD Monitor Cables and User manual Power Cord Warranty Card Quick Start Guide User's Manual VGA Cable Audio Cable (optional) DVI Cable (optional) HDMI to DVI Cable (optional) 7 HDMI Cable (optional)
User Manual
Page 8
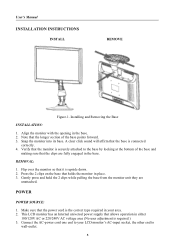
... an Internal universal power supply that allows operation in the base. 2. Align the monitor with the opening in either 100/120V AC or 220/240V AC voltage area (No user adjustment is required.) 3. Press the 2 clips on the base that the power cord is securely attached .... 3. Flip over the monitor so that the base is upside down. 2. Gently press and hold the 2 clips while pulling the base from the monitor unit they are fully engaged in place. 3. A clear click sound will affirm that it is connected correctly. 4. User's Manual INSTALLATION INSTRUCTIONS INSTALL REMOVE Figure...
... an Internal universal power supply that allows operation in the base. 2. Align the monitor with the opening in either 100/120V AC or 220/240V AC voltage area (No user adjustment is required.) 3. Press the 2 clips on the base that the power cord is securely attached .... 3. Flip over the monitor so that the base is upside down. 2. Gently press and hold the 2 clips while pulling the base from the monitor unit they are fully engaged in place. 3. A clear click sound will affirm that it is connected correctly. 4. User's Manual INSTALLATION INSTRUCTIONS INSTALL REMOVE Figure...
User Manual
Page 9
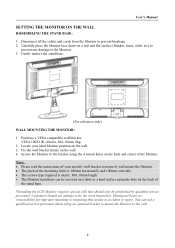
Purchase a VESA compatible wall bracket: VESA 100X100, 4 holes, M4, 10mm, 8kg. 2. Hannspree bears no responsibility for improper mounting or mounting that should not attempt to do the work themselves. You can be performed by qualified service personnel....back and center of the mounting holes is 100mm horizontally and 100mm vertically. • The screws type required is metric: M4, 10mm length. • The Monitor stand base can ask a qualified service personnel about using the 4 mount holes on the wall. 4. User's Manual SETTING THE MONITOR ON THE WALL DISSEMBLING THE STAND BASE: 1.
Purchase a VESA compatible wall bracket: VESA 100X100, 4 holes, M4, 10mm, 8kg. 2. Hannspree bears no responsibility for improper mounting or mounting that should not attempt to do the work themselves. You can be performed by qualified service personnel....back and center of the mounting holes is 100mm horizontally and 100mm vertically. • The screws type required is metric: M4, 10mm length. • The Monitor stand base can ask a qualified service personnel about using the 4 mount holes on the wall. 4. User's Manual SETTING THE MONITOR ON THE WALL DISSEMBLING THE STAND BASE: 1.

User Manual
Page 10
... Connect one end of the monitor and connect the other end to the computer's VGA port. 2. Connect the audio cable between the monitor's audio input and the PC's audio output (green port). 5. Turn on your computer before performing the procedure below. 1. Connecting to the computer's HDMI port. 4. Figure.2. User's Manual MAKING CONNECTIONS CONNECTING TO...
... Connect one end of the monitor and connect the other end to the computer's VGA port. 2. Connect the audio cable between the monitor's audio input and the PC's audio output (green port). 5. Turn on your computer before performing the procedure below. 1. Connecting to the computer's HDMI port. 4. Figure.2. User's Manual MAKING CONNECTIONS CONNECTING TO...
User Manual
Page 11
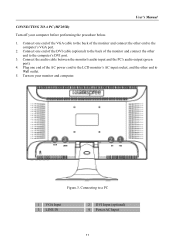
Connect one end of the DVI cable (optional) to the back of the monitor and connect the other end to a PC 1 VGA Input 3 LINE IN 2 DVI Input (optional) 4 Power AC Input 11 Turn on your computer before performing the ... back of the AC power cord to the LCD monitor's AC input socket, and the other end to Wall outlet. 5. Figure.3. Connect one end of the monitor and connect the other end to the computer's VGA port. 2. User's Manual CONNECTING TO A PC (HF205D) Turn off your monitor and computer. Connect the audio cable between the...
Connect one end of the DVI cable (optional) to the back of the monitor and connect the other end to a PC 1 VGA Input 3 LINE IN 2 DVI Input (optional) 4 Power AC Input 11 Turn on your computer before performing the ... back of the AC power cord to the LCD monitor's AC input socket, and the other end to Wall outlet. 5. Figure.3. Connect one end of the monitor and connect the other end to the computer's VGA port. 2. User's Manual CONNECTING TO A PC (HF205D) Turn off your monitor and computer. Connect the audio cable between the...
User Manual
Page 12
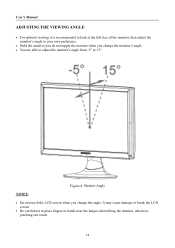
...may cause damage or break the LCD screen. • Be careful not to place fingers or hands near the hinges when tilting the monitor, otherwise pinching can result. 12 User's Manual ADJUSTING THE VIEWING ANGLE • For optimal viewing it is recommended to look at the full face of the... monitor, then adjust the monitor's angle to your own preference. • Hold the stand so you do not topple the monitor when you change the monitor's angle. •...
...may cause damage or break the LCD screen. • Be careful not to place fingers or hands near the hinges when tilting the monitor, otherwise pinching can result. 12 User's Manual ADJUSTING THE VIEWING ANGLE • For optimal viewing it is recommended to look at the full face of the... monitor, then adjust the monitor's angle to your own preference. • Hold the stand so you do not topple the monitor when you change the monitor's angle. •...
User Manual
Page 13
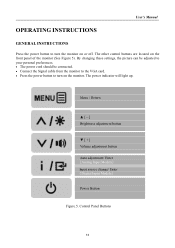
User's Manual OPERATING INSTRUCTIONS GENERAL INSTRUCTIONS Press the power button to turn the monitor on or off. Menu / Return ▲ [-] Brightness adjustment button ▼ [+] Volume adjustment button Auto adjustment/ Enter 《Analog Input Models&#...12299; Input source change/ Enter 《Digital Input Models》 Power Button Figure.5. The other control buttons are located on the monitor. By changing these settings, the picture can be adjusted to your personal preferences. • The power cord should be connected. • Connect the...
User's Manual OPERATING INSTRUCTIONS GENERAL INSTRUCTIONS Press the power button to turn the monitor on or off. Menu / Return ▲ [-] Brightness adjustment button ▼ [+] Volume adjustment button Auto adjustment/ Enter 《Analog Input Models&#...12299; Input source change/ Enter 《Digital Input Models》 Power Button Figure.5. The other control buttons are located on the monitor. By changing these settings, the picture can be adjusted to your personal preferences. • The power cord should be connected. • Connect the...
User Manual
Page 14
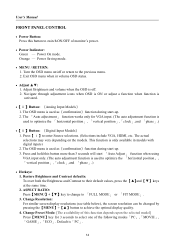
User's Manual FRONT PANEL CONTROL • Power Button: Press this button to switch ON/OFF of the following modes「PC」,「MOVIE」, 「GAME&#... more than 3 seconds will start 「Auto Adjust」 function when using VGA input only. (The auto adjustment function is used to select one of monitor's power. • Power Indicator: Green - Default is activated. •【 i 】Button: 《Analog Input Models》 1. The 「Auto adjustment」 function works only...
User's Manual FRONT PANEL CONTROL • Power Button: Press this button to switch ON/OFF of the following modes「PC」,「MOVIE」, 「GAME&#... more than 3 seconds will start 「Auto Adjust」 function when using VGA input only. (The auto adjustment function is used to select one of monitor's power. • Power Indicator: Green - Default is activated. •【 i 】Button: 《Analog Input Models》 1. The 「Auto adjustment」 function works only...
User Manual
Page 15
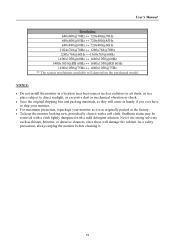
... soft cloth. Never use strong solvents such as it was originally packed at the factory. • To keep the monitor looking new, periodically clean it . 15 User's Manual Resolution 640x400@70Hz ↔ 720x400@70Hz 640x400@85Hz ↔ 720x400@85Hz 640x480@60Hz ↔ 720x480@60Hz 1024x768@70Hz ...75Hz ** The screen resolutions available will damage the cabinet. As a safety precaution, always unplug the monitor before cleaning it with a mild detergent solution. NOTES: • Do not install the monitor in a location near heat sources such as radiators or air dusts, or in a place subject ...
... soft cloth. Never use strong solvents such as it was originally packed at the factory. • To keep the monitor looking new, periodically clean it . 15 User's Manual Resolution 640x400@70Hz ↔ 720x400@70Hz 640x400@85Hz ↔ 720x400@85Hz 640x480@60Hz ↔ 720x480@60Hz 1024x768@70Hz ...75Hz ** The screen resolutions available will damage the cabinet. As a safety precaution, always unplug the monitor before cleaning it with a mild detergent solution. NOTES: • Do not install the monitor in a location near heat sources such as radiators or air dusts, or in a place subject ...
User Manual
Page 18
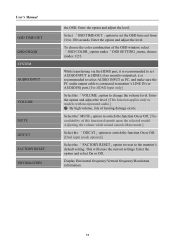
... level. This will erase the current settings. if no sound is outputted, it is connected to monitor's LINE IN (or AUDIO IN) port. [For HDMI Input only] Select the 「VOLUME」option to HDMI; User's Manual OSD TIME-OUT OSD COLOR SYSTEM AUDIO INPUT VOLUME MUTE DDC/CI FACTORY RESET INFORMATION the...;OSD COLOR」option under 「OSD SETTING」menu, choose modes 1/2/3. Enter the option and adjust the level. [This function applies only to the monitor's default setting.
... level. This will erase the current settings. if no sound is outputted, it is connected to monitor's LINE IN (or AUDIO IN) port. [For HDMI Input only] Select the 「VOLUME」option to HDMI; User's Manual OSD TIME-OUT OSD COLOR SYSTEM AUDIO INPUT VOLUME MUTE DDC/CI FACTORY RESET INFORMATION the...;OSD COLOR」option under 「OSD SETTING」menu, choose modes 1/2/3. Enter the option and adjust the level. [This function applies only to the monitor's default setting.
User Manual
Page 19
... the level of DDC used, communicate additional information about its display capabilities. The appearance is similar to the VESA DDC STANDARD. User's Manual PLUG AND PLAY Plug & Play DDC2B Feature This monitor is equipped with VESA DDC2B capabilities according to a "Screen Saver" feature except the display is completely off. When there is no...
... the level of DDC used, communicate additional information about its display capabilities. The appearance is similar to the VESA DDC STANDARD. User's Manual PLUG AND PLAY Plug & Play DDC2B Feature This monitor is equipped with VESA DDC2B capabilities according to a "Screen Saver" feature except the display is completely off. When there is no...
User Manual
Page 20
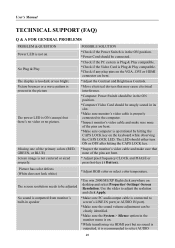
...make sure none of the pins are bent. * Adjust pixel frequency CLOCK and PHASE or press hot-key ( i Button). No sound is outputted from monitor's built-in speaker *Make sure PC audio output cable is connected to screen's LINE IN port (or AUDIO IN port). *Make sure the sound .... *Make sure computer is too dark or too bright. Picture has color defects (White does not look white) *Adjust RGB color or select color temperature. User's Manual TECHNICAL SUPPORT (FAQ) Q & A FOR GENERAL PROBLEMS PROBLEM & QUESTION Power LED is not on No Plug & Play The display is operational by hitting the ...
...make sure none of the pins are bent. * Adjust pixel frequency CLOCK and PHASE or press hot-key ( i Button). No sound is outputted from monitor's built-in speaker *Make sure PC audio output cable is connected to screen's LINE IN port (or AUDIO IN port). *Make sure the sound .... *Make sure computer is too dark or too bright. Picture has color defects (White does not look white) *Adjust RGB color or select color temperature. User's Manual TECHNICAL SUPPORT (FAQ) Q & A FOR GENERAL PROBLEMS PROBLEM & QUESTION Power LED is not on No Plug & Play The display is operational by hitting the ...
User Manual
Page 21
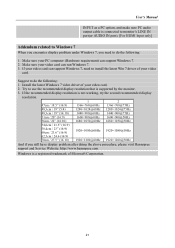
... the monitor. 3. User's Manual INPUT as a PC option, and make sure PC audio output cable is connected to monitor's LINE IN port(or AUDIO IN port). [For HDMI Input only] Addendum related to Windows 7 When you encounter display problem under Windows 7, you still have display problem after doing the above procedure, please visit Hannspree support...
... the monitor. 3. User's Manual INPUT as a PC option, and make sure PC audio output cable is connected to monitor's LINE IN port(or AUDIO IN port). [For HDMI Input only] Addendum related to Windows 7 When you encounter display problem under Windows 7, you still have display problem after doing the above procedure, please visit Hannspree support...

User Manual
Page 23
User's Manual 28 1280×800 @60Hz 29 1280×800 @60Hz 30 1280×800 @75Hz 31 1280×960 @60Hz 32 1280×1024 @60Hz ... @60Hz TV 9 1920x1080p @50Hz TV 10 1920x1080p @60Hz TV 11 1920x1080p @60Hz TV 12 1920x1080p @60Hz TV 13 640x480p@60Hz TV ** We ensure that the monitor can be lighted under interlace signal mode, but we can not guarantee the image quality. 23
User's Manual 28 1280×800 @60Hz 29 1280×800 @60Hz 30 1280×800 @75Hz 31 1280×960 @60Hz 32 1280×1024 @60Hz ... @60Hz TV 9 1920x1080p @50Hz TV 10 1920x1080p @60Hz TV 11 1920x1080p @60Hz TV 12 1920x1080p @60Hz TV 13 640x480p@60Hz TV ** We ensure that the monitor can be lighted under interlace signal mode, but we can not guarantee the image quality. 23


