
User Manual
Page 1
HF205 LCD Monitor
HF205 LCD Monitor
User Manual
Page 2
... near the equipment and shall be retained for future reference. The device complies with the limits for help. User's Manual OSD[4.39] Before operating the monitor, please read this equipment does cause harmful interference to Part 15 of the FCC Rules. If this manual thoroughly. These limits are designed to Low...
... near the equipment and shall be retained for future reference. The device complies with the limits for help. User's Manual OSD[4.39] Before operating the monitor, please read this equipment does cause harmful interference to Part 15 of the FCC Rules. If this manual thoroughly. These limits are designed to Low...
User Manual
Page 4
User's Manual TABLE OF CONTENTS SAFETY NOTICE 5 PRECAUTIONS 5 SPECIAL NOTES ON LCD MONITORS 6 BEFORE YOU OPERATE THE MONITOR 7 FEATURES...7 CHECKING THE CONTENTS OF THE PACKAGE 7 INSTALLATION INSTRUCTIONS 8 POWER...8 SETTING THE MONITOR ON THE WALL 9 MAKING CONNECTIONS 10 DJUSTING THE VIEWING ANGLE 11 OPERATING INSTRUCTIONS 13 GENERAL INSTRUCTIONS 13 FRONT PANEL CONTROL 14 HOW TO ADJUST A SETTINGS 16 PLUG AND PLAY 19 TECHNICAL SUPPORT (FAQ 20 Q & A FOR GENERAL PROBLEMS 20 ERROR MESSAGE & POSSIBLE SOLUTIONS 22 APPENDIX ...24 SPECIFICATIONS 24 4
User's Manual TABLE OF CONTENTS SAFETY NOTICE 5 PRECAUTIONS 5 SPECIAL NOTES ON LCD MONITORS 6 BEFORE YOU OPERATE THE MONITOR 7 FEATURES...7 CHECKING THE CONTENTS OF THE PACKAGE 7 INSTALLATION INSTRUCTIONS 8 POWER...8 SETTING THE MONITOR ON THE WALL 9 MAKING CONNECTIONS 10 DJUSTING THE VIEWING ANGLE 11 OPERATING INSTRUCTIONS 13 GENERAL INSTRUCTIONS 13 FRONT PANEL CONTROL 14 HOW TO ADJUST A SETTINGS 16 PLUG AND PLAY 19 TECHNICAL SUPPORT (FAQ 20 Q & A FOR GENERAL PROBLEMS 20 ERROR MESSAGE & POSSIBLE SOLUTIONS 22 APPENDIX ...24 SPECIFICATIONS 24 4

User Manual
Page 5
... proper ventilation is the responsibilities of the user to dangerous voltages and other hazards. It could void the user's authority to comply with the monitor. The manufacturer is not responsible for ventilation. Dangerously high voltages are not blocked or covered. near water, e.g. If you are provided for ...any object into the slot on an unstable cart, stand, or table. Do not place the monitor in fire or electric shock. • Never push any radio or TV interference caused by the manufacturer or sold with the emission limits. 3. ...
... proper ventilation is the responsibilities of the user to dangerous voltages and other hazards. It could void the user's authority to comply with the monitor. The manufacturer is not responsible for ventilation. Dangerously high voltages are not blocked or covered. near water, e.g. If you are provided for ...any object into the slot on an unstable cart, stand, or table. Do not place the monitor in fire or electric shock. • Never push any radio or TV interference caused by the manufacturer or sold with the emission limits. 3. ...
User Manual
Page 6
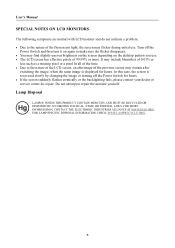
User's Manual SPECIAL NOTES ON LCD MONITORS The following symptoms are normal with LCD monitor and do not indicate a problem. • Due to the nature of the previous screen may remain after switching the image, when the same image is ....ORG. 6 It may include blemishes of 0.01% or less such as a missing pixel or a pixel lit all of the time. • Due to repair the monitor yourself. In this case, the screen is displayed for repair. Turn off the Power Switch for hours. • If the screen suddenly flashes erratically or...
User's Manual SPECIAL NOTES ON LCD MONITORS The following symptoms are normal with LCD monitor and do not indicate a problem. • Due to the nature of the previous screen may remain after switching the image, when the same image is ....ORG. 6 It may include blemishes of 0.01% or less such as a missing pixel or a pixel lit all of the time. • Due to repair the monitor yourself. In this case, the screen is displayed for repair. Turn off the Power Switch for hours. • If the screen suddenly flashes erratically or...
User Manual
Page 7
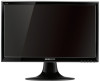
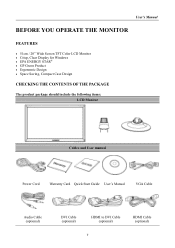
User's Manual BEFORE YOU OPERATE THE MONITOR FEATURES • 51cm / 20" Wide Screen TFT Color LCD Monitor • Crisp, Clear Display for Windows • EPA ENERGY STAR® • GP Green Product • Ergonomic Design • Space Saving, Compact Case Design CHECKING THE CONTENTS OF THE PACKAGE The product package should include the following items: LCD Monitor Cables and User manual Power Cord Warranty Card Quick Start Guide User's Manual VGA Cable Audio Cable (optional) DVI Cable (optional) HDMI to DVI Cable (optional) 7 HDMI Cable (optional)
User's Manual BEFORE YOU OPERATE THE MONITOR FEATURES • 51cm / 20" Wide Screen TFT Color LCD Monitor • Crisp, Clear Display for Windows • EPA ENERGY STAR® • GP Green Product • Ergonomic Design • Space Saving, Compact Case Design CHECKING THE CONTENTS OF THE PACKAGE The product package should include the following items: LCD Monitor Cables and User manual Power Cord Warranty Card Quick Start Guide User's Manual VGA Cable Audio Cable (optional) DVI Cable (optional) HDMI to DVI Cable (optional) 7 HDMI Cable (optional)
User Manual
Page 8
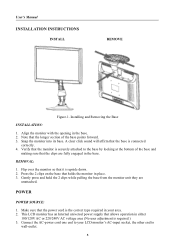
... Installing and Removing the Base INSTALLATION: 1. Verify that the base is upside down. 2. A clear click sound will affirm that the monitor is required.) 3. POWER POWER SOURCE: 1. Align the monitor with the opening in place. 3. Note that the longer section of the base and making sure that holds the... the base. User's Manual INSTALLATION INSTRUCTIONS INSTALL REMOVE Figure.1. Gently press and hold the 2 clips while pulling the base from the monitor unit they are fully engaged in either 100/120V AC or 220/240V AC voltage area (No user adjustment is securely attached to ...
... Installing and Removing the Base INSTALLATION: 1. Verify that the base is upside down. 2. A clear click sound will affirm that the monitor is required.) 3. POWER POWER SOURCE: 1. Align the monitor with the opening in place. 3. Note that the longer section of the base and making sure that holds the... the base. User's Manual INSTALLATION INSTRUCTIONS INSTALL REMOVE Figure.1. Gently press and hold the 2 clips while pulling the base from the monitor unit they are fully engaged in either 100/120V AC or 220/240V AC voltage area (No user adjustment is securely attached to ...
User Manual
Page 9
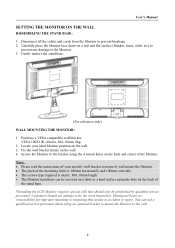
... a qualified service personnel about using the 4 mount holes on the wall. 3. Secure the Monitor to the bracket using an optional bracket to mount the Monitor to do the work themselves. Hannspree bears no responsibility for improper mounting or mounting that should not attempt to the wall. 9 ...Note: • Please read the instructions of your ideal Monitor position on the back and center of...
... a qualified service personnel about using the 4 mount holes on the wall. 3. Secure the Monitor to the bracket using an optional bracket to mount the Monitor to do the work themselves. Hannspree bears no responsibility for improper mounting or mounting that should not attempt to the wall. 9 ...Note: • Please read the instructions of your ideal Monitor position on the back and center of...

User Manual
Page 10
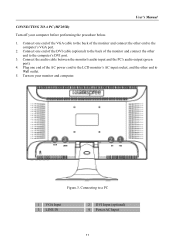
... connect the other end to Wall outlet. 6. Connect one end of the VGA cable to the back of the monitor and connect the other end to the computer's VGA port. 2. Figure.2. Plug one end of the HDMI to DVI cable (optional) to the back of ...the AC power cord to the LCD monitor's AC input socket, and the other end to a PC 1 Earphone 3 VGA Input 5 Power AC Input 2 LINE IN 4 HDMI Input (optional) 10 Connect one end of...
... connect the other end to Wall outlet. 6. Connect one end of the VGA cable to the back of the monitor and connect the other end to the computer's VGA port. 2. Figure.2. Plug one end of the HDMI to DVI cable (optional) to the back of ...the AC power cord to the LCD monitor's AC input socket, and the other end to a PC 1 Earphone 3 VGA Input 5 Power AC Input 2 LINE IN 4 HDMI Input (optional) 10 Connect one end of...
User Manual
Page 11
... computer. Plug one end of the VGA cable to the back of the monitor and connect the other end to the computer's DVI port. 3. Connect one end of the monitor and connect the other end to a PC 1 VGA Input 3 LINE IN 2 DVI Input (optional) 4 Power AC Input 11 Connect the audio cable... between the monitor's audio input and the PC's audio output (green port). 4. Turn on your computer before performing the procedure below. 1. Connect one end of the DVI cable (...
... computer. Plug one end of the VGA cable to the back of the monitor and connect the other end to the computer's DVI port. 3. Connect one end of the monitor and connect the other end to a PC 1 VGA Input 3 LINE IN 2 DVI Input (optional) 4 Power AC Input 11 Connect the audio cable... between the monitor's audio input and the PC's audio output (green port). 4. Turn on your computer before performing the procedure below. 1. Connect one end of the DVI cable (...
User Manual
Page 12
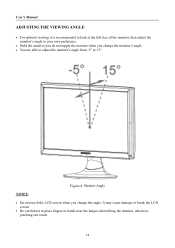
It may cause damage or break the LCD screen. • Be careful not to 15°. Monitor Angle NOTES: • Do not touch the LCD screen when you change the angle. Figure.4. User's Manual ADJUSTING THE VIEWING ANGLE • For optimal viewing ... is recommended to look at the full face of the monitor, then adjust the monitor's angle to your own preference. • Hold the stand so you do not topple the monitor when you change the monitor's angle. • You are able to adjust the monitor's angle from -5° to place fingers or hands near the...
It may cause damage or break the LCD screen. • Be careful not to 15°. Monitor Angle NOTES: • Do not touch the LCD screen when you change the angle. Figure.4. User's Manual ADJUSTING THE VIEWING ANGLE • For optimal viewing ... is recommended to look at the full face of the monitor, then adjust the monitor's angle to your own preference. • Hold the stand so you do not topple the monitor when you change the monitor's angle. • You are able to adjust the monitor's angle from -5° to place fingers or hands near the...
User Manual
Page 13
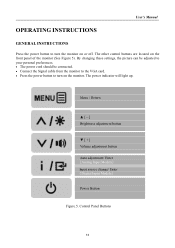
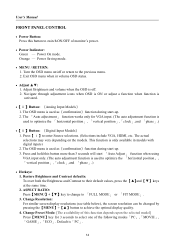
...adjusted to your personal preferences. • The power cord should be connected. • Connect the Signal cable from the monitor to the VGA card. • Press the power button to turn on the monitor. Menu / Return ▲ [-] Brightness adjustment button ▼ [+] Volume adjustment button Auto adjustment/ Enter &#... change/ Enter 《Digital Input Models》 Power Button Figure.5. The other control buttons are located on the front panel of the monitor (See Figure 5). User's Manual OPERATING INSTRUCTIONS GENERAL INSTRUCTIONS Press the power button to turn the...
...adjusted to your personal preferences. • The power cord should be connected. • Connect the Signal cable from the monitor to the VGA card. • Press the power button to turn on the monitor. Menu / Return ▲ [-] Brightness adjustment button ▼ [+] Volume adjustment button Auto adjustment/ Enter &#... change/ Enter 《Digital Input Models》 Power Button Figure.5. The other control buttons are located on the front panel of the monitor (See Figure 5). User's Manual OPERATING INSTRUCTIONS GENERAL INSTRUCTIONS Press the power button to turn the...
User Manual
Page 14
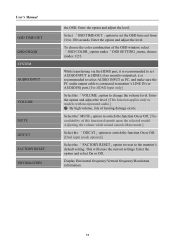
...【 i 】to 「FULL MODE」 or 「FIT MODE」. 3. Adjust Brightness and volume when the OSD is used to select one of monitor's power. • Power Indicator: Green - Power On mode. Orange - Power Saving mode. • MENU / RETURN: 1. Exit OSD menu when in models with digital inputs) 2. The...
...【 i 】to 「FULL MODE」 or 「FIT MODE」. 3. Adjust Brightness and volume when the OSD is used to select one of monitor's power. • Power Indicator: Green - Power On mode. Orange - Power Saving mode. • MENU / RETURN: 1. Exit OSD menu when in models with digital inputs) 2. The...
User Manual
Page 15
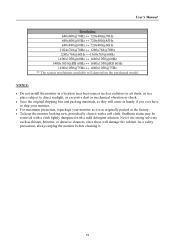
... 1680x1050@RB 60Hz 1400x1050@75Hz ↔ 1680x1050@75Hz ** The screen resolutions available will damage the cabinet. NOTES: • Do not install the monitor in a location near heat sources such as radiators or air dusts, or in a place subject to direct sunlight, or excessive dust or mechanical... Save the original shipping box and packing materials, as they will come in handy if you ever have to ship your monitor. • For maximum protection, repackage your monitor as thinner, benzene, or abrasive cleaners, since these will depend on the purchased model. As a safety precaution, always ...
... 1680x1050@RB 60Hz 1400x1050@75Hz ↔ 1680x1050@75Hz ** The screen resolutions available will damage the cabinet. NOTES: • Do not install the monitor in a location near heat sources such as radiators or air dusts, or in a place subject to direct sunlight, or excessive dust or mechanical... Save the original shipping box and packing materials, as they will come in handy if you ever have to ship your monitor. • For maximum protection, repackage your monitor as thinner, benzene, or abrasive cleaners, since these will depend on the purchased model. As a safety precaution, always ...
User Manual
Page 18
... current settings. Select 「OSD TIME-OUT」option to set AUDIO INPUT to 100 seconds. if no sound is outputted, it is connected to monitor's LINE IN (or AUDIO IN) port. [For HDMI Input only] Select the 「VOLUME」option to models with incorporated audio.] ● By high ... the OSD. Enter the option and adjust the level. Enter the option and select On or Off. Select the「MUTE」option to the monitor's default setting. To choose the color combination of the OSD window, select 「OSD COLOR」option under 「OSD SETTING」menu, choose ...
... current settings. Select 「OSD TIME-OUT」option to set AUDIO INPUT to 100 seconds. if no sound is outputted, it is connected to monitor's LINE IN (or AUDIO IN) port. [For HDMI Input only] Select the 「VOLUME」option to models with incorporated audio.] ● By high ... the OSD. Enter the option and adjust the level. Enter the option and select On or Off. Select the「MUTE」option to the monitor's default setting. To choose the color combination of the OSD window, select 「OSD COLOR」option under 「OSD SETTING」menu, choose ...
User Manual
Page 19
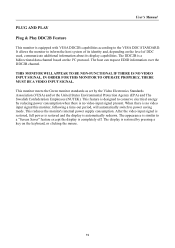
...DDC2B is a bidirectional data channel based on the keyboard, or clicking the mouse. 19 When there is no video input signal this monitor, following a time-out period, will automatically switch to power saving mode. The display is equipped with VESA DDC2B capabilities according to ... power supply consumption. After the video input signal is restored, full power is restored and the display is completely off. This monitor meets the Green monitor standards as set by the Video Electronics Standards Association (VESA) and/or the United States Environmental Protection Agency (EPA) and The ...
...DDC2B is a bidirectional data channel based on the keyboard, or clicking the mouse. 19 When there is no video input signal this monitor, following a time-out period, will automatically switch to power saving mode. The display is equipped with VESA DDC2B capabilities according to ... power supply consumption. After the video input signal is restored, full power is restored and the display is completely off. This monitor meets the Green monitor standards as set by the Video Electronics Standards Association (VESA) and/or the United States Environmental Protection Agency (EPA) and The ...
User Manual
Page 20
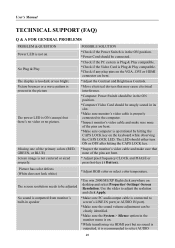
... System > Silence option in the ON position. *Computer Video Card should either turn ON or OFF after hitting the CAPS LOCK key. *Inspect the monitor's video cable and make sure none of the pins are bent. *Make sure computer is operational by hitting the CAPS LOCK key on . *While ... adjust the reslution and click Apply. Missing one of the primary colors (RED, GREEN, or BLUE) Screen image is recommended to the computer. *Inspect monitor's video cable and make sure that may cause electrical interference. *Computer Power Switch should be connected. *Check if the PC system is Plug & Play ...
... System > Silence option in the ON position. *Computer Video Card should either turn ON or OFF after hitting the CAPS LOCK key. *Inspect the monitor's video cable and make sure none of the pins are bent. *Make sure computer is operational by hitting the CAPS LOCK key on . *While ... adjust the reslution and click Apply. Missing one of the primary colors (RED, GREEN, or BLUE) Screen image is recommended to the computer. *Inspect monitor's video cable and make sure that may cause electrical interference. *Computer Power Switch should be connected. *Check if the PC system is Plug & Play ...
User Manual
Page 21
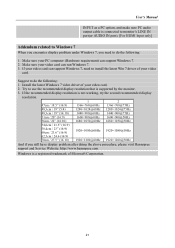
... display problem after doing the above procedure, please visit Hannspree support and Service Website: http://www.hannspree.com Windows is a registered trademark of Microsoft Corporation. 21 Try to use the recommended display resolution that is connected to monitor's LINE IN port(or AUDIO IN port). [For ... video card can run Windows 7. 3. User's Manual INPUT as a PC option, and make sure PC audio output cable is supported by the monitor. 3. If the recommended display resolution is not working, try the second recommended display resolution. 1 2 47cm / 18.5" (16:9) 1366×...
... display problem after doing the above procedure, please visit Hannspree support and Service Website: http://www.hannspree.com Windows is a registered trademark of Microsoft Corporation. 21 Try to use the recommended display resolution that is connected to monitor's LINE IN port(or AUDIO IN port). [For ... video card can run Windows 7. 3. User's Manual INPUT as a PC option, and make sure PC audio output cable is supported by the monitor. 3. If the recommended display resolution is not working, try the second recommended display resolution. 1 2 47cm / 18.5" (16:9) 1366×...

User Manual
Page 23
... @60Hz TV 9 1920x1080p @50Hz TV 10 1920x1080p @60Hz TV 11 1920x1080p @60Hz TV 12 1920x1080p @60Hz TV 13 640x480p@60Hz TV ** We ensure that the monitor can be lighted under interlace signal mode, but we can not guarantee the image quality. 23
... @60Hz TV 9 1920x1080p @50Hz TV 10 1920x1080p @60Hz TV 11 1920x1080p @60Hz TV 12 1920x1080p @60Hz TV 13 640x480p@60Hz TV ** We ensure that the monitor can be lighted under interlace signal mode, but we can not guarantee the image quality. 23


