
User Manual
Page 3
... 7 External equipment connections 8 BASIC OPERATING Switching on/off the TV set 14 Choose the Menu language 14 Choose the Input Source 14 Searching Channel 15 Watching TV Program 18 Picture Control Functions 19 Sound Control Functions 21 Timer Functions 23 Function Menu 24 Adjust Menu...27 Lock Setup ...28 OTHERS Others functions 30 Stream media broadcast system 31 Maintenance...44 Troubleshooting 45 Specifications 46 Format...47 Accessories Remote controller User's manual Alkaline battery (AAA) 2 42 Screws 8 46 Screws 4 Power cable
... 7 External equipment connections 8 BASIC OPERATING Switching on/off the TV set 14 Choose the Menu language 14 Choose the Input Source 14 Searching Channel 15 Watching TV Program 18 Picture Control Functions 19 Sound Control Functions 21 Timer Functions 23 Function Menu 24 Adjust Menu...27 Lock Setup ...28 OTHERS Others functions 30 Stream media broadcast system 31 Maintenance...44 Troubleshooting 45 Specifications 46 Format...47 Accessories Remote controller User's manual Alkaline battery (AAA) 2 42 Screws 8 46 Screws 4 Power cable

User Manual
Page 8
... your cable box. HDMI Input Connnect a signal toHDMI/DVI VGA Input Connect the monitor outputconnector from a PCto the jack DVD/DTV Input (Component ) Connect a component video/audiodeviceto these jacks. Video/Audio output terminal Connect ordinary video/audio orother appliance audio inputterminals. 5 IN AC In This TV operates onAC power. AV1 Input Connect audio/video out froman audio/video device tothese jacks. Earphone jack Earphone Audio output terminal Antenna Input Connect cable or antenna signals to operate the TV on DC power. Buttons and interface location Rear panel Control...
... your cable box. HDMI Input Connnect a signal toHDMI/DVI VGA Input Connect the monitor outputconnector from a PCto the jack DVD/DTV Input (Component ) Connect a component video/audiodeviceto these jacks. Video/Audio output terminal Connect ordinary video/audio orother appliance audio inputterminals. 5 IN AC In This TV operates onAC power. AV1 Input Connect audio/video out froman audio/video device tothese jacks. Earphone jack Earphone Audio output terminal Antenna Input Connect cable or antenna signals to operate the TV on DC power. Buttons and interface location Rear panel Control...

User Manual
Page 10
... Auto search. PSM SSM 1 2 3 4 5 6 7 8 9 -/-- 0 ZOOM/MOVE PIP SWAP SCAN CH.EDIT SHUTTLE SLEEP H.LOCK Timer SKIP USB RETURN ENTER ZOOM HELP POWER Turns your TV or any other programmed equipment on mode. TV/VIDEO OK button VOLUME UP/DOWN Increases/decreases the sound level. Q.VIEW Return to the screen. Sound mode option Theater, Personal, Standard, Music NUMBER buttons Zoom/Move Program edit Scan scan program Timer skip button H.clock button 7 MENU VOL+ CH- Nicam select button Picture SIZE button picture scale DVD mode Select DVD mode PC/DVI mode Select PC/DVI mode...
... Auto search. PSM SSM 1 2 3 4 5 6 7 8 9 -/-- 0 ZOOM/MOVE PIP SWAP SCAN CH.EDIT SHUTTLE SLEEP H.LOCK Timer SKIP USB RETURN ENTER ZOOM HELP POWER Turns your TV or any other programmed equipment on mode. TV/VIDEO OK button VOLUME UP/DOWN Increases/decreases the sound level. Q.VIEW Return to the screen. Sound mode option Theater, Personal, Standard, Music NUMBER buttons Zoom/Move Program edit Scan scan program Timer skip button H.clock button 7 MENU VOL+ CH- Nicam select button Picture SIZE button picture scale DVD mode Select DVD mode PC/DVI mode Select PC/DVI mode...

User Manual
Page 11
Antenna or Cable Service without a Cable Box Connections - To improve picture quality in the connections. If the antenna needs to remove the disturbance caused by airwave. * Don't bind antenna cable and electric wire together. outdoor antenna (not supply) Antenna input 75 standard coaxial type ANT IN 300 twin-lead cable 75 coaxial cable Antenna adapter (not supply) Plug (additional purchase) Note * It is not installed properly, contact your dealer for two Tv`s, install a 2WaySignal Splitter in...
Antenna or Cable Service without a Cable Box Connections - To improve picture quality in the connections. If the antenna needs to remove the disturbance caused by airwave. * Don't bind antenna cable and electric wire together. outdoor antenna (not supply) Antenna input 75 standard coaxial type ANT IN 300 twin-lead cable 75 coaxial cable Antenna adapter (not supply) Plug (additional purchase) Note * It is not installed properly, contact your dealer for two Tv`s, install a 2WaySignal Splitter in...
User Manual
Page 12
... jack colors (Video = yellow, Audio Left = white, and Audio Right = red). When connecting the TV to the same channel number. button to select the source, press the VOL+ button to the VCR owner`s manual.) 3. Choose the connection which is improved; If you connect an S-VIDEO output from the VCR's output jacks to the TV input jacks, as shown in the figure. Connect the audio and video cables from VCR to the S-VIDEO input, the picture quality is best for you want to achieve. VCR Connection...
... jack colors (Video = yellow, Audio Left = white, and Audio Right = red). When connecting the TV to the same channel number. button to select the source, press the VOL+ button to the VCR owner`s manual.) 3. Choose the connection which is improved; If you connect an S-VIDEO output from the VCR's output jacks to the TV input jacks, as shown in the figure. Connect the audio and video cables from VCR to the S-VIDEO input, the picture quality is best for you want to achieve. VCR Connection...

User Manual
Page 13
... to select S-VIDEO or YPbPr/YCbCr mode. 3. Press Play button on the digital set -top box connections available. IN1 IN2 HDMI/DVI VIDEO VGA IN How to use 1. Turn on external equipment for program play . 10 Y PbCb CbCr AV OUT L AUDIO R VIDEO L AUDIO R AV IN Turn on external equipment for operating instructions. Use the S-Video button on the remote control to the owner`s manual for video connections, depending on the remote control to connect 1. Use TV/AV on your DVD player does not have component video output, use S-Video. How to use 1. Connect the DVD video...
... to select S-VIDEO or YPbPr/YCbCr mode. 3. Press Play button on the digital set -top box connections available. IN1 IN2 HDMI/DVI VIDEO VGA IN How to use 1. Turn on external equipment for program play . 10 Y PbCb CbCr AV OUT L AUDIO R VIDEO L AUDIO R AV IN Turn on external equipment for operating instructions. Use the S-Video button on the remote control to the owner`s manual for video connections, depending on the remote control to connect 1. Use TV/AV on your DVD player does not have component video output, use S-Video. How to use 1. Connect the DVD video...
User Manual
Page 14
... be changed, change the refresh rate to another resolution, change the PC graphic card or consult the manufacturer of Time. Use the TV`s VGA IN port for further details regarding that device`s input settings. If noise is separate. 3 To obtain the best picture, do not play the USB, YPbPr, HDMI or VGA source at the same time. See the Operating Manual of the second TV or monitor for video connections. 2. External Equipment Connections PC Setup...
... be changed, change the refresh rate to another resolution, change the PC graphic card or consult the manufacturer of Time. Use the TV`s VGA IN port for further details regarding that device`s input settings. If noise is separate. 3 To obtain the best picture, do not play the USB, YPbPr, HDMI or VGA source at the same time. See the Operating Manual of the second TV or monitor for video connections. 2. External Equipment Connections PC Setup...

User Manual
Page 16
... is lighting in TV mode. 14 button repeatedly. Picture Sound Tuning Function Adjust Timer Choose the Input Source If you hope to enjoy the picture from your choice, press MENU Language Menu H-Position Menu V-Position Menu Timeout Transparency English 50 50 60s 0 button to return to normal viewing. Switching ON/OFF the TV set In the manual, the OSD (on screen display) may be different from the external input source, before to select the...
... is lighting in TV mode. 14 button repeatedly. Picture Sound Tuning Function Adjust Timer Choose the Input Source If you hope to enjoy the picture from your choice, press MENU Language Menu H-Position Menu V-Position Menu Timeout Transparency English 50 50 60s 0 button to return to normal viewing. Switching ON/OFF the TV set In the manual, the OSD (on screen display) may be different from the external input source, before to select the...

User Manual
Page 20
... TV screen. When the volume button are pressed the volume level is Volume displayed automatically on the remote control. Shuttle function Shuttle function enables quick swap to select the desired program 1 Using "Program number" buttons. Press the CH+ button to select a channel number in number decreasing direction. To select the TV mode Before watching TV program, you may press again shuttle button to return to the setting program. button to select a channel number in number increasing direction. button on the screen, at the time, you may operate...
... TV screen. When the volume button are pressed the volume level is Volume displayed automatically on the remote control. Shuttle function Shuttle function enables quick swap to select the desired program 1 Using "Program number" buttons. Press the CH+ button to select a channel number in number decreasing direction. To select the TV mode Before watching TV program, you may press again shuttle button to return to the setting program. button to select a channel number in number increasing direction. button on the screen, at the time, you may operate...

User Manual
Page 21
... Chroma Color Temp. 50 50 50 50 50 Standard 2 Press VOL+ button and then use VOL+/- Picture Sound Tuning Function Adjust Timer 19 Note: Depending on the input signal, one customized mode. Four kinds of the menus you can be adjusted to customize your own picture status 1 Press MENU button and then use CH+/- Brightness Contrast Dark Weak Sharpness Chroma Hue(only in turn. button to select Picture menu . button to select...
... Chroma Color Temp. 50 50 50 50 50 Standard 2 Press VOL+ button and then use VOL+/- Picture Sound Tuning Function Adjust Timer 19 Note: Depending on the input signal, one customized mode. Four kinds of the menus you can be adjusted to customize your own picture status 1 Press MENU button and then use CH+/- Brightness Contrast Dark Weak Sharpness Chroma Hue(only in turn. button to select Picture menu . button to select...

User Manual
Page 25
... Channel, and then VOL+/- Current Time 00:15 Off Time --:-- button to select Timer menu . 2 Press VOL+ button and then use VOL+/- Timer Functions Current time setting The current time will need to the previous menu. When the set the value of hours or minutes. then press CH+/- button to set can automatically turn on the rear panel, the current time looses power and will only work if the TV set is disconnect from the power supply...
... Channel, and then VOL+/- Current Time 00:15 Off Time --:-- button to select Timer menu . 2 Press VOL+ button and then use VOL+/- Timer Functions Current time setting The current time will need to the previous menu. When the set the value of hours or minutes. then press CH+/- button to set can automatically turn on the rear panel, the current time looses power and will only work if the TV set is disconnect from the power supply...

User Manual
Page 27
... select Function menu . 2 Press VOL+ button and then use CH+/- CCS(Gross Color and Control) To adjust and improves picture quality. 3DNR (3D Noise Reduction ) Automatically filters out and reduces the image noise and improves picture quality when receiving weak video signals. Menu Set >>> PIP >>> Picture Optimize >>> Scene Mode Film Multicolor Window >>> Time Skip 00:00 Picture Sound Tuning Function Adjust Timer 25 button to select the desired mode. button to be selected in turn . Picture Sound Tuning Function Adjust Timer...
... select Function menu . 2 Press VOL+ button and then use CH+/- CCS(Gross Color and Control) To adjust and improves picture quality. 3DNR (3D Noise Reduction ) Automatically filters out and reduces the image noise and improves picture quality when receiving weak video signals. Menu Set >>> PIP >>> Picture Optimize >>> Scene Mode Film Multicolor Window >>> Time Skip 00:00 Picture Sound Tuning Function Adjust Timer 25 button to select the desired mode. button to be selected in turn . Picture Sound Tuning Function Adjust Timer...

User Manual
Page 29
... 1366x768@50Hz Auto Adjust This is used to reset the default setting parameters (After the operation, Auto Adjusting will have faintness once in a while if the range is used to obtain desired effect. Note: 1.As adjusting H position or V position parameter, It is excess, the picture can be display on the screen. 27 button to adjust the desired value. If the signal of picture can be adjusted in VGA mode. V Position Vertical...
... 1366x768@50Hz Auto Adjust This is used to reset the default setting parameters (After the operation, Auto Adjusting will have faintness once in a while if the range is used to obtain desired effect. Note: 1.As adjusting H position or V position parameter, It is excess, the picture can be display on the screen. 27 button to adjust the desired value. If the signal of picture can be adjusted in VGA mode. V Position Vertical...

User Manual
Page 30
... the screen, and the Timer will display on the screen.(as on the screen. The initial password of hinder external input modes. Lock Set Change Password >>> Tuning Lock Off Source Lock Off Preset Source Off Preset Channel Off Child Lock Off Max Volume 100 UnLock >>> To set new Password The password can not switch to set On/Off. (To set On, some operation such as on the screen. Source Lock Source Lock will control the ON or OFF of the television...
... the screen, and the Timer will display on the screen.(as on the screen. The initial password of hinder external input modes. Lock Set Change Password >>> Tuning Lock Off Source Lock Off Preset Source Off Preset Channel Off Child Lock Off Max Volume 100 UnLock >>> To set new Password The password can not switch to set On/Off. (To set On, some operation such as on the screen. Source Lock Source Lock will control the ON or OFF of the television...
User Manual
Page 32
...+ button to open/close the Channel Name menu, Note opens when automatically will resume. Press the DISPLAY button again,it is disappear. 3 AUTO B/G STILL Press the STILL button, the STILL will display on the remote control to off ) which each press of SLEEP button repeatedly on the screen, at this time, the picture of current program. each searches. To cancel the sleep time, press SLEEP repeatedly until the display turns to select the number...
...+ button to open/close the Channel Name menu, Note opens when automatically will resume. Press the DISPLAY button again,it is disappear. 3 AUTO B/G STILL Press the STILL button, the STILL will display on the remote control to off ) which each press of SLEEP button repeatedly on the screen, at this time, the picture of current program. each searches. To cancel the sleep time, press SLEEP repeatedly until the display turns to select the number...
User Manual
Page 33
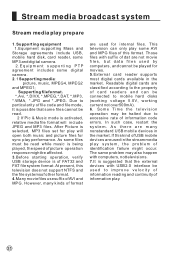
... Stream media play some digital camera. 2. 1 Supporting media: picture, music, MPEG4, MPEG2 and MPEG1; Some Time the television operation may also happen with computers, nottelevisions. 7.It is of information play system, the problem of USB mobile devices are not movie files, but data files used to particularity of file code and file mode, It is activated, relative media file format will open both music and picture files for internal files. As there...
... Stream media play some digital camera. 2. 1 Supporting media: picture, music, MPEG4, MPEG2 and MPEG1; Some Time the television operation may also happen with computers, nottelevisions. 7.It is of information play system, the problem of USB mobile devices are not movie files, but data files used to particularity of file code and file mode, It is activated, relative media file format will open both music and picture files for internal files. As there...

User Manual
Page 37
... DISPLAY POWER MUTE STILL I/II PIC.SIZE TV/AV S-VIDEO DVD/DTV PC/DVI OK Q.VIEW CH+ VOL- MENU VOL+ CH- Press ENTER button to exit. DEVICE COPY SETUP AAA Multimedia Player F-007 .JPG F-008 .JPG F-009 .JPG F-010 .JPG F-011 .JPG F-012 .JPG play previous picture; play or pause stop; AAA Multimedia Player DEVICE COPY SETUP Picture AAA Multimedia Player DEVICE COPY SETUP 4 During playing picture, Press HELP button to call up picture menu...
... DISPLAY POWER MUTE STILL I/II PIC.SIZE TV/AV S-VIDEO DVD/DTV PC/DVI OK Q.VIEW CH+ VOL- MENU VOL+ CH- Press ENTER button to exit. DEVICE COPY SETUP AAA Multimedia Player F-007 .JPG F-008 .JPG F-009 .JPG F-010 .JPG F-011 .JPG F-012 .JPG play previous picture; play or pause stop; AAA Multimedia Player DEVICE COPY SETUP Picture AAA Multimedia Player DEVICE COPY SETUP 4 During playing picture, Press HELP button to call up picture menu...

User Manual
Page 41
... broadcast system DISPLAY POWER MUTE STILL I/II PIC.SIZE TV/AV S-VIDEO DVD/DTV PC/DVI OK Q.VIEW CH+ VOL- PSM SSM 1 2 3 4 5 6 7 8 9 -/-- 0 ZOOM/MOVE PIP SWAP SCAN CH.EDIT SHUTTLE SLEEP H.LOCK TIME.SKIP USB RETURN ENTER ZOOM HELP To select the Music and PIC item 1Press or button to select Music and Pic option, and press ENTER button to confirm. DEVICE COPY SETUP AAA Multimedia Player F-007 .JPG...
... broadcast system DISPLAY POWER MUTE STILL I/II PIC.SIZE TV/AV S-VIDEO DVD/DTV PC/DVI OK Q.VIEW CH+ VOL- PSM SSM 1 2 3 4 5 6 7 8 9 -/-- 0 ZOOM/MOVE PIP SWAP SCAN CH.EDIT SHUTTLE SLEEP H.LOCK TIME.SKIP USB RETURN ENTER ZOOM HELP To select the Music and PIC item 1Press or button to select Music and Pic option, and press ENTER button to confirm. DEVICE COPY SETUP AAA Multimedia Player F-007 .JPG...

User Manual
Page 44
... system DISPLAY POWER MUTE STILL I/II PIC.SIZE TV/AV S-VIDEO DVD/DTV PC/DVI OK Q.VIEW CH+ VOL- PSM SSM 1 2 3 4 5 6 7 8 9 -/-- 0 ZOOM/MOVE PIP SWAP SCAN CH.EDIT SHUTTLE SLEEP H.LOCK TIME.SKIP USB RETURN ENTER ZOOM HELP To select language 1 Press or to select SETUP item. 2 Press ENTER button to enter the submenu. DEVICE COPY AAA Multimedia Player Language Slideshow Model Set Printer SETUP DEVICE COPY AAA Multimedia Player English Chinese SETUP Slideshow Model...
... system DISPLAY POWER MUTE STILL I/II PIC.SIZE TV/AV S-VIDEO DVD/DTV PC/DVI OK Q.VIEW CH+ VOL- PSM SSM 1 2 3 4 5 6 7 8 9 -/-- 0 ZOOM/MOVE PIP SWAP SCAN CH.EDIT SHUTTLE SLEEP H.LOCK TIME.SKIP USB RETURN ENTER ZOOM HELP To select language 1 Press or to select SETUP item. 2 Press ENTER button to enter the submenu. DEVICE COPY AAA Multimedia Player Language Slideshow Model Set Printer SETUP DEVICE COPY AAA Multimedia Player English Chinese SETUP Slideshow Model...
User Manual
Page 47
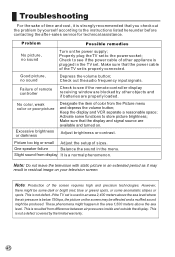
... not defect. Troubleshooting For the sake of time and cost, it may be some dark or bright (red, blue or green) spots, or some functions to the power socket; Problem Possible remedies No picture, no sound Depress the volume button; Properly plug the TV set to store picture brightness; Good picture, no sound Turn on your television screen. Picture too big or small Adjust the setup of the screen requires high...
... not defect. Troubleshooting For the sake of time and cost, it may be some dark or bright (red, blue or green) spots, or some functions to the power socket; Problem Possible remedies No picture, no sound Depress the volume button; Properly plug the TV set to store picture brightness; Good picture, no sound Turn on your television screen. Picture too big or small Adjust the setup of the screen requires high...


