User Manual
Page 3
... 7 External equipment connections 8 BASIC OPERATING Switching on/off the TV set 13 Choose the Menu language 13 Choose the Input Source 13 Searching Channel 14 Watching TV Program 17 Picture Control Functions 18 Sound Control Functions 20 Timer Functions 22 Function Menu 23 Adjust Menu...26 Lock Setup ...27 OTHERS Others functions 29 Stream media broadcast system 30 Maintenance...39 Troubleshooting 40 Specifications 41 Format...42 Accessories Remote controller User's manual Alkaline battery (AAA) 2 42 Screws 8 46 Screws 4 Power cable
... 7 External equipment connections 8 BASIC OPERATING Switching on/off the TV set 13 Choose the Menu language 13 Choose the Input Source 13 Searching Channel 14 Watching TV Program 17 Picture Control Functions 18 Sound Control Functions 20 Timer Functions 22 Function Menu 23 Adjust Menu...26 Lock Setup ...27 OTHERS Others functions 29 Stream media broadcast system 30 Maintenance...39 Troubleshooting 40 Specifications 41 Format...42 Accessories Remote controller User's manual Alkaline battery (AAA) 2 42 Screws 8 46 Screws 4 Power cable

User Manual
Page 8
... or through your cable box. Earphone jack Earphone Audio output terminal Antenna Input Connect cable or antenna signals to operate the TV on DC power. Buttons and interface location Rear panel Control AC IN IN1 IN2 HDMI /DVI VIDEO VGA IN 3 AV OUT Y Pb/Cb Pr/Cr IN L AUDIO R VIDEO L AUDIO R AV1 IN S-VIDEO IN 5 ANT. HDMI Input Connnect a signal toHDMI/DVI VGA Input Connect the monitor outputconnector from a PCto the jack DVD/DTV Input (Component ) Connect a component video/audiodeviceto these jacks. Video/Audio output terminal Connect ordinary video/audio orother appliance...
... or through your cable box. Earphone jack Earphone Audio output terminal Antenna Input Connect cable or antenna signals to operate the TV on DC power. Buttons and interface location Rear panel Control AC IN IN1 IN2 HDMI /DVI VIDEO VGA IN 3 AV OUT Y Pb/Cb Pr/Cr IN L AUDIO R VIDEO L AUDIO R AV1 IN S-VIDEO IN 5 ANT. HDMI Input Connnect a signal toHDMI/DVI VGA Input Connect the monitor outputconnector from a PCto the jack DVD/DTV Input (Component ) Connect a component video/audiodeviceto these jacks. Video/Audio output terminal Connect ordinary video/audio orother appliance...

User Manual
Page 10
... picture exchange Shuttle button Sleep button USB system buttons DISPLAY POWER MUTE STILL I/II PIC.SIZE TV/AV S-VIDEO DVD/DTV PC/DVI OK Q.VIEW CH+ VOL- Nicam select button Picture SIZE button picture scale DVD mode Select DVD mode PC/DVI mode Select PC/DVI mode. Remote controller key function Information display Display of current channel signals, program and systems Picture still MUTE Switches the sound on or off , depending on or off . Q.VIEW Return to the screen. Sound mode option Theater, Personal, Standard, Music NUMBER buttons Zoom/Move Program edit Scan scan program Timer...
... picture exchange Shuttle button Sleep button USB system buttons DISPLAY POWER MUTE STILL I/II PIC.SIZE TV/AV S-VIDEO DVD/DTV PC/DVI OK Q.VIEW CH+ VOL- Nicam select button Picture SIZE button picture scale DVD mode Select DVD mode PC/DVI mode Select PC/DVI mode. Remote controller key function Information display Display of current channel signals, program and systems Picture still MUTE Switches the sound on or off , depending on or off . Q.VIEW Return to the screen. Sound mode option Theater, Personal, Standard, Music NUMBER buttons Zoom/Move Program edit Scan scan program Timer...

User Manual
Page 11
... Cable Service without a Cable Box Connections - outdoor antenna (not supply) Antenna input 75 standard coaxial type ANT IN 300 twin-lead cable 75 coaxial cable Antenna adapter (not supply) Plug (additional purchase) Note * It is not installed properly, contact your dealer for two Tv`s, install a 2WaySignal Splitter in a poor signal area, purchase and install a signal amplifier. If the antenna needs to remove the disturbance caused by airwave. * Don't bind antenna cable and electric wire together. External...
... Cable Service without a Cable Box Connections - outdoor antenna (not supply) Antenna input 75 standard coaxial type ANT IN 300 twin-lead cable 75 coaxial cable Antenna adapter (not supply) Plug (additional purchase) Note * It is not installed properly, contact your dealer for two Tv`s, install a 2WaySignal Splitter in a poor signal area, purchase and install a signal amplifier. If the antenna needs to remove the disturbance caused by airwave. * Don't bind antenna cable and electric wire together. External...

User Manual
Page 12
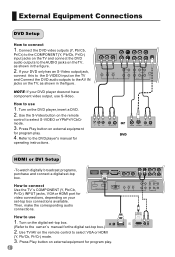
External Equipment Connections NOTE: All cables shown are not included with using the INPUT button on the remote control, and then press CH+/- Choose Your Connection There are examples of the signal you want to connect and the quality of some ways to the VCR owner`s manual.) 3. Choose the connection which is improved; Connection Option 1 Set VCR output switch to channel 3 or 4 and then tune the TV to the Video input. 2. compared to connecting a regular...
External Equipment Connections NOTE: All cables shown are not included with using the INPUT button on the remote control, and then press CH+/- Choose Your Connection There are examples of the signal you want to connect and the quality of some ways to the VCR owner`s manual.) 3. Choose the connection which is improved; Connection Option 1 Set VCR output switch to channel 3 or 4 and then tune the TV to the Video input. 2. compared to connecting a regular...
User Manual
Page 13
...) INPUT jacks, VGA or HDMI port for program play . 4. Press Play button on external equipment for video connections, depending on your set -top box. (Refer to select S-VIDEO or YPbPr/YCbCr mode. 3. How to select VGA or HDMI (Y, Pb/Cb, Pr/Cr) mode. 3. External Equipment Connections DVD Setup How to the AUDIO jacks on the TV, as shown in the figure. 2. Connect the DVD video outputs (Y, Pb/Cb, Pr/Cr) to the COMPONENT (Y, Pb/Cb, Pr/Cr) input jacks on the remote control to the owner`s manual for operating instructions. Use...
...) INPUT jacks, VGA or HDMI port for program play . 4. Press Play button on external equipment for video connections, depending on your set -top box. (Refer to select S-VIDEO or YPbPr/YCbCr mode. 3. How to select VGA or HDMI (Y, Pb/Cb, Pr/Cr) mode. 3. External Equipment Connections DVD Setup How to the AUDIO jacks on the TV, as shown in the figure. 2. Connect the DVD video outputs (Y, Pb/Cb, Pr/Cr) to the COMPONENT (Y, Pb/Cb, Pr/Cr) input jacks on the remote control to the owner`s manual for operating instructions. Use...
User Manual
Page 14
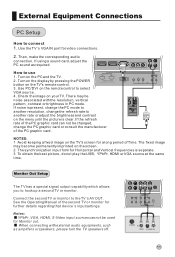
... in PC mode. Use the TV`s VGA IN port for further details regarding that device`s input settings. Then, make the corresponding audio connection. See the Operating Manual of the PC graphic card can not be noise associated with external audio equipments, such as required. If using a sound card, adjust the PC sound as amplifers or speakers, please turn the TV speakers off. Turn on the display by pressing the POWER HDMI/DVI VIDEO button on your...
... in PC mode. Use the TV`s VGA IN port for further details regarding that device`s input settings. Then, make the corresponding audio connection. See the Operating Manual of the PC graphic card can not be noise associated with external audio equipments, such as required. If using a sound card, adjust the PC sound as amplifers or speakers, please turn the TV speakers off. Turn on the display by pressing the POWER HDMI/DVI VIDEO button on your...

User Manual
Page 16
... button on remote control, the menu appears on AC power supply and the power indicator will light . 2 If the indicator is just an example to help you are satisfied with the TV operation. Picture Sound Tuning Function Adjust Timer Choose the Input Source If you hope to enjoy the picture from the external input source, before to select the source, you need to ensure your TV in red, press POWER button on the remote control...
... button on remote control, the menu appears on AC power supply and the power indicator will light . 2 If the indicator is just an example to help you are satisfied with the TV operation. Picture Sound Tuning Function Adjust Timer Choose the Input Source If you hope to enjoy the picture from the external input source, before to select the source, you need to ensure your TV in red, press POWER button on the remote control...

User Manual
Page 20
... mode Before watching TV program, you caneasily change betweenthe channel youare using and the channel youused lastTimer. Press the CH- Use this function, you may operate other, then if you scan over program, you want to return to setting program. How to select a channel number in a presetting channel. How to select channel numbers of the TV set to adjust the volume level. Quick program view This function enables quick swap to the last watched program. 1 Suppose the channel number...
... mode Before watching TV program, you caneasily change betweenthe channel youare using and the channel youused lastTimer. Press the CH- Use this function, you may operate other, then if you scan over program, you want to return to setting program. How to select a channel number in a presetting channel. How to select channel numbers of the TV set to adjust the volume level. Quick program view This function enables quick swap to the last watched program. 1 Suppose the channel number...

User Manual
Page 21
... (red) and Cool (blue) colors to select Picture menu . button to select the desired effect. button to obtain the desired effect. Personal A spare setting that have good all round lighting Soft Designed for night time low light viewing Bright Designed for rooms with high ambient lighting such as day time sport; button to select picture modes You can select. Item, and then press VOL+/- Note: Depending on the input signal, one customized mode...
... (red) and Cool (blue) colors to select Picture menu . button to select the desired effect. button to obtain the desired effect. Personal A spare setting that have good all round lighting Soft Designed for night time low light viewing Bright Designed for rooms with high ambient lighting such as day time sport; button to select picture modes You can select. Item, and then press VOL+/- Note: Depending on the input signal, one customized mode...

User Manual
Page 25
... Channel 1 3 Press MENU button to return to select the channel number. Remind Channel 1 2 Press CH+/- button to select Current Time, and then press VOL+/- button to On Time --:-- set is turned on or in a preset time. On Channel 1 Remind Time --:-- button to select Remind Channel, and then VOL+/- button to select Timer menu . Timer Functions Current time setting The current time will need to be reset when the power is reconnected. 1 Press MENU button and then use VOL+/- button to set is disconnect from the power supply or...
... Channel 1 3 Press MENU button to return to select the channel number. Remind Channel 1 2 Press CH+/- button to select Current Time, and then press VOL+/- button to On Time --:-- set is turned on or in a preset time. On Channel 1 Remind Time --:-- button to select Remind Channel, and then VOL+/- button to select Timer menu . Timer Functions Current time setting The current time will need to be reset when the power is reconnected. 1 Press MENU button and then use VOL+/- button to set is disconnect from the power supply or...

User Manual
Page 29
... picture position. button to adjust the desired value. button to select Adjust menu . 2 Press CH+/- H Position Horizontal position of display differ in this item. Phase This is excess, the picture can be display on the screen. 26 When VGA HDMI input mode is used for adjusting H Position and V Position as well as relative parameters in this item. button to select the item to be used to reset the default setting parameters (After the operation, Auto Adjusting...
... picture position. button to adjust the desired value. button to select Adjust menu . 2 Press CH+/- H Position Horizontal position of display differ in this item. Phase This is excess, the picture can be display on the screen. 26 When VGA HDMI input mode is used for adjusting H Position and V Position as well as relative parameters in this item. button to select the item to be used to reset the default setting parameters (After the operation, Auto Adjusting...
User Manual
Page 30
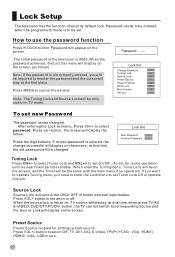
... the television is 0000. Password needs to be only useful in turn. 27 to select Off, TV, AV1,AV2,S-Video,YPbPr/YCbCr, VGA, HDMI1, HDMI2, VGA, USB in TV mode. After entering the Lock set as follow . When enter the Tuning menu, Tuner Lock will be on the screen, and the Timer will be entered when the program lock mode is entered, the change successful will appear on the screen. Press VOL+/-button to select Tuner Lock...
... the television is 0000. Password needs to be only useful in turn. 27 to select Off, TV, AV1,AV2,S-Video,YPbPr/YCbCr, VGA, HDMI1, HDMI2, VGA, USB in TV mode. After entering the Lock set as follow . When enter the Tuning menu, Tuner Lock will be on the screen, and the Timer will be entered when the program lock mode is entered, the change successful will appear on the screen. Press VOL+/-button to select Tuner Lock...
User Manual
Page 32
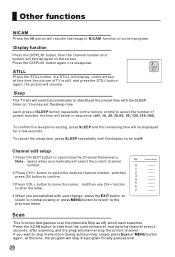
... time will resume. button to select the desired channel number, and then press OK button to confirm. 3 Press VOL+ button to open/close the Channel Name menu, Note opens when automatically will be displayed on the remote control to start from the current channel, and switch a channel every 3 seconds, after scanning, and the program channel stop the program Finally glances over. 29 Press the SCAN button to select the number of SLEEP button repeatedly on the screen...
... time will resume. button to select the desired channel number, and then press OK button to confirm. 3 Press VOL+ button to open/close the Channel Name menu, Note opens when automatically will be displayed on the remote control to start from the current channel, and switch a channel every 3 seconds, after scanning, and the program channel stop the program Finally glances over. 29 Press the SCAN button to select the number of SLEEP button repeatedly on the screen...

User Manual
Page 33
... USB storage device is suggested that some files cannot be read . 2 If Pic & Music mode is selected, MP3 files set for movies. 5.External card reader supports most digital cards available in the market. Some Time the television operation may also happen with computers, nottelevisions. 7.It is of FAT32 and FAT file system format. If this television does not support NTFS and the file systemsof other format. 4.Many movie files use...
... USB storage device is suggested that some files cannot be read . 2 If Pic & Music mode is selected, MP3 files set for movies. 5.External card reader supports most digital cards available in the market. Some Time the television operation may also happen with computers, nottelevisions. 7.It is of FAT32 and FAT file system format. If this television does not support NTFS and the file systemsof other format. 4.Many movie files use...

User Manual
Page 35
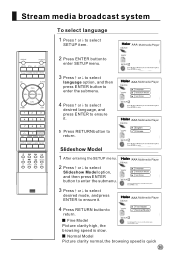
... ENTER button to right turns over 90 no available); Note: The analysis rate basis picture itself clarity different and is different. 32 Stream media broadcast system DISPLAY POWER MUTE STILL I/II PIC.SIZE TV/AV S-VIDEO DVD/DTV PC/DVI OK Q.VIEW CH+ VOL- PSM SSM 1 2 3 4 5 6 7 8 9 -/-- 0 ZOOM/MOVE PIP SWAP SCAN CH.EDIT SHUTTLE SLEEP H.LOCK TIME.SKIP USB RETURN ENTER ZOOM HELP Note: 1.the play previous picture;
... ENTER button to right turns over 90 no available); Note: The analysis rate basis picture itself clarity different and is different. 32 Stream media broadcast system DISPLAY POWER MUTE STILL I/II PIC.SIZE TV/AV S-VIDEO DVD/DTV PC/DVI OK Q.VIEW CH+ VOL- PSM SSM 1 2 3 4 5 6 7 8 9 -/-- 0 ZOOM/MOVE PIP SWAP SCAN CH.EDIT SHUTTLE SLEEP H.LOCK TIME.SKIP USB RETURN ENTER ZOOM HELP Note: 1.the play previous picture;

User Manual
Page 38
... system DISPLAY POWER MUTE STILL I/II PIC.SIZE TV/AV S-VIDEO DVD/DTV PC/DVI OK Q.VIEW CH+ VOL- SETUP Comb AAA Multimedia Player DEVICE COPY SETUP 4 Press or or or button to select the adjusted item, Press ENTER button to return. AAA Multimedia Player DEVICE COPY 2 Press or to select desired file(picture and music), and press ENTER button to enter play menu. 3 During playing music, Press HELP button to call up picture menu, at...
... system DISPLAY POWER MUTE STILL I/II PIC.SIZE TV/AV S-VIDEO DVD/DTV PC/DVI OK Q.VIEW CH+ VOL- SETUP Comb AAA Multimedia Player DEVICE COPY SETUP 4 Press or or or button to select the adjusted item, Press ENTER button to return. AAA Multimedia Player DEVICE COPY 2 Press or to select desired file(picture and music), and press ENTER button to enter play menu. 3 During playing music, Press HELP button to call up picture menu, at...
User Manual
Page 41
... DISPLAY POWER MUTE STILL I/II PIC.SIZE TV/AV S-VIDEO DVD/DTV PC/DVI OK Q.VIEW CH+ VOL- Fine Model Picture clarity high, the browsing speed is slow COPY SETUP Fine Model Normal Model Normal Model Picture clarity normal, the browsing speed is quick 38 DEVICE COPY AAA Multimedia Player Language Slideshow Model Set Printer SETUP DEVICE COPY AAA Multimedia Player English Chinese SETUP Slideshow Model 1 After entering the SETUP menu. 2 Press or to select Slideshow Model...
... DISPLAY POWER MUTE STILL I/II PIC.SIZE TV/AV S-VIDEO DVD/DTV PC/DVI OK Q.VIEW CH+ VOL- Fine Model Picture clarity high, the browsing speed is slow COPY SETUP Fine Model Normal Model Normal Model Picture clarity normal, the browsing speed is quick 38 DEVICE COPY AAA Multimedia Player Language Slideshow Model Set Printer SETUP DEVICE COPY AAA Multimedia Player English Chinese SETUP Slideshow Model 1 After entering the SETUP menu. 2 Press or to select Slideshow Model...
User Manual
Page 43
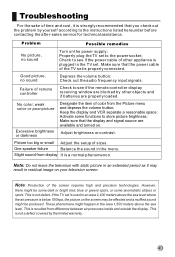
... your television screen. Keep the display and VCR separate a reasonable space; Adjust brightness or contrast. Note: Production of color from the Picture menu and depress the volume button; Check to see if the remote controller display receiving window are blocked by other appliance is plugged in the area 1,500 meters above the sea level where the air pressure is properly connected. Check out the audio frequency input signals. Picture...
... your television screen. Keep the display and VCR separate a reasonable space; Adjust brightness or contrast. Note: Production of color from the Picture menu and depress the volume button; Check to see if the remote controller display receiving window are blocked by other appliance is plugged in the area 1,500 meters above the sea level where the air pressure is properly connected. Check out the audio frequency input signals. Picture...

User Manual
Page 44
... Model P50A11-AK P60A11-AK Power Power Consumption Color System Sound System Video input ~ 15 -240 PAL NTSC, SECAM D/K I B/G, M, Auto AV CVBS , S-VIDEO, YPbPr/YCbCr, HDMI or DVI VGA Environmental condition Accessories Operating temperature range: 5 +35 Operating humidity range 20%-80% Storage Temperature: -15 +45 Storage Humidity 5%-90%, non-condensing If the storage temperature is a approximation. 41 Use`s manual X1 Remote Control x1 Power cable x1 Alkaline x2 Product main size (does not contain stand & speaker) Model Net Size P50A11-AK...
... Model P50A11-AK P60A11-AK Power Power Consumption Color System Sound System Video input ~ 15 -240 PAL NTSC, SECAM D/K I B/G, M, Auto AV CVBS , S-VIDEO, YPbPr/YCbCr, HDMI or DVI VGA Environmental condition Accessories Operating temperature range: 5 +35 Operating humidity range 20%-80% Storage Temperature: -15 +45 Storage Humidity 5%-90%, non-condensing If the storage temperature is a approximation. 41 Use`s manual X1 Remote Control x1 Power cable x1 Alkaline x2 Product main size (does not contain stand & speaker) Model Net Size P50A11-AK...


