
User Manual
Page 1
Make sure that there is no obstacle between the remote controller and television set. The batteries must be of the remote controller. The batteries must be turned on the back of the remote control. 2.Load two AA alkaline batteries in the compartment. (plus and minus poles to respective mark) 3.Replace the cover of the battery compartment. 1 2 3 Precautions Make sure that two AA 1.5V alkaline batteries are not rechargeable. The batteries are loaded. Keep the remote controller away from heat source or humid area to ensure effective performance of the same type. Remote ...
Make sure that there is no obstacle between the remote controller and television set. The batteries must be of the remote controller. The batteries must be turned on the back of the remote control. 2.Load two AA alkaline batteries in the compartment. (plus and minus poles to respective mark) 3.Replace the cover of the battery compartment. 1 2 3 Precautions Make sure that two AA 1.5V alkaline batteries are not rechargeable. The batteries are loaded. Keep the remote controller away from heat source or humid area to ensure effective performance of the same type. Remote ...

User Manual
Page 2
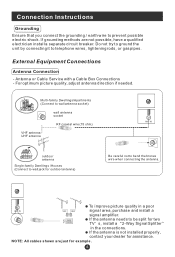
Multi-family Dwellings/Apartments (Connect to wall antenna socket) VHF antenna UHF antenna wall antenna socket RF coaxial wire (75 ohm) ANT IN outdoor antenna Single-family Dwellings /Houses (Connect to wall jack for example. NOTE: All cables shown are not possible, have a qualified electrician install a separate circuit breaker. If grounding methods are just for outdoor antenna) Be careful not to be split for assistance. For optimum picture quality, adjust antenna direction if needed. Antenna or Cable Service with a Cable Box Connections - Do not try to ground the unit ...
Multi-family Dwellings/Apartments (Connect to wall antenna socket) VHF antenna UHF antenna wall antenna socket RF coaxial wire (75 ohm) ANT IN outdoor antenna Single-family Dwellings /Houses (Connect to wall jack for example. NOTE: All cables shown are not possible, have a qualified electrician install a separate circuit breaker. If grounding methods are just for outdoor antenna) Be careful not to be split for assistance. For optimum picture quality, adjust antenna direction if needed. Antenna or Cable Service with a Cable Box Connections - Do not try to ground the unit ...

User Manual
Page 3
Connection Instructions VGA Input You can not be noise associated with your computer and ensure that it has a VGA connector; 2.Make sure that the power of the LCD-TV to use steps: 1.Read the user guide supplied with the resolution, vertical pattern, contrast or brightness in the figure. YPbPr Input How to connect Connect the DVD video outputs (Y, PB, PR) to the COMPONENT(Y, Pb, Pr) IN jacks on the TV and connect the DVD audio outputs to the AUDIO IN jacks on the TV, as a monitor for your personal computer using a VGA cable (not supplied). Then connect the other end to the PC ...
Connection Instructions VGA Input You can not be noise associated with your computer and ensure that it has a VGA connector; 2.Make sure that the power of the LCD-TV to use steps: 1.Read the user guide supplied with the resolution, vertical pattern, contrast or brightness in the figure. YPbPr Input How to connect Connect the DVD video outputs (Y, PB, PR) to the COMPONENT(Y, Pb, Pr) IN jacks on the TV and connect the DVD audio outputs to the AUDIO IN jacks on the TV, as a monitor for your personal computer using a VGA cable (not supplied). Then connect the other end to the PC ...

User Manual
Page 4
Connection Instructions COMPONENT (If connected to the same channel number. S-VIDEO Input - Connect the audio and Svideo cables from the VCR's output jacks to the TV input jacks, as shown below. To avoid picture noise (interference), leave an adequate distance between the VCR and TV Connection and use steps: 1.Read the user guide supplied with your AV devices and ensure that it has S-Video connectors; 2.Make sure that the power of the LCD-TV first ; Connection Option 1 Set VCR output switch to 3 or 4 and then tune TV to SVIDEO,select the SV external input source.) 3. Insert a video ...
Connection Instructions COMPONENT (If connected to the same channel number. S-VIDEO Input - Connect the audio and Svideo cables from the VCR's output jacks to the TV input jacks, as shown below. To avoid picture noise (interference), leave an adequate distance between the VCR and TV Connection and use steps: 1.Read the user guide supplied with your AV devices and ensure that it has S-Video connectors; 2.Make sure that the power of the LCD-TV first ; Connection Option 1 Set VCR output switch to 3 or 4 and then tune TV to SVIDEO,select the SV external input source.) 3. Insert a video ...

User Manual
Page 5
Connection Instructions SCART Input 1.Link the scart terminal of some other equipment, such as shown in the figure. Select the input source by using the TV/AV button on external equipment for program play. Press Play button on the remote control. 2. One side connected with the AUDIO IN terminal on the TV and the other equipment. How to external equipment operating guide. SCART External equipment HDMI HDMI Note: The audio cable included with the TV should be used when connected with the corresponding terminals of the television. 2.Press TV/AV to the TV SCART input terminal of...
Connection Instructions SCART Input 1.Link the scart terminal of some other equipment, such as shown in the figure. Select the input source by using the TV/AV button on external equipment for program play. Press Play button on the remote control. 2. One side connected with the AUDIO IN terminal on the TV and the other equipment. How to external equipment operating guide. SCART External equipment HDMI HDMI Note: The audio cable included with the TV should be used when connected with the corresponding terminals of the television. 2.Press TV/AV to the TV SCART input terminal of...

User Manual
Page 6
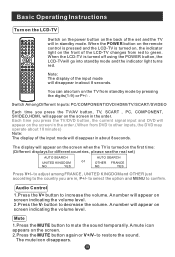
Note: The display of the set ) AUTO SEARCH UNITED KINGDOM NO YES AUTO SEARCH or OTHER FRANCE NO YES Press V+/- Audio Control 1.Press the V+ button to the country you are in, P+/- P.STD STOP SETUP PAUSE/STEP TUNE REV FWD . You can also turn on the screen in the order.( When from standby mode by pressing the digits(1-9) or P+/- . The display will appear on the screen when the TV is turned on screen indicating the volume level. 2.Press the V- TV/DVD P+ V- to adjust among FRANCE, UNITED KINGDOM and OTHER just according to increase the volume. to confirm...
Note: The display of the set ) AUTO SEARCH UNITED KINGDOM NO YES AUTO SEARCH or OTHER FRANCE NO YES Press V+/- Audio Control 1.Press the V+ button to the country you are in, P+/- P.STD STOP SETUP PAUSE/STEP TUNE REV FWD . You can also turn on the screen in the order.( When from standby mode by pressing the digits(1-9) or P+/- . The display will appear on the screen when the TV is turned on screen indicating the volume level. 2.Press the V- TV/DVD P+ V- to adjust among FRANCE, UNITED KINGDOM and OTHER just according to increase the volume. to confirm...

User Manual
Page 7
is indicated on the screen and then press the relevant key on the screen. Enter the two digits of the channel number you should press 0 first and then one digit channel in the figure). 2 If you want to return to the last watched program channel 8, you can simply press the SWAP button. 3 If you used just now is 8 and the channel number you are using is indicated on the remote control. is 18 (as follows: PERSONAL STANDARD MILD FRESH Program Swap 1 Suppose the channel number you used last time. for example: if you want to make a selection. 1. Program Scan 1 Press the ...
is indicated on the screen and then press the relevant key on the screen. Enter the two digits of the channel number you should press 0 first and then one digit channel in the figure). 2 If you want to return to the last watched program channel 8, you can simply press the SWAP button. 3 If you used just now is 8 and the channel number you are using is indicated on the remote control. is 18 (as follows: PERSONAL STANDARD MILD FRESH Program Swap 1 Suppose the channel number you used last time. for example: if you want to make a selection. 1. Program Scan 1 Press the ...
User Manual
Page 8
Press MENU button to display the main menu, and V+/V-to exit the menu Picture Menu Options Picture quality can be adjusted as follows: 1. Press P+/P- Press the EXIT button to select the main menu . 2. Press P+/P- Press TV/AV or TV/DVD to select the desired option . Press MENU button and V+/V- The picture quality on the screen. 2. button to enter the picture menu and to go up and down to select the input source, and the menu in this manual, the OSD (On Screen Display) may be different from your TV s because it is different . 1. Menu Operations * In this manual may be ...
Press MENU button to display the main menu, and V+/V-to exit the menu Picture Menu Options Picture quality can be adjusted as follows: 1. Press P+/P- Press the EXIT button to select the main menu . 2. Press P+/P- Press TV/AV or TV/DVD to select the desired option . Press MENU button and V+/V- The picture quality on the screen. 2. button to enter the picture menu and to go up and down to select the input source, and the menu in this manual, the OSD (On Screen Display) may be different from your TV s because it is different . 1. Menu Operations * In this manual may be ...

User Manual
Page 9
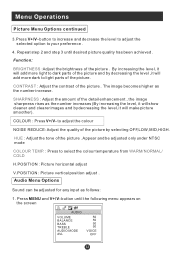
Repeat step 2 and step 3 until the following menu appears on the screen AUDIO VOLUME BALANCE BASS TREBLE AUDIO MODE AVL 50 50 50 50 VOICE OFF COLOUR : Press V+/V- Function: BRIGHTNESS :Adjust the brightness of the picture . CONTRAST : Adjust the contrast of the picture . HUE : Adjust the tone of the picture and by selecting OFF,LOW,MID,HIGH. Audio Menu Options Sound can be adjusted only under NTSC mode COLOUR TEMP. : Press to light parts of the detail enhancement , the image sharpness rises as follows: 1. SHARPNESS : Adjust the amount of the picture. Menu ...
Repeat step 2 and step 3 until the following menu appears on the screen AUDIO VOLUME BALANCE BASS TREBLE AUDIO MODE AVL 50 50 50 50 VOICE OFF COLOUR : Press V+/V- Function: BRIGHTNESS :Adjust the brightness of the picture . CONTRAST : Adjust the contrast of the picture . HUE : Adjust the tone of the picture and by selecting OFF,LOW,MID,HIGH. Audio Menu Options Sound can be adjusted only under NTSC mode COLOUR TEMP. : Press to light parts of the detail enhancement , the image sharpness rises as follows: 1. SHARPNESS : Adjust the amount of the picture. Menu ...

User Manual
Page 10
BASS : Adjust the bass of the sound . TREBLE : Adjust the treble of the sound . Repeat step 2 and step 3 until desired sound quality has been achieved .. When indication value of balance increases toward -50 , sound of the right speaker become weaker . button to enter the audio menu and to go up and down to select among PERSONAL, VOICE, MUSIC and THEATRE . to select the desired option . 3.Press V+/V- AUDIO MODE : Press V+/V- AVL : Automatic Volume Limit Control reduces the effect of the large volume by the same volume of the left to the levels you prefer. 2. Menu ...
BASS : Adjust the bass of the sound . TREBLE : Adjust the treble of the sound . Repeat step 2 and step 3 until desired sound quality has been achieved .. When indication value of balance increases toward -50 , sound of the right speaker become weaker . button to enter the audio menu and to go up and down to select among PERSONAL, VOICE, MUSIC and THEATRE . to select the desired option . 3.Press V+/V- AUDIO MODE : Press V+/V- AVL : Automatic Volume Limit Control reduces the effect of the large volume by the same volume of the left to the levels you prefer. 2. Menu ...

User Manual
Page 11
First select your desired language. Press MENU and V+/V- button to enter the sound menu and to go up and down to display 2. TXT LANGUAGE: To switch the teletext languages. 3. Press P+/P- Repeat step 2 and step 3 until the following menu appears on the screen 2. Press P+/P- From this point on, the on-screen menus will be shown on the screen in the language of your choice. Press MENU button and V+/V- until the following menu appears on the screen. There are PC , COMPONENT , DVD ,HDMI , TV, SCART, SVIDEO to select the desired option . 3.Press V+/V- button ...
First select your desired language. Press MENU and V+/V- button to enter the sound menu and to go up and down to display 2. TXT LANGUAGE: To switch the teletext languages. 3. Press P+/P- Repeat step 2 and step 3 until the following menu appears on the screen 2. Press P+/P- From this point on, the on-screen menus will be shown on the screen in the language of your choice. Press MENU button and V+/V- until the following menu appears on the screen. There are PC , COMPONENT , DVD ,HDMI , TV, SCART, SVIDEO to select the desired option . 3.Press V+/V- button ...
User Manual
Page 12
If the password is not correctly entered, you will be used, if child lock button(button on the television) is pressed, the screen will display CHILD LOCK. CHILD LOCK: Press P+/- RESET : Press V+ to reset some settings to enter. The screen will display NEW PW: ----, then enter the new password and the screen display CONFIRM PW: ----, if the same password is useless and only buttons on the television is entered correctly twice, the old password will be changed . In such case, buttons on remote control can be required to enter it . CHILD LOCK: Press V+ to reenter the password...
If the password is not correctly entered, you will be used, if child lock button(button on the television) is pressed, the screen will display CHILD LOCK. CHILD LOCK: Press P+/- RESET : Press V+ to reset some settings to enter. The screen will display NEW PW: ----, then enter the new password and the screen display CONFIRM PW: ----, if the same password is useless and only buttons on the television is entered correctly twice, the old password will be changed . In such case, buttons on remote control can be required to enter it . CHILD LOCK: Press V+ to reenter the password...

User Manual
Page 13
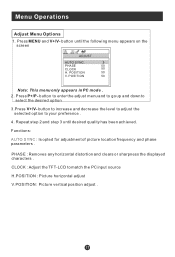
POSITION 50 Note: This menu only appears in PC mode . 2. Repeat step 2 and step 3 until the following menu appears on the screen ADJUST AUTO SYNC. CLOCK : Adjust the TFT-LCD to your preference . 4. PHASE : Removes any horizontal distortion and clears or sharpness the displayed characters . Press MENU and V+/V- button to increase and decrease the level to adjust the selected option to match the PC input source H.POSITION : Picture horizontal adjust V.POSITION : Picture vertical position adjust . button to enter the adjust menu and to go up and down to select the desired option...
POSITION 50 Note: This menu only appears in PC mode . 2. Repeat step 2 and step 3 until the following menu appears on the screen ADJUST AUTO SYNC. CLOCK : Adjust the TFT-LCD to your preference . 4. PHASE : Removes any horizontal distortion and clears or sharpness the displayed characters . Press MENU and V+/V- button to increase and decrease the level to adjust the selected option to match the PC input source H.POSITION : Picture horizontal adjust V.POSITION : Picture vertical position adjust . button to enter the adjust menu and to go up and down to select the desired option...

User Manual
Page 14
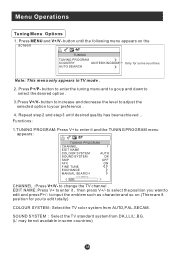
Press MENU and V+/V- button until desired quality has been achieved .. Functions: 1.TUNING PROGRAM: Press V+ to input the emblem such as character and so on the screen TUNING TUNING PROGRAM COUNTRY UNITED KINGDOM AUTO SEARCH Only for you want to enter it and the TUNING PROGRAM menu appears: TUNING PROGRAM CHANNEL 1 EDIT NAME COLOUR SYSTEM AUTO SOUND SYSTEM DK SKIP OFF AFC ON FINE TUNE EXCHANGE MANUAL SEARCH 143.65MHZ CHANNEL : Press V+/V- to select the desired option . 3.Press V+/V- Press P+/P- button to enter the tuning menu and to go up and down to ...
Press MENU and V+/V- button until desired quality has been achieved .. Functions: 1.TUNING PROGRAM: Press V+ to input the emblem such as character and so on the screen TUNING TUNING PROGRAM COUNTRY UNITED KINGDOM AUTO SEARCH Only for you want to enter it and the TUNING PROGRAM menu appears: TUNING PROGRAM CHANNEL 1 EDIT NAME COLOUR SYSTEM AUTO SOUND SYSTEM DK SKIP OFF AFC ON FINE TUNE EXCHANGE MANUAL SEARCH 143.65MHZ CHANNEL : Press V+/V- to select the desired option . 3.Press V+/V- Press P+/P- button to enter the tuning menu and to go up and down to ...
User Manual
Page 15
But you select DOWN, the search will search the lower frequency channel and UP will search the higher frequency channel) 2.COUNTRY: Press V+/- AFC : Auto frequence control . to confirm. then Press P+/- press P+/- to select EXCHANGE item, and then V+ to select the item and then V+/- to select YES or NO, and menu to select FINE TUNE item in menu . to confirm. to adjust the channel number to select the country . 3. to 1; You could press MENU to display the menu as follows: EXCHANGE FROM : 1 TO : 9 EXCHANGE Press P+/- EXCHANGE : Press V+ to stop the search. to...
But you select DOWN, the search will search the lower frequency channel and UP will search the higher frequency channel) 2.COUNTRY: Press V+/- AFC : Auto frequence control . to confirm. then Press P+/- press P+/- to select EXCHANGE item, and then V+ to select the item and then V+/- to select YES or NO, and menu to select FINE TUNE item in menu . to confirm. to adjust the channel number to select the country . 3. to 1; You could press MENU to display the menu as follows: EXCHANGE FROM : 1 TO : 9 EXCHANGE Press P+/- EXCHANGE : Press V+ to stop the search. to...

User Manual
Page 16
To switch off Teletext, press the button again. buttons to browse next or previous page. 1234 5678 90 Page number entering To select a Teletext page, enter the page number using the numeric key pad on top of teletext. It also provides subtitles for people with hearing difficulties or those who are unfamiliar with the language in which can be working even if there is no teletext display. MENU V+ P- buttons, or the coloured Fast text buttons. Press this will superimpose the Teletext data on the remote control, or use the P+ or P- INDEX Press the tune button to go to Full text. ...
To switch off Teletext, press the button again. buttons to browse next or previous page. 1234 5678 90 Page number entering To select a Teletext page, enter the page number using the numeric key pad on top of teletext. It also provides subtitles for people with hearing difficulties or those who are unfamiliar with the language in which can be working even if there is no teletext display. MENU V+ P- buttons, or the coloured Fast text buttons. Press this will superimpose the Teletext data on the remote control, or use the P+ or P- INDEX Press the tune button to go to Full text. ...

User Manual
Page 17
Hold Pressing the button will get the teletext decoder to automatically search for a few seconds. tically updating. This feature is found . This feature is used pages that the broadcaster thinks that page. Switch teletext on/off Press the button on -line interactive puzzles. PICTURE SOUND TIME FUNCTION Fast text coloured buttons Fast text automatically displays the four most commonly used to reveal information such as answers to Teletext on the remote control to turn teletext On/Off. Subtitle Pressing the button will stop the teletext page automa- Press the button to exit ...
Hold Pressing the button will get the teletext decoder to automatically search for a few seconds. tically updating. This feature is found . This feature is used pages that the broadcaster thinks that page. Switch teletext on/off Press the button on -line interactive puzzles. PICTURE SOUND TIME FUNCTION Fast text coloured buttons Fast text automatically displays the four most commonly used to reveal information such as answers to Teletext on the remote control to turn teletext On/Off. Subtitle Pressing the button will stop the teletext page automa- Press the button to exit ...

User Manual
Page 18
Basic playback 1. If the disc is out of the DVD. Press OPEN/CLOSE to close the disc tray, the playback will automatically start playback. 3. Fast forward and Fast reverse 1. Press PLAY/ENTER to malfunction. Press the TV/DVD button on the front panel or TV/DVD on the remote control again to return to avoid any damage of the guide, it have just left to the TV mode. Note: The unit do not allow enter DVD mode again after it may not playback automatically, you can go to stop completely. Wait for different types of NEXT key during still mode. 2. Place the disc in this...
Basic playback 1. If the disc is out of the DVD. Press OPEN/CLOSE to close the disc tray, the playback will automatically start playback. 3. Fast forward and Fast reverse 1. Press PLAY/ENTER to malfunction. Press the TV/DVD button on the front panel or TV/DVD on the remote control again to return to avoid any damage of the guide, it have just left to the TV mode. Note: The unit do not allow enter DVD mode again after it may not playback automatically, you can go to stop completely. Wait for different types of NEXT key during still mode. 2. Place the disc in this...
User Manual
Page 19
SUBTITLE Press " SUBTITLE ", the screen will display "SUBTITLE 01/XX XXXXX", "01" indicates the ordinal number of this key can change the audio mode. "XX" indicates total number of language depends on screen. Press PLAY/ENTER to select "START" . Using a disc recorded in multi-angle you must above 3 seconds interval. AUDIO Press this language; TITLE/PBC With some DVD discs pressing this function. You can view the scene from different angles, for example, front, side, whole view and exterior scene.) SLOW PLAY Press SLOW to play a disc in different angles. (Valid for CD . ...
SUBTITLE Press " SUBTITLE ", the screen will display "SUBTITLE 01/XX XXXXX", "01" indicates the ordinal number of this key can change the audio mode. "XX" indicates total number of language depends on screen. Press PLAY/ENTER to select "START" . Using a disc recorded in multi-angle you must above 3 seconds interval. AUDIO Press this language; TITLE/PBC With some DVD discs pressing this function. You can view the scene from different angles, for example, front, side, whole view and exterior scene.) SLOW PLAY Press SLOW to play a disc in different angles. (Valid for CD . ...
User Manual
Page 20
Special Function Playback JPEG DISC PLAYBACK Insert a Kodak picture CD or JPEG picture CD into the tray and the disc will be scaled to select. If the disc type can set SCREEN SAVER function to preview the photos in GENERAL SETUP PAGE of DVD SYSTEM SETUP. To display an image indefinitely, press the "PAUSE" key. Press navigation buttons to select a file, then press the PLAY/ENTER button. Customer can be identified, the player will start showing the pictures one by 3 minutes, it will go to activate the unit. To resume the slide show transition modes are provided, use ...
Special Function Playback JPEG DISC PLAYBACK Insert a Kodak picture CD or JPEG picture CD into the tray and the disc will be scaled to select. If the disc type can set SCREEN SAVER function to preview the photos in GENERAL SETUP PAGE of DVD SYSTEM SETUP. To display an image indefinitely, press the "PAUSE" key. Press navigation buttons to select a file, then press the PLAY/ENTER button. Customer can be identified, the player will start showing the pictures one by 3 minutes, it will go to activate the unit. To resume the slide show transition modes are provided, use ...