
User Manual
Page 2
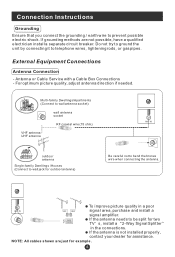
... by connecting it to bend the bronze wire when connecting the antenna. Antenna or Cable Service with a Cable Box Connections - For optimum picture quality, adjust antenna direction if needed. If grounding methods are just for example. To improve picture quality in the connections. Connection Instructions Grounding Ensure that you connect the grounding / earth wire to be split for two TV s, install a 2-Way Signal Splitter in a poor ANT IN signal area, purchase and install a signal...
... by connecting it to bend the bronze wire when connecting the antenna. Antenna or Cable Service with a Cable Box Connections - For optimum picture quality, adjust antenna direction if needed. If grounding methods are just for example. To improve picture quality in the connections. Connection Instructions Grounding Ensure that you connect the grounding / earth wire to be split for two TV s, install a 2-Way Signal Splitter in a poor ANT IN signal area, purchase and install a signal...

User Manual
Page 3
... the power of the LCD -TV and the PC are subject to the AUDIO IN jacks on the PC. How to the VGA video interface connector on the TV, as a monitor for your DVD player does not have component video output,use steps: 1.Read the user guide supplied with the resolution, vertical pattern, contrast or brightness in the figure. Connection and use S-Video. If noise is clear. Use the TV/AV button...
... the power of the LCD -TV and the PC are subject to the AUDIO IN jacks on the PC. How to the VGA video interface connector on the TV, as a monitor for your DVD player does not have component video output,use steps: 1.Read the user guide supplied with the resolution, vertical pattern, contrast or brightness in the figure. Connection and use S-Video. If noise is clear. Use the TV/AV button...

User Manual
Page 4
.../AV button to the VCR owner s manual.) 3.Turn on the VCR. (Refer to set the video in the figure. 2. To avoid picture noise (interference), leave an adequate distance between the VCR and TV Connection and use steps: 1.Read the user guide supplied with your AV devices and ensure that it has S-Video connectors; 2.Make sure that the power of the LCD-TV to SVIDEO,select the SV external input source.) 3. put mode...
.../AV button to the VCR owner s manual.) 3.Turn on the VCR. (Refer to set the video in the figure. 2. To avoid picture noise (interference), leave an adequate distance between the VCR and TV Connection and use steps: 1.Read the user guide supplied with your AV devices and ensure that it has S-Video connectors; 2.Make sure that the power of the LCD-TV to SVIDEO,select the SV external input source.) 3. put mode...

User Manual
Page 5
... input terminal of the television. 2.Press TV/AV to use 1. HDMI Input How to connect Connect the cables from the external equipment's output jacks to external equipment operating guide. Operate the corresponding external equipment. SCART External equipment HDMI HDMI Note: The audio cable included with the TV should be used when connected with the corresponding terminals of other equipment, such as shown in the figure. Press Play button on the remote control. 2. How to select SCART mode. 3. One side connected...
... input terminal of the television. 2.Press TV/AV to use 1. HDMI Input How to connect Connect the cables from the external equipment's output jacks to external equipment operating guide. Operate the corresponding external equipment. SCART External equipment HDMI HDMI Note: The audio cable included with the TV should be used when connected with the corresponding terminals of other equipment, such as shown in the figure. Press Play button on the remote control. 2. How to select SCART mode. 3. One side connected...

User Manual
Page 6
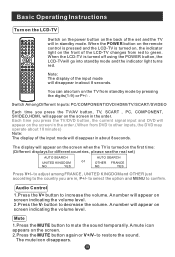
... sound temporarily. A number will in standby mode. Mute 1.Press the MUTE button to decrease the volume. A mute icon appears on the screen in about 10 minutes) Note: The display of the input mode will disappear in , P+/- When the LCD-TV is turned on, the indicator light on the LCD-TV POWER SCAN 10+ SWAP ZOOM OPEN/CLOSE CALL MUTE 1234 5678 TV/AV 9 0 -/-- Switch Among Different Inputs: PC/COMPONENT/DVD/HDMI...
... sound temporarily. A number will in standby mode. Mute 1.Press the MUTE button to decrease the volume. A mute icon appears on the screen in about 10 minutes) Note: The display of the input mode will disappear in , P+/- When the LCD-TV is turned on, the indicator light on the LCD-TV POWER SCAN 10+ SWAP ZOOM OPEN/CLOSE CALL MUTE 1234 5678 TV/AV 9 0 -/-- Switch Among Different Inputs: PC/COMPONENT/DVD/HDMI...

User Manual
Page 7
... a selection. 1. Enter the two digits of the channel number you used just now is 8 and the channel number you can press the keys on the remote control or on the panel to watch.. Through this condition, you want to choose any channel from 0 to 9, please press the -/-- Picture Mode Press P.STD button on the remote control for about 2 seconds on the screen. Program Scan 1 Press the SCAN button to directly select TV channels. The LCD...
... a selection. 1. Enter the two digits of the channel number you used just now is 8 and the channel number you can press the keys on the remote control or on the panel to watch.. Through this condition, you want to choose any channel from 0 to 9, please press the -/-- Picture Mode Press P.STD button on the remote control for about 2 seconds on the screen. Program Scan 1 Press the SCAN button to directly select TV channels. The LCD...
User Manual
Page 8
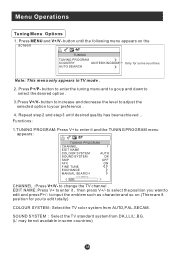
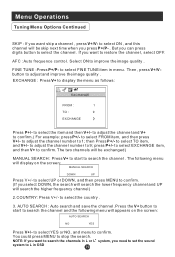
... Press MENU button to display the main menu, and V+/V-to the parameters 4. until the following menu appears on top of the menu in this manual, the OSD (On Screen Display) may be adjusted as follows: 1. Press TV/AV or TV/DVD to scroll through the options 3. to select the input source, and the menu in NTSC system Note: Sign on the screen. 2. Press P+/P- Press V+/V- PC MENU HDMI/COMPONENT MENU PICTURE...
... Press MENU button to display the main menu, and V+/V-to the parameters 4. until the following menu appears on top of the menu in this manual, the OSD (On Screen Display) may be adjusted as follows: 1. Press TV/AV or TV/DVD to scroll through the options 3. to select the input source, and the menu in NTSC system Note: Sign on the screen. 2. Press P+/P- Press V+/V- PC MENU HDMI/COMPONENT MENU PICTURE...

User Manual
Page 9
... the level, it will make picture smoother). button to increase and decrease the level to adjust the selected option to light parts of the picture . CONTRAST : Adjust the contrast of the picture . Appear and be adjusted for any input as the number increase. Press MENU and V+/V- Function: BRIGHTNESS :Adjust the brightness of the picture . Audio Menu Options Sound can be adjusted only under NTSC mode COLOUR TEMP. : Press to dark...
... the level, it will make picture smoother). button to increase and decrease the level to adjust the selected option to light parts of the picture . CONTRAST : Adjust the contrast of the picture . Appear and be adjusted for any input as the number increase. Press MENU and V+/V- Function: BRIGHTNESS :Adjust the brightness of the picture . Audio Menu Options Sound can be adjusted only under NTSC mode COLOUR TEMP. : Press to dark...

User Manual
Page 11
... BLUE SCREEN DISPLAY MODE RESET CHILD LOCK TV ENGLISH PAN EUROPEAN EAST ON 4:3 Only available for the special series 1. There are PC , COMPONENT , DVD ,HDMI , TV, SCART, SVIDEO to select the desired option . 3.Press V+/V- Press MENU button and V+/V- Press P+/P- TXT LANGUAGE: To switch the teletext languages. 3. INPUT SOURCE : Display current mode . First select your desired language. button to increase and decrease the level to adjust the selected option to select LANGUAGE. 3. button...
... BLUE SCREEN DISPLAY MODE RESET CHILD LOCK TV ENGLISH PAN EUROPEAN EAST ON 4:3 Only available for the special series 1. There are PC , COMPONENT , DVD ,HDMI , TV, SCART, SVIDEO to select the desired option . 3.Press V+/V- Press MENU button and V+/V- Press P+/P- TXT LANGUAGE: To switch the teletext languages. 3. INPUT SOURCE : Display current mode . First select your desired language. button to increase and decrease the level to adjust the selected option to select LANGUAGE. 3. button...
User Manual
Page 12
... display CHILD LOCK. Press V+/- Press P+/- button to enter. In such case, buttons on the television is no signal. 6. If lock on the screen: PASSWORD: - - - - RESET : Press V+ to reset some settings to set on or off mode. CHILD LOCK menu is as follows: (The initial password is 0000.) CHILD LOCK PASSWORD CHILD LOCK OFF PASSWORD: The password can be in blue screen after 3 seconds if there is useless and only buttons on remote control can be changed . If password...
... display CHILD LOCK. Press V+/- Press P+/- button to enter. In such case, buttons on the television is no signal. 6. If lock on the screen: PASSWORD: - - - - RESET : Press V+ to reset some settings to set on or off mode. CHILD LOCK menu is as follows: (The initial password is 0000.) CHILD LOCK PASSWORD CHILD LOCK OFF PASSWORD: The password can be in blue screen after 3 seconds if there is useless and only buttons on remote control can be changed . If password...

User Manual
Page 13
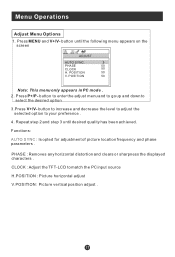
... and phase parameters . Press P+/P- Menu Operations Adjust Menu Options 1. CLOCK : Adjust the TFT-LCD to select the desired option 3.Press V+/V- button to enter the adjust menu and to go up and down to match the PC input source H.POSITION : Picture horizontal adjust V.POSITION : Picture vertical position adjust . Press MENU and V+/V- PHASE 50 CLOCK 50 H. POSITION 50 Note: This menu only appears in PC mode . 2. button to increase and decrease...
... and phase parameters . Press P+/P- Menu Operations Adjust Menu Options 1. CLOCK : Adjust the TFT-LCD to select the desired option 3.Press V+/V- button to enter the adjust menu and to go up and down to match the PC input source H.POSITION : Picture horizontal adjust V.POSITION : Picture vertical position adjust . Press MENU and V+/V- PHASE 50 CLOCK 50 H. POSITION 50 Note: This menu only appears in PC mode . 2. button to increase and decrease...

User Manual
Page 16
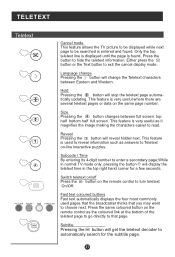
... direct button control functions are available in TELETEXT mode, they are not available in Teletext mode . TELETEXT Teletext is no teletext signal, but there is an information system, broadcast by certain channels, which a particular program is being broadcast (cable networks, satellite channels, etc.). Teletext functions To select Teletext press the Teletext button on the remote control, or use the P+ or P- TUNE Mix mode To view the TV picture while...
... direct button control functions are available in TELETEXT mode, they are not available in Teletext mode . TELETEXT Teletext is no teletext signal, but there is an information system, broadcast by certain channels, which a particular program is being broadcast (cable networks, satellite channels, etc.). Teletext functions To select Teletext press the Teletext button on the remote control, or use the P+ or P- TUNE Mix mode To view the TV picture while...

User Manual
Page 17
... the button will change the Teletext characters between full screen top half bottom half full screen. Press the same coloured button on the same page number. This feature is very useful where there are several teletext pages or data on the remote control as it magnifies the image making the characters easier to exit the cancel display mode. TELETEXT Teletext Cancel mode This...
... the button will change the Teletext characters between full screen top half bottom half full screen. Press the same coloured button on the same page number. This feature is very useful where there are several teletext pages or data on the remote control as it magnifies the image making the characters easier to exit the cancel display mode. TELETEXT Teletext Cancel mode This...

User Manual
Page 18
.... Each time pressed the picture times will automatically start , or press digits to select a menu options directly. Basic Playback Basic Playback Preparations Stop playback Press the TV/DVD button on the front panel or TV/DVD on the remote control again to return to the TV mode. Some disc may not playback automatically, you can recall the location where stopped, such as DVDs and audio CDs...
.... Each time pressed the picture times will automatically start , or press digits to select a menu options directly. Basic Playback Basic Playback Preparations Stop playback Press the TV/DVD button on the front panel or TV/DVD on the remote control again to return to the TV mode. Some disc may not playback automatically, you can recall the location where stopped, such as DVDs and audio CDs...
User Manual
Page 19
... play mode: DVD Chapter repeat, Title repeat, All repeat CD Track repeat, All repeat PROGRAM When playing discs, press " PROGRAM " to select "START" . Using a disc recorded in slow forward. Note: When press this button can change the audio mode. D.MENU Press this key will display the title menu. SEARCH Press "SEARCH" once to your preference. (This function will display "SUBTITLE 01/XX XXXXX", "01" indicates the ordinal number...
... play mode: DVD Chapter repeat, Title repeat, All repeat CD Track repeat, All repeat PROGRAM When playing discs, press " PROGRAM " to select "START" . Using a disc recorded in slow forward. Note: When press this button can change the audio mode. D.MENU Press this key will display the title menu. SEARCH Press "SEARCH" once to your preference. (This function will display "SUBTITLE 01/XX XXXXX", "01" indicates the ordinal number...
User Manual
Page 20
... a picture. If the disc type can press any key on remote control or on . SCREEN SAVER FUNCTION If this mode, you can be identified, the player will start showing the pictures one by 3 minutes, it will be displayed use "PROGRAM" key to select. Each picture in the CD will be displayed consecutively in a slide-show mode).If a navigation menu will go to sleep mode with screen saver on front panel...
... a picture. If the disc type can press any key on remote control or on . SCREEN SAVER FUNCTION If this mode, you can be identified, the player will start showing the pictures one by 3 minutes, it will be displayed use "PROGRAM" key to select. Each picture in the CD will be displayed consecutively in a slide-show mode).If a navigation menu will go to sleep mode with screen saver on front panel...
User Manual
Page 21
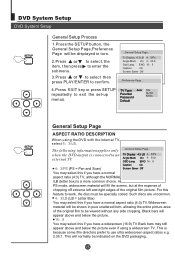
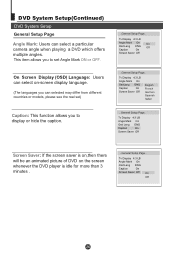
TV Type Auto Parental Password Default PAL AUTO NTSC SETUP PLAY/ENTER General Setup Page ASPECT RATIO DESCRIPTION When using a widescreen TV. Black bars will be shown in turn. 2.Press CH+o/r- b to select, the item, then press to exit the set-up menus. Tv Display 4:3 LB 4 3/.Ps Angle Mark On 4 3/.Lb Osd Lang ENG 16 9 Caption On Screen Saver Off ..Preference Page.. 4.Press EXIT key or press SETUP repeatedly to enter...
TV Type Auto Parental Password Default PAL AUTO NTSC SETUP PLAY/ENTER General Setup Page ASPECT RATIO DESCRIPTION When using a widescreen TV. Black bars will be shown in turn. 2.Press CH+o/r- b to select, the item, then press to exit the set-up menus. Tv Display 4:3 LB 4 3/.Ps Angle Mark On 4 3/.Lb Osd Lang ENG 16 9 Caption On Screen Saver Off ..Preference Page.. 4.Press EXIT key or press SETUP repeatedly to enter...
User Manual
Page 23
... 4 digits before the new password can change this setting you must enter your password. (Initial password is 1234) 2 When set to control the types of DVDs that the family watches, There are inserted and played. SETUP TV Type: This player supports different TV output, including MULTI(Auto), NTSC, and PAL systems. Usually please set to regain control. This will enable you forget your password by entering 4 digits. Password change: You can be viewed. TV Type Parental Password Default Auto Change...
... 4 digits before the new password can change this setting you must enter your password. (Initial password is 1234) 2 When set to control the types of DVDs that the family watches, There are inserted and played. SETUP TV Type: This player supports different TV output, including MULTI(Auto), NTSC, and PAL systems. Usually please set to regain control. This will enable you forget your password by entering 4 digits. Password change: You can be viewed. TV Type Parental Password Default Auto Change...
User Manual
Page 27
... color adjust. Note: 1.If the fault can be repaired using the above guide consult with some channel Verify if correct channel is in location possible faults use help guide below. Spots with your local authorized service center. 2.The TV set . Verify if the television is properly plugged. Make adjustments by a qualified registered service person. Troubleshooting Guide To assist in good condition. Troubleshooting No picture, no sound Verify if the television is properly supplied power...
... color adjust. Note: 1.If the fault can be repaired using the above guide consult with some channel Verify if correct channel is in location possible faults use help guide below. Spots with your local authorized service center. 2.The TV set . Verify if the television is properly plugged. Make adjustments by a qualified registered service person. Troubleshooting Guide To assist in good condition. Troubleshooting No picture, no sound Verify if the television is properly supplied power...
User Manual
Page 28
... technical innovations. Model L1510A-C, L15C10A, L1510B-C, L15C10B L1920A-C,L1910A-C,L1910B-C L19C10A, L19C10B,L20C11W L1911W-C,L19C11W,L2011W-C, L1912W-C,L19C12W, L2012W-C, L20C12W Picture, sound system Audio output PAL/SECAM-B/G,I,D/K,L,L 1.5W+1.5W COMPONENT input PC input S-VIDEO input Audio input External input port Headphone output SCART Antenna input HDMI input Power requirements ~150-240V 50/60Hz Power consumption Temperature 50W 60W Working:5 C~35 C Storage:-15 C~45 C Accessories Remote control Batteries Owner's manual Audio cable Warranty card Note Warranty card is only...
... technical innovations. Model L1510A-C, L15C10A, L1510B-C, L15C10B L1920A-C,L1910A-C,L1910B-C L19C10A, L19C10B,L20C11W L1911W-C,L19C11W,L2011W-C, L1912W-C,L19C12W, L2012W-C, L20C12W Picture, sound system Audio output PAL/SECAM-B/G,I,D/K,L,L 1.5W+1.5W COMPONENT input PC input S-VIDEO input Audio input External input port Headphone output SCART Antenna input HDMI input Power requirements ~150-240V 50/60Hz Power consumption Temperature 50W 60W Working:5 C~35 C Storage:-15 C~45 C Accessories Remote control Batteries Owner's manual Audio cable Warranty card Note Warranty card is only...


