
User Manual
Page 3
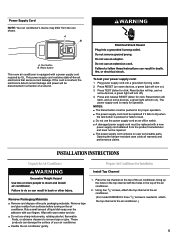
...: Plug into a grounded 3 prong outlet. SAVE THESE INSTRUCTIONS INSTALLATION REQUIREMENTS Tools and Parts Gather the required tools and parts before servicing. Top channel F. 31⁄32" screws (9) B. Remote control E. 13⁄32" screws: HWR08XCJ(3) HWR10XCJ,HWR12XCJ(4) 3 This symbol alerts you to move and install air conditioner. WARNING You can happen if the instructions are included in this manual and on your air conditioner, follow instructions. Unplug air conditioner before starting installation...
...: Plug into a grounded 3 prong outlet. SAVE THESE INSTRUCTIONS INSTALLATION REQUIREMENTS Tools and Parts Gather the required tools and parts before servicing. Top channel F. 31⁄32" screws (9) B. Remote control E. 13⁄32" screws: HWR08XCJ(3) HWR10XCJ,HWR12XCJ(4) 3 This symbol alerts you to move and install air conditioner. WARNING You can happen if the instructions are included in this manual and on your air conditioner, follow instructions. Unplug air conditioner before starting installation...

User Manual
Page 4
... type of plug on the side or back of where the power cord exits the air conditioner. (For model HWR08XCJ electrical outlet can be able to 12 amps ■ 15-amp time-delay fuse or circuit breaker ■ Use on the model and serial number label. Specific electrical requirements are supplied for double-hung windows. ■ Adequate wall support for your air conditioner are listed on single outlet circuit only. Check the location where the air conditioner...
... type of plug on the side or back of where the power cord exits the air conditioner. (For model HWR08XCJ electrical outlet can be able to 12 amps ■ 15-amp time-delay fuse or circuit breaker ■ Use on the model and serial number label. Specific electrical requirements are supplied for double-hung windows. ■ Adequate wall support for your air conditioner are listed on single outlet circuit only. Check the location where the air conditioner...
User Manual
Page 5
Reset button This room air conditioner is equipped with a new power supply cord obtained from the product manufacturer and must be replaced if it fails to trip when the test button is needed to attach the top channel to remove tape or glue. Press RESET (on some devices, a green light will turn on ). 3. Using four 13⁄32" screws, attach the top channel to the air conditioner. (For model HWR08XCJ three...
Reset button This room air conditioner is equipped with a new power supply cord obtained from the product manufacturer and must be replaced if it fails to trip when the test button is needed to attach the top channel to remove tape or glue. Press RESET (on some devices, a green light will turn on ). 3. Using four 13⁄32" screws, attach the top channel to the air conditioner. (For model HWR08XCJ three...

User Manual
Page 6
... the air conditioner before placing the air conditioner in the track on the right-hand side of the window opening B. Measure the width of the air conditioner cabinet. Center line 6 Prepare Window for the left-hand side curtain and frame. Width of the air conditioner. Mark the center line on the bottom of window opening . 2. Place the tabbed side of side curtain 2. NOTE: Your model...
... the air conditioner before placing the air conditioner in the track on the right-hand side of the window opening B. Measure the width of the air conditioner cabinet. Center line 6 Prepare Window for the left-hand side curtain and frame. Width of the air conditioner. Mark the center line on the bottom of window opening . 2. Place the tabbed side of side curtain 2. NOTE: Your model...

User Manual
Page 7
... side bracket installation on the outside of the air conditioner cabinet near the bottom. 7. Center the air conditioner in the side bracket and windowsill. 6. Lower the window sash behind the top channel to drill a starter hole through the holes in the window. Use 1⁄8" drill bit to hold the cabinet in place NOTE: Your model may differ from a grounded outlet. (For model HWR08XCJ electrical outlet...
... side bracket installation on the outside of the air conditioner cabinet near the bottom. 7. Center the air conditioner in the side bracket and windowsill. 6. Lower the window sash behind the top channel to drill a starter hole through the holes in the window. Use 1⁄8" drill bit to hold the cabinet in place NOTE: Your model may differ from a grounded outlet. (For model HWR08XCJ electrical outlet...

User Manual
Page 8
... right-hand curtain. See "Electrical Requirements." Attach the window lock bracket to drill a starter hole through the bottom hole in the side curtain and into the upper window. 3. Bottom View Complete Installation 1. Top of the upper window. Use a 1⁄8" drill bit to secure the window in the window lock bracket and into the window frame. 6. Press RESET on the power supply cord. Insert the foam seal behind...
... right-hand curtain. See "Electrical Requirements." Attach the window lock bracket to drill a starter hole through the bottom hole in the side curtain and into the upper window. 3. Bottom View Complete Installation 1. Top of the upper window. Use a 1⁄8" drill bit to secure the window in the window lock bracket and into the window frame. 6. Press RESET on the power supply cord. Insert the foam seal behind...
User Manual
Page 9
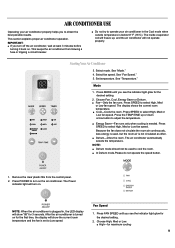
... setting. 2. Press MODE until you see the indicator light glow for maximum cooling· 9 AIR CONDITIONER USE Operating your air conditioner in , the LED display will show the current room temperature and the fan is turned on . This section explains proper air conditioner operation. Starting YourAir Conditioner 3. See "Temperature." Press SPEED to adjust the temperature. ■ Energy Saver-Fan runs only when cooling is plugged in the Cool mode when outside temperature is not circulated as often. ■ Dehum-Dries the room...
... setting. 2. Press MODE until you see the indicator light glow for maximum cooling· 9 AIR CONDITIONER USE Operating your air conditioner in , the LED display will show the current room temperature and the fan is turned on . This section explains proper air conditioner operation. Starting YourAir Conditioner 3. See "Temperature." Press SPEED to adjust the temperature. ■ Energy Saver-Fan runs only when cooling is plugged in the Cool mode when outside temperature is not circulated as often. ■ Dehum-Dries the room...

User Manual
Page 10
... the air conditioner will turn on the air conditioner control panel will turn on the air conditioner control panel will flash. NOTE: In Fan mode, the temperature cannot be set the Timer for minimum cooling Temperature ■ Press the TEMP/TIME up or down arrow button to increase or decrease the time. 3. Display will show remaining time. 2. Turn on the air conditioner. 2. For Fan, Cool or Energy Saver mode, adjust the fan speed to Fan, Cool, Energy Saver or Dehum. 3. Display will show the current room temperature. Display...
... the air conditioner will turn on the air conditioner control panel will turn on the air conditioner control panel will flash. NOTE: In Fan mode, the temperature cannot be set the Timer for minimum cooling Temperature ■ Press the TEMP/TIME up or down arrow button to increase or decrease the time. 3. Display will show remaining time. 2. Turn on the air conditioner. 2. For Fan, Cool or Energy Saver mode, adjust the fan speed to Fan, Cool, Energy Saver or Dehum. 3. Display will show the current room temperature. Display...
User Manual
Page 11
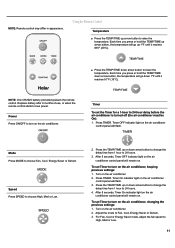
... down arrow button to change the delay time from 1 hour to 24 hours. 4. Using the Remote Control Temperature ■ Press the TEMP/TIME up 1ºF until it reaches 61°F (16°C). Timer To set Timer to 24 hours. 3. Mode Press MODE to Fan, Cool, Energy Saver or Dehum. 3. After 5 seconds, Timer OFF indicator light on the air conditioner control panel will remain on . Turn on the air conditioner. 2. Adjust the mode to choose Fan, Cool, Energy Saver or Dehum...
... down arrow button to change the delay time from 1 hour to 24 hours. 4. Using the Remote Control Temperature ■ Press the TEMP/TIME up 1ºF until it reaches 61°F (16°C). Timer To set Timer to 24 hours. 3. Mode Press MODE to Fan, Cool, Energy Saver or Dehum. 3. After 5 seconds, Timer OFF indicator light on the air conditioner control panel will remain on . Turn on the air conditioner. 2. Adjust the mode to choose Fan, Cool, Energy Saver or Dehum...

User Manual
Page 12
...;C). To see whether it needs cleaning. Cleaning the Air Filter The air filter is showing the remaining time, press TIMER untill Timer indicator light turns off the air conditioner. 2. Display on the air conditioner control panel will show the current room temperature. The water droplets help cool the condenser. ■ Air movement from the fan. ■ Clicks from the thermostat cycle. ■ Vibrations or noise due to give you control the direction of water hitting the condenser, causing a pinging or...
...;C). To see whether it needs cleaning. Cleaning the Air Filter The air filter is showing the remaining time, press TIMER untill Timer indicator light turns off the air conditioner. 2. Display on the air conditioner control panel will show the current room temperature. The water droplets help cool the condenser. ■ Air movement from the fan. ■ Clicks from the thermostat cycle. ■ Vibrations or noise due to give you control the direction of water hitting the condenser, causing a pinging or...

User Manual
Page 13
... "Electrical Requirements." ■ The Power button has not been pressed or the Mode control knob is being used . Air dry the front panel completely. 4. The expense of the correct capacity. Replace the air filter. 5. Turn on the air conditioner. Call your responsibility. Replace the fuse or reset the circuit breaker. Wait for power to be restored. ■ The power supply cord is your local authorized dealer to resume operation. ■ A household fuse has...
... "Electrical Requirements." ■ The Power button has not been pressed or the Mode control knob is being used . Air dry the front panel completely. 4. The expense of the correct capacity. Replace the air filter. 5. Turn on the air conditioner. Call your responsibility. Replace the fuse or reset the circuit breaker. Wait for power to be restored. ■ The power supply cord is your local authorized dealer to resume operation. ■ A household fuse has...

User Manual
Page 14
... your electrical current can trip (Reset button will turn on some devices, a green light will turn on the size of the room being used. Water drips from curtains, blinds, furniture, etc. ■ The outside temperature is below 61°F (16°C). Air conditioner cycles on the air conditioner. ■ The air conditioner is excessive heat or moisture (open . Install the air conditioner in cooling mode ■ The air conditioner is not properly leveled. Adjust the TEMP/TIME control...
... your electrical current can trip (Reset button will turn on some devices, a green light will turn on the size of the room being used. Water drips from curtains, blinds, furniture, etc. ■ The outside temperature is below 61°F (16°C). Air conditioner cycles on the air conditioner. ■ The air conditioner is excessive heat or moisture (open . Install the air conditioner in cooling mode ■ The air conditioner is not properly leveled. Adjust the TEMP/TIME control...

User Manual
Page 15
... model and serial number information below . In the U.S.A. It may save you need to : Haier America 1356 Broadway New York, NY 10018 Please include a daytime phone number in your complete model number and serial number. Our consultants provide assistance with the same precision used to repair parts distributors, and service companies. Whenever you use only factory-specified replacement parts. See "Electrical Requirements" for assistance or service, please check "Troubleshooting...
... model and serial number information below . In the U.S.A. It may save you need to : Haier America 1356 Broadway New York, NY 10018 Please include a daytime phone number in your complete model number and serial number. Our consultants provide assistance with the same precision used to repair parts distributors, and service companies. Whenever you use only factory-specified replacement parts. See "Electrical Requirements" for assistance or service, please check "Troubleshooting...

User Manual
Page 16
... to state. FIVE YEAR LIMITED WARRANTY ON THE SEALED SYSTEM The sealed system and compressor (hermetic compressor, condenser and evaporator) contained in normal household use . 6. Haier America will repair or replace any mechanical, electrical part or the compressor, which vary from the date of 12 months. For commercial or rental application, the warranty is for the removal of defective parts and installation of the Service Depot nearest you...
... to state. FIVE YEAR LIMITED WARRANTY ON THE SEALED SYSTEM The sealed system and compressor (hermetic compressor, condenser and evaporator) contained in normal household use . 6. Haier America will repair or replace any mechanical, electrical part or the compressor, which vary from the date of 12 months. For commercial or rental application, the warranty is for the removal of defective parts and installation of the Service Depot nearest you...


