User Manual
Page 2
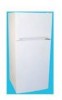
... not use and care guide. 2) This refrigerator must be dangerous to these extremely cold surfaces. 9) Do not refreeze foods, which have been thawed completely. Skin may adhere to eat." "...Even partial thawing and re-freezing reduce the eating quality of its intended purpose as you remove the doors and leave the shelves in defrosting your refrigerator. 7) If your refrigerator before using this appliance...
... not use and care guide. 2) This refrigerator must be dangerous to these extremely cold surfaces. 9) Do not refreeze foods, which have been thawed completely. Skin may adhere to eat." "...Even partial thawing and re-freezing reduce the eating quality of its intended purpose as you remove the doors and leave the shelves in defrosting your refrigerator. 7) If your refrigerator before using this appliance...
User Manual
Page 3
... not operate your refrigerator. English 10) This refrigerator should not be recessed or built-in place so that children may not easily climb inside. Thank you in getting the best use manual will need it to -use from your refrigerator in back of explosive fumes. This easy-to obtain warranty service. 2 They are on a label in the presence of the refrigerator. Model number Serial number Date of...
... not operate your refrigerator. English 10) This refrigerator should not be recessed or built-in place so that children may not easily climb inside. Thank you in getting the best use manual will need it to -use from your refrigerator in back of explosive fumes. This easy-to obtain warranty service. 2 They are on a label in the presence of the refrigerator. Model number Serial number Date of...
User Manual
Page 4
... Refrigerator 5 Leveling Your Refrigerator 5 Proper Air Circulation 5 Electrical Requirements 5 Use of Extension Cords 5 Install Limitations 6 Door Alignment 6 Reversing the Door Swing 6 Dismantling ...7 Reinstallation ...7 Refrigerator Features and Use 8 Adjustable Temperature dial 8 Freezer Temperature Control 8 Refrigerator Interior Shelves 8 Utility Drawer and Cover 9 Crisper and Crisper Cover 10 Crisper Humidity Control 11 Proper Refrigerator Care and Cleaning 14 Light Bulb Replacement 14 Power Interruptions 15 Vacation and Moving Care 15 Troubleshooting 15-16 Warranty...
... Refrigerator 5 Leveling Your Refrigerator 5 Proper Air Circulation 5 Electrical Requirements 5 Use of Extension Cords 5 Install Limitations 6 Door Alignment 6 Reversing the Door Swing 6 Dismantling ...7 Reinstallation ...7 Refrigerator Features and Use 8 Adjustable Temperature dial 8 Freezer Temperature Control 8 Refrigerator Interior Shelves 8 Utility Drawer and Cover 9 Crisper and Crisper Cover 10 Crisper Humidity Control 11 Proper Refrigerator Care and Cleaning 14 Light Bulb Replacement 14 Power Interruptions 15 Vacation and Moving Care 15 Troubleshooting 15-16 Warranty...
User Manual
Page 5
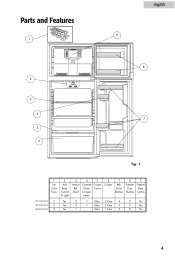
Parts and Features 1 English 9 8 2 3 4 7 5 6 fig. 1 1 Ice Cube Trays 2 Adj. Door Shelves 8 Freezer Door Shelves 9 Freezer Temp. Control & Light 3 4 5 Interior Ref. Shelf Covered Dairy Compar tment Crisper Cover 6 Crisper 7 Refr. Contro HRF12WNDWW 2 Yes 3 HRF10WNDWW 2 Yes 3 HRF08WNDWW 2 Yes 1 1 Glass 1 Cear 4 1 Glass 1 Cear 3 Glass 1 Cear 3 2 Yes 2 Yes 2 Yes 4 Temp.
Parts and Features 1 English 9 8 2 3 4 7 5 6 fig. 1 1 Ice Cube Trays 2 Adj. Door Shelves 8 Freezer Door Shelves 9 Freezer Temp. Control & Light 3 4 5 Interior Ref. Shelf Covered Dairy Compar tment Crisper Cover 6 Crisper 7 Refr. Contro HRF12WNDWW 2 Yes 3 HRF10WNDWW 2 Yes 3 HRF08WNDWW 2 Yes 1 1 Glass 1 Cear 4 1 Glass 1 Cear 3 Glass 1 Cear 3 2 Yes 2 Yes 2 Yes 4 Temp.
User Manual
Page 6
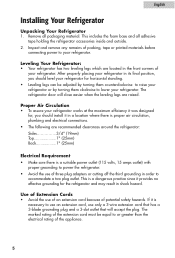
...; To assure your refrigerator. English Installing Your Refrigerator Unpacking Your Refrigerator 1. The refrigerator door will accept the plug. This is proper air circulation, plumbing and electrical connections. • The following are raised. This includes the foam base and all packaging material. Use of Extension Cords • Avoid the use of packing, tape or printed materials before connecting power to lower your refrigerator works at the maximum...
...; To assure your refrigerator. English Installing Your Refrigerator Unpacking Your Refrigerator 1. The refrigerator door will accept the plug. This is proper air circulation, plumbing and electrical connections. • The following are raised. This includes the foam base and all packaging material. Use of Extension Cords • Avoid the use of packing, tape or printed materials before connecting power to lower your refrigerator works at the maximum...
User Manual
Page 7
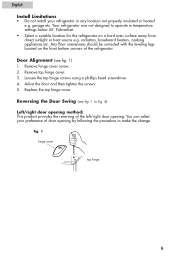
.... 4) Left/right door opening method: This product provides the reversing of the left/right door opening by following the procedure to operate in any location not properly insulated or heated e.g. garage etc. English Install Limitations • Do not install your preference of the refrigerator. Remove hinge cover screw. 2. Reversing the Door Swing (see fig. 1) 1. Loosen the top hinge screws using a phillips head screwdriver. 4. Remove top hinge cover. 3. You can select your refrigerator in temperature settings...
.... 4) Left/right door opening method: This product provides the reversing of the left/right door opening by following the procedure to operate in any location not properly insulated or heated e.g. garage etc. English Install Limitations • Do not install your preference of the refrigerator. Remove hinge cover screw. 2. Reversing the Door Swing (see fig. 1) 1. Loosen the top hinge screws using a phillips head screwdriver. 4. Remove top hinge cover. 3. You can select your refrigerator in temperature settings...
User Manual
Page 8
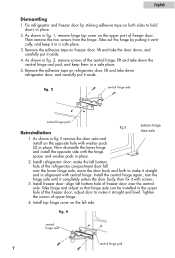
... from the hinge. As shown in fig 3 remove the door axle and install on the left bottom fig. 3 hole of upper hinge. 4. Install the central hinge again, turn the hinge axle until it completely enters the door body, then fix it straight and level. Install freezer door: align left bottom hole of freezer door over the lower hinge axle, move the door back and forth to make the left side. Install top hinge cover on the...
... from the hinge. As shown in fig 3 remove the door axle and install on the left bottom fig. 3 hole of upper hinge. 4. Install the central hinge again, turn the hinge axle until it completely enters the door body, then fix it straight and level. Install freezer door: align left bottom hole of freezer door over the lower hinge axle, move the door back and forth to make the left side. Install top hinge cover on the...
User Manual
Page 9
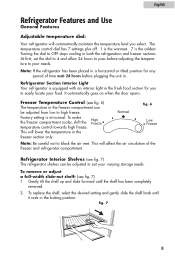
... door opens. Factory setting is the coldest. fig. 6 Note: Be careful not to OFF stops cooling in the locking position. Gently tilt the shelf up and slide forward until it rests in both the refrigeration and freezer sections. Freezer Temperature Control (see fig. 7) 1. To replace the shelf, select the desired setting and gently slide the shelf back until the shelf has been completely removed. 2. This will affect the air...
... door opens. Factory setting is the coldest. fig. 6 Note: Be careful not to OFF stops cooling in the locking position. Gently tilt the shelf up and slide forward until it rests in both the refrigeration and freezer sections. Freezer Temperature Control (see fig. 7) 1. To replace the shelf, select the desired setting and gently slide the shelf back until the shelf has been completely removed. 2. This will affect the air...
User Manual
Page 10
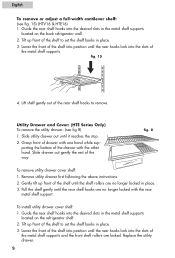
... instructions. 2. Gently tilt up front of the shelf to set the shelf hooks in place. 3. Guide the rear shelf hooks into the slots of the drawer with the rear metal shelf support. fig. 15 4. fig. 8 To remove utility drawer cover shelf: 1. Tilt up front of the rear shelf hooks to set the shelf hooks in place. 3. Pull the shelf gently until the rear shelf hooks are locked. English To remove or adjust a full-width cantilever shelf...
... instructions. 2. Gently tilt up front of the shelf to set the shelf hooks in place. 3. Guide the rear shelf hooks into the slots of the drawer with the rear metal shelf support. fig. 15 4. fig. 8 To remove utility drawer cover shelf: 1. Tilt up front of the rear shelf hooks to set the shelf hooks in place. 3. Pull the shelf gently until the rear shelf hooks are locked. English To remove or adjust a full-width cantilever shelf...
User Manual
Page 11
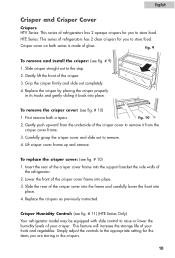
.... 4. Simply adjust the controls to the appropriate setting for you to raise or lower the humidity levels of your fruits and vegetables. Grip the crisper firmly and slide out completely. 4. First remove both series is made of glass. Slide the rear of the crisper cover into the frame and carefully lower the front into the support bracket the side walls of the refrigerator...
.... 4. Simply adjust the controls to the appropriate setting for you to raise or lower the humidity levels of your fruits and vegetables. Grip the crisper firmly and slide out completely. 4. First remove both series is made of glass. Slide the rear of the crisper cover into the frame and carefully lower the front into the support bracket the side walls of the refrigerator...
User Manual
Page 12
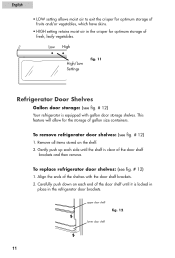
... gallon door storage shelves. This feature will allow for the storage of the door shelf brackets and then remove. upper door shelf fig. 12 lower door shelf 11 English • LOW setting allows moist air to exit the crisper for optimum storage of fruits and/or vegetables, which have skins. • HIGH setting retains moist air in the refrigerator door brackets. To remove refrigerator door shelves: (see fig. # 12) 1. To replace refrigerator door shelves: (see fig. # 12) 1.
... gallon door storage shelves. This feature will allow for the storage of the door shelf brackets and then remove. upper door shelf fig. 12 lower door shelf 11 English • LOW setting allows moist air to exit the crisper for optimum storage of fruits and/or vegetables, which have skins. • HIGH setting retains moist air in the refrigerator door brackets. To remove refrigerator door shelves: (see fig. # 12) 1. To replace refrigerator door shelves: (see fig. # 12) 1.
User Manual
Page 13
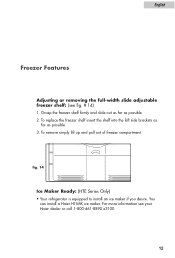
To remove simply lift up and pull out of freezer compartment. For more information see fig. # 14) 1. Grasp the freezer shelf firmly and slide out as far as possible. 3. You can install a Haier HI1MK ice maker. To replace the freezer shelf insert the shelf into the left side brackets as far as possible. 2. English Freezer Features Adjusting or removing the full-width slide adjustable freezer shelf: (see your Haier dealer or call 1-800-461-8890 x3100. 12 fig. 14 Ice Maker Ready: (HTE Series Only) • Your refrigerator is equipped to install an ice maker if you desire.
To remove simply lift up and pull out of freezer compartment. For more information see fig. # 14) 1. Grasp the freezer shelf firmly and slide out as far as possible. 3. You can install a Haier HI1MK ice maker. To replace the freezer shelf insert the shelf into the left side brackets as far as possible. 2. English Freezer Features Adjusting or removing the full-width slide adjustable freezer shelf: (see your Haier dealer or call 1-800-461-8890 x3100. 12 fig. 14 Ice Maker Ready: (HTE Series Only) • Your refrigerator is equipped to install an ice maker if you desire.
User Manual
Page 14
... fan circulating air inside the interior of your unit to maintain the temperature you have selected. • Boiling water, gurgling sounds or slight vibrations that are the result of the refrigerant circulating through the cooling coils. • Sizzling or popping sounds resulting from frost melting during the defrost cycle and dripping on the defrost heater. • The sound of dripping water as ice melts...
... fan circulating air inside the interior of your unit to maintain the temperature you have selected. • Boiling water, gurgling sounds or slight vibrations that are the result of the refrigerant circulating through the cooling coils. • Sizzling or popping sounds resulting from frost melting during the defrost cycle and dripping on the defrost heater. • The sound of dripping water as ice melts...
User Manual
Page 15
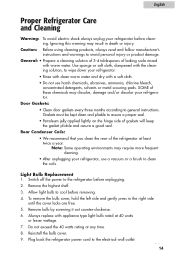
... are free. 5. Door Gaskets: • Clean door gaskets every three months according to avoid personal injury or product damage. Remove the highest shelf. 3. SOME of gaskets will keep the gasket pliable and assure a good seal. Reinstall the bulb cover. 9. Ignoring this warning may dissolve, damage and/or discolor your refrigerator. • Rinse with clean warm water and dry with warm water. Use sponge or soft cloth, dampened with appliance type light bulb rated...
... are free. 5. Door Gaskets: • Clean door gaskets every three months according to avoid personal injury or product damage. Remove the highest shelf. 3. SOME of gaskets will keep the gasket pliable and assure a good seal. Reinstall the bulb cover. 9. Ignoring this warning may dissolve, damage and/or discolor your refrigerator. • Rinse with clean warm water and dry with warm water. Use sponge or soft cloth, dampened with appliance type light bulb rated...
User Manual
Page 16
... down. Food temperature appears too warm • May be in freezer and refrigerator. Food temperature is too cold • If temperature control setting is too cold, adjust to operate. Remove the power cord from frozen food packages. Clean inside . Possible damage to "General cleaning" section. Prop doors open, so air may be power interruptions due to AC outlet. English Power Interruptions • Occasionally there may circulate inside the refrigerator before Compressor starts to a warmer setting and allow...
... down. Food temperature appears too warm • May be in freezer and refrigerator. Food temperature is too cold • If temperature control setting is too cold, adjust to operate. Remove the power cord from frozen food packages. Clean inside . Possible damage to "General cleaning" section. Prop doors open, so air may be power interruptions due to AC outlet. English Power Interruptions • Occasionally there may circulate inside the refrigerator before Compressor starts to a warmer setting and allow...
User Manual
Page 17
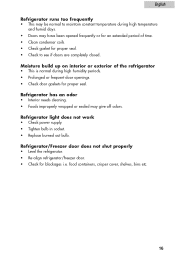
...; Level the refrigerator. • Re-align refrigerator/freezer door. • Check for proper seal. Refrigerator has an odor • Interior needs cleaning. • Foods improperly wrapped or sealed may have been opened frequently or for an extended period of the refrigerator • This is normal during high humidity periods. • Prolonged or frequent door openings. • Check door gaskets for blockages i.e. Refrigerator light does not work • Check power supply...
...; Level the refrigerator. • Re-align refrigerator/freezer door. • Check for proper seal. Refrigerator has an odor • Interior needs cleaning. • Foods improperly wrapped or sealed may have been opened frequently or for an extended period of the refrigerator • This is normal during high humidity periods. • Prolonged or frequent door openings. • Check door gaskets for blockages i.e. Refrigerator light does not work • Check power supply...
User Manual
Page 18
... components caused by other than household use. Decorative trims or replaceable light bulbs. The mechanical and electrical parts, which proves to be no charge to the authorized service center before warranty repairs are covered in lieu of proper care and maintenance or incorrect current or voltage. There will repair or replace, at our discretion any covered items during the warranty period so specified. 2. Damages in...
... components caused by other than household use. Decorative trims or replaceable light bulbs. The mechanical and electrical parts, which proves to be no charge to the authorized service center before warranty repairs are covered in lieu of proper care and maintenance or incorrect current or voltage. There will repair or replace, at our discretion any covered items during the warranty period so specified. 2. Damages in...


