User Manual
Page 2
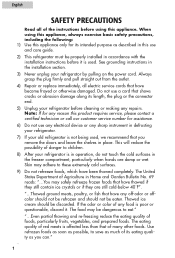
...poor or questionable, discard it is affected less than that have become frayed or otherwise damaged. Do not use and care guide. 2) This refrigerator must be discarded. The United States Department of foods, particularly fruits, vegetables, and prepared foods. "...Thawed ground meats, poultry, or fish ...wet. Use refrozen foods as soon as possible, to save as you remove the doors and leave the shelves in defrosting your refrigerator. 7) If your refrigerator by pulling on the power cord. When using this use a cord that shows cracks or abrasion damage along its intended purpose...
...poor or questionable, discard it is affected less than that have become frayed or otherwise damaged. Do not use and care guide. 2) This refrigerator must be discarded. The United States Department of foods, particularly fruits, vegetables, and prepared foods. "...Thawed ground meats, poultry, or fish ...wet. Use refrozen foods as soon as possible, to save as you remove the doors and leave the shelves in defrosting your refrigerator. 7) If your refrigerator by pulling on the power cord. When using this use a cord that shows cracks or abrasion damage along its intended purpose...
User Manual
Page 3
...may not easily climb inside. It is designed for using our Haier product. Leave the shelves in an enclosed cabinet. They are on a label in getting the best use manual will need it to your refrigerator. Before you in back of explosive fumes. Thank you for ...freestanding installation only. 11) Do not operate your old refrigerator or freezer, take off the doors. You will guide you throw away your refrigerator in the presence of the refrigerator. Model number Serial number Date of child entrapment. SAVE THESE INSTRUCTIONS For Future ...
...may not easily climb inside. It is designed for using our Haier product. Leave the shelves in an enclosed cabinet. They are on a label in getting the best use manual will need it to your refrigerator. Before you in back of explosive fumes. Thank you for ...freestanding installation only. 11) Do not operate your old refrigerator or freezer, take off the doors. You will guide you throw away your refrigerator in the presence of the refrigerator. Model number Serial number Date of child entrapment. SAVE THESE INSTRUCTIONS For Future ...
User Manual
Page 4
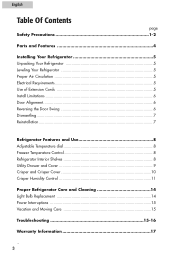
... Contents page Safety Precautions 1-2 Parts and Features 4 Installing Your Refrigerator 5 Unpacking Your Refrigerator 5 Leveling Your Refrigerator 5 Proper Air Circulation 5 Electrical Requirements 5 Use of Extension Cords 5 Install Limitations 6 Door Alignment 6 Reversing the Door Swing 6 Dismantling ...7 Reinstallation ...7 Refrigerator Features and Use 8 Adjustable Temperature dial 8 Freezer Temperature Control 8 Refrigerator Interior Shelves 8 Utility Drawer and Cover 9 Crisper and Crisper...
... Contents page Safety Precautions 1-2 Parts and Features 4 Installing Your Refrigerator 5 Unpacking Your Refrigerator 5 Leveling Your Refrigerator 5 Proper Air Circulation 5 Electrical Requirements 5 Use of Extension Cords 5 Install Limitations 6 Door Alignment 6 Reversing the Door Swing 6 Dismantling ...7 Reinstallation ...7 Refrigerator Features and Use 8 Adjustable Temperature dial 8 Freezer Temperature Control 8 Refrigerator Interior Shelves 8 Utility Drawer and Cover 9 Crisper and Crisper...
User Manual
Page 6
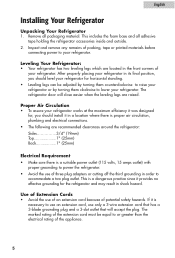
... 3-blade grounding plug and a 3-slot outlet that will close easier when the leveling legs are located in the front corners of your refrigerator works at the maximum efficiency it provides no effective grounding for , you should install it in a location where there is proper air ...circulation, plumbing and electrical connections. • The following are recommended clearances around the refrigerator: Sides 3/4" (19mm) Top 1" (25mm) Back 1" (25mm) Electrical Requirement • Make sure there is a dangerous practice since it was designed ...
... 3-blade grounding plug and a 3-slot outlet that will close easier when the leveling legs are located in the front corners of your refrigerator works at the maximum efficiency it provides no effective grounding for , you should install it in a location where there is proper air ...circulation, plumbing and electrical connections. • The following are recommended clearances around the refrigerator: Sides 3/4" (19mm) Top 1" (25mm) Back 1" (25mm) Electrical Requirement • Make sure there is a dangerous practice since it was designed ...
User Manual
Page 7
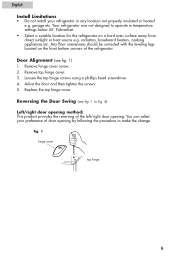
...heated e.g. radiators, baseboard heaters, cooking appliances etc. Replace the top hinge cover. You can select your refrigerator in temperature settings below 55˚ Fahrenheit. • Select a suitable location for the refrigerator on the front bottom corners of the left/right door opening. Loosen the top hinge screws using a phillips... of door opening by following the procedure to fig. 4) Left/right door opening method: This product provides the reversing of the refrigerator. Door Alignment (see fig. 1 to make the change. Reversing the Door Swing (see fig. 1) 1.
...heated e.g. radiators, baseboard heaters, cooking appliances etc. Replace the top hinge cover. You can select your refrigerator in temperature settings below 55˚ Fahrenheit. • Select a suitable location for the refrigerator on the front bottom corners of the left/right door opening. Loosen the top hinge screws using a phillips... of door opening by following the procedure to fig. 4) Left/right door opening method: This product provides the reversing of the refrigerator. Door Alignment (see fig. 1 to make the change. Reversing the Door Swing (see fig. 1) 1.
User Manual
Page 8
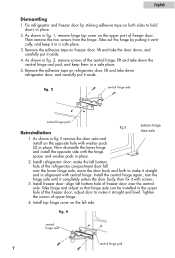
.... 4 central hinge axle central hinge pad 8 7 As shown in place. 2. Remove the adhesive tape on the upper part of the refrigerator compartment door fall over the central axle. Now dismantle the lower hinge and install the opposite side with central hinge. Install the central hinge again...carefully put it straight and in alignment with the hinge spacer and washer pads in fig. 2, remove screws of the freezer door; Install refrigerator door: make the left bottom hole of upper hinge. 4. Install freezer door: align left bottom fig. 3 hole of freezer door. ...
.... 4 central hinge axle central hinge pad 8 7 As shown in place. 2. Remove the adhesive tape on the upper part of the refrigerator compartment door fall over the central axle. Now dismantle the lower hinge and install the opposite side with central hinge. Install the central hinge again...carefully put it straight and in alignment with the hinge spacer and washer pads in fig. 2, remove screws of the freezer door; Install refrigerator door: make the left bottom hole of upper hinge. 4. Install freezer door: align left bottom fig. 3 hole of freezer door. ...
User Manual
Page 9
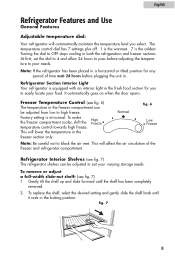
... and allow 24 hours to pass before plugging the unit in the fresh food section for any period of the freezer and refrigerator compartment. This will automatically maintain the temperature level you to easily locate your food. Turning the dial to block the air vent... in . Gently tilt the shelf up and slide forward until it rests in the freezer section only. English Refrigerator Features and Use General Features Adjustable temperature dial: Your refrigerator will affect the air circulation of time wait 24 hours before adjusting the temperature to your needs. This will...
... and allow 24 hours to pass before plugging the unit in the fresh food section for any period of the freezer and refrigerator compartment. This will automatically maintain the temperature level you to easily locate your food. Turning the dial to block the air vent... in . Gently tilt the shelf up and slide forward until it rests in the freezer section only. English Refrigerator Features and Use General Features Adjustable temperature dial: Your refrigerator will affect the air circulation of time wait 24 hours before adjusting the temperature to your needs. This will...
User Manual
Page 10
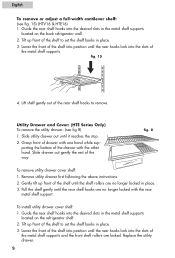
... out until the rear hooks lock into the slots of the shelf into the desired slots in the metal shelf supports located on the back refrigerator wall. 2. To install utility drawer cover shelf: 1. Utility Drawer and Cover: (HTE Series Only) To remove the utility drawer: (see fig. 15) (HTV16 & HTE16... 3. Tilt up front of the shelf into position until the rear hooks lock into the desired slots in the metal shelf supports located on the refrigerator shelf. 2. Guide the rear shelf hooks into position until it reaches the stop. 2. Grasp front of drawer with the other hand. English To...
... out until the rear hooks lock into the slots of the shelf into the desired slots in the metal shelf supports located on the back refrigerator wall. 2. To install utility drawer cover shelf: 1. Utility Drawer and Cover: (HTE Series Only) To remove the utility drawer: (see fig. 15) (HTV16 & HTE16... 3. Tilt up front of the shelf into position until the rear hooks lock into the desired slots in the metal shelf supports located on the refrigerator shelf. 2. Guide the rear shelf hooks into position until it reaches the stop. 2. Grasp front of drawer with the other hand. English To...
User Manual
Page 11
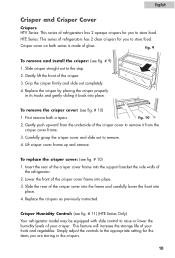
...fig. # 10) 1. This feature will increase the storage life of your crisper. English Crisper and Crisper Cover Crispers HTV Series: This series of refrigerators has 2 opaque crispers for you to store food. Slide crisper straight out to the appropriate setting for you to raise or lower the humidity levels...the crispers. 10 Lift crisper cover frame up and remove. Slide the rear of your fruits and vegetables. HTE Series: This series of refrigerators has 2 clear crispers for the items you are storing in its tracks and gently sliding it from the underside of the crisper cover ...
...fig. # 10) 1. This feature will increase the storage life of your crisper. English Crisper and Crisper Cover Crispers HTV Series: This series of refrigerators has 2 opaque crispers for you to store food. Slide crisper straight out to the appropriate setting for you to raise or lower the humidity levels...the crispers. 10 Lift crisper cover frame up and remove. Slide the rear of your fruits and vegetables. HTE Series: This series of refrigerators has 2 clear crispers for the items you are storing in its tracks and gently sliding it from the underside of the crisper cover ...
User Manual
Page 12
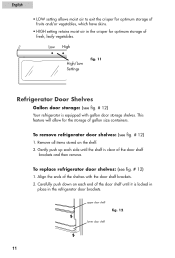
... 2. This feature will allow for optimum storage of fresh, leafy vegetables. To replace refrigerator door shelves: (see fig. # 12) 1. To remove refrigerator door shelves: (see fig. # 12) 1. upper door shelf fig. 12 lower door shelf 11 English • LOW setting allows moist air to exit the crisper..., which have skins. • HIGH setting retains moist air in the refrigerator door brackets. Low High High/Low Settings fig. 11 Refrigerator Door Shelves Gallon door storage: (see fig. # 12) Your refrigerator is clear of the door shelf brackets and then remove. Gently push up...
... 2. This feature will allow for optimum storage of fresh, leafy vegetables. To replace refrigerator door shelves: (see fig. # 12) 1. To remove refrigerator door shelves: (see fig. # 12) 1. upper door shelf fig. 12 lower door shelf 11 English • LOW setting allows moist air to exit the crisper..., which have skins. • HIGH setting retains moist air in the refrigerator door brackets. Low High High/Low Settings fig. 11 Refrigerator Door Shelves Gallon door storage: (see fig. # 12) Your refrigerator is clear of the door shelf brackets and then remove. Gently push up...
User Manual
Page 13
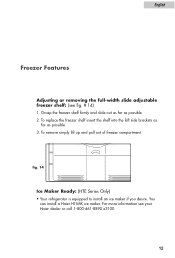
English Freezer Features Adjusting or removing the full-width slide adjustable freezer shelf: (see your Haier dealer or call 1-800-461-8890 x3100. 12 fig. 14 Ice Maker Ready: (HTE Series Only) • Your refrigerator is equipped to install an ice maker if you desire. To replace the freezer shelf insert the shelf into the left side brackets as far as possible. 2. For more information see fig. # 14) 1. You can install a Haier HI1MK ice maker. Grasp the freezer shelf firmly and slide out as far as possible. 3. To remove simply lift up and pull out of freezer compartment.
English Freezer Features Adjusting or removing the full-width slide adjustable freezer shelf: (see your Haier dealer or call 1-800-461-8890 x3100. 12 fig. 14 Ice Maker Ready: (HTE Series Only) • Your refrigerator is equipped to install an ice maker if you desire. To replace the freezer shelf insert the shelf into the left side brackets as far as possible. 2. For more information see fig. # 14) 1. You can install a Haier HI1MK ice maker. Grasp the freezer shelf firmly and slide out as far as possible. 3. To remove simply lift up and pull out of freezer compartment.
User Manual
Page 14
... interior of your unit to maintain the temperature you have selected. • Boiling water, gurgling sounds or slight vibrations that are the result of the refrigerant circulating through the cooling coils. • Sizzling or popping sounds resulting from frost melting during the defrost cycle and dripping on the defrost heater. •...
... interior of your unit to maintain the temperature you have selected. • Boiling water, gurgling sounds or slight vibrations that are the result of the refrigerant circulating through the cooling coils. • Sizzling or popping sounds resulting from frost melting during the defrost cycle and dripping on the defrost heater. •...
User Manual
Page 15
...free. 5. Gaskets must be kept clean and pliable to general instructions. Note: Some operating environments may dissolve, damage and/or discolor your refrigerator. Door Gaskets: • Clean door gaskets every three months according to assure a proper seal. • Petroleum jelly applied lightly on... baking soda mixed with appliance type light bulb rated at 40 watts or lesser wattage. 7. Light Bulb Replacement 1. Plug back the refrigerator power cord to avoid personal injury or product damage. General: • Prepare a cleaning solution of 3-4 tablespoons of gaskets will keep...
...free. 5. Gaskets must be kept clean and pliable to general instructions. Note: Some operating environments may dissolve, damage and/or discolor your refrigerator. Door Gaskets: • Clean door gaskets every three months according to assure a proper seal. • Petroleum jelly applied lightly on... baking soda mixed with appliance type light bulb rated at 40 watts or lesser wattage. 7. Light Bulb Replacement 1. Plug back the refrigerator power cord to avoid personal injury or product damage. General: • Prepare a cleaning solution of 3-4 tablespoons of gaskets will keep...
User Manual
Page 16
... the unit lying down. English Power Interruptions • Occasionally there may be power interruptions due to the sealed system could occur. Do not move the refrigerator vertically. Trouble Shooting Refrigerator Does Not Operate • Check if the thermostat control is in the "OFF" position. • Check if the... refrigerator is plugged in. • Check if there is too cold, adjust to a warmer setting and allow several hours for temperature to colder setting. • Check ...
... the unit lying down. English Power Interruptions • Occasionally there may be power interruptions due to the sealed system could occur. Do not move the refrigerator vertically. Trouble Shooting Refrigerator Does Not Operate • Check if the thermostat control is in the "OFF" position. • Check if the... refrigerator is plugged in. • Check if there is too cold, adjust to a warmer setting and allow several hours for temperature to colder setting. • Check ...
User Manual
Page 17
...• This may be normal to see if doors are completely closed. Refrigerator light does not work • Check power supply. • Tighten bulb in socket. • Replace burned out bulb. Refrigerator has an odor • Interior needs cleaning. • Foods improperly wrapped...; This is normal during high temperature and humid days. • Doors may give off odors. Refrigerator/Freezer door does not shut properly • Level the refrigerator. • Re-align refrigerator/freezer door. • Check for proper seal. • Check to maintain constant temperature during high ...
...• This may be normal to see if doors are completely closed. Refrigerator light does not work • Check power supply. • Tighten bulb in socket. • Replace burned out bulb. Refrigerator has an odor • Interior needs cleaning. • Foods improperly wrapped...; This is normal during high temperature and humid days. • Doors may give off odors. Refrigerator/Freezer door does not shut properly • Level the refrigerator. • Re-align refrigerator/freezer door. • Check for proper seal. • Check to maintain constant temperature during high ...


