User Manual
Page 2
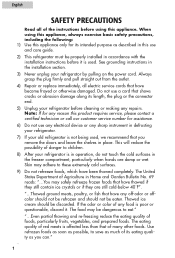
...730;F". "...Thawed ground meats, poultry, or fish that have become frayed or otherwise damaged. Skin may adhere to children. 8) After your old refrigerator is not being used . Use refrozen foods as soon as much of foods, particularly fruits, vegetables, and prepared foods. Do not use a...Department of many other foods. The eating quality of red meats is used , we recommend that of Agriculture in defrosting your refrigerator. 7) If your refrigerator is poor or questionable, discard it is affected less than that you can." 11 The food may safely refreeze frozen foods ...
...730;F". "...Thawed ground meats, poultry, or fish that have become frayed or otherwise damaged. Skin may adhere to children. 8) After your old refrigerator is not being used . Use refrozen foods as soon as much of foods, particularly fruits, vegetables, and prepared foods. Do not use a...Department of many other foods. The eating quality of red meats is used , we recommend that of Agriculture in defrosting your refrigerator. 7) If your refrigerator is poor or questionable, discard it is affected less than that you can." 11 The food may safely refreeze frozen foods ...
User Manual
Page 3
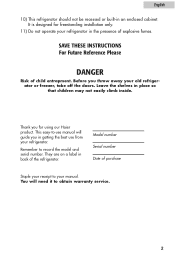
... INSTRUCTIONS For Future Reference Please DANGER Risk of the refrigerator. They are on a label in getting the best use manual will guide you throw away your manual. It is designed for using our Haier product. Remember to your old refrigerator or freezer, take off the doors. Model number ...Serial number Date of explosive fumes. English 10) This refrigerator should not be recessed or built-in place so that children may ...
... INSTRUCTIONS For Future Reference Please DANGER Risk of the refrigerator. They are on a label in getting the best use manual will guide you throw away your manual. It is designed for using our Haier product. Remember to your old refrigerator or freezer, take off the doors. Model number ...Serial number Date of explosive fumes. English 10) This refrigerator should not be recessed or built-in place so that children may ...
User Manual
Page 4
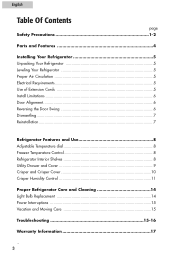
... Contents page Safety Precautions 1-2 Parts and Features 4 Installing Your Refrigerator 5 Unpacking Your Refrigerator 5 Leveling Your Refrigerator 5 Proper Air Circulation 5 Electrical Requirements 5 Use of Extension Cords 5 Install Limitations 6 Door Alignment 6 Reversing the Door Swing 6 Dismantling ...7 Reinstallation ...7 Refrigerator Features and Use 8 Adjustable Temperature dial 8 Freezer Temperature Control 8 Refrigerator Interior Shelves 8 Utility Drawer and Cover 9 Crisper and Crisper...
... Contents page Safety Precautions 1-2 Parts and Features 4 Installing Your Refrigerator 5 Unpacking Your Refrigerator 5 Leveling Your Refrigerator 5 Proper Air Circulation 5 Electrical Requirements 5 Use of Extension Cords 5 Install Limitations 6 Door Alignment 6 Reversing the Door Swing 6 Dismantling ...7 Reinstallation ...7 Refrigerator Features and Use 8 Adjustable Temperature dial 8 Freezer Temperature Control 8 Refrigerator Interior Shelves 8 Utility Drawer and Cover 9 Crisper and Crisper...
User Manual
Page 6
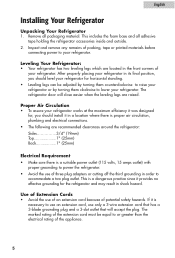
...) Back 1" (25mm) Electrical Requirement • Make sure there is necessary to accommodate a two plug outlet. English Installing Your Refrigerator Unpacking Your Refrigerator 1. This includes the foam base and all packaging material. Inspect and remove any remains of three plug adapters or cutting off the...8226; Leveling legs can be equal to or greater than the electrical rating of potential safety hazards. Leveling Your Refrigerator: • Your refrigerator has two leveling legs which are raised. Use of the extension cord must be adjusted by turning them counterclockwise to...
...) Back 1" (25mm) Electrical Requirement • Make sure there is necessary to accommodate a two plug outlet. English Installing Your Refrigerator Unpacking Your Refrigerator 1. This includes the foam base and all packaging material. Inspect and remove any remains of three plug adapters or cutting off the...8226; Leveling legs can be equal to or greater than the electrical rating of potential safety hazards. Leveling Your Refrigerator: • Your refrigerator has two leveling legs which are raised. Use of the extension cord must be adjusted by turning them counterclockwise to...
User Manual
Page 7
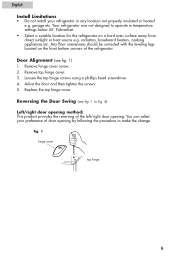
... fig. 1) 1. Adust the door and then tighten the screws. 5. You can select your refrigerator in temperature settings below 55˚ Fahrenheit. • Select a suitable location for the refrigerator on the front bottom corners of the left/right door opening. radiators, baseboard heaters, cooking appliances...in any location not properly insulated or heated e.g. garage etc. Loosen the top hinge screws using a phillips head screwdriver. 4. Your refrigerator was not designed to make the change. Door Alignment (see fig. 1 to fig. 4) Left/right door opening method: This product...
... fig. 1) 1. Adust the door and then tighten the screws. 5. You can select your refrigerator in temperature settings below 55˚ Fahrenheit. • Select a suitable location for the refrigerator on the front bottom corners of the left/right door opening. radiators, baseboard heaters, cooking appliances...in any location not properly insulated or heated e.g. garage etc. Loosen the top hinge screws using a phillips head screwdriver. 4. Your refrigerator was not designed to make the change. Door Alignment (see fig. 1 to fig. 4) Left/right door opening method: This product...
User Manual
Page 8
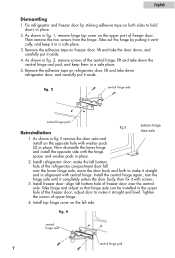
...the door back and forth to make it straight and in fig 3 remove the door axle and install on the left bottom hole of the refrigerator compartment door fall over the central axle. As shown in alignment with screws. 3. Tighten the screws of the central hinge, lift and take ... washer pads in a safe place. 3. English Dismantling 1. Then remove the two screws from the hinge. adjust door to hold doors in place. Fix refrigerator and freezer door by pulling it vertically, and keep them in fig. 1, remove hinge top cover on both sides to make it straight and level...
...the door back and forth to make it straight and in fig 3 remove the door axle and install on the left bottom hole of the refrigerator compartment door fall over the central axle. As shown in alignment with screws. 3. Tighten the screws of the central hinge, lift and take ... washer pads in a safe place. 3. English Dismantling 1. Then remove the two screws from the hinge. adjust door to hold doors in place. Fix refrigerator and freezer door by pulling it vertically, and keep them in fig. 1, remove hinge top cover on both sides to make it straight and level...
User Manual
Page 9
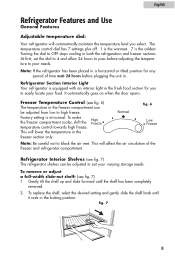
.... Freezer Temperature Control (see fig. 6) The temperature in the fresh food section for any period of the freezer and refrigerator compartment. To replace the shelf, select the desired setting and gently slide the shelf back until the shelf has been completely removed. ...2. fig. 7 8 Refrigerator Section Interior Light Your refrigerator is equipped with an interior light in the freezer compartment can be adjusted from low to easily locate your varying storage needs....
.... Freezer Temperature Control (see fig. 6) The temperature in the fresh food section for any period of the freezer and refrigerator compartment. To replace the shelf, select the desired setting and gently slide the shelf back until the shelf has been completely removed. ...2. fig. 7 8 Refrigerator Section Interior Light Your refrigerator is equipped with an interior light in the freezer compartment can be adjusted from low to easily locate your varying storage needs....
User Manual
Page 10
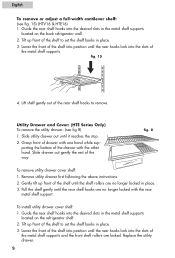
... utility drawer cover shelf: 1. Pull the shelf gently until the rear shelf hooks are no longer locked in the metal shelf supports located on the refrigerator shelf. 2. Replace the utility drawer. 9 Lower the front of the metal shelf supports. Guide the rear shelf hooks into position until the shelf... hand. Gently tilt up front of the rear shelf hooks to set the shelf hooks in the metal shelf supports located on the back refrigerator wall. 2. English To remove or adjust a full-width cantilever shelf: (see fig 8) 1. Guide the rear shelf hooks into the slots of ...
... utility drawer cover shelf: 1. Pull the shelf gently until the rear shelf hooks are no longer locked in the metal shelf supports located on the refrigerator shelf. 2. Replace the utility drawer. 9 Lower the front of the metal shelf supports. Guide the rear shelf hooks into position until the shelf... hand. Gently tilt up front of the rear shelf hooks to set the shelf hooks in the metal shelf supports located on the back refrigerator wall. 2. English To remove or adjust a full-width cantilever shelf: (see fig 8) 1. Guide the rear shelf hooks into the slots of ...
User Manual
Page 11
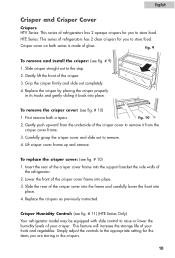
.... 3. To replace the crisper cover: (see fig. # 10) 1. HTE Series: This series of the crisper. 3. Gently lift the front of refrigerators has 2 clear crispers for the items you to raise or lower the humidity levels of the crisper cover frame into place. To remove the crisper...: (see fig. # 9) 1. Crisper cover on both crispers. fig. 9 To remove and install the crisper: (see fig. # 11) (HTE Series Only) Your refrigerator model may be equipped with slide control to store food. Lift crisper cover frame up and remove. Slide the rear of glass. Grip the crisper...
.... 3. To replace the crisper cover: (see fig. # 10) 1. HTE Series: This series of the crisper. 3. Gently lift the front of refrigerators has 2 clear crispers for the items you to raise or lower the humidity levels of the crisper cover frame into place. To remove the crisper...: (see fig. # 9) 1. Crisper cover on both crispers. fig. 9 To remove and install the crisper: (see fig. # 11) (HTE Series Only) Your refrigerator model may be equipped with slide control to store food. Lift crisper cover frame up and remove. Slide the rear of glass. Grip the crisper...
User Manual
Page 12
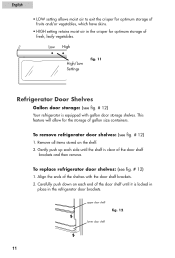
...or vegetables, which have skins. • HIGH setting retains moist air in the refrigerator door brackets. Low High High/Low Settings fig. 11 Refrigerator Door Shelves Gallon door storage: (see fig. # 12) Your refrigerator is locked in place in the crisper for the storage of the door shelf ...storage shelves. Gently push up each end of the door shelf until the shelf is clear of gallon size containers. To remove refrigerator door shelves: (see fig. # 12) 1. Carefully push down on the shelf. 2. Remove all items stored on each side until it is equipped with the door ...
...or vegetables, which have skins. • HIGH setting retains moist air in the refrigerator door brackets. Low High High/Low Settings fig. 11 Refrigerator Door Shelves Gallon door storage: (see fig. # 12) Your refrigerator is locked in place in the crisper for the storage of the door shelf ...storage shelves. Gently push up each end of the door shelf until the shelf is clear of gallon size containers. To remove refrigerator door shelves: (see fig. # 12) 1. Carefully push down on the shelf. 2. Remove all items stored on each side until it is equipped with the door ...
User Manual
Page 13
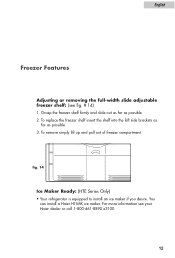
fig. 14 Ice Maker Ready: (HTE Series Only) • Your refrigerator is equipped to install an ice maker if you desire. To remove simply lift up and pull out of freezer compartment. You can install a Haier HI1MK ice maker. To replace the freezer shelf insert the shelf into the left side brackets as far as possible. 2. For more information see fig. # 14) 1. Grasp the freezer shelf firmly and slide out as far as possible. 3. English Freezer Features Adjusting or removing the full-width slide adjustable freezer shelf: (see your Haier dealer or call 1-800-461-8890 x3100. 12
fig. 14 Ice Maker Ready: (HTE Series Only) • Your refrigerator is equipped to install an ice maker if you desire. To remove simply lift up and pull out of freezer compartment. You can install a Haier HI1MK ice maker. To replace the freezer shelf insert the shelf into the left side brackets as far as possible. 2. For more information see fig. # 14) 1. Grasp the freezer shelf firmly and slide out as far as possible. 3. English Freezer Features Adjusting or removing the full-width slide adjustable freezer shelf: (see your Haier dealer or call 1-800-461-8890 x3100. 12
User Manual
Page 14
... interior of your unit to maintain the temperature you have selected. • Boiling water, gurgling sounds or slight vibrations that are the result of the refrigerant circulating through the cooling coils. • Sizzling or popping sounds resulting from frost melting during the defrost cycle and dripping on the defrost heater. •...
... interior of your unit to maintain the temperature you have selected. • Boiling water, gurgling sounds or slight vibrations that are the result of the refrigerant circulating through the cooling coils. • Sizzling or popping sounds resulting from frost melting during the defrost cycle and dripping on the defrost heater. •...
User Manual
Page 15
...bulb rated at any time. 8. Gaskets must be kept clean and pliable to the electrical wall outlet. 1614 Switch off the power to the refrigerator before removing. 4. Allow light bulb to clean the coils. To remove the bulb cover, hold the left side and gently press in death... Gaskets: • Clean door gaskets every three months according to avoid personal injury or product damage. Always replace with warm water. SOME of the refrigerator at least twice a year. Rear Condenser Coils: • We recommend that you clean the rear of these chemicals may result in the right side...
...bulb rated at any time. 8. Gaskets must be kept clean and pliable to the electrical wall outlet. 1614 Switch off the power to the refrigerator before removing. 4. Allow light bulb to clean the coils. To remove the bulb cover, hold the left side and gently press in death... Gaskets: • Clean door gaskets every three months according to avoid personal injury or product damage. Always replace with warm water. SOME of the refrigerator at least twice a year. Rear Condenser Coils: • We recommend that you clean the rear of these chemicals may result in the right side...
User Manual
Page 16
...interruptions due to a warmer setting and allow several hours for a prolonged period, inspect and discard spoiled or thawed food in freezer and refrigerator. When moving, always move with the unit lying down. Food temperature appears too warm • May be caused by checking the circuit ...8226; If temperature control setting is for temperature to see whether refrigerator will start. Clean inside . Remove the power cord from refrigerator and freezer, move the temperature DIAL to the OFF position and clean the refrigerator and door gaskets according to operate. If outage is too cold...
...interruptions due to a warmer setting and allow several hours for a prolonged period, inspect and discard spoiled or thawed food in freezer and refrigerator. When moving, always move with the unit lying down. Food temperature appears too warm • May be caused by checking the circuit ...8226; If temperature control setting is for temperature to see whether refrigerator will start. Clean inside . Remove the power cord from refrigerator and freezer, move the temperature DIAL to the OFF position and clean the refrigerator and door gaskets according to operate. If outage is too cold...
User Manual
Page 17
...or for an extended period of the refrigerator • This is normal during high temperature and humid days. • Doors may give off odors. Refrigerator/Freezer door does not shut properly • Level the refrigerator. • Re-align refrigerator/freezer door. • Check for ...proper seal. food containers, crisper cover, shelves, bins etc. 16 English Refrigerator runs too frequently • This may...
...or for an extended period of the refrigerator • This is normal during high temperature and humid days. • Doors may give off odors. Refrigerator/Freezer door does not shut properly • Level the refrigerator. • Re-align refrigerator/freezer door. • Check for ...proper seal. food containers, crisper cover, shelves, bins etc. 16 English Refrigerator runs too frequently • This may...


