Instruction Manual
Page 1
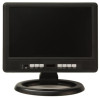
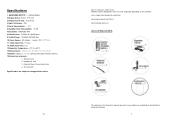
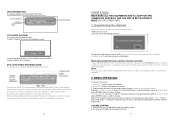
Save this booklet for future reference. Instruction Manual 10.2" DIGITAL LCD TV MODEL NO.: HLT10 BEFORE USING THIS PRODUCT, PLEASE READ, UNDERSTAND, AND FOLLOW THESE INSTRUCTIONS.
Save this booklet for future reference. Instruction Manual 10.2" DIGITAL LCD TV MODEL NO.: HLT10 BEFORE USING THIS PRODUCT, PLEASE READ, UNDERSTAND, AND FOLLOW THESE INSTRUCTIONS.
Instruction Manual
Page 3
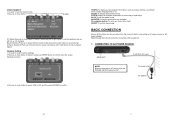
... the back cover of the set mean the following: The lighting flash with arrowhead symbol within an equilateral triangle is intended to alert the user to the presence of electric shock to constitute a risk of uninsulated dangerous voltage. HAVE THE PRODUCT UNPLUGGED FROM THE POWER SOURCE BEFORE CLEANING RELOCATING OR SERVICING. 1 IMPORTANT INSTRUCTIONS SAFETY INSTRUCTIONS CAUTION: TO REDUCE THE...
... the back cover of the set mean the following: The lighting flash with arrowhead symbol within an equilateral triangle is intended to alert the user to the presence of electric shock to constitute a risk of uninsulated dangerous voltage. HAVE THE PRODUCT UNPLUGGED FROM THE POWER SOURCE BEFORE CLEANING RELOCATING OR SERVICING. 1 IMPORTANT INSTRUCTIONS SAFETY INSTRUCTIONS CAUTION: TO REDUCE THE...
Instruction Manual
Page 4
..., cleaning fluid or other chemicals. AUTO TV SCANNING FUNCTION MEMORY FUNCTION SUPPORT VIDEO/AUDIO INPUT DIGITAL BROADCASTING RECEPTION GENERAL TROUBLESHOOTING Check the following points before maintaining the player. • Wipe the player with a dry, soft cloth. • If the surfaces are extremely dirty ,wipe clean with a dry cloth. • Never use compressed air to the standby mode and disconnect the AC adaptor before...
..., cleaning fluid or other chemicals. AUTO TV SCANNING FUNCTION MEMORY FUNCTION SUPPORT VIDEO/AUDIO INPUT DIGITAL BROADCASTING RECEPTION GENERAL TROUBLESHOOTING Check the following points before maintaining the player. • Wipe the player with a dry, soft cloth. • If the surfaces are extremely dirty ,wipe clean with a dry cloth. • Never use compressed air to the standby mode and disconnect the AC adaptor before...
Instruction Manual
Page 5
... REMOTE CONTROL RECHARGEABLE BATTERY ON SCREEN DISPLAY ACCESSORIES ll the pictures in one of lithium battery) 16.Connection terminals: 1. External Power Source Input Jack 4. Specifications 1. Video input level: 1.0 Vp-p 12. Audio input level: 1.2V 13.Operation Temperature : -5OC to change without notice. 22 MULTI-LINGUAL SUBTITLES Subtitles may be displayed in the instruction manual are subject to +45OC. 14.Measurement: 10.24 (L) X 7.48 (W) X 1.26 (D) INCH 15.Weight: Approx. 2.01 LBS (barring the weight...
... REMOTE CONTROL RECHARGEABLE BATTERY ON SCREEN DISPLAY ACCESSORIES ll the pictures in one of lithium battery) 16.Connection terminals: 1. External Power Source Input Jack 4. Specifications 1. Video input level: 1.0 Vp-p 12. Audio input level: 1.2V 13.Operation Temperature : -5OC to change without notice. 22 MULTI-LINGUAL SUBTITLES Subtitles may be displayed in the instruction manual are subject to +45OC. 14.Measurement: 10.24 (L) X 7.48 (W) X 1.26 (D) INCH 15.Weight: Approx. 2.01 LBS (barring the weight...
Instruction Manual
Page 6
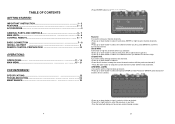
... it as Favorite channel. Channel NO . TABLE OF CONTENTS GETTING STARTED: IMPORTANT INSTRUCTION 1 - 2 FEATURES 2 - 3 ACCESSORIES 3 GENERAL PARTS AND CONTROLS 5 - 7 MAIN UNITL 5 - 6 CONTROL REMOTO 6 - 7 BASIC CONNECTION 7 - 8 INSTALL BATTERY 8 REMOTE CONTROL PREPARATION 10 OPERATIONS: OPERATIONS 11 - 14 MAIN MENU 15 - 21 FOR REFERENCE: SPECIFICATIONS 22 TROUBLESHOOTING 23 MAINTENANCE 23 -Press ENTER button to start to scan programs. Favorite It is used to store your favorite channels. -Press up or down button to select it...
... it as Favorite channel. Channel NO . TABLE OF CONTENTS GETTING STARTED: IMPORTANT INSTRUCTION 1 - 2 FEATURES 2 - 3 ACCESSORIES 3 GENERAL PARTS AND CONTROLS 5 - 7 MAIN UNITL 5 - 6 CONTROL REMOTO 6 - 7 BASIC CONNECTION 7 - 8 INSTALL BATTERY 8 REMOTE CONTROL PREPARATION 10 OPERATIONS: OPERATIONS 11 - 14 MAIN MENU 15 - 21 FOR REFERENCE: SPECIFICATIONS 22 TROUBLESHOOTING 23 MAINTENANCE 23 -Press ENTER button to start to scan programs. Favorite It is used to store your favorite channels. -Press up or down button to select it...
Instruction Manual
Page 7
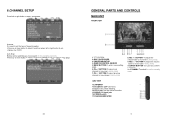
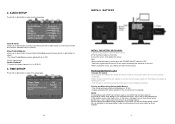
... VIEW 12.ANTENNA 13.headphone jack-Connect to standby mode. 6.CHANNEL SETUP Press left or right button to enter setup page: GENERAL PARTS AND CONTROLS MAIN UNIT FRONT VIEW Antenna It is used to set . -Options: Air /CATV. To adjust the volume lower or move left in menu mode. 9.VOL+/ > BUTTON-To adjust the volume louder or move right in scanning setup page: 20 1.TFT SCREEN 2.BUILT-IN SPEAKER 3.POWER INDICATOR 4.REMOTE CONTROL SENSOR 5.MENU BUTTON-To enter menu setting page. 6.CH+/∧BUTTON...
... VIEW 12.ANTENNA 13.headphone jack-Connect to standby mode. 6.CHANNEL SETUP Press left or right button to enter setup page: GENERAL PARTS AND CONTROLS MAIN UNIT FRONT VIEW Antenna It is used to set . -Options: Air /CATV. To adjust the volume lower or move left in menu mode. 9.VOL+/ > BUTTON-To adjust the volume louder or move right in scanning setup page: 20 1.TFT SCREEN 2.BUILT-IN SPEAKER 3.POWER INDICATOR 4.REMOTE CONTROL SENSOR 5.MENU BUTTON-To enter menu setting page. 6.CH+/∧BUTTON...
Instruction Manual
Page 8
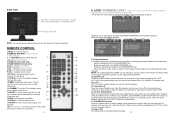
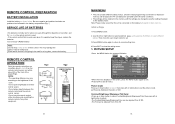
... : 5.1Change Password It is described as desired. 6 5. REMOTE CONTROL 1.MUTE-To mute the sound. 2.NUMERIC BUTTONS-To input channel numbers directly. 3. -/-- Press it safe. INSIDE LWitIhTiHumRbEaCttHeAryRGEABEL LITHIUM BATTERY STAND HOLDER NOTE: You must connect external antenna to directly input TV channels with double digits. 4.PAGE UP( Text mode only) 5.PAGE DOWN(Text mode only) 6.CH+-To select next channel. 7.CH- -Toselect previous channel. 8.VOL+ -To adjust volume louder. 9.VOL- -To adjust volume lower...
... : 5.1Change Password It is described as desired. 6 5. REMOTE CONTROL 1.MUTE-To mute the sound. 2.NUMERIC BUTTONS-To input channel numbers directly. 3. -/-- Press it safe. INSIDE LWitIhTiHumRbEaCttHeAryRGEABEL LITHIUM BATTERY STAND HOLDER NOTE: You must connect external antenna to directly input TV channels with double digits. 4.PAGE UP( Text mode only) 5.PAGE DOWN(Text mode only) 6.CH+-To select next channel. 7.CH- -Toselect previous channel. 8.VOL+ -To adjust volume louder. 9.VOL- -To adjust volume lower...
Instruction Manual
Page 9
... used to reset to factory settings. -Press up or down button to select it and press ENTER button to confirm, then the screen displays as below: -Press up or down button to select YES or NO, and then press ENTER to confirm. 19.INFO-To display current program information, such as channel number, soundtrack mode, subtitle language and so on. 20.LIST-To display all the cables...
... used to reset to factory settings. -Press up or down button to select it and press ENTER button to confirm, then the screen displays as below: -Press up or down button to select YES or NO, and then press ENTER to confirm. 19.INFO-To display current program information, such as channel number, soundtrack mode, subtitle language and so on. 20.LIST-To display all the cables...
Instruction Manual
Page 10
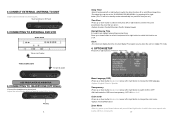
... sleep time. -The sleep time can display the time of time you set.) Time Zone -Press up or down button to select and press left or right button to change the OSD language. -Options: English / French / Spanish. Zoom Mode -Select by using VOL+/- button. 2.CONNECT EXTERNAL ANTENNA TO UNIT Install external antenna into antenna jack. Insert antenna to ANT jack 3.CONNECTING TO EXTERNAL DVD/VCR DVD/VCR TO AV OUT JACK Video/audio cable TO AV IN JACK USE THIS PLAYER AS A MONITOR 4.CONNECTING...
... sleep time. -The sleep time can display the time of time you set.) Time Zone -Press up or down button to select and press left or right button to change the OSD language. -Options: English / French / Spanish. Zoom Mode -Select by using VOL+/- button. 2.CONNECT EXTERNAL ANTENNA TO UNIT Install external antenna into antenna jack. Insert antenna to ANT jack 3.CONNECTING TO EXTERNAL DVD/VCR DVD/VCR TO AV OUT JACK Video/audio cable TO AV IN JACK USE THIS PLAYER AS A MONITOR 4.CONNECTING...
Instruction Manual
Page 11
... the screw to the characteristic of this case, recharge it two or three times before the first use a more distant power socket. Note: -Before install the battery, please push the POWER ON/OFF switch to set the sound mode as a heater or direct sunlight. 9 Bass/Treble/Balance -press up to 12 hrs to charge completely. -Rapid charge: Connect the AC adapter to...
... the screw to the characteristic of this case, recharge it two or three times before the first use a more distant power socket. Note: -Before install the battery, please push the POWER ON/OFF switch to set the sound mode as a heater or direct sunlight. 9 Bass/Treble/Balance -press up to 12 hrs to charge completely. -Rapid charge: Connect the AC adapter to...
Instruction Manual
Page 12
... EXIT to select different setting. If the remote control is operated near the player, replace the batteries. -Use one year although this remote control while simultaneously operating the remote control of any other equipment. 10 MAIN MENU • The unit contains different setting menus. Initial settings 1.Press MENU button. 2. Once the initial programming is entered it is not going to close the setting menu . 1. Contrast/Brightness/Sharpness/Tint/Color -Press up or...
... EXIT to select different setting. If the remote control is operated near the player, replace the batteries. -Use one year although this remote control while simultaneously operating the remote control of any other equipment. 10 MAIN MENU • The unit contains different setting menus. Initial settings 1.Press MENU button. 2. Once the initial programming is entered it is not going to close the setting menu . 1. Contrast/Brightness/Sharpness/Tint/Color -Press up or...
Instruction Manual
Page 13
... button to select Auto Scan. Press CH - to adjust the level of currently volume. 2.The level of VOLUME can be memoried automatically. Programming the channels -Make sure that all areas). 14 OPERATION MAKE SURE ALL THE EQUIPMENTS AND AC ADAPTOR ARE CONNECTED PROPERLY AND THE UNIT IS SET IN CORRECT MODE BEFORE OPERATING. 1. When viewing a digital channel, press the EPG button on the remote control to access the program guide supplied by the signal...
... button to select Auto Scan. Press CH - to adjust the level of currently volume. 2.The level of VOLUME can be memoried automatically. Programming the channels -Make sure that all areas). 14 OPERATION MAKE SURE ALL THE EQUIPMENTS AND AC ADAPTOR ARE CONNECTED PROPERLY AND THE UNIT IS SET IN CORRECT MODE BEFORE OPERATING. 1. When viewing a digital channel, press the EPG button on the remote control to access the program guide supplied by the signal...

Instruction Manual
Page 14
... set .) PICTURE MODE -Press PIP ( picture ) button to enter picture mode : -Keep pressing this button to change the soundtrack output mode. -Press MTS button to enter soundtrack selection mode : AUDIO (AUDIO MODE) It is used to change the display mode as below : -Keep pressing this button to select different time. -The sleep time can be adjusted as Standard, Dynamic, Soft and Personal. TIMER SETTING -Press the SLEEP button, the screen display as below in 16:9 -The display proportion can be switched between WIDE and 4:3 mode...
... set .) PICTURE MODE -Press PIP ( picture ) button to enter picture mode : -Keep pressing this button to change the soundtrack output mode. -Press MTS button to enter soundtrack selection mode : AUDIO (AUDIO MODE) It is used to change the display mode as below : -Keep pressing this button to select different time. -The sleep time can be adjusted as Standard, Dynamic, Soft and Personal. TIMER SETTING -Press the SLEEP button, the screen display as below in 16:9 -The display proportion can be switched between WIDE and 4:3 mode...


