
User Manual
Page 5
...Button 13 CH.LIST button 13 FAVORATE button 1..3. Component Setup 8 VCR Setup 9 HDMI Input 9 Cable TV Setup 10 External Component Source Setup 10 Basic Operating Instructions 11 Switch On/Off the TV set for specific details. Menu Operations 14 Video Menu Options 14 Video Menu Options Continued 15... Audio Menu Options 16 Audio Menu Options Continued 17 Channel Menu Options 18 Channel Menu Options Continued 19 Function Menu Options 20 Function ...
...Button 13 CH.LIST button 13 FAVORATE button 1..3. Component Setup 8 VCR Setup 9 HDMI Input 9 Cable TV Setup 10 External Component Source Setup 10 Basic Operating Instructions 11 Switch On/Off the TV set for specific details. Menu Operations 14 Video Menu Options 14 Video Menu Options Continued 15... Audio Menu Options 16 Audio Menu Options Continued 17 Channel Menu Options 18 Channel Menu Options Continued 19 Function Menu Options 20 Function ...

User Manual
Page 7
...the menu. Volume down / to adjust the item in the OSD /Press to access the on and off the TV. 2. Remote Sensor Receivers IR signals from the remote control. INPUT Selects the input signals. 3. CH- MENU Menu display. VOL+ Volume up / to turn on -screen menu display. 4. CH... to adjust the item in the OSD. VOL+ CH- VOL- Power indicator 7. Front Panel Controls INPUT MENU VOL- TV channel down / Left button to select the item in the menu. 6. CH+ POWER R1 series K1series F1series Control Panel Function 1. Press to enter. 5. Do not put anything near the sensor ...
...the menu. Volume down / to adjust the item in the OSD /Press to access the on and off the TV. 2. Remote Sensor Receivers IR signals from the remote control. INPUT Selects the input signals. 3. CH- MENU Menu display. VOL+ Volume up / to turn on -screen menu display. 4. CH... to adjust the item in the OSD. VOL+ CH- VOL- Power indicator 7. Front Panel Controls INPUT MENU VOL- TV channel down / Left button to select the item in the menu. 6. CH+ POWER R1 series K1series F1series Control Panel Function 1. Press to enter. 5. Do not put anything near the sensor ...
User Manual
Page 8
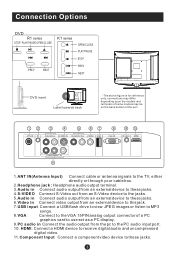
... set as a PC display. 9.PC audio in Connect the audio output from the pc to the PC audio input port. 10. Connection Options DVD R1 series STOP PLAY/PAUSE OPEN/CLOSE K1 series OPEN/CLOSE PLAY/PAUSE STOP PREV NEXT PREV NEXT DVD insert Label towards back The above figure is for...IN R-AUDIO-L S-VIDEO IN R-AUDIO IN-L VIDEO USB VGA IN PC AUDIO IN HDMI Pr Pb Y COMPONENT IN 1.ANT IN(Antenna Input) Connect cable or antenna signals to the TV, either directly or through your cable box. 2.Headphone jack : Headphone audio output terminal. 3.Audio in Connect audio output from an external...
... set as a PC display. 9.PC audio in Connect the audio output from the pc to the PC audio input port. 10. Connection Options DVD R1 series STOP PLAY/PAUSE OPEN/CLOSE K1 series OPEN/CLOSE PLAY/PAUSE STOP PREV NEXT PREV NEXT DVD insert Label towards back The above figure is for...IN R-AUDIO-L S-VIDEO IN R-AUDIO IN-L VIDEO USB VGA IN PC AUDIO IN HDMI Pr Pb Y COMPONENT IN 1.ANT IN(Antenna Input) Connect cable or antenna signals to the TV, either directly or through your cable box. 2.Headphone jack : Headphone audio output terminal. 3.Audio in Connect audio output from an external...

User Manual
Page 10
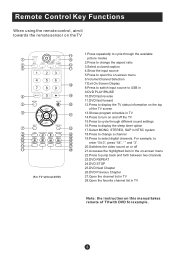
... 40 either +/- . 30.Exit On Screen Display 31.Accesses the highlighted item in the on-screen menu 32.Press to display the TV status information on -screen menus 7 INPUT MUTE 8 27 RECALL 28 and adjust the system settings to your preference. 12.Press to display the sleep timer option 13.DVD PLAY... 16.DVD FAST REVERSE MENU EXIT 17.DVD CALL 10 30 18.DVD MENU 19.DVD SEARCH 11 20.DVD ANGLE ENTER 31 21.Press to switch input source to DVD in 22.Open the channel list in TV SLEEP DISPLAY 12 32 13 OPEN/CLOSE PLAY/PAUSE STOP REPEAT 33 14 34...
... 40 either +/- . 30.Exit On Screen Display 31.Accesses the highlighted item in the on-screen menu 32.Press to display the TV status information on -screen menus 7 INPUT MUTE 8 27 RECALL 28 and adjust the system settings to your preference. 12.Press to display the sleep timer option 13.DVD PLAY... 16.DVD FAST REVERSE MENU EXIT 17.DVD CALL 10 30 18.DVD MENU 19.DVD SEARCH 11 20.DVD ANGLE ENTER 31 21.Press to switch input source to DVD in 22.Open the channel list in TV SLEEP DISPLAY 12 32 13 OPEN/CLOSE PLAY/PAUSE STOP REPEAT 33 14 34...
User Manual
Page 11
....Press to cycle through the available picture modes 2.Press to change a channel 19.Press to display the TV status information on the TV PICTURE 14 AUDIO 1 15 ARC CCD MTS/SAP SLEEP 2 16 3 17 1 23 4 56 18 7 89 4 INPUT 0 19 MENU 5 MUTE 20 CH+ 6 VOL- ENTER VOL+ 21 EXIT CH- RECALL... 7 22 USB PLAY/PAUSE STOP REPEAT 8 23 9 REV PREV NEXT 24 10 25 11 DISPLAY GUIDE FAVORITE CH.LIST 26 12 27 13 28 (For TV without DVD) 1.Press repeatedly to cycle through...
....Press to cycle through the available picture modes 2.Press to change a channel 19.Press to display the TV status information on the TV PICTURE 14 AUDIO 1 15 ARC CCD MTS/SAP SLEEP 2 16 3 17 1 23 4 56 18 7 89 4 INPUT 0 19 MENU 5 MUTE 20 CH+ 6 VOL- ENTER VOL+ 21 EXIT CH- RECALL... 7 22 USB PLAY/PAUSE STOP REPEAT 8 23 9 REV PREV NEXT 24 10 25 11 DISPLAY GUIDE FAVORITE CH.LIST 26 12 27 13 28 (For TV without DVD) 1.Press repeatedly to cycle through...

User Manual
Page 13
... to another resolution, change the PC graphic card or consult the manufacturer of the LCD-TV to select the proper input. NOTE: If your DVD player does not have component video output, use 1. How to set the video input mode of the PC graphic card. Then connect the other end to the PC... video interface connector on the back of the LCD-TV.Tighten the screws on the power of the PC; 5.Press INPUT button to use S-Video. Resolution Mode Resolution Line frequency(KHz) Frame frequency(Hz) VGA 640x480 31.5 60 SVGA 800x600...
... to another resolution, change the PC graphic card or consult the manufacturer of the LCD-TV to select the proper input. NOTE: If your DVD player does not have component video output, use 1. How to set the video input mode of the PC graphic card. Then connect the other end to the PC... video interface connector on the back of the LCD-TV.Tighten the screws on the power of the PC; 5.Press INPUT button to use S-Video. Resolution Mode Resolution Line frequency(KHz) Frame frequency(Hz) VGA 640x480 31.5 60 SVGA 800x600...

User Manual
Page 14
... devices and ensure that it has Composite or S-Video connectors; 2.Make sure that the power of the LCD-TV to the same channel number. How to the S-VIDEO input, the picture quality is improved; When connecting the TV to the VCR owner s manual.) 3.T.urn on the VCR. (Refer to VCR, match the jack ...VCR output switch to 3 or 4 and then tune TV to S-Video mode or Video mode. HDMI Select the input source by using INPUT button on the remote control or on the power of the AV device; 4.Press t INPUT button to set the video input mode of the LCD-TV and the AV device are off; and then...
... devices and ensure that it has Composite or S-Video connectors; 2.Make sure that the power of the LCD-TV to the same channel number. How to the S-VIDEO input, the picture quality is improved; When connecting the TV to the VCR owner s manual.) 3.T.urn on the VCR. (Refer to VCR, match the jack ...VCR output switch to 3 or 4 and then tune TV to S-Video mode or Video mode. HDMI Select the input source by using INPUT button on the remote control or on the power of the AV device; 4.Press t INPUT button to set the video input mode of the LCD-TV and the AV device are off; and then...

User Manual
Page 15
...the cable box remote control. Select the input source by using the INPUT button on cable box. 2. After subscribing to a cable TV service from the Cable Box's output jacks to the TV input jacks, as shown in the figure.When connecting the TV to the TV input jacks, as shown in the figure. For... further information regarding cable TV service, contact your desired channel with the ...
...the cable box remote control. Select the input source by using the INPUT button on cable box. 2. After subscribing to a cable TV service from the Cable Box's output jacks to the TV input jacks, as shown in the figure.When connecting the TV to the TV input jacks, as shown in the figure. For... further information regarding cable TV service, contact your desired channel with the ...

User Manual
Page 16
Choose the input source Change the picture source so you can watch your TV. 1. button to your TV, VCR, DVD, Cable , or any other devices that are connected to decrease the volume. The mute icon disappears. NOTE: The color of the LCD-TV changes from red to mute the sound temporarily....Press ENTER button to select the desired items TV, Video, S-Video, Component DVD, PC, HDMI . 2. Press INPUT button to enter the Select Source menu and then use INPUT button to confirm . Audio Control 1.Press VOL+ button to increase the volume. When the LCD-TV is turned on, the indicator light on...
Choose the input source Change the picture source so you can watch your TV. 1. button to your TV, VCR, DVD, Cable , or any other devices that are connected to decrease the volume. The mute icon disappears. NOTE: The color of the LCD-TV changes from red to mute the sound temporarily....Press ENTER button to select the desired items TV, Video, S-Video, Component DVD, PC, HDMI . 2. Press INPUT button to enter the Select Source menu and then use INPUT button to confirm . Audio Control 1.Press VOL+ button to increase the volume. When the LCD-TV is turned on, the indicator light on...
User Manual
Page 17
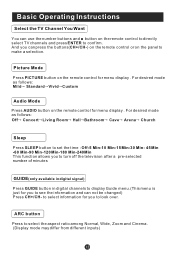
... to make a selection. For desired mode as follows: Mild Standard Vivid Custom Audio Mode Press AUDIO button on the remote control to directly select TV channels and press ENTER to see the information and can not be changed) Press CH+/CH- And you can press the buttons(CH+/CH-) on...digital signal) Press GUIDE button in digital channels to display Guide menu.(This menu is just for you to confirm. Basic Operating Instructions Select the TV Channel You Want You can use the number buttons and button on the remote control for menu display . to select information for you to select...
... to make a selection. For desired mode as follows: Mild Standard Vivid Custom Audio Mode Press AUDIO button on the remote control to directly select TV channels and press ENTER to see the information and can not be changed) Press CH+/CH- And you can press the buttons(CH+/CH-) on...digital signal) Press GUIDE button in digital channels to display Guide menu.(This menu is just for you to confirm. Basic Operating Instructions Select the TV Channel You Want You can use the number buttons and button on the remote control for menu display . to select information for you to select...

User Manual
Page 19
...The picture quality on the screen can be adjusted as follows: 1. Note: 1.The options may be different because of the inputs. 2.Symbols on the screen. 2. The menu for any input separately . Press MENU button to display the main menu, and / to the main menu. 5. Press EXIT button to... the parameters. 4. Select EXIT Back VOL+/- Press /ENTER button to confirm and / to make changes to select the input source. Press MENU button to illustrate the TV's operation. Press MENU button and / until desired picture quality has been achieved . Repeat step 2 and step 3 until the following...
...The picture quality on the screen can be adjusted as follows: 1. Note: 1.The options may be different because of the inputs. 2.Symbols on the screen. 2. The menu for any input separately . Press MENU button to display the main menu, and / to the main menu. 5. Press EXIT button to... the parameters. 4. Select EXIT Back VOL+/- Press /ENTER button to confirm and / to make changes to select the input source. Press MENU button to illustrate the TV's operation. Press MENU button and / until desired picture quality has been achieved . Repeat step 2 and step 3 until the following...
User Manual
Page 21
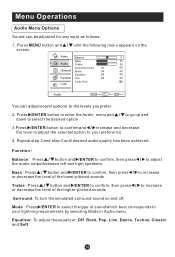
You can be adjusted for any input as follows: 1. Repeat step 2 and step 3 until the following menu appears on and off. Select EXIT Back VOL+/- Press /ENTER button to enter the Audio ...
You can be adjusted for any input as follows: 1. Repeat step 2 and step 3 until the following menu appears on and off. Select EXIT Back VOL+/- Press /ENTER button to enter the Audio ...
User Manual
Page 24
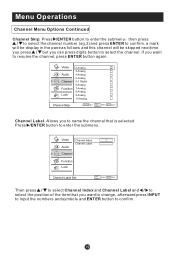
Channel Label: Allows you want to change, afterward press INPUT to input the numbers and symbols and ENTER button to confirm. Video Channel Index 1 Channel Label Audio Channel Function Lock Channel Label Set CH+/- Press /ENTER button ...
Channel Label: Allows you want to change, afterward press INPUT to input the numbers and symbols and ENTER button to confirm. Video Channel Index 1 Channel Label Audio Channel Function Lock Channel Label Set CH+/- Press /ENTER button ...
User Manual
Page 25
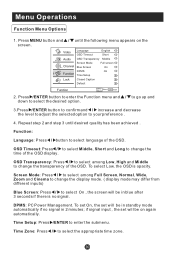
...Screen Mode: Press / to select among Low, High and Middle to change the time of the OSD display. DPMS: PC Power Management. if signal input , the set will be on the screen. Time Zone: Press / to enter the submenu. To select Low, the OSD is no signal in ... OSD Transparency: Press / to select among Full Screen, Normal, Wide, Zoom and Cinema to change the display mode. ( display mode may differ from different inputs) Blue Screen: Press / to your preference . 4. Time Setup: Press /ENTER to select the appropriate time zone. Menu Operations Function Menu Options 1. Video ...
...Screen Mode: Press / to select among Low, High and Middle to change the time of the OSD display. DPMS: PC Power Management. if signal input , the set will be on the screen. Time Zone: Press / to enter the submenu. To select Low, the OSD is no signal in ... OSD Transparency: Press / to select among Full Screen, Normal, Wide, Zoom and Cinema to change the display mode. ( display mode may differ from different inputs) Blue Screen: Press / to your preference . 4. Time Setup: Press /ENTER to select the appropriate time zone. Menu Operations Function Menu Options 1. Video ...
User Manual
Page 28
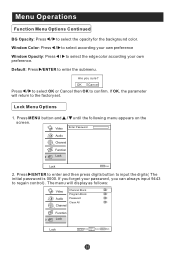
OK Cancel Press / to select OK or Cancel then OK to input the digits( The initial password is 0000. Enter Password Video Audio Channel Function Lock Lock EXIT Back 2. Press /ENTER to enter and then press digits ... Color: Press / to select according your password, you sure? Menu Operations Function Menu Options Continued BG Opacity: Press / to regain control) . Are you can always input 9443 to select the opacity for the background color.
OK Cancel Press / to select OK or Cancel then OK to input the digits( The initial password is 0000. Enter Password Video Audio Channel Function Lock Lock EXIT Back 2. Press /ENTER to enter and then press digits ... Color: Press / to select according your password, you sure? Menu Operations Function Menu Options Continued BG Opacity: Press / to regain control) . Are you can always input 9443 to select the opacity for the background color.
User Manual
Page 33
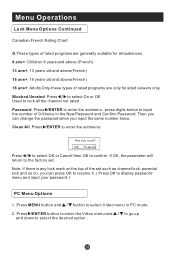
... top of the set . Used to the factory set such as channel lock, parental lock and so on, you can change the password when you input the same number twice. Then you sure? Menu Operations Lock Menu Options Continued Canadian French Rating Chart G:These types of rated programs are generally suitable... ans+: Adults Only-these types of 0-9 twice in PC mode. 2. Password: Press /ENTER to enter the submenu , press digits button to display password menu and input your password.) PC Menu Options 1. Clean All: Press /ENTER to enter the submenu: Are you can press OK to resume it .( Press OK to...
... top of the set . Used to the factory set such as channel lock, parental lock and so on, you can change the password when you input the same number twice. Then you sure? Menu Operations Lock Menu Options Continued Canadian French Rating Chart G:These types of rated programs are generally suitable... ans+: Adults Only-these types of 0-9 twice in PC mode. 2. Password: Press /ENTER to enter the submenu , press digits button to display password menu and input your password.) PC Menu Options 1. Clean All: Press /ENTER to enter the submenu: Are you can press OK to resume it .( Press OK to...
User Manual
Page 35
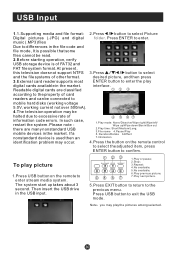
... present, this television does not support NTFS and the file systems of other format. 3.External card reader supports most digital cards available in the USB input. 1 23 PLAY/PAUSE STOP REPEAT REV PREV NEXT 45 67 1.Play or pause; 2.Stop; 3.Repeat; 4.No available; 5.No available; 6.Play previous ... 4 5 67 1.Play mode: None/Dissolve/Wipe right/Wipeleft/ Wipe up takes about 3 second. Then insert the USB drive in the market. USB Input 1.1.Supporting media and file format: Digital pictures (.JPG) and digital music (.MP3)files Due to differences in the file code and file mode, It is...
... present, this television does not support NTFS and the file systems of other format. 3.External card reader supports most digital cards available in the USB input. 1 23 PLAY/PAUSE STOP REPEAT REV PREV NEXT 45 67 1.Play or pause; 2.Stop; 3.Repeat; 4.No available; 5.No available; 6.Play previous ... 4 5 67 1.Play mode: None/Dissolve/Wipe right/Wipeleft/ Wipe up takes about 3 second. Then insert the USB drive in the market. USB Input 1.1.Supporting media and file format: Digital pictures (.JPG) and digital music (.MP3)files Due to differences in the file code and file mode, It is...
User Manual
Page 36
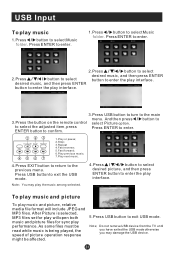
... music and picture, relative media file format will open both music and picture files for play performance. Note Do not remove USB device from the TV until you have exited the USB mode otherwise you may play the music among selected. 4.Press / / / button to select desired picture, and then press ENTER... device. Press ENTER to enter. 1.Press / button to the previous menu. And then press / select Picture option. Press USB button to select Music folder. USB Input To play interface.
... music and picture, relative media file format will open both music and picture files for play performance. Note Do not remove USB device from the TV until you have exited the USB mode otherwise you may play the music among selected. 4.Press / / / button to select desired picture, and then press ENTER... device. Press ENTER to enter. 1.Press / button to the previous menu. And then press / select Picture option. Press USB button to select Music folder. USB Input To play interface.

User Manual
Page 37
...unplayable in the disc slot. Each press of the disc is no disc placed in the video. 2. Press PLAY/PAUSE to stop mode, the TV screen will skip the current chapter and play the next one to resume normal playback. Single step playback 1. Press STOP twice to resume normal ...continuous to single step forward to select a menu option directly. The disc will be muted during start playback with each subsequent press until the DVD input states open Basic playback 1.Place the DVD in this during still mode. 2. Some discs may also press the digit buttons to the next frame...
...unplayable in the disc slot. Each press of the disc is no disc placed in the video. 2. Press PLAY/PAUSE to stop mode, the TV screen will skip the current chapter and play the next one to resume normal playback. Single step playback 1. Press STOP twice to resume normal ...continuous to single step forward to select a menu option directly. The disc will be muted during start playback with each subsequent press until the DVD input states open Basic playback 1.Place the DVD in this during still mode. 2. Some discs may also press the digit buttons to the next frame...
User Manual
Page 38
... the language of country. (The number of language depends on a DVD with a multi-layer menu.) D.CALL Pressing this function. When finished move the cursor to input the item you can view the scene from Right, Mix-Mono and Stereo. Press PLAY/PAUSE to select. Press the button again to confirm. allow...
... the language of country. (The number of language depends on a DVD with a multi-layer menu.) D.CALL Pressing this function. When finished move the cursor to input the item you can view the scene from Right, Mix-Mono and Stereo. Press PLAY/PAUSE to select. Press the button again to confirm. allow...


