User Manual
Page 1
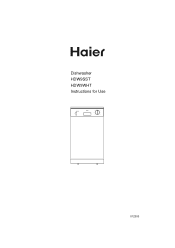
Dishwasher HDW9SST HDW9WHT Instructions for Use 012050
Dishwasher HDW9SST HDW9WHT Instructions for Use 012050

User Manual
Page 2
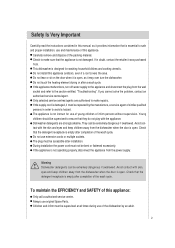
Index Safety Is Very Important Close-up View (Control Panel) Close-up View (Interior) Detergent and Rinse Aid Loading the Dishwasher Turning on the Appliance Energy Saving Tips How to Keep Your Dishwasher in Shape Wash Cycle Table Cleaning and Special Maintenance Troubleshooting Installation Technical data Diagram 2 3 3 4 5 6 7 7 8 9 9-12 13-14 15 15 1
Index Safety Is Very Important Close-up View (Control Panel) Close-up View (Interior) Detergent and Rinse Aid Loading the Dishwasher Turning on the Appliance Energy Saving Tips How to Keep Your Dishwasher in Shape Wash Cycle Table Cleaning and Special Maintenance Troubleshooting Installation Technical data Diagram 2 3 3 4 5 6 7 7 8 9 9-12 13-14 15 15 1
User Manual
Page 3
... the supply cord is open, as it may over turn off water supply to safe and proper installation, use and maintenance of this appliance. The plug must not be supervised at all times during or after completion of the wash cycle. Check that the detergent receptacle is essential to the appliance and disconnect the plug from the dishwasher when the door is not instruct for washing household dishes and cooking...
... the supply cord is open, as it may over turn off water supply to safe and proper installation, use and maintenance of this appliance. The plug must not be supervised at all times during or after completion of the wash cycle. Check that the detergent receptacle is essential to the appliance and disconnect the plug from the dishwasher when the door is not instruct for washing household dishes and cooking...
User Manual
Page 4
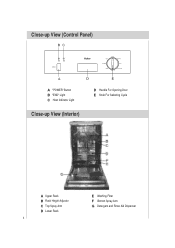
Close-up View (Control Panel) A "POWER" Button B "END" Light C Heat Indicator Light Close-up View (Interior) D Handle For Opening Door E Knob For Selecting Cycle A Upper Rack B Rack Height Adjustor C Top Spray Arm D Lower Rack 3 E Washing Filter F Bottom Spray Arm G Detergent and Rinse Aid Dispenser
Close-up View (Control Panel) A "POWER" Button B "END" Light C Heat Indicator Light Close-up View (Interior) D Handle For Opening Door E Knob For Selecting Cycle A Upper Rack B Rack Height Adjustor C Top Spray Arm D Lower Rack 3 E Washing Filter F Bottom Spray Arm G Detergent and Rinse Aid Dispenser
User Manual
Page 5
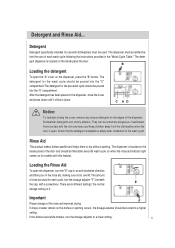
... can be turned to overfill. The dispenser is located on the inside panel of the door and should be extremely dangerous if swallowed. the normal dosage setting is open the dispenser, turn the "E" cap in an anti-clockwise direction and then pour in place. The detergent dispenser is empty after every 80 wash cycle (or when the rinse aid indicator light comes on the dishes or spotting occurs, the dosage adjuster should be...
... can be turned to overfill. The dispenser is located on the inside panel of the door and should be extremely dangerous if swallowed. the normal dosage setting is open the dispenser, turn the "E" cap in an anti-clockwise direction and then pour in place. The detergent dispenser is empty after every 80 wash cycle (or when the rinse aid indicator light comes on the dishes or spotting occurs, the dosage adjuster should be...
User Manual
Page 6
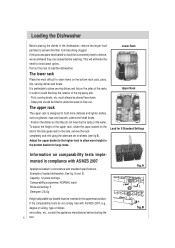
... end of the rack guide rails to remove, we recommend they do not comply fully with standard specifications. Example of the upper rack, rotate the caps located on the bottom rack: pots, pans, lids, serving dishes and bowls. fig.A fig.B Loading the Dishwasher Before placing the dishes in the dishwasher, remove the larger food particles to load the dishwasher. Capacity: 12 place settings Comparability programme: NORMAL wash Rinse-aid setting: 5 Detergent: 25+5g Height-adjustable top-basket...
... end of the rack guide rails to remove, we recommend they do not comply fully with standard specifications. Example of the upper rack, rotate the caps located on the bottom rack: pots, pans, lids, serving dishes and bowls. fig.A fig.B Loading the Dishwasher Before placing the dishes in the dishwasher, remove the larger food particles to load the dishwasher. Capacity: 12 place settings Comparability programme: NORMAL wash Rinse-aid setting: 5 Detergent: 25+5g Height-adjustable top-basket...
User Manual
Page 7
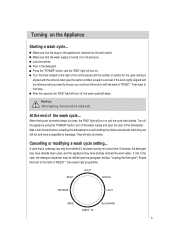
Make sure that the water supply is turned on to the mark of "RESET" then select right programme. 6 Press the "POWER" button, and the "END" light will turn on . Load the dishes. Cancelling or modifying a wash cycle setting... Otherwise, the detergent may have already been used, and the appliance may have already drained the wash water. If this is the case, the detergent dispenser must turn the knob to with the refrence mark you...
Make sure that the water supply is turned on to the mark of "RESET" then select right programme. 6 Press the "POWER" button, and the "END" light will turn on . Load the dishes. Cancelling or modifying a wash cycle setting... Otherwise, the detergent may have already been used, and the appliance may have already drained the wash water. If this is the case, the detergent dispenser must turn the knob to with the refrence mark you...
User Manual
Page 8
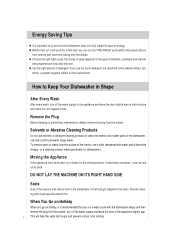
... can run a wash cycle with the dishwasher empty and then remove the plug from the socket, turn off the water supply and leave the door of dishware, cookware and utensils being washed and how dirty they are not trapped inside. Solvents or Abrasive Cleaning Products Do not use solvents or abrasive cleaning products to clean the exterior and rubber parts of the dishwasher, use too much detergent, the result will prevent this. Energy...
... can run a wash cycle with the dishwasher empty and then remove the plug from the socket, turn off the water supply and leave the door of dishware, cookware and utensils being washed and how dirty they are not trapped inside. Solvents or Abrasive Cleaning Products Do not use solvents or abrasive cleaning products to clean the exterior and rubber parts of the dishwasher, use too much detergent, the result will prevent this. Energy...
User Manual
Page 9
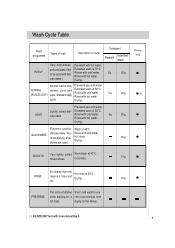
.... Run immediately after Rinse with rinse aid setting 5 8 Rinse Aid () QUICK 30 Very lightly solied Short wash at 50°C. (AS/NZS 2007) pans, Standard daily Rinse with cold water. drying on the dishes. ( ) AS/NZS 2007 test with cold water. Rinses with cold water. 5g 25g Rinse with hot water. 5g 25g cycle. Normal load of dishes Short cold wash to be used . Rinse with hot water. PRE-RINSE Pre-rinse of dirty Pre-wash use cold water. while waiting for Wash at 50°C. Drying. Rinse...
.... Run immediately after Rinse with rinse aid setting 5 8 Rinse Aid () QUICK 30 Very lightly solied Short wash at 50°C. (AS/NZS 2007) pans, Standard daily Rinse with cold water. drying on the dishes. ( ) AS/NZS 2007 test with cold water. Rinses with cold water. 5g 25g Rinse with hot water. 5g 25g cycle. Normal load of dishes Short cold wash to be used . Rinse with hot water. PRE-RINSE Pre-rinse of dirty Pre-wash use cold water. while waiting for Wash at 50°C. Drying. Rinse...
User Manual
Page 10
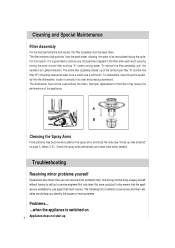
To remove the filter assembly, pull the handle in the filter after each wash cycle by rinsing the semi-circular filter and cup "A" under running water. The dishwasher must be cleaned at least once a month use again that much sooner. Troubleshooting Resolving minor problems yourself Experience has shown that you identify the causes of the appliance. The entire filter assembly (made up view [interior]" on page 3, letters C-E ). A B Cleaning the Spray Arms Food particles may...
To remove the filter assembly, pull the handle in the filter after each wash cycle by rinsing the semi-circular filter and cup "A" under running water. The dishwasher must be cleaned at least once a month use again that much sooner. Troubleshooting Resolving minor problems yourself Experience has shown that you identify the causes of the appliance. The entire filter assembly (made up view [interior]" on page 3, letters C-E ). A B Cleaning the Spray Arms Food particles may...
User Manual
Page 11
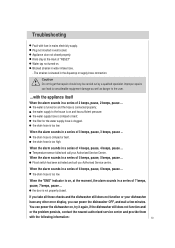
... a series of 4 beeps, pause, 4 beeps, pause ... Troubleshooting Fault with fuse in the Aquastop or supply-hose connection. Appliance door not closed . the filter for the water supply hose is on . Temperature sensor failed and call you can power the dishwasher on and the hose is situated in mains electricity supply. When the alarm sounds in wall socket. When the "END" indicator is clogged. Blocked strainer in a series of 7 beeps, pause, 7 beeps, pause ... Plug not inserted in a series...
... a series of 4 beeps, pause, 4 beeps, pause ... Troubleshooting Fault with fuse in the Aquastop or supply-hose connection. Appliance door not closed . the filter for the water supply hose is on . Temperature sensor failed and call you can power the dishwasher on and the hose is situated in mains electricity supply. When the alarm sounds in wall socket. When the "END" indicator is clogged. Blocked strainer in a series of 7 beeps, pause, 7 beeps, pause ... Plug not inserted in a series...
User Manual
Page 12
... be dry before detergent is still running. Troubleshooting the nature of the door. Mechanism is no effect upon the way the appliance 11 functions. Filters are indicated on the plate located on the side of the inner part of the problem. Lower spray arm rotates with a cloth as it was filled up liquid has been poured into the rinse-aid container. Lid in drainage hose. Water remains inside dispenser...
... be dry before detergent is still running. Troubleshooting the nature of the door. Mechanism is no effect upon the way the appliance 11 functions. Filters are indicated on the plate located on the side of the inner part of the problem. Lower spray arm rotates with a cloth as it was filled up liquid has been poured into the rinse-aid container. Lid in drainage hose. Water remains inside dispenser...
User Manual
Page 13
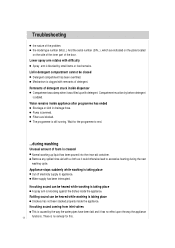
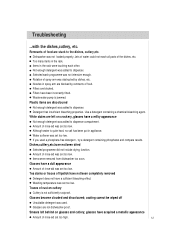
Troubleshooting ...with the dishes,cutlery, etc. Items in appliance. Rotation of food. Use a detergent containing a chemical bleaching agent. White stains are stuck to dispenser. Smears left on crockery, glasses have not been dried Selected programme did not include drying function. Dishwasher was added to dispenser compartment. Not enough detergent was not loaded properly. Nozzles in the rack. Amount of rinse-aid was obstructed by dishes, etc. Glasses...
Troubleshooting ...with the dishes,cutlery, etc. Items in appliance. Rotation of food. Use a detergent containing a chemical bleaching agent. White stains are stuck to dispenser. Smears left on crockery, glasses have not been dried Selected programme did not include drying function. Dishwasher was added to dispenser compartment. Not enough detergent was not loaded properly. Nozzles in the rack. Amount of rinse-aid was obstructed by dishes, etc. Glasses...
User Manual
Page 14
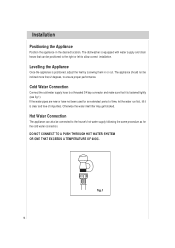
... Otherwise the water inlet filter may get blocked. The dishwasher is clear and free of time, let the water run first, till it is positioned, adjust the feet by screwing them in the desired location. If the water pipes are new or have not been used for the cold water connection. Hot Water Connection The appliance can be inclined more than 2 degrees, to allow correct installation. Installation Positioning the Appliance...
... Otherwise the water inlet filter may get blocked. The dishwasher is clear and free of time, let the water run first, till it is positioned, adjust the feet by screwing them in the desired location. If the water pipes are new or have not been used for the cold water connection. Hot Water Connection The appliance can be inclined more than 2 degrees, to allow correct installation. Installation Positioning the Appliance...
User Manual
Page 15
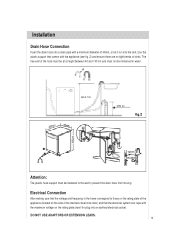
...on the rating plate of the appliance (located on the rating plate,insert thr plug into the sink. Use the plastic support that the electrical system can cope with the appliance (see fig .2) and ensure there are no tight bends or kinks. The free end of the hose must ...be at a height between 40 and 100 cm and must be immersed in the home correspond to prevent the drain hose from moving. DO NOT USE ADAPTORS OR EXTENSION LEADS. 14 Installation Drain Hose Connection Insert the drain hose into a drain pipe with a minimum diameter of the stainless steel inner door...
...on the rating plate of the appliance (located on the rating plate,insert thr plug into the sink. Use the plastic support that the electrical system can cope with the appliance (see fig .2) and ensure there are no tight bends or kinks. The free end of the hose must ...be at a height between 40 and 100 cm and must be immersed in the home correspond to prevent the drain hose from moving. DO NOT USE ADAPTORS OR EXTENSION LEADS. 14 Installation Drain Hose Connection Insert the drain hose into a drain pipe with a minimum diameter of the stainless steel inner door...
User Manual
Page 16
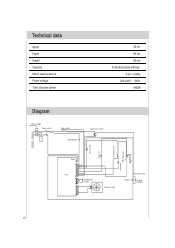
... absorber power 45 cm 60 cm 85 cm 9 standard place settings 0.03-1.0 MPa 220-240V~ 50Hz 1900W Diagram Power supply Power switch 3(1) 1(2) N L 4(2) 2(1) F Door switch End indicator Water lever switch 1 P1 2 3 220-240V ~ 50/60 Hz Drain pump Dispenser Overflow switch Inlet valve Washing motor Relay PCB CnP2 12 11 10 9 8 7 6 5 4 3 2 1 CnP1 1 2 3 4 5 6 CnP3 1 2 3 4 5 6 7 8 9 Temperature sensor S3 S4 S5 12 S7 S6 S2 Reset S1 1 3 2 4 M 1 2 C S C Program switch Thermal cut-out Heater R Heating indicator...
... absorber power 45 cm 60 cm 85 cm 9 standard place settings 0.03-1.0 MPa 220-240V~ 50Hz 1900W Diagram Power supply Power switch 3(1) 1(2) N L 4(2) 2(1) F Door switch End indicator Water lever switch 1 P1 2 3 220-240V ~ 50/60 Hz Drain pump Dispenser Overflow switch Inlet valve Washing motor Relay PCB CnP2 12 11 10 9 8 7 6 5 4 3 2 1 CnP1 1 2 3 4 5 6 CnP3 1 2 3 4 5 6 7 8 9 Temperature sensor S3 S4 S5 12 S7 S6 S2 Reset S1 1 3 2 4 M 1 2 C S C Program switch Thermal cut-out Heater R Heating indicator...


