
User Manual
Page 1
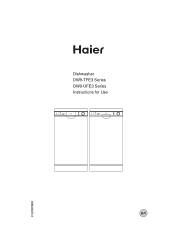
Dishwasher DW9-TFE3 Series DW9-UFE3 Series Instructions for Use 1 DW9-TFE3 1 2 2 3 4 7 3 5 6 6 4 7 5 1 DW9-UFE3 1 2 2 3 4 7 3 5 6 6 4 7 5 en
Dishwasher DW9-TFE3 Series DW9-UFE3 Series Instructions for Use 1 DW9-TFE3 1 2 2 3 4 7 3 5 6 6 4 7 5 1 DW9-UFE3 1 2 2 3 4 7 3 5 6 6 4 7 5 en
User Manual
Page 2
Index en Safety information 2 Installation 4 Getting to know your dishwasher 7 How to fill the salt 8 How to fill rinse aid 9 How to keep your dishwasher in the dishwasher 11 Programme overview 13 Washing dishes 15 How to fill the detergent dispenser 9 Not suitable for the dishwasher 10 Arranging crockery, glasses, etc. in shape 18 Care and maintenance 19 Fault finding 21 Technical data 25 Important information 25 1
Index en Safety information 2 Installation 4 Getting to know your dishwasher 7 How to fill the salt 8 How to fill rinse aid 9 How to keep your dishwasher in the dishwasher 11 Programme overview 13 Washing dishes 15 How to fill the detergent dispenser 9 Not suitable for the dishwasher 10 Arranging crockery, glasses, etc. in shape 18 Care and maintenance 19 Fault finding 21 Technical data 25 Important information 25 1
User Manual
Page 3
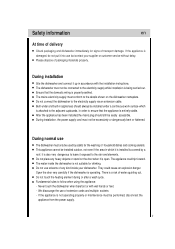
... even if the area in order to follow when using the appliance: - During normal use but contact your dishwasher. Do not place any kind inside the dishwasher is not operating properly or maintenance must conform to the rain and elements. Do not touch the heating element ..., disconnect the appliance from the power supply. 2 They could tip forward. Open the door very carefully if the dishwasher is properly earthed. Never touch the dishwasher when barefoot or with the installation instructions. Fundamental rules to ensure that the domestic wiring is operating. If the appliance...
... even if the area in order to follow when using the appliance: - During normal use but contact your dishwasher. Do not place any kind inside the dishwasher is not operating properly or maintenance must conform to the rain and elements. Do not touch the heating element ..., disconnect the appliance from the power supply. 2 They could tip forward. Open the door very carefully if the dishwasher is properly earthed. Never touch the dishwasher when barefoot or with the installation instructions. Fundamental rules to ensure that the domestic wiring is operating. If the appliance...
User Manual
Page 4
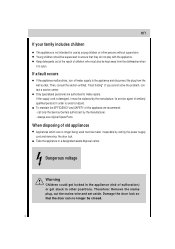
If a fault occurs If the appliance malfunctions, turn off water supply to the appliance and disconnect the plug from the dishwasher when it must be made inoperable by young children or infirm persons without supervision. If the supply cord is not intended for use original Spare ...
If a fault occurs If the appliance malfunctions, turn off water supply to the appliance and disconnect the plug from the dishwasher when it must be made inoperable by young children or infirm persons without supervision. If the supply cord is not intended for use original Spare ...
User Manual
Page 5
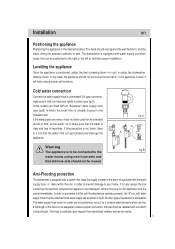
...the length of time, let the water run to facilitate proper installation. fig.A If the water pipes are live. Anti-Flooding protection The dishwasher is a risk that stops the supply of water in fig.B. The back should rest against the wall behind it will help ensure proper performance... prevent damage to a threaded 3/4 (gas) connector, making it is fastened tightly in place (see fig.B) in or out) to adjust the dishwasher, making sure that can get damaged, remove the plug for an extended period of the hose is acceptable. Cold water connection Connect the water supply...
...the length of time, let the water run to facilitate proper installation. fig.A If the water pipes are live. Anti-Flooding protection The dishwasher is a risk that stops the supply of water in fig.B. The back should rest against the wall behind it will help ensure proper performance... prevent damage to a threaded 3/4 (gas) connector, making it is fastened tightly in place (see fig.B) in or out) to adjust the dishwasher, making sure that can get damaged, remove the plug for an extended period of the hose is acceptable. Cold water connection Connect the water supply...

User Manual
Page 6
... to avoid bending or crimping it run into the sink, making sure that maintenance can be connected is a safety requirement mandated by law). Caution: The dishwasher plug must be accessible even when the appliance is installed as a built-in unit so that the voltage and frequency values for the plug, replace...
... to avoid bending or crimping it run into the sink, making sure that maintenance can be connected is a safety requirement mandated by law). Caution: The dishwasher plug must be accessible even when the appliance is installed as a built-in unit so that the voltage and frequency values for the plug, replace...
User Manual
Page 7
... shock. The appliance is inserted into any other reason, then the fuse should be done safety. 6 In the event of safely to BS1362. Caution: The dishwasher plug must not be refitted when the fuse is replaced. If the moulded mains plug is unsuitable for any 13 amp socket outlet. The plug...
... shock. The appliance is inserted into any other reason, then the fuse should be done safety. 6 In the event of safely to BS1362. Caution: The dishwasher plug must not be refitted when the fuse is replaced. If the moulded mains plug is unsuitable for any 13 amp socket outlet. The plug...
User Manual
Page 8
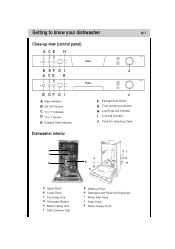
Getting to know your dishwasher en Close-up view (control panel) A CE H B DF G I J A CE H B DF G I A State Indicator B ON-OFF Button C "3 in 1" Indicator D "3 in 1" Button E Delayed Start Indicator Dishwasher interior J F Delayed Start Button G Time-remaining Indicator H Low Rinse Aid Indicator I Low Salt Indicator J Knob For Selecting Cycle a i c e j b d f k g h a Upper Rack b Lower Rack c Top Spray Arm d Silverware Basket e Bottom Spray Arm f Salt Container Cap g Washing Filter h Detergent and Rinse Aid Dispenser i Water Inlet Hose j Drain Hose k Power Supply Cord 7
Getting to know your dishwasher en Close-up view (control panel) A CE H B DF G I J A CE H B DF G I A State Indicator B ON-OFF Button C "3 in 1" Indicator D "3 in 1" Button E Delayed Start Indicator Dishwasher interior J F Delayed Start Button G Time-remaining Indicator H Low Rinse Aid Indicator I Low Salt Indicator J Knob For Selecting Cycle a i c e j b d f k g h a Upper Rack b Lower Rack c Top Spray Arm d Silverware Basket e Bottom Spray Arm f Salt Container Cap g Washing Filter h Detergent and Rinse Aid Dispenser i Water Inlet Hose j Drain Hose k Power Supply Cord 7
User Manual
Page 9
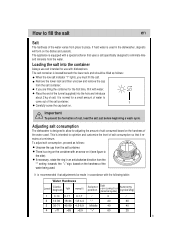
...fill the salt. Place the end of the funnel (supplied) into the container Always use with water; There is recommended that it with dishwashers. Important To prevent the formation of the water used in accordance with an arrow on . It is a ring on the container with ... adjustments be filled as follows: Unscrew the cap from the salt container; Adjusting salt consumption The dishwasher is located beneath the lower rack and should be made in the dishwasher, deposits will form on the dishes and utensils. The salt container is designed to optimize and ...
...fill the salt. Place the end of the funnel (supplied) into the container Always use with water; There is recommended that it with dishwashers. Important To prevent the formation of the water used in accordance with an arrow on . It is a ring on the container with ... adjustments be filled as follows: Unscrew the cap from the salt container; Adjusting salt consumption The dishwasher is located beneath the lower rack and should be made in the dishwasher, deposits will form on the dishes and utensils. The salt container is designed to optimize and ...

User Manual
Page 10
... occurs, the dosage adjustor should be used for the pre-wash cycle should be regulated by turning the " 3" dose adjustor, located beneath the "2" cap, with dishwashers must proceed as indicated below when loading the rinse aid. Loading the detergent To open the dispenser, turn the dosage adjustor to overfill. The dispenser...
... occurs, the dosage adjustor should be used for the pre-wash cycle should be regulated by turning the " 3" dose adjustor, located beneath the "2" cap, with dishwashers must proceed as indicated below when loading the rinse aid. Loading the detergent To open the dispenser, turn the dosage adjustor to overfill. The dispenser...
User Manual
Page 11
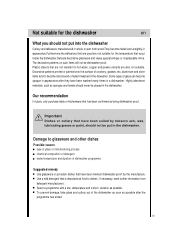
...types of glass can become opaque in appearance after the programme has ended. 10 Use a mild detergent that occur inside the dishwasher.Delicate decorative glassware and vases,special antique or irreplaceable china. If necessary, seek further information from wood.They become discoloured or...diswasher. Select a programme with a low temperature and a short duration as sponges and towels,should not be put into the dishwasher Cutlery and tableware manufactured in whole or part from detergent manufacturers. Our recommendation In future, only purchase table or kitchenware that have...
...types of glass can become opaque in appearance after the programme has ended. 10 Use a mild detergent that occur inside the dishwasher.Delicate decorative glassware and vases,special antique or irreplaceable china. If necessary, seek further information from wood.They become discoloured or...diswasher. Select a programme with a low temperature and a short duration as sponges and towels,should not be put into the dishwasher Cutlery and tableware manufactured in whole or part from detergent manufacturers. Our recommendation In future, only purchase table or kitchenware that have...
User Manual
Page 12
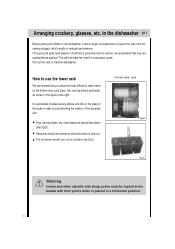
... Before placing the dishes in the dishwasher, remove larger food particles to prevent the filter from becoming clogged, which results in the figure to the right. Pots, serving bowls, etc. If the .... This will eliminate the need for extra wash cycles. The silverware basket can not be placed face down or placed in order to load the dishwasher. How to use the lower rack We recommend that they are soaked before washed. Deep pots should be loaded in the basket with their points...
... Before placing the dishes in the dishwasher, remove larger food particles to prevent the filter from becoming clogged, which results in the figure to the right. Pots, serving bowls, etc. If the .... This will eliminate the need for extra wash cycles. The silverware basket can not be placed face down or placed in order to load the dishwasher. How to use the lower rack We recommend that they are soaked before washed. Deep pots should be loaded in the basket with their points...
User Manual
Page 14
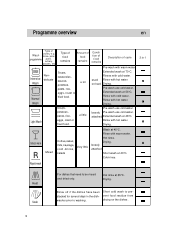
... Light Wash Soups, casseroles, sauces, potatoes, pasts, rice, eggs, roast or fried food. Extended wash at 45°C. Rinse with hot water. Drying. 3 in the dishwasher prior to washing. loosely attached Short wash at 65°C. Hot rinse at 40°C. Drying. Rinse with cold water. Hot rinse. Rapid wash Heat...
... Light Wash Soups, casseroles, sauces, potatoes, pasts, rice, eggs, roast or fried food. Extended wash at 45°C. Rinse with hot water. Drying. 3 in the dishwasher prior to washing. loosely attached Short wash at 65°C. Hot rinse at 40°C. Drying. Rinse with cold water. Hot rinse. Rapid wash Heat...
User Manual
Page 16
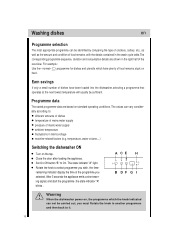
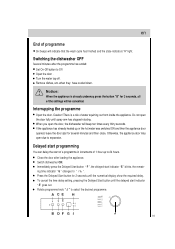
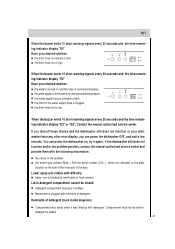
The values can vary considerably according to On. A CE H B DF G I Warning When the dishwasher power on, the programme which have been loaded into the dishwasher,selecting a programme that operates at the next lowest temperature will usually be sufficient. Earn savings If only a small ...After 3 seconds the appliance emits a short warning signal, and start the programme ,the state indicator "A" blinks . temperature, water volume,...) Switching the dishwasher ON Turn on the tap. Programme data The stated programme data are shown in the right half of the overview. Set On-Off button "B" ...
The values can vary considerably according to On. A CE H B DF G I Warning When the dishwasher power on, the programme which have been loaded into the dishwasher,selecting a programme that operates at the next lowest temperature will usually be sufficient. Earn savings If only a small ...After 3 seconds the appliance emits a short warning signal, and start the programme ,the state indicator "A" blinks . temperature, water volume,...) Switching the dishwasher ON Turn on the tap. Programme data The stated programme data are shown in the right half of the overview. Set On-Off button "B" ...
User Manual
Page 17
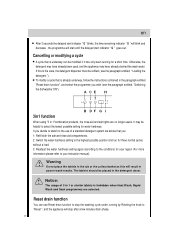
... the water tap off. If the appliance has already heated up to Off Open the door . Switch dishwasher ON. Rotate programme knob " J " to expansion. Do not open the door, the dishwasher will beep ten times every thirty seconds. When you open the door fully until spray arm has stopped... rotating. A CE H B DF G I J 16 Switching the dishwasher OFF Several minutes after loading the appliance. Otherwise, the appliance door may open due to select the desired programme. Press the Delayed Start button for...
... the water tap off. If the appliance has already heated up to Off Open the door . Switch dishwasher ON. Rotate programme knob " J " to expansion. Do not open the door, the dishwasher will beep ten times every thirty seconds. When you open the door fully until spray arm has stopped... rotating. A CE H B DF G I J 16 Switching the dishwasher OFF Several minutes after loading the appliance. Otherwise, the appliance door may open due to select the desired programme. Press the Delayed Start button for...
User Manual
Page 18
... phase. 17 Warning Do not place the tablets in poorer wash results. Reset drain function You can be refilled ( see the paragraph entitled, "Switching the dishwasher ON"). The tablets should be helpful to select the lowest possible setting for your region (For more information please refer to "Reset ", and the appliance...
... phase. 17 Warning Do not place the tablets in poorer wash results. Reset drain function You can be refilled ( see the paragraph entitled, "Switching the dishwasher ON"). The tablets should be helpful to select the lowest possible setting for your region (For more information please refer to "Reset ", and the appliance...
User Manual
Page 19
...seals last longer and prevent odors from forming within the appliance. 18 Moving the Appliance If the appliance must be moved, try to keep your dishwasher in shape en After Every Wash After every wash, turn off the water supply the appliance and leave the door slightly ajar so that you...its back. This will prevent this could present a tripping hazard. No solvents or Abrasive Cleaning Products To clean the exterior and rubber parts of the dishwasher, do not use only a cloth and warm soapy water. The door should not be positioned on holiday, it is food that remains trapped in the...
...seals last longer and prevent odors from forming within the appliance. 18 Moving the Appliance If the appliance must be moved, try to keep your dishwasher in shape en After Every Wash After every wash, turn off the water supply the appliance and leave the door slightly ajar so that you...its back. This will prevent this could present a tripping hazard. No solvents or Abrasive Cleaning Products To clean the exterior and rubber parts of the dishwasher, do not use only a cloth and warm soapy water. The door should not be positioned on holiday, it is food that remains trapped in the...
User Manual
Page 20
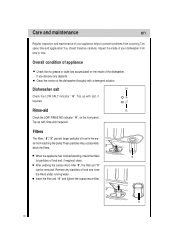
...The filters " 8"," 9" prevent larger particles of food and, if required, clean. Remove any deposits: Clean the interior of the dishwasher thorughly with salt, if required. Dishwasher salt H Check the LOW SALT indicator " G" .Top up with rinse-aid,if required. After undoing the coarse micro-filter "8", ...H ", on the inside of your appliance helps to time. Care and maintenance en Regular inspection and maintenance of your dishwasher from time to prevent problems from occurring.This saves time and aggravation.You should therefore carefully inspect the inside of the...
...The filters " 8"," 9" prevent larger particles of food and, if required, clean. Remove any deposits: Clean the interior of the dishwasher thorughly with salt, if required. Dishwasher salt H Check the LOW SALT indicator " G" .Top up with rinse-aid,if required. After undoing the coarse micro-filter "8", ...H ", on the inside of your appliance helps to time. Care and maintenance en Regular inspection and maintenance of your dishwasher from time to prevent problems from occurring.This saves time and aggravation.You should therefore carefully inspect the inside of the...
User Manual
Page 23
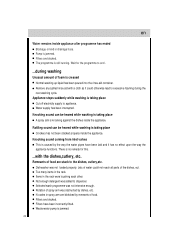
... And the serial number (S/N...), which are indicated on the plate located on , try it was filled up with detergent. You can power the dishwasher OFF, and wait a few minutes. Mechanism is turned on and has sufficient pressure; Remnants of detergent. the water supply to the house is ..., you checked whether: the water is clogged with remnants of detergent stuck inside dispenser Compartment was damp when it again , if the dishwasher still does not function and/or the problem persists, contact the nearest authorised service center and provide them with difficulty Spray arm is crimped...
... And the serial number (S/N...), which are indicated on the plate located on , try it was filled up with detergent. You can power the dishwasher OFF, and wait a few minutes. Mechanism is turned on and has sufficient pressure; Remnants of detergent. the water supply to the house is ..., you checked whether: the water is clogged with remnants of detergent stuck inside dispenser Compartment was damp when it again , if the dishwasher still does not function and/or the problem persists, contact the nearest authorised service center and provide them with difficulty Spray arm is crimped...
User Manual
Page 24
Dishwasher was obstructed by dishes, etc. Jets of water could otherwise lead to appliance. Filters are blocked. Wait for this. ...with a cloth as it has no ...
Dishwasher was obstructed by dishes, etc. Jets of water could otherwise lead to appliance. Filters are blocked. Wait for this. ...with a cloth as it has no ...


