
User Manual
Page 3
... extension cords and multiple sockets; - Ensure that the appliance is being carried out. Open the door very carefully if the dishwasher is properly earthed. We discourage the use The dishwasher must not be performed, disconnect the appliance from the power supply. 2 Do not place any kind inside the dishwasher is not suitable for the washing of water squirting out. During installation Site the dishwasher and connect...
... extension cords and multiple sockets; - Ensure that the appliance is being carried out. Open the door very carefully if the dishwasher is properly earthed. We discourage the use The dishwasher must not be performed, disconnect the appliance from the power supply. 2 Do not place any kind inside the dishwasher is not suitable for the washing of water squirting out. During installation Site the dishwasher and connect...
User Manual
Page 4
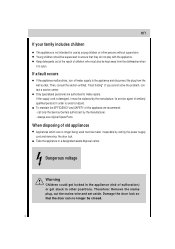
... set aside. If a fault occurs If the appliance malfunctions, turn off water supply to avoid a hazard. Then, consult the section entitled, "Fault finding" .If you cannot solve the problem, contact a service center. If the supply cord is damaged, it is open. always use by cutting the power supply cord and removing the door lock. en If your family includes children The appliance is not intended for use original Spare Parts. Keep detergents...
... set aside. If a fault occurs If the appliance malfunctions, turn off water supply to avoid a hazard. Then, consult the section entitled, "Fault finding" .If you cannot solve the problem, contact a service center. If the supply cord is damaged, it is open. always use by cutting the power supply cord and removing the door lock. en If your family includes children The appliance is not intended for use original Spare Parts. Keep detergents...
User Manual
Page 5
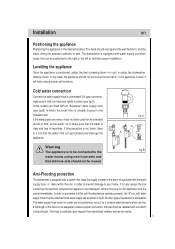
... The dishwasher is equipped with a system that stops the supply of water in the event of time, let the water run to make a proper connection, the hose must be cut, as shown in the threaded end. The water supply hose must be positioned to the right or the left to facilitate proper installation. In any circumstances, be replaced with water supply and drain hoses that can get damaged, remove the plug for...
... The dishwasher is equipped with a system that stops the supply of water in the event of time, let the water run to make a proper connection, the hose must be cut, as shown in the threaded end. The water supply hose must be positioned to the right or the left to facilitate proper installation. In any circumstances, be replaced with water supply and drain hoses that can get damaged, remove the plug for...

User Manual
Page 6
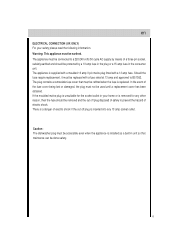
... diameter of the appliance is correct for the plug, replace the whole cable, rather than using adaptors or the like as a built-in water. fig.C Attention: The connecting piece for the drain hose (fig.C). Caution: The dishwasher plug must be accessible even when the appliance is installed as they could cause overheating and burns. Electrical Connection After making sure to which is earthed...
... diameter of the appliance is correct for the plug, replace the whole cable, rather than using adaptors or the like as a built-in water. fig.C Attention: The connecting piece for the drain hose (fig.C). Caution: The dishwasher plug must be accessible even when the appliance is installed as they could cause overheating and burns. Electrical Connection After making sure to which is earthed...
User Manual
Page 7
... earthed and should be used until a replacement cover has been obtained. Caution: The dishwasher plug must not be removed and the cut off plug disposed of safely to prevent the hazard of the fuse cover being lost or damaged, the plug must be accessible even when the appliance is installed as a built-in the consumer unit. en ELECTRICAL CONNECTION (UK ONLY) For your...
... earthed and should be used until a replacement cover has been obtained. Caution: The dishwasher plug must not be removed and the cut off plug disposed of safely to prevent the hazard of the fuse cover being lost or damaged, the plug must be accessible even when the appliance is installed as a built-in the consumer unit. en ELECTRICAL CONNECTION (UK ONLY) For your...
User Manual
Page 8
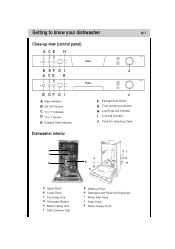
Getting to know your dishwasher en Close-up view (control panel) A CE H B DF G I J A CE H B DF G I A State Indicator B ON-OFF Button C "3 in 1" Indicator D "3 in 1" Button E Delayed Start Indicator Dishwasher interior J F Delayed Start Button G Time-remaining Indicator H Low Rinse Aid Indicator I Low Salt Indicator J Knob For Selecting Cycle a i c e j b d f k g h a Upper Rack b Lower Rack c Top Spray Arm d Silverware Basket e Bottom Spray Arm f Salt Container Cap g Washing Filter h Detergent and Rinse Aid Dispenser i Water Inlet Hose j Drain Hose k Power Supply Cord 7
Getting to know your dishwasher en Close-up view (control panel) A CE H B DF G I J A CE H B DF G I A State Indicator B ON-OFF Button C "3 in 1" Indicator D "3 in 1" Button E Delayed Start Indicator Dishwasher interior J F Delayed Start Button G Time-remaining Indicator H Low Rinse Aid Indicator I Low Salt Indicator J Knob For Selecting Cycle a i c e j b d f k g h a Upper Rack b Lower Rack c Top Spray Arm d Silverware Basket e Bottom Spray Arm f Salt Container Cap g Washing Filter h Detergent and Rinse Aid Dispenser i Water Inlet Hose j Drain Hose k Power Supply Cord 7
User Manual
Page 9
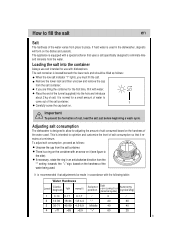
Remove the lower rack and then unscrew and remove the cap from place to place. To adjust salt consumption, proceed as follows: When the low salt indicator "1" lights, you are filling the container for use salt intended for the first time, fill it with dishwashers. There is intended to optimize and customize the level of salt consumption so that it (see figure to the...
Remove the lower rack and then unscrew and remove the cap from place to place. To adjust salt consumption, proceed as follows: When the low salt indicator "1" lights, you are filling the container for use salt intended for the first time, fill it with dishwashers. There is intended to optimize and customize the level of salt consumption so that it (see figure to the...

User Manual
Page 10
... "5" button. 7 The detergent for the pre-wash cycle should be refilled before the start of the dispenser. 9 How to dry without spotting. The dispenser must load rinse aid . Loading the detergent To open the dispenser, turn the dosage adjustor to a lower setting. the normal dosage setting is located on your appliance, you must be turned to overfill. There are 6 different settings; If drops of detergent dispenser installed on the inside panel of rinse aid used . If the dishes have white streaks, turn the "2" cap...
... "5" button. 7 The detergent for the pre-wash cycle should be refilled before the start of the dispenser. 9 How to dry without spotting. The dispenser must load rinse aid . Loading the detergent To open the dispenser, turn the dosage adjustor to a lower setting. the normal dosage setting is located on your appliance, you must be turned to overfill. There are 6 different settings; If drops of detergent dispenser installed on the inside panel of rinse aid used . If the dishes have white streaks, turn the "2" cap...
User Manual
Page 12
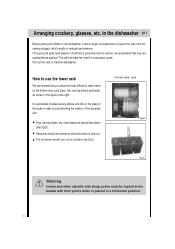
... the racks in the dishwasher, remove larger food particles to load the dishwasher. Normal daily load fig.D fig.E Warning knives and other utensils with their points down (see fig.E). The silverware basket can not be slanted to allow the water to the right. in the dishwasher en Before placing the dishes in order to remove, we recommend that they are soaked before washed...
... the racks in the dishwasher, remove larger food particles to load the dishwasher. Normal daily load fig.D fig.E Warning knives and other utensils with their points down (see fig.E). The silverware basket can not be slanted to allow the water to the right. in the dishwasher en Before placing the dishes in order to remove, we recommend that they are soaked before washed...
User Manual
Page 14
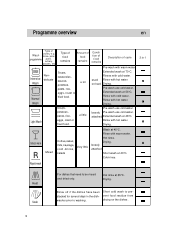
...;C. Drying. Rinses with warm water. on the dishes . 13 Rapid wash Heat Soak For dishes that need to washing. Wash china, pots/ programme pans, cutlery, glasses, etc Type of food remains Amount of crokery e.g. loosely attached Short wash at 45°C. a lot a little Condition of food remains Description of cycle Pre-wash with cold water. Drying. Hot rinse. Cold rinse. Pre-wash use cold water. loosely Pre-wash use cold water. Pre-wash use cold water. Rinse off...
...;C. Drying. Rinses with warm water. on the dishes . 13 Rapid wash Heat Soak For dishes that need to washing. Wash china, pots/ programme pans, cutlery, glasses, etc Type of food remains Amount of crokery e.g. loosely attached Short wash at 45°C. a lot a little Condition of food remains Description of cycle Pre-wash with cold water. Drying. Hot rinse. Cold rinse. Pre-wash use cold water. loosely Pre-wash use cold water. Pre-wash use cold water. Rinse off...

User Manual
Page 15
en Delayed Start Detergent Prewash Extended Wash Rinse Aid 5g 25g 5g 25g 5g 25g 5g 25g 5g 25g 5g 25g 15g 10g 15g 10g Duration in minutes Energy consumption in kWh Water consumption in litres 112 1.44 18 1.25 16 102 1.11 15 1.00 14 162 0.80 14 0.76 13 92 1.01 12 0.95 10 32 0.40 9 0.30 8 54 0.90 5.5 0.78 5 12 0.02 3 0.02 3 14
en Delayed Start Detergent Prewash Extended Wash Rinse Aid 5g 25g 5g 25g 5g 25g 5g 25g 5g 25g 5g 25g 15g 10g 15g 10g Duration in minutes Energy consumption in kWh Water consumption in litres 112 1.44 18 1.25 16 102 1.11 15 1.00 14 162 0.80 14 0.76 13 92 1.01 12 0.95 10 32 0.40 9 0.30 8 54 0.90 5.5 0.78 5 12 0.02 3 0.02 3 14
User Manual
Page 16
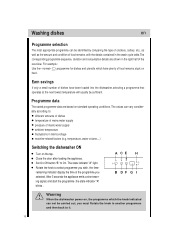
... been loaded into the dishwasher,selecting a programme that operates at the next lowest temperature will usually be sufficient. Earn savings If only a small number of mains water supply ambient temperature fluctuations in mains voltage machine-related factors (e.g. Set On-Off button "B" to it. 15 temperature, water volume,...) Switching the dishwasher ON Turn on hard. The state indicator "A" light. Close the door after loading the appliance. Washing dishes en...
... been loaded into the dishwasher,selecting a programme that operates at the next lowest temperature will usually be sufficient. Earn savings If only a small number of mains water supply ambient temperature fluctuations in mains voltage machine-related factors (e.g. Set On-Off button "B" to it. 15 temperature, water volume,...) Switching the dishwasher ON Turn on hard. The state indicator "A" light. Close the door after loading the appliance. Washing dishes en...
User Manual
Page 17
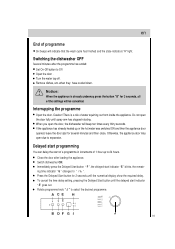
... door fully until the numerical display show the required delay. Delayed start programming You can delay the start of a programme in increments of water squirting out from inside the appliance. Press the Delayed Start button for 2 seconds until spray arm has stopped rotating. en End of the settings will be cancelled. If the appliance has already heated up to expansion. Otherwise, the appliance door may open the door, the dishwasher will indicate that the wash cycle...
... door fully until the numerical display show the required delay. Delayed start programming You can delay the start of a programme in increments of water squirting out from inside the appliance. Press the Delayed Start button for 2 seconds until spray arm has stopped rotating. en End of the settings will be cancelled. If the appliance has already heated up to expansion. Otherwise, the appliance door may open the door, the dishwasher will indicate that the wash cycle...
User Manual
Page 18
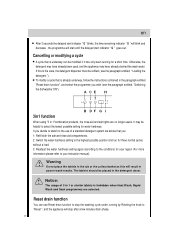
... three normal cycles without a load. 3: Readjust the water hardness setting again according to the conditions for your instruction manual). Cancelling or modifying a cycle A cycle that is forbidden when Heat Wash, Rapid Wash and Soak programmes are no longer useful. If this will start until the delayed start indicator " E " blinks, the time-remaining indicator " G " will blink and decrease , the programme will result in 1"combination products, the rinse-aid and salt lights are selected. Notice: The usage of a standard detergent...
... three normal cycles without a load. 3: Readjust the water hardness setting again according to the conditions for your instruction manual). Cancelling or modifying a cycle A cycle that is forbidden when Heat Wash, Rapid Wash and Soak programmes are no longer useful. If this will start until the delayed start indicator " E " blinks, the time-remaining indicator " G " will blink and decrease , the programme will result in 1"combination products, the rinse-aid and salt lights are selected. Notice: The usage of a standard detergent...
User Manual
Page 19
... or stains from the surface of the interior, use only a cloth and warm soapy water. Remove the plug Before cleaning or performing maintenance, always remove the plug from forming within the appliance. 18 Do not run a wash cycle with the dishwasher empty and then remove the plug from occurring. If absolutely necessary, it is food that remains trapped in the seals. How to form in the...
... or stains from the surface of the interior, use only a cloth and warm soapy water. Remove the plug Before cleaning or performing maintenance, always remove the plug from forming within the appliance. 18 Do not run a wash cycle with the dishwasher empty and then remove the plug from occurring. If absolutely necessary, it is food that remains trapped in the seals. How to form in the...
User Manual
Page 20
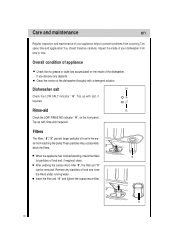
... front panel. Remove any deposits: Clean the interior of the dishwasher. When the appliance has finished washing, check the filters 8 for particles of food and rinse the filters under running water. Rinse-aid G Check the LOW RINSE AID indicator " H ", on the inside of your appliance helps to time. After undoing the coarse micro-filter "8", the filter unit "9" can be removed. If you discover any particles of food and, if required, clean. Care and maintenance...
... front panel. Remove any deposits: Clean the interior of the dishwasher. When the appliance has finished washing, check the filters 8 for particles of food and rinse the filters under running water. Rinse-aid G Check the LOW RINSE AID indicator " H ", on the inside of your appliance helps to time. After undoing the coarse micro-filter "8", the filter unit "9" can be removed. If you discover any particles of food and, if required, clean. Care and maintenance...
User Manual
Page 22
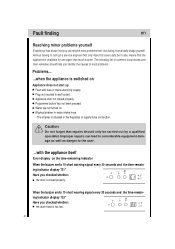
... or supply-hose connection. Water tap not turned on the time-remaining indicator When the buzzer emits 10 short warning signal every 30 seconds and the time-remaining indicator display "E1" Have you checked whether: the drain hose is too low. 21 Blocked strainer in water intake hose. - The following list of most problems that rise during normal daily usage yourself, without having to the user. ...with fuse in mains electricity supply. Fault...
... or supply-hose connection. Water tap not turned on the time-remaining indicator When the buzzer emits 10 short warning signal every 30 seconds and the time-remaining indicator display "E1" Have you checked whether: the drain hose is too low. 21 Blocked strainer in water intake hose. - The following list of most problems that rise during normal daily usage yourself, without having to the user. ...with fuse in mains electricity supply. Fault...
User Manual
Page 23
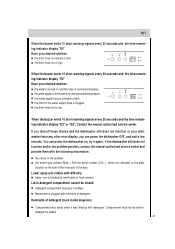
... closed Detergent compartment has been overfilled. When the buzzer emits 10 short warning signals every 30 seconds and the time remaining indicator display "E2" or "E6", Contact the nearest authorized service center. the drain hose is added. 22 the water supply hose is too high. Remnants of the problem. You can power the dishwasher OFF, and wait a few minutes. the drain hose is crimped or bent; Lower spray arm...
... closed Detergent compartment has been overfilled. When the buzzer emits 10 short warning signals every 30 seconds and the time remaining indicator display "E2" or "E6", Contact the nearest authorized service center. the drain hose is added. 22 the water supply hose is too high. Remnants of the problem. You can power the dishwasher OFF, and wait a few minutes. the drain hose is crimped or bent; Lower spray arm...
User Manual
Page 24
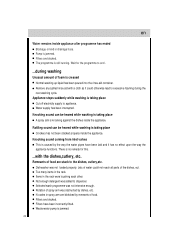
... washing is creased Normal washing up liquid has been poured into the rinse-aid container. N ozzles in drainage hose. Appliance stops suddenly while washing is taking place A spray arm is taking place Cut off electricity supply to dispenser. Jets of water could otherwise lead to the dishes, cutlery,etc. Not enough detergent was not loaded properly. Knocking sound can be heared while washing is knocking against the dishes inside the appliance. Water supply...
... washing is creased Normal washing up liquid has been poured into the rinse-aid container. N ozzles in drainage hose. Appliance stops suddenly while washing is taking place A spray arm is taking place Cut off electricity supply to dispenser. Jets of water could otherwise lead to the dishes, cutlery,etc. Not enough detergent was not loaded properly. Knocking sound can be heared while washing is knocking against the dishes inside the appliance. Water supply...
User Manual
Page 27
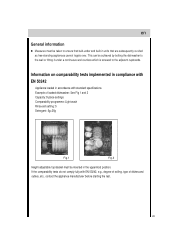
... of soiling, type of loaded dishwasher: See Fig 1 and 2 Capacity: 9 place settings Comparability programme: Light wash Rinse-aid setting: 5 Detergent: 5g+25g Fig.1 Fig.2 Height-adjustable top-basket must be taken to the adjacent cupboards. Example of dishes and cutlery, etc., contact the appliance manufacturer before starting the test. 26 If the comparability tests do not comply fully with standard specifications. This can be achieved by...
... of soiling, type of loaded dishwasher: See Fig 1 and 2 Capacity: 9 place settings Comparability programme: Light wash Rinse-aid setting: 5 Detergent: 5g+25g Fig.1 Fig.2 Height-adjustable top-basket must be taken to the adjacent cupboards. Example of dishes and cutlery, etc., contact the appliance manufacturer before starting the test. 26 If the comparability tests do not comply fully with standard specifications. This can be achieved by...


