
User Manual
Page 2
... filter and LayerEn./ Color En. * For your password 26 Setting the Lock 27 Others functions 28 Calendar,picture still and zoom functions 28 Setting and Using Favorite programs, Setting Sleep Timer 29 VGA input adjustment 30 Multi-Media Player system 31 Multi-Media Player Preparation 31 To operate the menu 33 Multi-Media player 34 Copy file function 38 Set up functions 39 Technical Operation External connections 40 Video/Audio output connection, VGA input 40 Video/Audio input connection 41 Others Trouble shooting 42 Specifications...43
... filter and LayerEn./ Color En. * For your password 26 Setting the Lock 27 Others functions 28 Calendar,picture still and zoom functions 28 Setting and Using Favorite programs, Setting Sleep Timer 29 VGA input adjustment 30 Multi-Media Player system 31 Multi-Media Player Preparation 31 To operate the menu 33 Multi-Media player 34 Copy file function 38 Set up functions 39 Technical Operation External connections 40 Video/Audio output connection, VGA input 40 Video/Audio input connection 41 Others Trouble shooting 42 Specifications...43

User Manual
Page 6
... and power button TV and AV exchange button A changeover between TV and other input signals like AV I/II select button Picture still button Screen call/help button HDM menu button Program scan button Direct select button Select a TV channel directly Digital selection button Changeover from one digital, two digital and three digital Program swap button Picture mode selection button Sound mode selection button Volume adjustment button Program adjustment button Menu call/select button Select menu, call and exit Picture menu call Sound menu call Favorite program button Shuttle button(No available...
... and power button TV and AV exchange button A changeover between TV and other input signals like AV I/II select button Picture still button Screen call/help button HDM menu button Program scan button Direct select button Select a TV channel directly Digital selection button Changeover from one digital, two digital and three digital Program swap button Picture mode selection button Sound mode selection button Volume adjustment button Program adjustment button Menu call/select button Select menu, call and exit Picture menu call Sound menu call Favorite program button Shuttle button(No available...
User Manual
Page 7
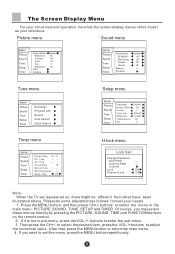
... the MENU button to adjust the numerical value. The Screen Display Menu For your convenience of operation, here lists the screen display menus of this model as follows to meet your reference. Picture menu Sound menu MENU Picture Sound Tune Setup Timer Picture Mode Brightness Contrast Color Hue Sharpness Filter Advance Standard 50 50 50 0 30 MENU Picture Sound Tune Setup Timer Sound Mode 3D MONO SRS Dialog Trubass Woofer Balance Equalizer Standard Off Off Off Off 0 Tune menu MENU Picture Sound Tune Setup Timer Exchange Program...
... the MENU button to adjust the numerical value. The Screen Display Menu For your convenience of operation, here lists the screen display menus of this model as follows to meet your reference. Picture menu Sound menu MENU Picture Sound Tune Setup Timer Picture Mode Brightness Contrast Color Hue Sharpness Filter Advance Standard 50 50 50 0 30 MENU Picture Sound Tune Setup Timer Sound Mode 3D MONO SRS Dialog Trubass Woofer Balance Equalizer Standard Off Off Off Off 0 Tune menu MENU Picture Sound Tune Setup Timer Exchange Program...
User Manual
Page 9
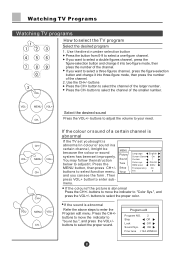
... set you can see the form . buttons to adjust the volume to enter submenu. If the sound is abnormal in colour or sound in a certain channel, it into two-figure mode, then press the number of the channel. 2. If you want to select function menu, and you bought is abnormal Refer the above steps to select a one-figure channel. Use the CH+/- CH+ VOL- Use the direct number selection button...
... set you can see the form . buttons to adjust the volume to enter submenu. If the sound is abnormal in colour or sound in a certain channel, it into two-figure mode, then press the number of the channel. 2. If you want to select function menu, and you bought is abnormal Refer the above steps to select a one-figure channel. Use the CH+/- CH+ VOL- Use the direct number selection button...

User Manual
Page 11
... use this section, how to use the remote control to set the channels, which are Auto search, Search, Quick Search and Fine tune. Picture Sound Tune Setup Timer Exchange Program edit Search Auto Search Quick Search CH+ VOL- Auto Search VHF-L 188.16 MHz CH NO:4 If you may be because that the colour or sound system has not been set will be stored in a certain channel, it may adjust...
... use this section, how to use the remote control to set the channels, which are Auto search, Search, Quick Search and Fine tune. Picture Sound Tune Setup Timer Exchange Program edit Search Auto Search Quick Search CH+ VOL- Auto Search VHF-L 188.16 MHz CH NO:4 If you may be because that the colour or sound system has not been set will be stored in a certain channel, it may adjust...

User Manual
Page 12
MENU Picture Sound Tune Setup Timer Exchange Program edit Search Auto Search Quick Search 4. buttons, the TV set will begin to search up or down, when the TV set has searched a program, the TV set continue to search until it has searched the TV signal you are watching, just press the CALL/HELP button once. buttons or Direct select button to enter. Press the VOL+ or VOL- Search VHF-L 188.16...
MENU Picture Sound Tune Setup Timer Exchange Program edit Search Auto Search Quick Search 4. buttons, the TV set will begin to search up or down, when the TV set has searched a program, the TV set continue to search until it has searched the TV signal you are watching, just press the CALL/HELP button once. buttons or Direct select button to enter. Press the VOL+ or VOL- Search VHF-L 188.16...

User Manual
Page 13
...+ button to turn the Channel Lock function to sub-menu. buttons or Direct select button to enter. 3. Press the MENU button to display the menu, then press CH+/-buttons to select TUNE menu, press VOL+ button to select the desired channel number. ( For example, the channel 1.) 2. Timer Exchange Program edit Search Auto Search Quick Search 4. Press the VOL+ button to search upwards until it has searched the TV signal you need. Program Lock buttons If the program Lock and the program Lock of the Lock Set are...
...+ button to turn the Channel Lock function to sub-menu. buttons or Direct select button to enter. 3. Press the MENU button to display the menu, then press CH+/-buttons to select TUNE menu, press VOL+ button to select the desired channel number. ( For example, the channel 1.) 2. Timer Exchange Program edit Search Auto Search Quick Search 4. Press the VOL+ button to search upwards until it has searched the TV signal you need. Program Lock buttons If the program Lock and the program Lock of the Lock Set are...

User Manual
Page 14
... directly using the CH+/buttons. buttons or Direct select button to sub-menu. Press the MENU button to enter. 3. DK Fine tune If you do not wish to be displayed when using the channel number buttons on the remote control. 1. Press the MENU button to display the menu, then press CH+/-buttons to select TUNE menu, press VOL+ MENU button to exit the menu display. buttons to move the indicator to " Program Setup edit ", then press the VOL+ button Timer to select the desired channel number...
... directly using the CH+/buttons. buttons or Direct select button to sub-menu. Press the MENU button to enter. 3. DK Fine tune If you do not wish to be displayed when using the channel number buttons on the remote control. 1. Press the MENU button to display the menu, then press CH+/-buttons to select TUNE menu, press VOL+ MENU button to exit the menu display. buttons to move the indicator to " Program Setup edit ", then press the VOL+ button Timer to select the desired channel number...

User Manual
Page 16
... screen. button Dark Weak Light Soft Press VOL+ button Bright Strong Thick Sharp Tip: HUE option is User mode, you can quickly select the desired picture mode from four preset modes and one customized mode. buttons to move the indicator to the desired Picture Sound Tune option (For example, Contrast), then Setup press VOL-/+ buttons to set the picture quality 1. MENU . MODE Standard Soft User Listen Rich PICTURE QUALITY Medium color and brightness Low color...
... screen. button Dark Weak Light Soft Press VOL+ button Bright Strong Thick Sharp Tip: HUE option is User mode, you can quickly select the desired picture mode from four preset modes and one customized mode. buttons to move the indicator to the desired Picture Sound Tune option (For example, Contrast), then Setup press VOL-/+ buttons to set the picture quality 1. MENU . MODE Standard Soft User Listen Rich PICTURE QUALITY Medium color and brightness Low color...

User Manual
Page 17
Press the CH+/- Press MENU button to "Filter". Press the CH+/- buttons to move the indicator to exit the sub-menu. Filter Mode Standard CH- . Picture Adjusting (Continued) Filter Function PICTURE Filter Function 1. buttons to select the desired option, then press VOL-/+ buttons to the Filter sub-menu. MENU Picture Sound Tune Setup Timer Exchange Program edit Search Auto Search Quick Search CH+ VOL- Press the VOL+ button to adjust the value. MENU VOL+ . Press the PICTURE button, the Picture menu will appear on the screen. .
Press the CH+/- Press MENU button to "Filter". Press the CH+/- buttons to move the indicator to exit the sub-menu. Filter Mode Standard CH- . Picture Adjusting (Continued) Filter Function PICTURE Filter Function 1. buttons to select the desired option, then press VOL-/+ buttons to the Filter sub-menu. MENU Picture Sound Tune Setup Timer Exchange Program edit Search Auto Search Quick Search CH+ VOL- Press the VOL+ button to adjust the value. MENU VOL+ . Press the PICTURE button, the Picture menu will appear on the screen. .
User Manual
Page 20
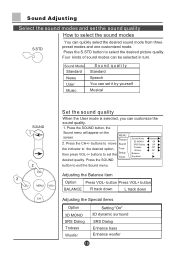
... turn. MENU VOL+ Set the sound quality When the User mode is selected, you can quickly select the desired sound mode from three preset modes and one customized mode. buttons to move Sound the indicator to the desired option, Tune Setup then press VOL-/+ buttons to set it by yourself Musical SOUND CH+ VOL- button Press VOL+ button BALANCE R track down L track down CH- Sound Adjusting Select the sound modes and set the sound quality How to select the sound modes...
... turn. MENU VOL+ Set the sound quality When the User mode is selected, you can quickly select the desired sound mode from three preset modes and one customized mode. buttons to move Sound the indicator to the desired option, Tune Setup then press VOL-/+ buttons to set it by yourself Musical SOUND CH+ VOL- button Press VOL+ button BALANCE R track down L track down CH- Sound Adjusting Select the sound modes and set the sound quality How to select the sound modes...
User Manual
Page 22
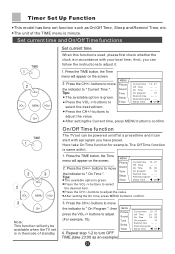
... setting the Current time, press MENU button to turn OFF TIME.(take On Time function for example. Press the TIME button, the Time MENU menu will appear on the screen. Tips: The available option is same with it . 1. Sleep Time Off Press the VOL-/+ buttons to MENU Picture Sound Tune Setup Timer Current time 12 27 Off Time -- -- CH- Sleep Time Off Timer Set Up Function This model has time set is in accordance with a program you can follow the instructions to adjust...
... setting the Current time, press MENU button to turn OFF TIME.(take On Time function for example. Press the TIME button, the Time MENU menu will appear on the screen. Tips: The available option is same with it . 1. Sleep Time Off Press the VOL-/+ buttons to MENU Picture Sound Tune Setup Timer Current time 12 27 Off Time -- -- CH- Sleep Time Off Timer Set Up Function This model has time set is in accordance with a program you can follow the instructions to adjust...

User Manual
Page 27
... set a four digit password, the original one is 0000, if you want to confirm. buttons to move the indicator to " Confirm", and then press the VOL+ to reset it is not accordance with the LOCK function, you can not use the function. buttons to move the indicator to " Confirm PWD", and then press the Digital number button to input the password, screen will display Passwrod Error...
... set a four digit password, the original one is 0000, if you want to confirm. buttons to move the indicator to " Confirm", and then press the VOL+ to reset it is not accordance with the LOCK function, you can not use the function. buttons to move the indicator to " Confirm PWD", and then press the Digital number button to input the password, screen will display Passwrod Error...

User Manual
Page 28
... you set) to regain control. MENU VOL+ CH- 2.Press the Direct-digit Choosing button 0 for four times( or input the password you to enter the Lock Menu. Description of Lock, and the buttons won't work. 2.When the Channel Lock is set ON, the Locked channel is accidentally set enter 9443 as the form on the TV are Child Lock and Channel lock setting, you forget your need. 1.Press the H.LOCK button, the screen will show as the password. Lock Set Change Password New...
... you set) to regain control. MENU VOL+ CH- 2.Press the Direct-digit Choosing button 0 for four times( or input the password you to enter the Lock Menu. Description of Lock, and the buttons won't work. 2.When the Channel Lock is set ON, the Locked channel is accidentally set enter 9443 as the form on the TV are Child Lock and Channel lock setting, you forget your need. 1.Press the H.LOCK button, the screen will show as the password. Lock Set Change Password New...

User Manual
Page 31
... Monitor tab on the dialog-box. buttons to move the indicator to " Advan", and press MENU H-Position 0 VOL+ button to the desired options, then press the VOL+/- Others Functions (Continued) VGA input adjustment Setting the PC software 1.First, click on Settings on the Windows start menu and click on "Control Panel". 2.Double click on the Display icon. 3.Click on the Settings tab on the display dialog-box. 4.Adjust the resolution...
... Monitor tab on the dialog-box. buttons to move the indicator to " Advan", and press MENU H-Position 0 VOL+ button to the desired options, then press the VOL+/- Others Functions (Continued) VGA input adjustment Setting the PC software 1.First, click on Settings on the Windows start menu and click on "Control Panel". 2.Double click on the Display icon. 3.Click on the Settings tab on the display dialog-box. 4.Adjust the resolution...
User Manual
Page 32
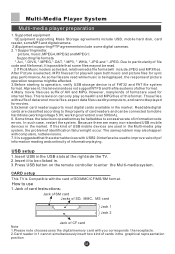
... format. 4.Many movie files use 1.Jack of card Instructions Jack of SM card Jacks of SD MMC MS card Jack 1 Jack 2 Jack of cardreaders and canbe connected tomobile hard disks (workingvoltage 5.0V, working currentnot over 500mA). 6. This television can only play performance. Readable digital cards are classifiedaccording to particularity of file code and fileformat, It ispossible that some AVI and MPG files of AVI and MPG. After Picture is Compatible...
... format. 4.Many movie files use 1.Jack of card Instructions Jack of SM card Jacks of SD MMC MS card Jack 1 Jack 2 Jack of cardreaders and canbe connected tomobile hard disks (workingvoltage 5.0V, working currentnot over 500mA). 6. This television can only play performance. Readable digital cards are classifiedaccording to particularity of file code and fileformat, It ispossible that some AVI and MPG files of AVI and MPG. After Picture is Compatible...

User Manual
Page 41
VGA IN AVOUT VIDEO L AUDIO R AV2IN AV1IN YUV L L R R Pb(cb) L Pr(cr) R To VGA input To Video input Video/Audio Output Connection, VGA Input To Audio/Video input PC VCR Etc. External connections In the following, the methods of connecting the video/audio system and PC for the TV set will be explained.
VGA IN AVOUT VIDEO L AUDIO R AV2IN AV1IN YUV L L R R Pb(cb) L Pr(cr) R To VGA input To Video input Video/Audio Output Connection, VGA Input To Audio/Video input PC VCR Etc. External connections In the following, the methods of connecting the video/audio system and PC for the TV set will be explained.

User Manual
Page 42
... connecting the video/audio system and other sets for the TV set will be explained. Video/Audio Input Connection To Audio Right Output To Audio Left Output To Video Output VCD Side AV To Video Terminal To Audio-L Terminal To Audio/Video Input To Audio-R Terminal AVOUT VIDEO L AUDIO R AV2IN AV1IN YUV L L R R Pb(cb) L Pr(cr) R TO AUDIO/VIDEO INPUT (Y) (Cr) (Cb) TO AUDIO LEFT OUTPUT TO AUDIO RIGHT OUTPUT TO S-VIDEO OUTPUT TO AUDIO LEFT OUTPUT TO AUDIO RIGHT OUTPUT TO VIDEO OUTPUT TO AUDIO LEFT OUTPUT TO AUDIO RIGHT OUTPUT DVD VCR(S-VIDEO...
... connecting the video/audio system and other sets for the TV set will be explained. Video/Audio Input Connection To Audio Right Output To Audio Left Output To Video Output VCD Side AV To Video Terminal To Audio-L Terminal To Audio/Video Input To Audio-R Terminal AVOUT VIDEO L AUDIO R AV2IN AV1IN YUV L L R R Pb(cb) L Pr(cr) R TO AUDIO/VIDEO INPUT (Y) (Cr) (Cb) TO AUDIO LEFT OUTPUT TO AUDIO RIGHT OUTPUT TO S-VIDEO OUTPUT TO AUDIO LEFT OUTPUT TO AUDIO RIGHT OUTPUT TO VIDEO OUTPUT TO AUDIO LEFT OUTPUT TO AUDIO RIGHT OUTPUT DVD VCR(S-VIDEO...
User Manual
Page 43
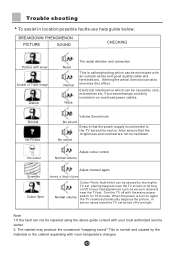
... the TV screen or turning on overhead power cables. No sound No colour Adjust colour control Normal volume Scramble Colour Spot Adjust channel again Normal or Weak Volume Normal volume Colour Purity fault which can be caused by moving the TV set, placing magnets near the TV set and turned on. Note: 1.If the fault can also minimize this effect. Altering the aerial direction can not...
... the TV screen or turning on overhead power cables. No sound No colour Adjust colour control Normal volume Scramble Colour Spot Adjust channel again Normal or Weak Volume Normal volume Colour Purity fault which can be caused by moving the TV set, placing magnets near the TV set and turned on. Note: 1.If the fault can also minimize this effect. Altering the aerial direction can not...
User Manual
Page 44
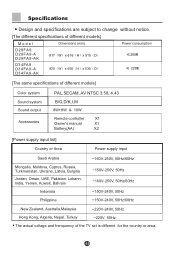
Specifications Design and specifications are subject to change without notice. [The different specifications of different models] Model Dimensions (mm) Power consumption D29FA9 D29FA9-A D29FA9-AK D34FA9 D34FA9-A D34FA9-AK 817 W x 616 H x 515 D 920 W x 695 H x 530 D [The same specifications of different models] Color system Sound system Sound output Accessories PAL,SECAM, AV NTSC 3.58, 4.43 B/G,D/K,I,M 8W+8W & 10W Remote controller X1 Owner's manual X1 Battery(AA) X2 [Power supply input list] Country or Area Power supply input...the TV set is different for the country or area.
Specifications Design and specifications are subject to change without notice. [The different specifications of different models] Model Dimensions (mm) Power consumption D29FA9 D29FA9-A D29FA9-AK D34FA9 D34FA9-A D34FA9-AK 817 W x 616 H x 515 D 920 W x 695 H x 530 D [The same specifications of different models] Color system Sound system Sound output Accessories PAL,SECAM, AV NTSC 3.58, 4.43 B/G,D/K,I,M 8W+8W & 10W Remote controller X1 Owner's manual X1 Battery(AA) X2 [Power supply input list] Country or Area Power supply input...the TV set is different for the country or area.


