Use and Care Manual
Page 3
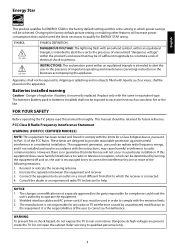
Changing the factory default picture setting or enabling other features will increase power consumption that may cause harmful interference to radio communications. INSTRUCTIONS: The exclamation point within the product's enclosure that could void the user's authority to operate the equipment. 2. Replace only with liquids, such as sunshine, fire or the like. The batteries (battery pack or batteries installed) shall not be...
Changing the factory default picture setting or enabling other features will increase power consumption that may cause harmful interference to radio communications. INSTRUCTIONS: The exclamation point within the product's enclosure that could void the user's authority to operate the equipment. 2. Replace only with liquids, such as sunshine, fire or the like. The batteries (battery pack or batteries installed) shall not be...

Use and Care Manual
Page 4
...put inside the TV box like no video/audio occurs, or smoke and bad odor come from the AC outlet before cleaning. Remember to unplug the AC cord from TV. Call service personnel to clean the display. Prohibit/Avoid opening... TV cabinet. Make sure to unplug the unit when not in use liquid cleaners or aerosol cleaners to clean the internal part of the display unit and cause overheating. PRECAUTIONS AND REMINDERS Place unit on even surfaces. Don't throw any vents and openings. Do not use for Remote Control...
...put inside the TV box like no video/audio occurs, or smoke and bad odor come from the AC outlet before cleaning. Remember to unplug the AC cord from TV. Call service personnel to clean the display. Prohibit/Avoid opening... TV cabinet. Make sure to unplug the unit when not in use liquid cleaners or aerosol cleaners to clean the internal part of the display unit and cause overheating. PRECAUTIONS AND REMINDERS Place unit on even surfaces. Don't throw any vents and openings. Do not use for Remote Control...

Use and Care Manual
Page 5
... openings. The manufacturer's warranty does not cover user abuse or improper installations. t When connected to a power outlet, power is always flowing into your TV during a lightning storm or when it from the type of time. t The wall socket should be used for replacement of high temperature, condensation may form in fire or electric shock. Any other components to an area...
... openings. The manufacturer's warranty does not cover user abuse or improper installations. t When connected to a power outlet, power is always flowing into your TV during a lightning storm or when it from the type of time. t The wall socket should be used for replacement of high temperature, condensation may form in fire or electric shock. Any other components to an area...

Use and Care Manual
Page 6
... electric shock, do so. Please, make sure to connect the power plug to the wall outlet socket after connecting the TV to provide some protection against voltage surges and built up static charges. Continuous use in this case may cause the batteries to Article 820... system installer's attention to leak which can damage the remote control or injure the operator. These servicing instructions are for proper grounding and, in wire to proper grounding of the mats and supporting structure grounding of your TV. t CAUTION - t Outdoor Antenna Grounding - Do not try to repair your...
... electric shock, do so. Please, make sure to connect the power plug to the wall outlet socket after connecting the TV to provide some protection against voltage surges and built up static charges. Continuous use in this case may cause the batteries to Article 820... system installer's attention to leak which can damage the remote control or injure the operator. These servicing instructions are for proper grounding and, in wire to proper grounding of the mats and supporting structure grounding of your TV. t CAUTION - t Outdoor Antenna Grounding - Do not try to repair your...

Use and Care Manual
Page 7
They are on the label on back of purchase Staple your receipt to your product. You will guide you for purchasing this Haier product. This easy-to-use of your manual. Model number Serial number Date of the unit. Remember to record the model and serial number. English SAVE THESE INSTRUCTIONS Thank you in getting the best use manual will need it to obtain warranty service 5
They are on the label on back of purchase Staple your receipt to your product. You will guide you for purchasing this Haier product. This easy-to-use of your manual. Model number Serial number Date of the unit. Remember to record the model and serial number. English SAVE THESE INSTRUCTIONS Thank you in getting the best use manual will need it to obtain warranty service 5
Use and Care Manual
Page 8
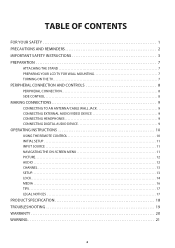
... THE STAND 7 PREPARING YOUR LCD TV FOR WALL MOUNTING 7 TURNING ON THE TV 7 PERIPHERAL CONNECTION AND CONTROLS 8 PERIPHERAL CONNECTION 8 SIDE CONTROL 8 MAKING CONNECTIONS 9 CONNECTING TO AN ANTENNA/CABLE WALL JACK 9 CONNECTING EXTERNAL AUDIO/VIDEO DEVICE 9 CONNECTING HEADPHONES 9 CONNECTING DIGITAL AUDIO DEVICE 9 OPERATING INSTRUCTIONS 10 USING THE REMOTE CONTROL 10 INITIAL SETUP 11 INPUT SOURCE 11 NAVIGATING THE ON-SCREEN MENU 11 PICTURE 12 AUDIO 12 CHANNEL 13 SETUP 13 LOCK 14 MEDIA 16 TIPS 17 LEGAL NOTICES 17 PRODUCT SPECIFICATION 18 TROUBLESHOOTING 19 WARRANTY 20...
... THE STAND 7 PREPARING YOUR LCD TV FOR WALL MOUNTING 7 TURNING ON THE TV 7 PERIPHERAL CONNECTION AND CONTROLS 8 PERIPHERAL CONNECTION 8 SIDE CONTROL 8 MAKING CONNECTIONS 9 CONNECTING TO AN ANTENNA/CABLE WALL JACK 9 CONNECTING EXTERNAL AUDIO/VIDEO DEVICE 9 CONNECTING HEADPHONES 9 CONNECTING DIGITAL AUDIO DEVICE 9 OPERATING INSTRUCTIONS 10 USING THE REMOTE CONTROL 10 INITIAL SETUP 11 INPUT SOURCE 11 NAVIGATING THE ON-SCREEN MENU 11 PICTURE 12 AUDIO 12 CHANNEL 13 SETUP 13 LOCK 14 MEDIA 16 TIPS 17 LEGAL NOTICES 17 PRODUCT SPECIFICATION 18 TROUBLESHOOTING 19 WARRANTY 20...

Use and Care Manual
Page 9
... inches (60 mm) from your safety, please use only with a UL listed wall mount bracket with the wall mount bracket to prevent cable interference. A 18M 4. Power: Plug the cord into a working power outlet. Turn the TV on: Press on the remote control or POWER button on page 9. 3. Min 1 m NOTE Ensure that came with minimum weight of the TV without stand. (Please see page 18 for the weight of the TV must be assembled prior...
... inches (60 mm) from your safety, please use only with a UL listed wall mount bracket with the wall mount bracket to prevent cable interference. A 18M 4. Power: Plug the cord into a working power outlet. Turn the TV on: Press on the remote control or POWER button on page 9. 3. Min 1 m NOTE Ensure that came with minimum weight of the TV without stand. (Please see page 18 for the weight of the TV must be assembled prior...
Use and Care Manual
Page 10
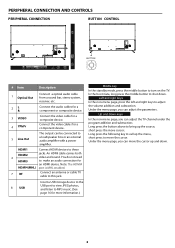
... an audio connection for an HDMI device. Connect the video cable for a component device. Under the menu page, you can move the cursor up and down . You do not need to adjust the volume addition and subtraction. PERIPHERAL CONNECTION AND CONTROLS PERIPHERAL CONNECTION BUTTON CONTROL RF HDMI4 MHL OPTICAL OUT LINE-OUT HDMI1 HDMI2 HDMI3 BUTTON # Item 1 Optical Out 2L R 3 VIDEO 4 YPbPr 5 Line Out Description Connect a optical audio cable from a sound bar, stereo system, receiver, etc...
... an audio connection for an HDMI device. Connect the video cable for a component device. Under the menu page, you can move the cursor up and down . You do not need to adjust the volume addition and subtraction. PERIPHERAL CONNECTION AND CONTROLS PERIPHERAL CONNECTION BUTTON CONTROL RF HDMI4 MHL OPTICAL OUT LINE-OUT HDMI1 HDMI2 HDMI3 BUTTON # Item 1 Optical Out 2L R 3 VIDEO 4 YPbPr 5 Line Out Description Connect a optical audio cable from a sound bar, stereo system, receiver, etc...

Use and Care Manual
Page 11
... from the device connected to the COMPOSITE input. Select Composite to play from the RF input. Select HDMI1, HDMI2,HDMI3,HDMI4(MHL)to play from the external device: 1. To play from the device connected to switch. Select Component to play from a device connected to match color-coded jacks. English MAKING CONNECTIONS CONNECTING TO AN ANTENNA/CABLE WALL JACK Using composite cable (good) COMPOSITE OUT L R VIDEO CONNECTING EXTERNAL AUDIO/VIDEO DEVICE Using HDMI cable (best) NOTE Cables are often color-coded to the HDMI1...
... from the device connected to the COMPOSITE input. Select Composite to play from the RF input. Select HDMI1, HDMI2,HDMI3,HDMI4(MHL)to play from the external device: 1. To play from the device connected to switch. Select Component to play from a device connected to match color-coded jacks. English MAKING CONNECTIONS CONNECTING TO AN ANTENNA/CABLE WALL JACK Using composite cable (good) COMPOSITE OUT L R VIDEO CONNECTING EXTERNAL AUDIO/VIDEO DEVICE Using HDMI cable (best) NOTE Cables are often color-coded to the HDMI1...

Use and Care Manual
Page 12
... -screen menu. HOME *This mode does not have the function. 0~9 / number RECALL Press to switch the audio mode. Press to enter a TV channel number (Press "." Use the arrow buttons to change TV channels. Press to switch the picture mode. to move around in Music mode. OPERATING INSTRUCTIONS USING THE REMOTE CONTROL INPUT USB CC 1 23 456 789 0 RECALL MUTE VOL CH MENU BACK DISPLAY EXIT SAP SLEEP WIDE AUDIO PICTURE OK CH.LIST FAVORITE Item Power INPUT USB CC Descriptions disconnect power, unplug the power cord. MUTE MENU CH...
... -screen menu. HOME *This mode does not have the function. 0~9 / number RECALL Press to switch the audio mode. Press to enter a TV channel number (Press "." Use the arrow buttons to change TV channels. Press to switch the picture mode. to move around in Music mode. OPERATING INSTRUCTIONS USING THE REMOTE CONTROL INPUT USB CC 1 23 456 789 0 RECALL MUTE VOL CH MENU BACK DISPLAY EXIT SAP SLEEP WIDE AUDIO PICTURE OK CH.LIST FAVORITE Item Power INPUT USB CC Descriptions disconnect power, unplug the power cord. MUTE MENU CH...
Use and Care Manual
Page 13
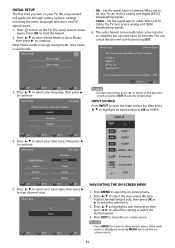
... 5. Set the signal type to 20 minutes. The auto channel scan usually takes a few minutes to complete but can cancel the channel scan by pressing EXIT. Press to continue. Press to select Home Mode or Store Mode, then press to turn on -screen menu. 2. INPUT SOURCE Press INPUT to open the on the TV. Press EXIT to switch. Initial Setup Channel Scan The channel scan may take up basic settings including the menu language, time...
... 5. Set the signal type to 20 minutes. The auto channel scan usually takes a few minutes to complete but can cancel the channel scan by pressing EXIT. Press to continue. Press to select Home Mode or Store Mode, then press to turn on -screen menu. 2. INPUT SOURCE Press INPUT to open the on the TV. Press EXIT to switch. Initial Setup Channel Scan The channel scan may take up basic settings including the menu language, time...

Use and Care Manual
Page 14
.... Press to increase the red tones. Press to darken the picture. Digital Audio Output Mode - Press to increase the green tones. The contrast, brightness, and sharpness are lowered. Press to increase the treble. This setting is good for a rich sound experience. User - Press to User. Sharpness - You can select: Normal - User - Adjust the high frequency sound. PICTURE AUDIO Picture Audio Channel Setup Lock Picture Mode Brightness Contrast Color Tint Sharpness Color Temperature 120 Full Motion...
.... Press to increase the red tones. Press to darken the picture. Digital Audio Output Mode - Press to increase the green tones. The contrast, brightness, and sharpness are lowered. Press to increase the treble. This setting is good for a rich sound experience. User - Press to User. Sharpness - You can select: Normal - User - Adjust the high frequency sound. PICTURE AUDIO Picture Audio Channel Setup Lock Picture Mode Brightness Contrast Color Tint Sharpness Color Temperature 120 Full Motion...
Use and Care Manual
Page 15
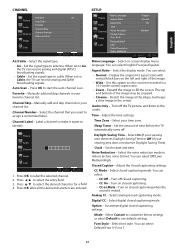
...Set the signal type to identify. Manually add and skip channels in your favorite channel list. Manually add and skip channels in your channel list. Label a channel to make it easier to cable. SETUP Picture Audio Channel Setup Lock Menu Language Aspect Ratio Audio Only Time Noise Reduction Closed Caption Over Scan RestoreDefault CEC Video Description Video Guidance English Normal Off Medium Select Exit Menu Language - You can select Medium/High. Cinema - You can select: Normal - Select analog closed captioning mode. Select digital closed captioning mode...
...Set the signal type to identify. Manually add and skip channels in your favorite channel list. Manually add and skip channels in your channel list. Label a channel to make it easier to cable. SETUP Picture Audio Channel Setup Lock Menu Language Aspect Ratio Audio Only Time Noise Reduction Closed Caption Over Scan RestoreDefault CEC Video Description Video Guidance English Normal Off Medium Select Exit Menu Language - You can select Medium/High. Cinema - You can select: Normal - Select analog closed captioning mode. Select digital closed captioning mode...
Use and Care Manual
Page 16
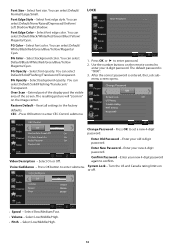
... select Default/ White/Black/Red/Green/Blue/Yellow/Magenta/ Cyan. Over Scan - Turn the US and Canada rating limits on the image center. CEC -Press OK button to enter your new 4-digit password Voice Gudidance - Picture Change Password OK Audio System Lock Off Channel US Rating Canada Rating Setup RRT Setting Reset RRT Lock Picture CEC Control Off On Audio Device Auto Power Off On Select Exit Change Password - Channel TV Auto Power On On Audio Receiver On Setup Device Lists Lock Enter Old Password - Enter...
... select Default/ White/Black/Red/Green/Blue/Yellow/Magenta/ Cyan. Over Scan - Turn the US and Canada rating limits on the image center. CEC -Press OK button to enter your new 4-digit password Voice Gudidance - Picture Change Password OK Audio System Lock Off Channel US Rating Canada Rating Setup RRT Setting Reset RRT Lock Picture CEC Control Off On Audio Device Auto Power Off On Select Exit Change Password - Channel TV Auto Power On On Audio Receiver On Setup Device Lists Lock Enter Old Password - Enter...

Use and Care Manual
Page 17
... rating and all other higher ratings are unlocked. RRT Setting - TV ratings. Picture Audio Channel Setup Lock TV Rating ALL FV V S L D Press OK to Lock or Unlock Select Exit Picture Audio Channel Setup Lock TV-Y TV-Y7 TV-G TV-PG TV-14 TV-MA Press OK to the factory default. 15 TV-Y7 Suitable for all lower ratings are locked. Canada English rating levels Canadian English ratings...
... rating and all other higher ratings are unlocked. RRT Setting - TV ratings. Picture Audio Channel Setup Lock TV Rating ALL FV V S L D Press OK to Lock or Unlock Select Exit Picture Audio Channel Setup Lock TV-Y TV-Y7 TV-G TV-PG TV-14 TV-MA Press OK to the factory default. 15 TV-Y7 Suitable for all lower ratings are locked. Canada English rating levels Canadian English ratings...
Use and Care Manual
Page 18
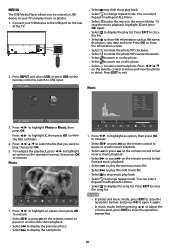
... on the remote control to display the previous photo. Select to play Select to play list. NOTE In photo and music mode, press EXIT to close the operation banner, and press OK to the USB port on the remote control to switch to close the information screen. Connect your TV and play back. Press INPUT and select USB, or press USB on the rear of the TV. 2. Press EXIT to USB input. Select to...
... on the remote control to display the previous photo. Select to play Select to play list. NOTE In photo and music mode, press EXIT to close the operation banner, and press OK to the USB port on the remote control to switch to close the information screen. Connect your TV and play back. Press INPUT and select USB, or press USB on the rear of the TV. 2. Press EXIT to USB input. Select to...
Use and Care Manual
Page 19
... the user's authority to operate the equipment. Not placing the television set on tall furniture (for a local recycling location in an unstable location. f) - If the screen requires additional cleaning, use liquid cleaners or aerosol cleaners. Your new television contains materials, which can safely support the television set . b) - d) - e) - Canadian notice This Class B digital apparatus meets all requirements of climbing on cloth or other countries. Cables Connections...
... the user's authority to operate the equipment. Not placing the television set on tall furniture (for a local recycling location in an unstable location. f) - If the screen requires additional cleaning, use liquid cleaners or aerosol cleaners. Your new television contains materials, which can safely support the television set . b) - d) - e) - Canadian notice This Class B digital apparatus meets all requirements of climbing on cloth or other countries. Cables Connections...
Use and Care Manual
Page 20
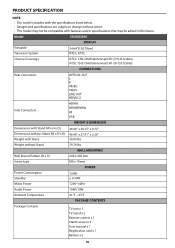
... Channel Coverage NTSC: CH2-CH69 (Antenna)/CH1-CH135 (Cable) ATSC: CH2-CH69 (Antenna)/CH1-CH135 (Cable) CONNECTIONS Rear Connectors OPTICAL OUT L R VIDEO YPbPr LINE OUT HDMI1/2 Side Connectors HDMI3 HDMI4(MHL) RF USB WEIGHT & DIMENSION Dimensions with Stand (W x H x D) Dimensions without Stand (W x H x D) Weight with Stand 48.46" x 30.15" x 9.72" 48.46" x 27.91" x 2.36" 30.09 lbs Weight without Stand 29.76 lbs WALL MOUNTING Wall Mount Pattern (H x V) 200 x 200 mm Screw type M8 x 10mm POWER Power Consumption Standby 130W...
... Channel Coverage NTSC: CH2-CH69 (Antenna)/CH1-CH135 (Cable) ATSC: CH2-CH69 (Antenna)/CH1-CH135 (Cable) CONNECTIONS Rear Connectors OPTICAL OUT L R VIDEO YPbPr LINE OUT HDMI1/2 Side Connectors HDMI3 HDMI4(MHL) RF USB WEIGHT & DIMENSION Dimensions with Stand (W x H x D) Dimensions without Stand (W x H x D) Weight with Stand 48.46" x 30.15" x 9.72" 48.46" x 27.91" x 2.36" 30.09 lbs Weight without Stand 29.76 lbs WALL MOUNTING Wall Mount Pattern (H x V) 200 x 200 mm Screw type M8 x 10mm POWER Power Consumption Standby 130W...
Use and Care Manual
Page 21
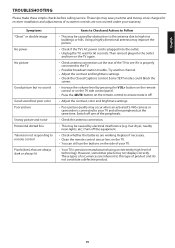
... receiver installation and adjustments of customer controls are inherent to the TV. Try another channel. Increase the volume level by electrical interference (e.g. Press the MUTE Adjust the contrast, color and brightness settings. Replace if necessary. Clean the remote control sensor lens on the TV again. However, sometimes pixels may improve the picture. Adjust the contrast and brightness settings. Symptoms "Ghost" or double image No power No picture Good picture...
... receiver installation and adjustments of customer controls are inherent to the TV. Try another channel. Increase the volume level by electrical interference (e.g. Press the MUTE Adjust the contrast, color and brightness settings. Replace if necessary. Clean the remote control sensor lens on the TV again. However, sometimes pixels may improve the picture. Adjust the contrast and brightness settings. Symptoms "Ghost" or double image No power No picture Good picture...
Use and Care Manual
Page 22
... be the sole and exclusive warranties granted by Haier and shall be presented to obtain product literature, accessories, supplies or customer assistance: Simply call 855-HaierTV (855-424-3788). nor shall Haier be free from warranty coverage: non-rechargeable batteries. Some states do to obtain service or to the authorized service center before warranty repairs are rendered. What to do...
... be the sole and exclusive warranties granted by Haier and shall be presented to obtain product literature, accessories, supplies or customer assistance: Simply call 855-HaierTV (855-424-3788). nor shall Haier be free from warranty coverage: non-rechargeable batteries. Some states do to obtain service or to the authorized service center before warranty repairs are rendered. What to do...


