
User Manual
Page 2
... 2 Installation 3 Aerial connection 3 Preparation of the remote control unit 3 Function buttons and external sockets 4 Front panel of the TV set 4 Rear panel of screen displays and figures in the User's Manual may vary due to the external audio and video equipment 24 Troubleshooting guide 25 Specifications 26 *Please read this manual carefully before using your television and keep this manual in a good place for future reference. *To achieve the best performance of your television, read this User's Manual...
... 2 Installation 3 Aerial connection 3 Preparation of the remote control unit 3 Function buttons and external sockets 4 Front panel of the TV set 4 Rear panel of screen displays and figures in the User's Manual may vary due to the external audio and video equipment 24 Troubleshooting guide 25 Specifications 26 *Please read this manual carefully before using your television and keep this manual in a good place for future reference. *To achieve the best performance of your television, read this User's Manual...

User Manual
Page 4
... remote control and/or getting it is strongly advised that the TV set top boxes, that battery polarity matches with the +/- Operation notes for a long period or the electricity of batteries is one year. When connecting to HiFi VCRs, satellite (or cable) set connect to prevent batteries acid from leaking into the battery compartment. Installation Aerial connection For an optimum high quality picture...
... remote control and/or getting it is strongly advised that the TV set top boxes, that battery polarity matches with the +/- Operation notes for a long period or the electricity of batteries is one year. When connecting to HiFi VCRs, satellite (or cable) set connect to prevent batteries acid from leaking into the battery compartment. Installation Aerial connection For an optimum high quality picture...
User Manual
Page 5
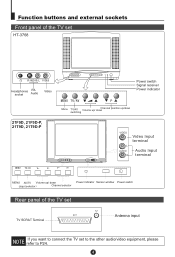
Function buttons and external sockets Front panel of the TV set HT-3768 Headphones R/L socket Audio Video Power switch Signal receiver Power indicator 21F9D, 21F9D-P, 21T9D, 21T9D-P Menu TV/AV Channel position up/down Volume up/ down switching VIDEO L AUDIO R Video Input terminal Audio Input terminal MENU AV/TV Volume up/ down Power indicator Sensor window Power switch (input selector Channel selector Rear panel of the TV set EXT TV SCRAT Terminal Antenna input If you want to connect the TV set to the other audio/video equipment, please refer to P24.
Function buttons and external sockets Front panel of the TV set HT-3768 Headphones R/L socket Audio Video Power switch Signal receiver Power indicator 21F9D, 21F9D-P, 21T9D, 21T9D-P Menu TV/AV Channel position up/down Volume up/ down switching VIDEO L AUDIO R Video Input terminal Audio Input terminal MENU AV/TV Volume up/ down Power indicator Sensor window Power switch (input selector Channel selector Rear panel of the TV set EXT TV SCRAT Terminal Antenna input If you want to connect the TV set to the other audio/video equipment, please refer to P24.
User Manual
Page 6
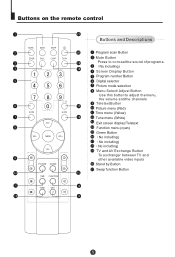
... EXIT Buttons and Descriptions Program scan Button Mute Button Press to conceal the sound of programs. No including) Screen Display Button Program number Button Digital selector Picture mode selection Menu Select/ Adjust Button Use this button to adjust the menu, the volume and the channels Teletext Button Picture menu (Red) Time menu (Yellow) Tune menu (White) Exit screen display/Teletext Function menu (cyan) Green Button No including) No including) No including) TV and AV Exchange Button To exchanger between TV and other available video inputs Stand by Button Swap function Button MENU VOL...
... EXIT Buttons and Descriptions Program scan Button Mute Button Press to conceal the sound of programs. No including) Screen Display Button Program number Button Digital selector Picture mode selection Menu Select/ Adjust Button Use this button to adjust the menu, the volume and the channels Teletext Button Picture menu (Red) Time menu (Yellow) Tune menu (White) Exit screen display/Teletext Function menu (cyan) Green Button No including) No including) No including) TV and AV Exchange Button To exchanger between TV and other available video inputs Stand by Button Swap function Button MENU VOL...

User Manual
Page 7
... switched off 5 minutes later automatically. buttons on the TV set (Child Lock must be turned off). 4 AUTO DK 2 If you want to exchange to standby status, please press down the button on the remote control. 3 If you can turn on , if an empty channel is less than 5 minutes, it directly through pressing the P+/- If the "OFF TIME" is lighting in red, press the button on /off power supply...
... switched off 5 minutes later automatically. buttons on the TV set (Child Lock must be turned off). 4 AUTO DK 2 If you want to exchange to standby status, please press down the button on the remote control. 3 If you can turn on , if an empty channel is less than 5 minutes, it directly through pressing the P+/- If the "OFF TIME" is lighting in red, press the button on /off power supply...
User Manual
Page 8
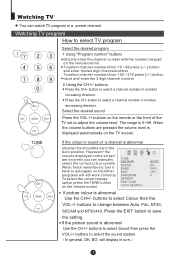
... the 3 digit channel number 2 Using the CH+/- button to change option press the TUNE button on the remote control. The range is abnormal Use the CH+/- buttons to select Colour then the VOL-/+ buttons to select a channel number in turn it back to select a channel number in the Auto position. Select the desired program 1 Using "Program number" buttons Directly enter the channel number with the numeric keypad on the TV screen. buttons to select Sound then press the VOL-/+ buttons to select TV program CH+ VOL- MENU VOL...
... the 3 digit channel number 2 Using the CH+/- button to change option press the TUNE button on the remote control. The range is abnormal Use the CH+/- buttons to select Colour then the VOL-/+ buttons to select a channel number in turn it back to select a channel number in the Auto position. Select the desired program 1 Using "Program number" buttons Directly enter the channel number with the numeric keypad on the TV screen. buttons to select Sound then press the VOL-/+ buttons to select TV program CH+ VOL- MENU VOL...
User Manual
Page 10
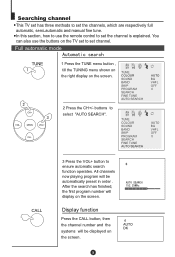
... TUNING menu shown on the right display on the TV set to set the channel is explained. TUNE COLOUR SOUND BAND SKIP PROGRAM SEARCH FINE TUNE AUTO SEARCH AUTO BG VHFL OFF 0 AUTO BG VHFL OFF 0 CALL 3 Press the VOL+ button to set channel. You can also use the remote control to ensure automatic search function operates. Full automatic mode TUNE CH+ VOL- All channels now playing program will display on the screen. 4 AUTO...
... TUNING menu shown on the right display on the TV set to set the channel is explained. TUNE COLOUR SOUND BAND SKIP PROGRAM SEARCH FINE TUNE AUTO SEARCH AUTO BG VHFL OFF 0 AUTO BG VHFL OFF 0 CALL 3 Press the VOL+ button to set channel. You can also use the remote control to ensure automatic search function operates. Full automatic mode TUNE CH+ VOL- All channels now playing program will display on the screen. 4 AUTO...
User Manual
Page 11
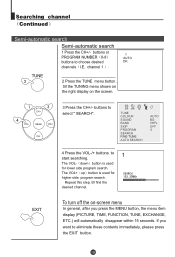
... step, till find the desired channel. If you press the MENU button, the menu item display (PICTURE, TIME, FUNCTION, TUNE, EXCHANGE, ETC.) will automatically disappear within 15 seconds. buttons or PROGRAM NUMBER 0-9 buttons to select " SEARCH". The VOL+ up button is used for lower side program search. down button is used for higher side program search. TUNE COLOUR SOUND BAND SKIP PROGRAM SEARCH FINE TUNE AUTO SEARCH AUTO BG VHFL OFF 0 4 Press...
... step, till find the desired channel. If you press the MENU button, the menu item display (PICTURE, TIME, FUNCTION, TUNE, EXCHANGE, ETC.) will automatically disappear within 15 seconds. buttons or PROGRAM NUMBER 0-9 buttons to select " SEARCH". The VOL+ up button is used for lower side program search. down button is used for higher side program search. TUNE COLOUR SOUND BAND SKIP PROGRAM SEARCH FINE TUNE AUTO SEARCH AUTO BG VHFL OFF 0 4 Press...
User Manual
Page 12
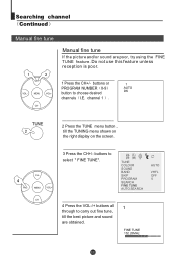
...+/- channel 1 1 AUTO DK TUNE 2 Press the TUNE menu button , till the TUNING menu shown on the right display on the screen. TUNE COLOUR SOUND BAND SKIP PROGRAM SEARCH FINE TUNE AUTO SEARCH AUTO VHFL OFF 0 4 Press the VOL-/+ buttons all through to carry out fine tune, till the best picture and sound are poor, try using the FINE TUNE feature. CH+ VOL- Searching channel Continued Manual fine tune Manual...
...+/- channel 1 1 AUTO DK TUNE 2 Press the TUNE menu button , till the TUNING menu shown on the right display on the screen. TUNE COLOUR SOUND BAND SKIP PROGRAM SEARCH FINE TUNE AUTO SEARCH AUTO VHFL OFF 0 4 Press the VOL-/+ buttons all through to carry out fine tune, till the best picture and sound are poor, try using the FINE TUNE feature. CH+ VOL- Searching channel Continued Manual fine tune Manual...

User Manual
Page 13
... programs that you use the PROGRAM NUMBER buttons to select channel, this channel will still be displayed when using the channel number buttons on the screen. Searching channel Continued Program skip CH+ VOL- These channels will be recovered. 2 Repeat those steps just now. 3 Press the VOL-/+ buttons to turn the SKIP function "ON". 5 Press the TUNE button to be displayed by directly using the CH+/- When you do not wish to close the menu. buttons or PROGRAM NUMBER 0-9 button...
... programs that you use the PROGRAM NUMBER buttons to select channel, this channel will still be displayed when using the channel number buttons on the screen. Searching channel Continued Program skip CH+ VOL- These channels will be recovered. 2 Repeat those steps just now. 3 Press the VOL-/+ buttons to turn the SKIP function "ON". 5 Press the TUNE button to be displayed by directly using the CH+/- When you do not wish to close the menu. buttons or PROGRAM NUMBER 0-9 button...
User Manual
Page 14
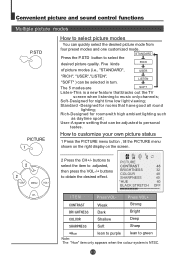
... night time low light viewing; Standard -Designed for rooms that can quickly select the desired picture mode from four preset modes and one customized mode. STANDARD Press the P.STD button to music only channels; How to select picture modes You can be selected in turn. Convenient picture and sound control functions Multiple picture modes P.STD PICTURE How to customize your own picture status 1 Press the PICTURE menu button , till the PICTURE menu shown on the right display on the screen...
... night time low light viewing; Standard -Designed for rooms that can quickly select the desired picture mode from four preset modes and one customized mode. STANDARD Press the P.STD button to music only channels; How to select picture modes You can be selected in turn. Convenient picture and sound control functions Multiple picture modes P.STD PICTURE How to customize your own picture status 1 Press the PICTURE menu button , till the PICTURE menu shown on the right display on the screen...

User Manual
Page 15
... ON 2 Press the CH+/- CALENDAR button to BLACK STRETCH OFF select "BLACK STRETCH". 3 Press the VOL-/+ buttons to turn the NOISE REDUCE CHILD LOCK AVL OFF ON function "ON" or "OFF". Convenient picture and sound control functions Continued Black Stretch-(Automatically Increases the Contrast Rage) Noise Reduce - (Picture Noise & Grain Reduction Circuit. How to FADE ON turn the BLACK STRETCH function "ON" or "OFF...
... ON 2 Press the CH+/- CALENDAR button to BLACK STRETCH OFF select "BLACK STRETCH". 3 Press the VOL-/+ buttons to turn the NOISE REDUCE CHILD LOCK AVL OFF ON function "ON" or "OFF". Convenient picture and sound control functions Continued Black Stretch-(Automatically Increases the Contrast Rage) Noise Reduce - (Picture Noise & Grain Reduction Circuit. How to FADE ON turn the BLACK STRETCH function "ON" or "OFF...

User Manual
Page 16
Convenient picture and sound control functions Continued Mute function Sound mute MUTE 1 Press the MUTE button on the remote control and "MUTE" type face will display on the lower part of the TV set is turned off. At this time, the sound of the screen. MUTE 2 If you want to recover the sound, press the MUTE button again or directly press the VOL-/+ buttons.
Convenient picture and sound control functions Continued Mute function Sound mute MUTE 1 Press the MUTE button on the remote control and "MUTE" type face will display on the lower part of the TV set is turned off. At this time, the sound of the screen. MUTE 2 If you want to recover the sound, press the MUTE button again or directly press the VOL-/+ buttons.
User Manual
Page 17
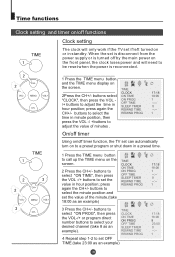
... TIME SLEEP TIMER REMIND TIME REMIND PROG 17:18 18:00 1 --:-0 --:-1 On/off timer Using on/off timer function, the TV set can automatically turn on to a preset program or shut down in standby. CH+ VOL- Time functions Clock setting and timer on/off functions Clock setting TIME The clock will need to be reset when the power is reconnected. MENU VOL+ CH- 1 Press the TIME menu button, and the TIME menu display on the screen...
... TIME SLEEP TIMER REMIND TIME REMIND PROG 17:18 18:00 1 --:-0 --:-1 On/off timer Using on/off timer function, the TV set can automatically turn on to a preset program or shut down in standby. CH+ VOL- Time functions Clock setting and timer on/off functions Clock setting TIME The clock will need to be reset when the power is reconnected. MENU VOL+ CH- 1 Press the TIME menu button, and the TIME menu display on the screen...
User Manual
Page 18
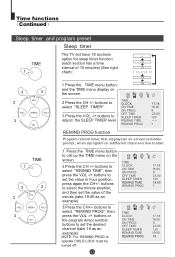
... to adjust the SLEEP TIMER level. buttons to select "SLEEP TIMER". 3 Press the VOL -/+ buttons to operate CHILD LOCK must be turned off. TIME CLOCK ON TIME ON PROG OFF TIME SLEEP TIMER REMIND TIME REMIND PROG 17:18 18:00 8 23:00 120 --:-1 REMIND PROG function Program remind timer, that displays an on-screen reminder prompt, when a program on the screen. 2 Press the CH +/- MENU VOL+ CH- 1 Press the TIME menu button to call up the TIME menu...
... to adjust the SLEEP TIMER level. buttons to select "SLEEP TIMER". 3 Press the VOL -/+ buttons to operate CHILD LOCK must be turned off. TIME CLOCK ON TIME ON PROG OFF TIME SLEEP TIMER REMIND TIME REMIND PROG 17:18 18:00 8 23:00 120 --:-1 REMIND PROG function Program remind timer, that displays an on-screen reminder prompt, when a program on the screen. 2 Press the CH +/- MENU VOL+ CH- 1 Press the TIME menu button to call up the TIME menu...
User Manual
Page 19
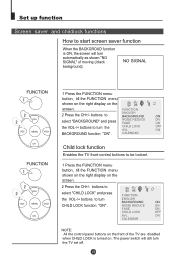
... ( black background). CALENDAR Child lock function Enables the TV front control buttons to turn ENGLISH BACKGROUND ON CHILD LOCK function "ON" . MENU VOL+ CH- buttons to ENGLISH BACKGROUND ON select "BACKGROUND" and press NOISE REDUCE FADE ON ON the VOL-/+ buttons to start screen saver function When the BACKGROUD function is turned on the screen. 2 Press the CH+/- The power switch will turn automatically as shown "NO SIGNAL" of...
... ( black background). CALENDAR Child lock function Enables the TV front control buttons to turn ENGLISH BACKGROUND ON CHILD LOCK function "ON" . MENU VOL+ CH- buttons to ENGLISH BACKGROUND ON select "BACKGROUND" and press NOISE REDUCE FADE ON ON the VOL-/+ buttons to start screen saver function When the BACKGROUD function is turned on the screen. 2 Press the CH+/- The power switch will turn automatically as shown "NO SIGNAL" of...

User Manual
Page 21
... FUNCTION ENGLISH the screen. FUNCTION ENGLISH 3 Press the VOL-/+ button to select the desired language. buttons to select "FADE . buttons to select "AVL " . BACKGROUND ON NOISE REDUCE ON FADE ON CHILD LOCK OFF AVL ON CALENDAR CH+ VOL- Set up function Continued Fade and select a language FUNCTION Fade The FADE control allows time for the picture tube to warm up and gently turned on, which can help...
... FUNCTION ENGLISH the screen. FUNCTION ENGLISH 3 Press the VOL-/+ button to select the desired language. buttons to select "FADE . buttons to select "AVL " . BACKGROUND ON NOISE REDUCE ON FADE ON CHILD LOCK OFF AVL ON CALENDAR CH+ VOL- Set up function Continued Fade and select a language FUNCTION Fade The FADE control allows time for the picture tube to warm up and gently turned on, which can help...

User Manual
Page 22
... be on a wrong TV channel number to the correct channel numbers. 1 Press the MENU button again (6 times), till the EXCHANGE menu display on the screen. This feature is very useful when Automatic Search Tuning has been used, to reallocate the found programs to be swapped/exchanged. buttons to set PROGRAM 2 TO 9. MENU VOL+ 6 Press the VOL-/+ buttons to CH+ select "EXCHANGE". the PROGRAM NUMBER 0-9 buttons to set CH- MENU VOL+ CH- "EXCHANGE". EXCHANGE PROGRAM 1 6 PROGRAM 2 9 EXCHANGE
... be on a wrong TV channel number to the correct channel numbers. 1 Press the MENU button again (6 times), till the EXCHANGE menu display on the screen. This feature is very useful when Automatic Search Tuning has been used, to reallocate the found programs to be swapped/exchanged. buttons to set PROGRAM 2 TO 9. MENU VOL+ 6 Press the VOL-/+ buttons to CH+ select "EXCHANGE". the PROGRAM NUMBER 0-9 buttons to set CH- MENU VOL+ CH- "EXCHANGE". EXCHANGE PROGRAM 1 6 PROGRAM 2 9 EXCHANGE
User Manual
Page 24
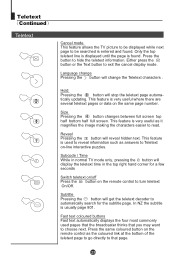
... and found . Subtitle Pressing the button will display the teletext time in normal TV mode only, pressing the button will get the teletext decoder to automatically search for a few seconds Switch teletext on/off Press the button on the remote control to turn teletext On/Off. tically updating. Teletext Continued Teletext Cancel mode This feature allows the TV picture to be displayed while next page...
... and found . Subtitle Pressing the button will display the teletext time in normal TV mode only, pressing the button will get the teletext decoder to automatically search for a few seconds Switch teletext on/off Press the button on the remote control to turn teletext On/Off. tically updating. Teletext Continued Teletext Cancel mode This feature allows the TV picture to be displayed while next page...
User Manual
Page 26
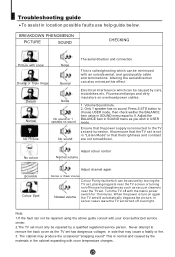
... "Listen Mode" or that the TV set will automatically degauss the picture. BREAKDOWN PHENOMENON PICTURE SOUND CHECKING Picture with snow Double or Triple Image Noise Normal The aerial direction and connection This is turn on overhead power cables. 1. Only 1 speaker has no sound No sound Electrical interference which can not be repaired using the above guide consult with room temperature changes. No colour Scramble Colour Spot Adjust colour control Normal volume Adjust channel again...
... "Listen Mode" or that the TV set will automatically degauss the picture. BREAKDOWN PHENOMENON PICTURE SOUND CHECKING Picture with snow Double or Triple Image Noise Normal The aerial direction and connection This is turn on overhead power cables. 1. Only 1 speaker has no sound No sound Electrical interference which can not be repaired using the above guide consult with room temperature changes. No colour Scramble Colour Spot Adjust colour control Normal volume Adjust channel again...


