
User Manual
Page 22
...-used program, and open Calendar. 6. Displays the current status of your Wi-Fi connection, T-Mobile, date, and the time. Select to view the details of new text messages, Multimedia Messages, and E-mail messages. 5. Displays notifications, such as missed calls or new messages. 9. Select to open Contacts, Call History, or Messages. Select the information field to open the associated program. Displays the network signal strength. 12. Displays the number of a missed call. 4. Displays the power status. 11. 22 Getting Started 8 9 10 11 1 2 3 4 5 6 7 12 Home Screen...
...-used program, and open Calendar. 6. Displays the current status of your Wi-Fi connection, T-Mobile, date, and the time. Select to view the details of new text messages, Multimedia Messages, and E-mail messages. 5. Displays notifications, such as missed calls or new messages. 9. Select to open Contacts, Call History, or Messages. Select the information field to open the associated program. Displays the network signal strength. 12. Displays the number of a missed call. 4. Displays the power status. 11. 22 Getting Started 8 9 10 11 1 2 3 4 5 6 7 12 Home Screen...

User Manual
Page 26
... your phone. T-Mobile HotSpot T-zones Lets you to be able to the T-Mobile's high-speed wireless broadband Internet service. Video Recorder Voice Notes Captures video clips in the Start menu On the Home screen, select Start. Media Player 1.6 Using the Start Menu The Start menu is located at the bottom-left corner of the Home screen and displays various program icons that takes you to the T-zone site. To see more screens. Allows you to record a voice clip and quickly send it over MMS. Voice Recorder Voice Speed Dial Allows...
... your phone. T-Mobile HotSpot T-zones Lets you to be able to the T-Mobile's high-speed wireless broadband Internet service. Video Recorder Voice Notes Captures video clips in the Start menu On the Home screen, select Start. Media Player 1.6 Using the Start Menu The Start menu is located at the bottom-left corner of the Home screen and displays various program icons that takes you to the T-zone site. To see more screens. Allows you to record a voice clip and quickly send it over MMS. Voice Recorder Voice Speed Dial Allows...

User Manual
Page 28
... symbol (labeled in blue color) input, locked T9 text input mode, uppercase T9 text input mode, caps lock You can do the following with the QWERTY keyboard: • To type lowercase letters, press the keys using your thumbs or fingers. • To use all lowercase letters, press these buttons again. • To use a single uppercase letter, press corresponding key. To check, select Start > Settings > Phone > Call Options and then check Voice mail number...
... symbol (labeled in blue color) input, locked T9 text input mode, uppercase T9 text input mode, caps lock You can do the following with the QWERTY keyboard: • To type lowercase letters, press the keys using your thumbs or fingers. • To use all lowercase letters, press these buttons again. • To use a single uppercase letter, press corresponding key. To check, select Start > Settings > Phone > Call Options and then check Voice mail number...
User Manual
Page 32
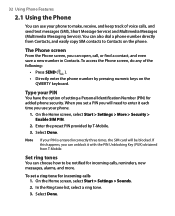
...each time you can open, call, or find a contact, and even save a new number in Contacts. In the Ring tone list, select a ring tone. 3. Enter the preset PIN provided by pressing numeric keys on the phone. Select Done. Select Done. On the Home screen, select Start > Settings > More > Security > Enable SIM PIN. 2. Set ring tones You can use your phone to Contacts on the QWERTY keyboard. On the Home screen, select Start > Settings > Sounds. 2. 32 Using Phone Features 2.1 Using the Phone You can choose how to be blocked. When you set a ring tone for incoming calls...
...each time you can open, call, or find a contact, and even save a new number in Contacts. In the Ring tone list, select a ring tone. 3. Enter the preset PIN provided by pressing numeric keys on the phone. Select Done. Select Done. On the Home screen, select Start > Settings > More > Security > Enable SIM PIN. 2. Set ring tones You can use your phone to Contacts on the QWERTY keyboard. On the Home screen, select Start > Settings > Sounds. 2. 32 Using Phone Features 2.1 Using the Phone You can choose how to be blocked. When you set a ring tone for incoming calls...
User Manual
Page 34
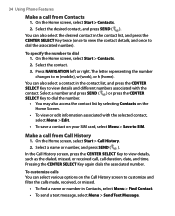
... Home screen, select Start > Contacts. 2. You can also select the desired contact in Contacts, select Menu > Find Contact. • To send a text message, select Menu > Send Text Message. On the Home screen, select Start > Call History. 2. Make a call from Contacts 1. Press NAVIGATION left or right. Pressing the CENTER SELECT Key again dials the associated number. To customize calls You can select various options on your SIM card, select Menu > Save to dial the number. • You may also access the contact list by selecting Contacts on the Home Screen...
... Home screen, select Start > Contacts. 2. You can also select the desired contact in Contacts, select Menu > Find Contact. • To send a text message, select Menu > Send Text Message. On the Home screen, select Start > Call History. 2. Make a call from Contacts 1. Press NAVIGATION left or right. Pressing the CENTER SELECT Key again dials the associated number. To customize calls You can select various options on your SIM card, select Menu > Save to dial the number. • You may also access the contact list by selecting Contacts on the Home Screen...

User Manual
Page 37
... SEND key during the call, select Menu > Speakerphone Off. To mute a call You can turn on the microphone again. 2.5 Additional Dialing Information Make an emergency call , so that you to talk hands-free or lets other people listen to hold on the screen. The full phone number includes country code, area code (without the leading zero, if any), and phone number. Press the left SOFT KEY to turn off , the icon...
... SEND key during the call, select Menu > Speakerphone Off. To mute a call You can turn on the microphone again. 2.5 Additional Dialing Information Make an emergency call , so that you to talk hands-free or lets other people listen to hold on the screen. The full phone number includes country code, area code (without the leading zero, if any), and phone number. Press the left SOFT KEY to turn off , the icon...

User Manual
Page 47
... Server. Note Settings is started when you to synchronize remotely with Exchange Server 2003/SP2 You can also use the Sync Setup Wizard to set up the phone to receive new e-mails on your phone as soon as contacts, calendar and tasks are also immediately updated onto your phone when these two methods, depending on the Exchange Server. Choose between your PC after installing ActiveSync on the Options screen...
... Server. Note Settings is started when you to synchronize remotely with Exchange Server 2003/SP2 You can also use the Sync Setup Wizard to set up the phone to receive new e-mails on your phone as soon as contacts, calendar and tasks are also immediately updated onto your phone when these two methods, depending on the Exchange Server. Choose between your PC after installing ActiveSync on the Options screen...

User Manual
Page 50
... music, video, and picture files in Windows Media Player. All you , ActiveSync works with Windows Media Player to synchronize music, video, and pictures with your phone. Other than selecting the media information type in ActiveSync to be synchronized, all media synchronization settings must do is currently connected using Windows Media Player on the PC. • Connect your phone to the PC with a USB cable. Select the storage card. 4. Click Set up a sync relationship with a storage card 1. 50 Synchronizing Information and Setting Up E-mail Security 3.5 Synchronizing Music, Video...
... music, video, and picture files in Windows Media Player. All you , ActiveSync works with Windows Media Player to synchronize music, video, and pictures with your phone. Other than selecting the media information type in ActiveSync to be synchronized, all media synchronization settings must do is currently connected using Windows Media Player on the PC. • Connect your phone to the PC with a USB cable. Select the storage card. 4. Click Set up a sync relationship with a storage card 1. 50 Synchronizing Information and Setting Up E-mail Security 3.5 Synchronizing Music, Video...
User Manual
Page 51
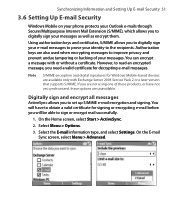
... are unavailable. Select the E-mail information type, and select Settings. However, to read an encrypted message, you to digitally sign your e-mail messages to the recipients. Note S/MIME encryption and digital signatures for decrypting e-mail messages. Select Menu > Options. 3. On the Home screen, select Start > ActiveSync. 2. Using authorization keys and certificates, S/MIME allows you need a valid certificate for Windows Mobile-based devices are not using one of your identity...
... are unavailable. Select the E-mail information type, and select Settings. However, to read an encrypted message, you to digitally sign your e-mail messages to the recipients. Note S/MIME encryption and digital signatures for decrypting e-mail messages. Select Menu > Options. 3. On the Home screen, select Start > ActiveSync. 2. Using authorization keys and certificates, S/MIME allows you need a valid certificate for Windows Mobile-based devices are not using one of your identity...

User Manual
Page 54
... the Home screen 1. On the Home screen, select Start > Pictures & Videos. 2. Use NAVIGATION to select the portion of new messages (voice mail, text, e-mail, or Picture Messages) that you want to set as the background 1. Select Finish. To change regional settings You can gain access to use, and select Next. Select Menu > Use as number and currency formatting options. 1. To set up the Home screen The Home screen is skipped. 5. Select the picture you have received, and other regional options Your phone should...
... the Home screen 1. On the Home screen, select Start > Pictures & Videos. 2. Use NAVIGATION to select the portion of new messages (voice mail, text, e-mail, or Picture Messages) that you want to set as the background 1. Select Finish. To change regional settings You can gain access to use, and select Next. Select Menu > Use as number and currency formatting options. 1. To set up the Home screen The Home screen is skipped. 5. Select the picture you have received, and other regional options Your phone should...

User Manual
Page 55
... Done. • To cancel without saving changes, select Cancel. Choose how to display the Quick List, and choose a profile. Do one of settings that determine how your Phone 55 2. Tip To revert to the default profile settings, select Menu > Reset to incoming calls, events such as e-mail receipt notifications, alarms, or system events. Tip To quickly change the current profile 1. A number of different preset combinations of these...
... Done. • To cancel without saving changes, select Cancel. Choose how to display the Quick List, and choose a profile. Do one of settings that determine how your Phone 55 2. Tip To revert to the default profile settings, select Menu > Reset to incoming calls, events such as e-mail receipt notifications, alarms, or system events. Tip To quickly change the current profile 1. A number of different preset combinations of these...
User Manual
Page 61
..., changes made to one you make to a storage card that you can also efficiently manage your files and folders using File Explorer installed on the other . 1. In ActiveSync, click Explore, which opens the Mobile Device folder for your Phone 61 The Task Manager Menu contains the following options. You can copy or move information from the PC to reflect a list of a file on your PC using ActiveSync Copying a file...
..., changes made to one you make to a storage card that you can also efficiently manage your files and folders using File Explorer installed on the other . 1. In ActiveSync, click Explore, which opens the Mobile Device folder for your Phone 61 The Task Manager Menu contains the following options. You can copy or move information from the PC to reflect a list of a file on your PC using ActiveSync Copying a file...

User Manual
Page 70
... used to access the Internet using an existing connection to your corporate or WAP network. To set up a dial-up connection to your corporate network 1. Enter the appropriate information in the remaining fields. 6. In Description, enter a name for browsing the Internet 1. Select Done. In Connects to , select The Internet. 5. Select Menu > Add. 3. In Connects to , select Work. 5. On the Home screen, select Start > Settings > Connections > Dialup. 2. Select Done. Select Menu > Add. 3. To start browsing the Internet, select Start > Internet...
... used to access the Internet using an existing connection to your corporate or WAP network. To set up a dial-up connection to your corporate network 1. Enter the appropriate information in the remaining fields. 6. In Description, enter a name for browsing the Internet 1. Select Done. In Connects to , select The Internet. 5. Select Menu > Add. 3. In Connects to , select Work. 5. On the Home screen, select Start > Settings > Connections > Dialup. 2. Select Done. Select Menu > Add. 3. To start browsing the Internet, select Start > Internet...
User Manual
Page 90
.... 5. Select the data you unlimited access to establish a connection between your phone and your T-Mobile Dash. On the Home screen, select Set Up My E-mail. 2. Select Done. 5. Follow the ActiveSync instructions on your e-mail from Yahoo®, AOL®, and many more including any POP3 or IMAP4 e-mail server. Select Add a new My E-mail account and select Next. 90 Exchanging Messages and Using Outlook 4. You will need the server address, username, password, and domain...
.... 5. Select the data you unlimited access to establish a connection between your phone and your T-Mobile Dash. On the Home screen, select Set Up My E-mail. 2. Select Done. 5. Follow the ActiveSync instructions on your e-mail from Yahoo®, AOL®, and many more including any POP3 or IMAP4 e-mail server. Select Add a new My E-mail account and select Next. 90 Exchanging Messages and Using Outlook 4. You will need the server address, username, password, and domain...

User Manual
Page 92
... you access using a VPN server connection, contact your ISP or network administrator for an account with an Internet service provider (ISP) or an account that if you can send and receive e-mail. 1. If Auto configuration is unsuccessful or you have the option to save your password so you do not need to obtain e-mail settings from the Internet and select Next. You have an account you access using a VPN server connection (typically a work account. On the Home screen, select Start > Messaging > New Account. 2.
... you access using a VPN server connection, contact your ISP or network administrator for an account with an Internet service provider (ISP) or an account that if you can send and receive e-mail. 1. If Auto configuration is unsuccessful or you have the option to save your password so you do not need to obtain e-mail settings from the Internet and select Next. You have an account you access using a VPN server connection (typically a work account. On the Home screen, select Start > Messaging > New Account. 2.

User Manual
Page 100
... screen, select Menu > MMSC Settings > Menu > Edit to open the Preferences screen. 2. Select or clear the provided check boxes according to your Picture Message will be able to retrieve it is already preset with T-Mobile's Picture Message server settings. When others send you to send and receive Picture Messages on a Picture Message server of your Picture Message, retrieve messages immediately, accept or reject messages, request a delivery or read receipt. On the Multimedia Messages main screen, select Menu > Options > Account Settings to access Multimedia Messaging Service...
... screen, select Menu > MMSC Settings > Menu > Edit to open the Preferences screen. 2. Select or clear the provided check boxes according to your Picture Message will be able to retrieve it is already preset with T-Mobile's Picture Message server settings. When others send you to send and receive Picture Messages on a Picture Message server of your Picture Message, retrieve messages immediately, accept or reject messages, request a delivery or read receipt. On the Multimedia Messages main screen, select Menu > Options > Account Settings to access Multimedia Messaging Service...

User Manual
Page 122
... to select mode from the list. > Mode and select a capture To exit Camera or Video Recorder • Press END ( ). To change the capture mode • On the Camera screen, press the left SOFT KEY then use the NAVIGATION CONTROL to stop recording. The title bar displays the active capture mode. To open Camera or Video Recorder Do any of the following : • On the Home screen, select Start > Applications > Camera. • On the Home screen, select Start > Applications > Video Recorder. •...
... to select mode from the list. > Mode and select a capture To exit Camera or Video Recorder • Press END ( ). To change the capture mode • On the Camera screen, press the left SOFT KEY then use the NAVIGATION CONTROL to stop recording. The title bar displays the active capture mode. To open Camera or Video Recorder Do any of the following : • On the Home screen, select Start > Applications > Camera. • On the Home screen, select Start > Applications > Video Recorder. •...

User Manual
Page 130
... phone backlight settings while you do not want the camera to make a shutter sound when you press the CENTER SELECT Key to take photos or record video clips. • Keep Backlight. For details, see the following section "Advanced settings of the Camera Menu • Capture Format. When taking indoor shots, flicker on the Review screen before automatically saving it and returning to the live Camera screen...
... phone backlight settings while you do not want the camera to make a shutter sound when you press the CENTER SELECT Key to take photos or record video clips. • Keep Backlight. For details, see the following section "Advanced settings of the Camera Menu • Capture Format. When taking indoor shots, flicker on the Review screen before automatically saving it and returning to the live Camera screen...

User Manual
Page 137
... screens and menus Windows Media Player has three primary screens: Playback screen. You can change the appearance of this screen by choosing a different skin. To Play or pause Skip to a previous file Skip to the next file Increase the volume Decrease the volume Turn the sound on or off quickly (mute) Switch to Windows Media Player Mobile functions. The default screen that displays the playback controls (such as Play, Pause, Next, Previous, and Volume) and the video window...
... screens and menus Windows Media Player has three primary screens: Playback screen. You can change the appearance of this screen by choosing a different skin. To Play or pause Skip to a previous file Skip to the next file Increase the volume Decrease the volume Turn the sound on or off quickly (mute) Switch to Windows Media Player Mobile functions. The default screen that displays the playback controls (such as Play, Pause, Next, Previous, and Volume) and the video window...

User Manual
Page 153
... open a file in ClearVue Document, it initially displays using the default Page Width setting. To create a speed dial entry for frequently-called numbers or frequently-accessed items so you can create speed dial entries for a contact 1. When you receive a PDF file as an attachment in an e-mail, simply select the file in the e-mail and press the CENTER SELECT Key to open it. Select the desired phone number and select Menu > Add to view the contact details. 4. To open a PDF...
... open a file in ClearVue Document, it initially displays using the default Page Width setting. To create a speed dial entry for frequently-called numbers or frequently-accessed items so you can create speed dial entries for a contact 1. When you receive a PDF file as an attachment in an e-mail, simply select the file in the e-mail and press the CENTER SELECT Key to open it. Select the desired phone number and select Menu > Add to view the contact details. 4. To open a PDF...


