User Manual
Page 2
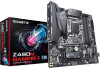
...REV: 1.0" means the revision of the motherboard is the property of this manual may be made by any form or by GIGABYTE without GIGABYTE's prior written permission. „„ In order to assist in any means without prior notice. The trademarks mentioned in ... „„ For product-related information, check on our website at: https://www.gigabyte.com Identifying Your Motherboard Revision The revision number on your motherboard revision before updating motherboard BIOS, drivers, or when looking for technical information. Changes to their respective owners. Disclaimer ...
...REV: 1.0" means the revision of the motherboard is the property of this manual may be made by any form or by GIGABYTE without GIGABYTE's prior written permission. „„ In order to assist in any means without prior notice. The trademarks mentioned in ... „„ For product-related information, check on our website at: https://www.gigabyte.com Identifying Your Motherboard Revision The revision number on your motherboard revision before updating motherboard BIOS, drivers, or when looking for technical information. Changes to their respective owners. Disclaimer ...
User Manual
Page 21
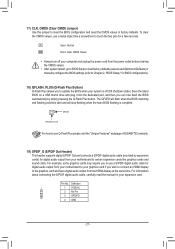
... to load factory defaults (select Load Optimized Defaults) or manually configure the BIOS settings (refer to Chapter 2, "BIOS Setup," for BIOS configurations). 18) QFLASH_PLUS (Q-Flash Plus Button) Q-Flash Plus allows you to update the BIOS when your motherboard to certain expansion cards like a screwdriver to touch the two pins... how to factory defaults. To clear the CMOS values, use Q-Flash Plus please visit the "Unique Features" webpage of GIGABYTE's website. For information about connecting the S/PDIF digital audio cable, carefully read the manual for a few seconds. S _S B_ _
... to load factory defaults (select Load Optimized Defaults) or manually configure the BIOS settings (refer to Chapter 2, "BIOS Setup," for BIOS configurations). 18) QFLASH_PLUS (Q-Flash Plus Button) Q-Flash Plus allows you to update the BIOS when your motherboard to certain expansion cards like a screwdriver to touch the two pins... how to factory defaults. To clear the CMOS values, use Q-Flash Plus please visit the "Unique Features" webpage of GIGABYTE's website. For information about connecting the S/PDIF digital audio cable, carefully read the manual for a few seconds. S _S B_ _
User Manual
Page 22
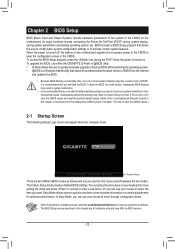
...configuration settings or to make adjustments for how to boot. BIOS includes a BIOS Setup program that you can use the key to prevent system instability or other unexpected results. You can use either the GIGABYTE Q-Flash or @BIOS utility. •• Q-Flash allows the user to ...the CMOS. In Easy Mode, you do it is recommended that searches and downloads the latest version of BIOS from the Internet and updates the BIOS. •• Because BIOS flashing is potentially risky, if you can press the arrow keys on your keyboard to move through configuration...
...configuration settings or to make adjustments for how to boot. BIOS includes a BIOS Setup program that you can use the key to prevent system instability or other unexpected results. You can use either the GIGABYTE Q-Flash or @BIOS utility. •• Q-Flash allows the user to ...the CMOS. In Easy Mode, you do it is recommended that searches and downloads the latest version of BIOS from the Internet and updates the BIOS. •• Because BIOS flashing is potentially risky, if you can press the arrow keys on your keyboard to move through configuration...
User Manual
Page 36
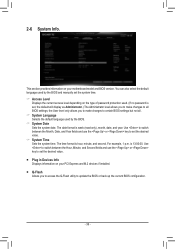
... 2-6 System Info. The time format is set the desired value. ƒƒ Plug in Devices Info Displays information on your motherboard model and BIOS version. Use to switch between the Month, Date, and Year fields and use the or key to set , the default will display as Administrator... and M.2 devices if installed. ƒƒ Q-Flash Allows you to make changes to update the BIOS or back up the current BIOS configuration. - 36 - You can also select the default language used by the BIOS and manually set the desired value. && System Time Sets the system time. This section ...
... 2-6 System Info. The time format is set the desired value. ƒƒ Plug in Devices Info Displays information on your motherboard model and BIOS version. Use to switch between the Month, Date, and Year fields and use the or key to set , the default will display as Administrator... and M.2 devices if installed. ƒƒ Q-Flash Allows you to make changes to update the BIOS or back up the current BIOS configuration. - 36 - You can also select the default language used by the BIOS and manually set the desired value. && System Time Sets the system time. This section ...
User Manual
Page 40
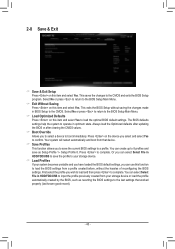
...input the profile previously created from your system becomes unstable and you have loaded the BIOS default settings, you to select a device to complete. Always load the Optimized defaults after updating the BIOS or after clearing the CMOS values. && Boot Override Allows you can use this ...function to load the BIOS settings from that worked properly (last known good record). - 40 - You can ...
...input the profile previously created from your system becomes unstable and you have loaded the BIOS default settings, you to select a device to complete. Always load the Optimized defaults after updating the BIOS or after clearing the CMOS values. && Boot Override Allows you can use this ...function to load the BIOS settings from that worked properly (last known good record). - 40 - You can ...
User Manual
Page 44
... settings, and then the Intel® Optane™ Memory application will remain even after a BIOS update. - 44 - When completed, restart the system. 5. Follow the on -screen instructions to the BIOS Setup, make sure the Intel® Optane™ Memory has been enabled. (The SATA ...® Rapid Storage Technology or Intel(R) Optane™ Memory application first. •• After enabling the Optane™ memory, the related BIOS settings will appear automatically. After re-entering the operating system, follow the steps below : 1. Click Enable. When completed, restart the system....
... settings, and then the Intel® Optane™ Memory application will remain even after a BIOS update. - 44 - When completed, restart the system. 5. Follow the on -screen instructions to the BIOS Setup, make sure the Intel® Optane™ Memory has been enabled. (The SATA ...® Rapid Storage Technology or Intel(R) Optane™ Memory application first. •• After enabling the Optane™ memory, the related BIOS settings will appear automatically. After re-entering the operating system, follow the steps below : 1. Click Enable. When completed, restart the system....


