User Manual
Page 1
... the specifications might be reproduced or transmitted in technology, some of this manual. Due to update the information contained herein. Use of their respective owners. Trademarks Third-party brands and names are the properties of this document nor does the author make a commitment to rapid change in any errors or omissions that is prohibited. AMD® Graphics Accelerator User's Manual Rev. 107 Copyright © 2018 GIGABYTE TECHNOLOGY CO...
... the specifications might be reproduced or transmitted in technology, some of this manual. Due to update the information contained herein. Use of their respective owners. Trademarks Third-party brands and names are the properties of this document nor does the author make a commitment to rapid change in any errors or omissions that is prohibited. AMD® Graphics Accelerator User's Manual Rev. 107 Copyright © 2018 GIGABYTE TECHNOLOGY CO...
User Manual
Page 2
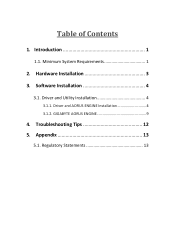
Software Installation 4 3.1. Regulatory Statements 13 Introduction 1 1.1. Driver and AORUS ENGINE Installation 4 3.1.2. GIGABYTE AORUS ENGINE 9 4. Table of Contents 1. Hardware Installation 3 3. Driver and Utility Installation 4 3.1.1. Troubleshooting Tips 12 5. Appendix 13 5.1. Minimum System Requirements 1 2.
Software Installation 4 3.1. Regulatory Statements 13 Introduction 1 1.1. Driver and AORUS ENGINE Installation 4 3.1.2. GIGABYTE AORUS ENGINE 9 4. Table of Contents 1. Hardware Installation 3 3. Driver and Utility Installation 4 3.1.1. Troubleshooting Tips 12 5. Appendix 13 5.1. Minimum System Requirements 1 2.
User Manual
Page 3
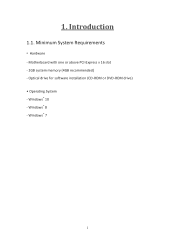
Optical drive for software installation (CD-ROM or DVD-ROM drive) • Operating System - Minimum System Requirements • Hardware - Windows® 10 - Motherboard with one or above PCI-Express x 16 slot - 2GB system memory (4GB recommended) - Windows® 7 1 Windows® 8 - Introduction 1.1. 1.
Optical drive for software installation (CD-ROM or DVD-ROM drive) • Operating System - Minimum System Requirements • Hardware - Windows® 10 - Motherboard with one or above PCI-Express x 16 slot - 2GB system memory (4GB recommended) - Windows® 7 1 Windows® 8 - Introduction 1.1. 1.
User Manual
Page 4
...static electricity, you work correctly, please use official GIGABYTE BIOS only. Place components on a grounded antistatic pad or on the bag that your computer and unplug power supply. 2. Turn off your graphics card can be wearing...installed. Unpacking and installation should be easily damaged by static electricity, so the card should follow some precautions whenever you should be done on the graphics card. 2 Using non-official GIGABYTE BIOS might cause problem(s) on a grounded anti-static mat. The card contains sensitive electric components, which can work on the card...
...static electricity, you work correctly, please use official GIGABYTE BIOS only. Place components on a grounded antistatic pad or on the bag that your computer and unplug power supply. 2. Turn off your graphics card can be wearing...installed. Unpacking and installation should be easily damaged by static electricity, so the card should follow some precautions whenever you should be done on the graphics card. 2 Using non-official GIGABYTE BIOS might cause problem(s) on a grounded anti-static mat. The card contains sensitive electric components, which can work on the card...
User Manual
Page 5
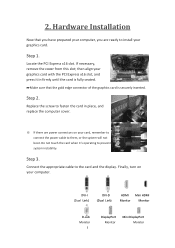
... the PCI Express x16 slot. Do not touch the card when it in place, and replace the computer cover. ※ If there are ready to them, or the system will not boot. If necessary, remove the cover from this slot; Step 3. DVI-I (Dual Link) DVI-D (Dual Link) HDMI Mini HDMI Monitor Monitor D-sub Monitor 3 DisplayPort Monitor Mini DisplayPort Monitor Hardware Installation Now that the gold edge connector of the graphics card...
... the PCI Express x16 slot. Do not touch the card when it in place, and replace the computer cover. ※ If there are ready to them, or the system will not boot. If necessary, remove the cover from this slot; Step 3. DVI-I (Dual Link) DVI-D (Dual Link) HDMI Mini HDMI Monitor Monitor D-sub Monitor 3 DisplayPort Monitor Mini DisplayPort Monitor Hardware Installation Now that the gold edge connector of the graphics card...
User Manual
Page 6
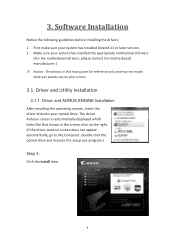
... the driver disk into your system has installed DirectX 11 or later version. 2. 3. The driver Autorun screen is automatically displayed which looks like that shown in this manual are for reference only and may not match what you exactly see on the right. (If the driver Autorun screen does not appear automatically, go to My Computer, double-click the optical drive and...
... the driver disk into your system has installed DirectX 11 or later version. 2. 3. The driver Autorun screen is automatically displayed which looks like that shown in this manual are for reference only and may not match what you exactly see on the right. (If the driver Autorun screen does not appear automatically, go to My Computer, double-click the optical drive and...
User Manual
Page 7
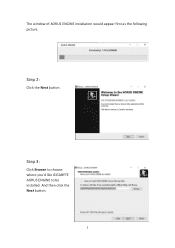
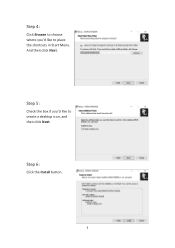
Step 2: Click the Next button. The window of AORUS ENGINE installation would appear first as the following picture. Step 3: Click Browse to choose where you'd like GIGABYTE AORUS ENGINE to be installed. And then click the Next button. 5
Step 2: Click the Next button. The window of AORUS ENGINE installation would appear first as the following picture. Step 3: Click Browse to choose where you'd like GIGABYTE AORUS ENGINE to be installed. And then click the Next button. 5
User Manual
Page 8
Step 4: Click Browse to choose where you 'd like to create a desktop icon, and then click Next. Step 6: Click the Install button. 6 Step 5: Check the box if you 'd like to place the shortcuts in Start Menu. And then click Next.
Step 4: Click Browse to choose where you 'd like to create a desktop icon, and then click Next. Step 6: Click the Install button. 6 Step 5: Check the box if you 'd like to place the shortcuts in Start Menu. And then click Next.
User Manual
Page 9
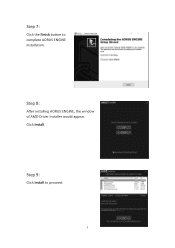
Step 7: Click the Finish button to proceed. 7 Step 8: After installing AORUS ENGINE, the window of AMD Driver Installer would appear. Step 9: Click Install to complete AORUS ENGINE installation. Click Install.
Step 7: Click the Finish button to proceed. 7 Step 8: After installing AORUS ENGINE, the window of AMD Driver Installer would appear. Step 9: Click Install to complete AORUS ENGINE installation. Click Install.
User Manual
Page 10
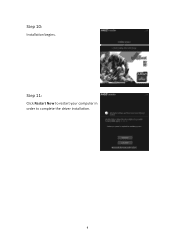
Step 10: Installation begins. Step 11: Click Restart Now to restart your computer in order to complete the driver installation. 8
Step 10: Installation begins. Step 11: Click Restart Now to restart your computer in order to complete the driver installation. 8
User Manual
Page 11
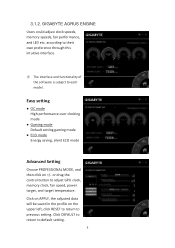
... control button to each model. Easy setting OC mode High performance over clocking mode Gaming mode Default setting gaming mode ECO mode Energy saving, silent ECO mode Advanced Setting Choose PROFESSIONAL MODE, and then click on the upper left, click RESET to return to default setting. 9 GIGABYTE AORUS ENGINE Users could adjust clock speeds, memory speeds, fan performance, and LED etc. Click on APPLY, the adjusted data will be saved in the profile...
... control button to each model. Easy setting OC mode High performance over clocking mode Gaming mode Default setting gaming mode ECO mode Energy saving, silent ECO mode Advanced Setting Choose PROFESSIONAL MODE, and then click on the upper left, click RESET to return to default setting. 9 GIGABYTE AORUS ENGINE Users could adjust clock speeds, memory speeds, fan performance, and LED etc. Click on APPLY, the adjusted data will be saved in the profile...
User Manual
Page 12
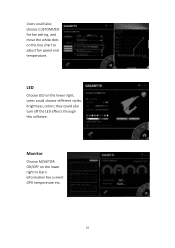
Users could choose different styles, brightness, colors; LED Choose LED on the lower right, users could also choose CUSTOMIZED for fan setting, and move the white dots on the lower right to adjust fan speed and temperature. they could also turn off the LED effects through this software. Monitor Choose MONITOR ON/OFF on the line chart to learn information like current GPU temperature etc. 10
Users could choose different styles, brightness, colors; LED Choose LED on the lower right, users could also choose CUSTOMIZED for fan setting, and move the white dots on the lower right to adjust fan speed and temperature. they could also turn off the LED effects through this software. Monitor Choose MONITOR ON/OFF on the line chart to learn information like current GPU temperature etc. 10
User Manual
Page 13
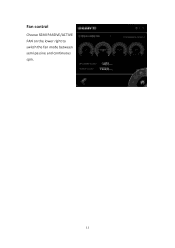
Fan control Choose SEMI PASSIVE/ACTIVE FAN on the lower right to switch the fan mode between semi passive and continuous spin. 11
Fan control Choose SEMI PASSIVE/ACTIVE FAN on the lower right to switch the fan mode between semi passive and continuous spin. 11
User Manual
Page 14
... the appropriate display device and graphics card when you experience problems. Contact your dealer or GIGABYTE for selection depend on your monitor's setting using monitor's adjust panel to make the screen looks focused, crisp, and sharp. 12 When the Windows Advanced Options Menu appears, select Safe Mode and press . After getting into Safe Mode, in graphics capabilities on the graphics card being installed. ※ If necessary, adjust your motherboard. Troubleshooting Tips The...
... the appropriate display device and graphics card when you experience problems. Contact your dealer or GIGABYTE for selection depend on your monitor's setting using monitor's adjust panel to make the screen looks focused, crisp, and sharp. 12 When the Windows Advanced Options Menu appears, select Safe Mode and press . After getting into Safe Mode, in graphics capabilities on the graphics card being installed. ※ If necessary, adjust your motherboard. Troubleshooting Tips The...
User Manual
Page 15
... high-efficiency performance, all respects at GIGABYTE are continuing our efforts to develop products that the information in this document is subject to change without our written permission, and the contents there of Hazardous Substances (RoHS) Directive Statement GIGABYTE products have been carefully selected to a third party nor be used equipment must not be copied without notice...
... high-efficiency performance, all respects at GIGABYTE are continuing our efforts to develop products that the information in this document is subject to change without our written permission, and the contents there of Hazardous Substances (RoHS) Directive Statement GIGABYTE products have been carefully selected to a third party nor be used equipment must not be copied without notice...

User Manual
Page 16
... waste disposal service or where you purchased the product for details of environmentally safe recycling. ☛ When your electrical or electronic equipment is no longer useful to you, "take it back" to your local or regional waste collection administration for recycling. ☛ If you need further assistance in recycling, reusing in your product's user's manual and we...
... waste disposal service or where you purchased the product for details of environmentally safe recycling. ☛ When your electrical or electronic equipment is no longer useful to you, "take it back" to your local or regional waste collection administration for recycling. ☛ If you need further assistance in recycling, reusing in your product's user's manual and we...
User Manual
Page 17
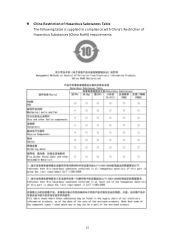
China Restriction of Hazardous Substances Table The following table is supplied in compliance with China's Restriction of Hazardous Substances (China RoHS) requirements: 15
China Restriction of Hazardous Substances Table The following table is supplied in compliance with China's Restriction of Hazardous Substances (China RoHS) requirements: 15
User Manual
Page 18
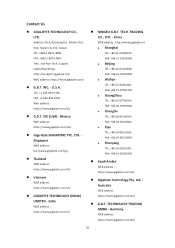
... CO., LTD. - TECHNOLOGY TRADING GMBH - LTD. Address: No.6, Baoqiang Rd., Xindian Dist., New Taipei City 231, Taiwan TEL: +886-2-8912-4888 FAX: +886-2-8912-4003 Tech. and Non-Tech. Support (Sales/Marketing) : https://esupport.gigabyte.com WEB address: https://www.gigabyte.com/ G.B.T. INC. - Ltd. U.S.A. Mexico Web address: https://www.gigabyte.com/mx/ Giga-Byte SINGAPORE PTE...
... CO., LTD. - TECHNOLOGY TRADING GMBH - LTD. Address: No.6, Baoqiang Rd., Xindian Dist., New Taipei City 231, Taiwan TEL: +886-2-8912-4888 FAX: +886-2-8912-4003 Tech. and Non-Tech. Support (Sales/Marketing) : https://esupport.gigabyte.com WEB address: https://www.gigabyte.com/ G.B.T. INC. - Ltd. U.S.A. Mexico Web address: https://www.gigabyte.com/mx/ Giga-Byte SINGAPORE PTE...
User Manual
Page 19
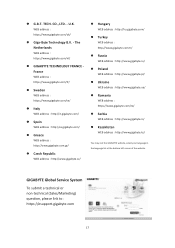
WEB address : https://www.gigabyte.com/uk/ Giga-Byte Technology B.V. - The Netherlands WEB address : https://www.gigabyte.com/nl/ GIGABYTE TECHNOLOGY FRANCE France WEB address : https://www.gigabyte.com/fr/ Sweden WEB address : https://www.gigabyte.com/se/ Italy WEB address : http://it.gigabyte.com/ Spain WEB address : http://es.gigabyte.com/ Greece WEB address : http...
WEB address : https://www.gigabyte.com/uk/ Giga-Byte Technology B.V. - The Netherlands WEB address : https://www.gigabyte.com/nl/ GIGABYTE TECHNOLOGY FRANCE France WEB address : https://www.gigabyte.com/fr/ Sweden WEB address : https://www.gigabyte.com/se/ Italy WEB address : http://it.gigabyte.com/ Spain WEB address : http://es.gigabyte.com/ Greece WEB address : http...


