Manual
Page 3
... 8 1-3-2 Installing the CPU Cooler 11 1-4 Installing the Memory 12 1-4-1 Dual Channel Memory Configuration 12 1-4-2 Installing a Memory 13 1-5 Back Panel Connectors 14 1-6 Internal Connectors 16 Chapter 2 BIOS Setup 25 2-1 The Main Menu 27 2-2 Advanced Menu 29 2-2-1 ACPI Settings...30 2-2-2 CPU Configuration 31 2-2-2-1 Socket 0 CPU Information 34 2-2-3 SATA Configuration 35 2-2-4 Acoustic Management Configuration...
... 8 1-3-2 Installing the CPU Cooler 11 1-4 Installing the Memory 12 1-4-1 Dual Channel Memory Configuration 12 1-4-2 Installing a Memory 13 1-5 Back Panel Connectors 14 1-6 Internal Connectors 16 Chapter 2 BIOS Setup 25 2-1 The Main Menu 27 2-2 Advanced Menu 29 2-2-1 ACPI Settings...30 2-2-2 CPU Configuration 31 2-2-2-1 Socket 0 CPU Information 34 2-2-3 SATA Configuration 35 2-2-4 Acoustic Management Configuration...

Manual
Page 15
Hardware Installation Hardware Monitor BIOS ŠŠ CPU/System temperature detection ŠŠ CPU fan speed detection ŠŠ 1 x 64 Mbit flash ŠŠ AMI BIOS Form Factor ŠŠ Mini ITX Form Factor; 170cm x 170cm * GIGABYTE reserves the right to make any changes to the product specifications and product-related information without prior notice. - 9 -
Hardware Installation Hardware Monitor BIOS ŠŠ CPU/System temperature detection ŠŠ CPU fan speed detection ŠŠ 1 x 64 Mbit flash ŠŠ AMI BIOS Form Factor ŠŠ Mini ITX Form Factor; 170cm x 170cm * GIGABYTE reserves the right to make any changes to the product specifications and product-related information without prior notice. - 9 -
Manual
Page 18
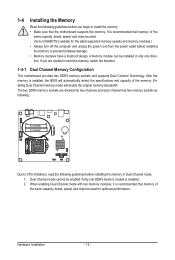
... memory speeds and memory modules.) • Always turn off the computer and unplug the power cord from the power outlet before installing the memory to GIGABYTE's website for optimum performance. When enabling Dual Channel mode with two memory modules, it is recommended that the motherboard supports the memory. 1-4 Installing the Memory...
... memory speeds and memory modules.) • Always turn off the computer and unplug the power cord from the power outlet before installing the memory to GIGABYTE's website for optimum performance. When enabling Dual Channel mode with two memory modules, it is recommended that the motherboard supports the memory. 1-4 Installing the Memory...
Manual
Page 20
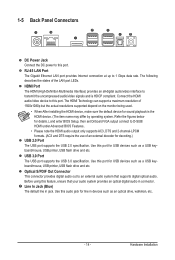
...to an external audio system that your audio system provides an optical digital audio in jack. Refer the figures below for details.), and enter BIOS Setup, then set Onboard VGA output connect to transmit the uncompressed audio/video signals and is the HDMI device. (The item name may ... walkman, etc. - 14 - HDMI Port The HDMI (High-Definition Multimedia Interface) provides an all-digital audio/video interface to D-SUB/ HDMI under Advanced BIOS Features.. • Please note the HDMI audio output only supports AC3, DTS and 2-channel-LPCM formats. (AC3 and DTS require the use of the LAN...
...to an external audio system that your audio system provides an optical digital audio in jack. Refer the figures below for details.), and enter BIOS Setup, then set Onboard VGA output connect to transmit the uncompressed audio/video signals and is the HDMI device. (The item name may ... walkman, etc. - 14 - HDMI Port The HDMI (High-Definition Multimedia Interface) provides an all-digital audio/video interface to D-SUB/ HDMI under Advanced BIOS Features.. • Please note the HDMI audio output only supports AC3, DTS and 2-channel-LPCM formats. (AC3 and DTS require the use of the LAN...
Manual
Page 29
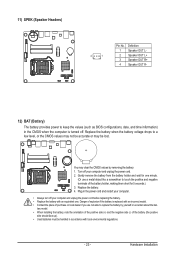
... replaced with an incorrect model. • Contact the place of purchase or local dealer if you are not able to keep the values (such as BIOS configurations, date, and time information) in the CMOS when the computer is turned off. tery model. • When installing the battery, note the orientation of...
... replaced with an incorrect model. • Contact the place of purchase or local dealer if you are not able to keep the values (such as BIOS configurations, date, and time information) in the CMOS when the computer is turned off. tery model. • When installing the battery, note the orientation of...
Manual
Page 30
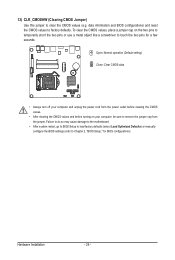
...24 - Failure to do so may cause damage to the motherboard. • After system restart, go to BIOS Setup to load factory defaults (select Load Optimized Defaults) or manually configure the BIOS settings (refer to remove the jumper cap from the jumper. Open: Normal operation (Default setting) Close: ...the two pins to temporarily short the two pins or use a metal object like a screwdriver to touch the two pins for BIOS configurations). date information and BIOS configurations) and reset the CMOS values to clear the CMOS values (e.g. 13) CLR_CMOSHW (Clearing CMOS Jumper) Use this jumper to...
...24 - Failure to do so may cause damage to the motherboard. • After system restart, go to BIOS Setup to load factory defaults (select Load Optimized Defaults) or manually configure the BIOS settings (refer to remove the jumper cap from the jumper. Open: Normal operation (Default setting) Close: ...the two pins to temporarily short the two pins or use a metal object like a screwdriver to touch the two pins for BIOS configurations). date information and BIOS configurations) and reset the CMOS values to clear the CMOS values (e.g. 13) CLR_CMOSHW (Clearing CMOS Jumper) Use this jumper to...
Manual
Page 31
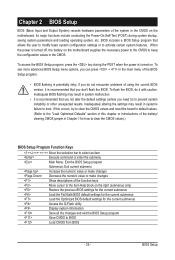
... to) to prevent system instability or other unexpected results. When the power is turned off, the battery on the motherboard. Chapter 2 BIOS Setup BIOS (Basic Input and Output System) records hardware parameters of the system in the CMOS on the motherboard supplies the necessary power to the CMOS... to keep the configuration values in the CMOS. To access the BIOS Setup program, press the key during system startup, saving system parameters and loading operating system, etc. Its major functions include conducting the...
... to) to prevent system instability or other unexpected results. When the power is turned off, the battery on the motherboard. Chapter 2 BIOS Setup BIOS (Basic Input and Output System) records hardware parameters of the system in the CMOS on the motherboard supplies the necessary power to the CMOS... to keep the configuration values in the CMOS. To access the BIOS Setup program, press the key during system startup, saving system parameters and loading operating system, etc. Its major functions include conducting the...
Manual
Page 32
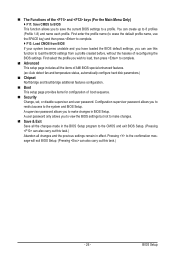
...profile name, use this task.) - 26 - Pressing to make changes. Save & Exit Save all the items of AMI BIOS special enhanced features. (ex: Auto detect fan and temperature status, automatically configure hard disk parameters.) Chipset Northbridge and Southbridge additional... features configuration. Boot This setup page provides items for configuration of reconfiguring the BIOS settings. A supervisor password allows you to the confirmation message will exit BIOS Setup. (Pressing can use the SPACE key) and then press to complete. F12...
...profile name, use this task.) - 26 - Pressing to make changes. Save & Exit Save all the items of AMI BIOS special enhanced features. (ex: Auto detect fan and temperature status, automatically configure hard disk parameters.) Chipset Northbridge and Southbridge additional... features configuration. Boot This setup page provides items for configuration of reconfiguring the BIOS settings. A supervisor password allows you to the confirmation message will exit BIOS Setup. (Pressing can use the SPACE key) and then press to complete. F12...
Manual
Page 33
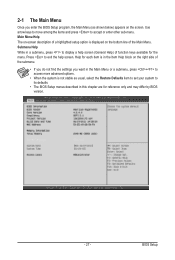
... Submenu Help While in this chapter are for reference only and may differ by BIOS version. - 27 - 2-1 The Main Menu Once you want in the Main Menu or a submenu, press + to... right side of the submenu. • If you do not find the settings you enter the BIOS Setup program, the Main Menu (as usual, select the Restore Defaults item to set your system to its defaults. &#...8226; The BIOS Setup menus described in a submenu, press to display a help screen. Use arrow keys to move among the items...
... Submenu Help While in this chapter are for reference only and may differ by BIOS version. - 27 - 2-1 The Main Menu Once you want in the Main Menu or a submenu, press + to... right side of the submenu. • If you do not find the settings you enter the BIOS Setup program, the Main Menu (as usual, select the Restore Defaults item to set your system to its defaults. &#...8226; The BIOS Setup menus described in a submenu, press to display a help screen. Use arrow keys to move among the items...
Manual
Page 34
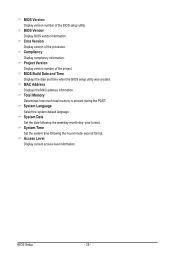
... and Time Displays the date and time when the BIOS setup utility was created. Project Version Display version number of the processor. System Language Select the system default language. System Date Set the date ...of the project. Total Memory Determines how much total memory is present during the POST. BIOS Vendor Display BIOS vendor information. System Time Set the system time following the weekday-month-day- BIOS Version Display version number of the BIOS setup utility. MAC Address Displays the MAC address information. second format. Compliency Display compliency...
... and Time Displays the date and time when the BIOS setup utility was created. Project Version Display version number of the processor. System Language Select the system default language. System Date Set the date ...of the project. Total Memory Determines how much total memory is present during the POST. BIOS Vendor Display BIOS vendor information. System Time Set the system time following the weekday-month-day- BIOS Version Display version number of the BIOS setup utility. MAC Address Displays the MAC address information. second format. Compliency Display compliency...
Manual
Page 35
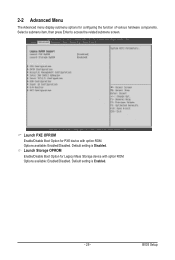
Options available: Enabled/Disabled. 2-2 Advanced Menu The Advanced menu display submenu options for Legacy Mass Storage device with option ROM. Select a submenu item, then press Enter to access the related submenu screen. Default setting is Enabled. - 29 - BIOS Setup Default setting is Disabled. Launch PXE OPROM Enable/Disable Boot Option for PXE device with option ROM. Launch Storage OPROM Enable/Disable Boot Option for configuring the function of various hardware components. Options available: Enabled/Disabled.
Options available: Enabled/Disabled. 2-2 Advanced Menu The Advanced menu display submenu options for Legacy Mass Storage device with option ROM. Select a submenu item, then press Enter to access the related submenu screen. Default setting is Enabled. - 29 - BIOS Setup Default setting is Disabled. Launch PXE OPROM Enable/Disable Boot Option for PXE device with option ROM. Launch Storage OPROM Enable/Disable Boot Option for configuring the function of various hardware components. Options available: Enabled/Disabled.
Manual
Page 36
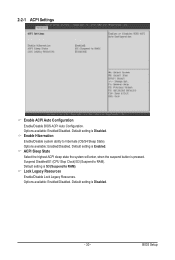
Default setting is Enabled. Lock Legacy Resources Enable/Disable Lock Legacy Resources. BIOS Setup Enable Hibernation Enable/Disable system ability to RAM). Suspend Disabled/S1 (CPU Stop Clock)/S3 (Suspend to hibernate (OS/S4 ...available: Enabled/Disabled. Default setting is Disabled. Options available: Enabled/Disabled. Default setting is pressed. 2-2-1 ACPI Settings Enable ACPI Auto Configuration Enable/Disable BIOS ACPI Auto Configuration. ACPI Sleep State Select the highest ACPI sleep state the system will enter, when the suspend button is Disabled. - 30 - ...
Default setting is Enabled. Lock Legacy Resources Enable/Disable Lock Legacy Resources. BIOS Setup Enable Hibernation Enable/Disable system ability to RAM). Suspend Disabled/S1 (CPU Stop Clock)/S3 (Suspend to hibernate (OS/S4 ...available: Enabled/Disabled. Default setting is Disabled. Options available: Enabled/Disabled. Default setting is pressed. 2-2-1 ACPI Settings Enable ACPI Auto Configuration Enable/Disable BIOS ACPI Auto Configuration. ACPI Sleep State Select the highest ACPI sleep state the system will enter, when the suspend button is Disabled. - 30 - ...
Manual
Page 38
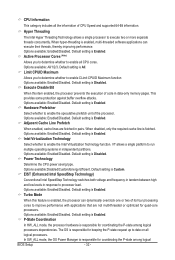
... Disabled. Hardware Prefetcher Select whether to enable all CPU cores. Options available: Enabled/Disabled. When hyper-threading is responsible for coordinating the P-state among logical BIOS Setup - 32 - Options available: All/1/2/3. Limit CPUID Maximum Allows you to determine whether to enable the speculative prefetch unit of CPU Speed and supported 64...
... Disabled. Hardware Prefetcher Select whether to enable all CPU cores. Options available: Enabled/Disabled. When hyper-threading is responsible for coordinating the P-state among logical BIOS Setup - 32 - Options available: All/1/2/3. Limit CPUID Maximum Allows you to determine whether to enable the speculative prefetch unit of CPU Speed and supported 64...

Manual
Page 39
Auto lets the BIOS automatically configure this feature. Package C State Limit Configure state for CPU C6 Report: Enabled/Disabled. Default setting is present only if you to determine whether .... Default setting is Enabled. CPU C3/C6 Support (Note) Allows you install a CPU that supports this setting. Default setting is HW_ALL. Options available: Enabled/Disabled. BIOS Setup - 33 - Options available for the C-State package limit. Long duration maintained Press numeric keys to determine desire values. Options available: HW_ALL/SW_ALL/SW_ANY. The...
Auto lets the BIOS automatically configure this feature. Package C State Limit Configure state for CPU C6 Report: Enabled/Disabled. Default setting is present only if you to determine whether .... Default setting is Enabled. CPU C3/C6 Support (Note) Allows you install a CPU that supports this setting. Default setting is HW_ALL. Options available: Enabled/Disabled. BIOS Setup - 33 - Options available for the C-State package limit. Long duration maintained Press numeric keys to determine desire values. Options available: HW_ALL/SW_ALL/SW_ANY. The...
Manual
Page 40
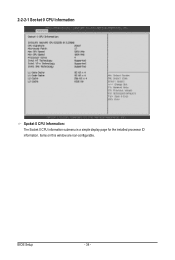
2-2-2-1 Socket 0 CPU Information Spcket 0 CPU Information: The Socket 0 CPU information submenu is a simple display page for the installed processor ID information. Items on this window are non-configurable. BIOS Setup - 34 -
2-2-2-1 Socket 0 CPU Information Spcket 0 CPU Information: The Socket 0 CPU information submenu is a simple display page for the installed processor ID information. Items on this window are non-configurable. BIOS Setup - 34 -
Manual
Page 41
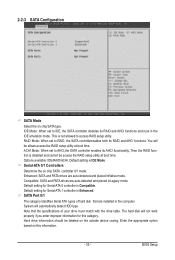
...,the SATA controller enables its AHCI functionality. The hard disk will not work properly if you enter improper information for Serial-ATA 0 controller is Compatible. BIOS Setup You will automatically detect HDD type. Compatible: SATA and PATA drives are auto-detected and placed inNative mode. System will be access the RAID...
...,the SATA controller enables its AHCI functionality. The hard disk will not work properly if you enter improper information for Serial-ATA 0 controller is Compatible. BIOS Setup You will automatically detect HDD type. Compatible: SATA and PATA drives are auto-detected and placed inNative mode. System will be access the RAID...
Manual
Page 42
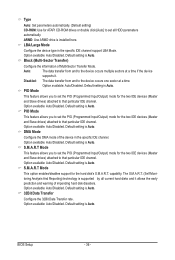
... automatically. (Default setting) CD-ROM: Use for the two IDE devices (Master and Slave drives) attached to that particular IDE channel. Option available: Auto/Disabled. BIOS Setup - 36 - PIO Mode This feature allows you to that particular IDE channel. S.M.A.R.T Mode This feature allows you to set the PIO (Programmed Input/Output...
... automatically. (Default setting) CD-ROM: Use for the two IDE devices (Master and Slave drives) attached to that particular IDE channel. Option available: Auto/Disabled. BIOS Setup - 36 - PIO Mode This feature allows you to that particular IDE channel. S.M.A.R.T Mode This feature allows you to set the PIO (Programmed Input/Output...
Manual
Page 44
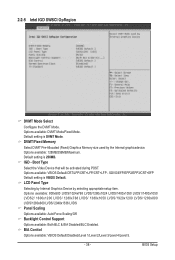
... LVDS/1280x600 LVDS/ 2048x1536 LVDS Panel Scaling Options available: Auto/Force Scaling/Off. Boot Type Select the Video Device that will be activated during POST. BIOS Setup SDVO/EFP/EFP2/EFP3/CRT+EFP Default setting is DVMT Mode. LCD Panel Type Selecting by Internal Graphics Device by the Internal graphicsdevice. Backlight...
... LVDS/1280x600 LVDS/ 2048x1536 LVDS Panel Scaling Options available: Auto/Force Scaling/Off. Boot Type Select the Video Device that will be activated during POST. BIOS Setup SDVO/EFP/EFP2/EFP3/CRT+EFP Default setting is DVMT Mode. LCD Panel Type Selecting by Internal Graphics Device by the Internal graphicsdevice. Backlight...

Manual
Page 45
Options available: VBIOS Default/NTSC-M/NTSC-J/NTSC-443/PAL-B/PAL-G/PAL-D/PAL-H/PAL-I/PAL-K/PAL-M/PAL-N/ PAL-Nc/SECAM-L/SECAM-B/SECAM-D/SECAM-G/SECAM-H/SECAM-K/1080i59/1080i60/ 33K 576i @50Hz/31K 576p @50Hz/ 1080i50/1080p50/720p59/720p60/480p60/480p59/480i60/480i59/1 080p60/1080p59/1080i60/1080i59 - 39 - BIOS Setup TV Standard elect the TV standard used by the Internal graphics device. Options available: Enabled/Disabled. Spread Spectrum Clock Enable/Disabled Spread Spectrum Clock. Deafult setting is Disabled.
Options available: VBIOS Default/NTSC-M/NTSC-J/NTSC-443/PAL-B/PAL-G/PAL-D/PAL-H/PAL-I/PAL-K/PAL-M/PAL-N/ PAL-Nc/SECAM-L/SECAM-B/SECAM-D/SECAM-G/SECAM-H/SECAM-K/1080i59/1080i60/ 33K 576i @50Hz/31K 576p @50Hz/ 1080i50/1080p50/720p59/720p60/480p60/480p59/480i60/480i59/1 080p60/1080p59/1080i60/1080i59 - 39 - BIOS Setup TV Standard elect the TV standard used by the Internal graphics device. Options available: Enabled/Disabled. Spread Spectrum Clock Enable/Disabled Spread Spectrum Clock. Deafult setting is Disabled.
Manual
Page 46
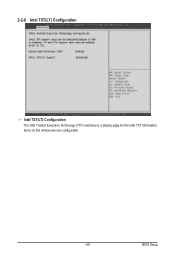
2-2-6 Intel TXT(LT) Configuration Intel TXT(LT) Configuration The Intel Trusted Execution Technology (TXT) submenu is a display page for the Intel TXT information. Items on this window are non-configurable. - 40 - BIOS Setup
2-2-6 Intel TXT(LT) Configuration Intel TXT(LT) Configuration The Intel Trusted Execution Technology (TXT) submenu is a display page for the Intel TXT information. Items on this window are non-configurable. - 40 - BIOS Setup


