Gigabyte MN525MI Support and Manuals
Get Help and Manuals for this Gigabyte item
View All Support Options Below
Free Gigabyte MN525MI manuals!
Problems with Gigabyte MN525MI?
Ask a Question
Free Gigabyte MN525MI manuals!
Problems with Gigabyte MN525MI?
Ask a Question
Popular Gigabyte MN525MI Manual Pages
Manual - Page 1

MN525RI MN525MI
Intel® D525 Processor Motherboards
User's Manual
Rev. 1001
Manual - Page 2

... specifications and features in this manual may be reproduced, copied, translated, transmitted, or published in this product, GIGABYTE provides the following types of documentations:
For quick set-up of this manual are legally registered to their respective owners.
For product-related information, check on our website at: http://www.gigabyte.com No part of GIGABYTE. Changes...
Manual - Page 3

Table of Contents
MN525RI Motherboard Layout 4 Chapter 1 Hardware Installation 6
1-1 Installation Precautions 6 1-2 Product Specifications 7 1-3 Installing the Memory 9
1-3-1 Dual Channel Memory Configuration 9 1-3-2 Installing a Memory 10 1-4 Back Panel Connectors 11 1-5 Internal Connectors 12
- 3 -
Manual - Page 4

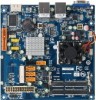
MN525RI Motherboard Layout
- 4 -
Manual - Page 6

... hardware components are connected tightly and securely.
• When handling the motherboard, avoid touching any installation steps or have a problem related to the use of the product, please consult a certified computer... the motherboard, make sure the power supply has been turned off. • Before turning on the motherboard, make sure the power supply voltage has been set according to...
Manual - Page 7

...Specifications
CPU
ŠŠ Supports single Intel® D525 processor
ŠŠ Supports 1.8GHz
Chipset
ŠŠ Intel® ICH9R
Memory
ŠŠ 2 x SO-DIMM slot support DDR3 800/1066/1333
ŠŠ Support up 8GB
LAN
ŠŠ 1 x Intel® 82574L supports 10/100/1000 Mbps
ŠŠ 1 x Intel® 82567LM supports... chip
Hardware Monitor
BIOS
ŠŠ ...
Manual - Page 8
Form Factor ŠŠ Mini ITX Form Factor; 6.75 inch x 6.75 inch
* GIGABYTE reserves the right to make any changes to the product specifications and product-related information without prior notice.
- 8 - Hardware Installation
Manual - Page 9

... insert the memory, switch the direction.
1-3-1 Dual Channel Memory Configuration
This motherboard provides four DDR3 memory sockets and supports Dual Channel Technology. It is installed, the BIOS will double the original memory bandwidth. A memory module can be used. (Go to GIGABYTE's website for the latest supported memory speeds and memory modules.) • Always turn off the computer...
Manual - Page 10

... turn off the computer and unplug the power cord from the power outlet to prevent damage to remove the DIMM module.
1
2
Hardware Installation
- 10 - Step 3. Installation Step: Step 1.
Be sure to install DDR3 DIMMs on this motherboard. Align the memory with the DIMM module and insert the DIMM memory module into the DIM slot.
Manual - Page 11

...Hardware Installation
RJ-45 LAN Port The Gigabit Ethernet LAN port provides Internet connection at up to video loop thru function. USB 2.0/1.1 Port The USB port supports the USB 2.0/1.1 specification.
... USB flash drive and etc. eSTA Port This connector supports SATA 3Gb/s specification. Do not rock it straight out from the motherboard.
• When removing the cable, pull it side...
Manual - Page 13

...2x12-pin ATX) GND (Only for 2x12-pin ATX)
Hardware Installation
- 13 - If the 12V power connector is turned off and all the components on the motherboard. Connect the power supply cable to the CPU. If a power... can supply enough stable power to all devices are properly installed.
Before connecting the power connector, first make sure the power supply is not connected, the computer ...
Manual - Page 14

The motherboard supports CPU fan speed control, which requires the use of a CPU fan with fan speed control ... Switch (-) LAN1 Act LED Signal (+) LAN 2Act LED Signal (+) LAN1 Act LED Signal (-) LAN2 Act LED Signal (-)
Hardware Installation 2/3) FAN1/FAN2 (CPU Fan/System Fan Headers)
The motherboard has a 4-pin CPU fan header (FAN1), a 4-pin (FAN2) system fan headers. Do not place a jumper cap on...
Manual - Page 15

.../s Connectors) The SF_APTAANEcLonnectors conform to USB 2.0/1.1 specification. C
7/8) F_USB1/F_USB2 (USB Headers)
The...8226;ANEAL RAID 5 configuration requires at least two hard drives. MODEM
Hardware Installation
DPVRM
Definition
F_AUDIO
1 GND 2 TXP
3 TXN
4 GND
5 RXN
F... USB header can
support the ON/OFF Charge function.
- 15 - Each SATA connector supports a single SATA device...
Manual - Page 17

... if the battery is replaced with an incorrect model. • Contact the place of purchase or local dealer if you are not able to keep the values (such as BIOS configurations, date, and ...off . tery model. • When installing the battery, note the orientation of the positive side (+) and the negative side (-) of the battery holder, making them short for 5 seconds.) 3. Replace the battery when...
Manual - Page 18

... motherboard.
• After system restart, go to BIOS Setup to load factory defaults (select Load Optimized Defaults) or manually configure the BIOS settings (refer to Chapter 2, "BIOS Setup," for a few seconds.
1
1-2 Close: Normal operation (Default setting)...to remove the jumper cap from the jumper. Hardware Installation
- 18 -
To clear the CMOS values, place a jumper cap on your...
Gigabyte MN525MI Reviews
We have not received any reviews for Gigabyte yet.