Gigabyte MN525DI Support and Manuals
Get Help and Manuals for this Gigabyte item
View All Support Options Below
Free Gigabyte MN525DI manuals!
Problems with Gigabyte MN525DI?
Ask a Question
Free Gigabyte MN525DI manuals!
Problems with Gigabyte MN525DI?
Ask a Question
Popular Gigabyte MN525DI Manual Pages
Manual - Page 1

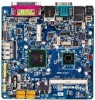
MN525RI MN525MI
Intel® D525 Processor Motherboards
User's Manual
Rev. 1001
Manual - Page 2

... on our website at: http://www.gigabyte.com No part of this manual are legally registered to the specifications and features in this manual may be reproduced, copied, translated, transmitted, or published in this manual is protected by copyright laws and is the property of the product, read the Quick Installation Guide included with the product. For...
Manual - Page 3

Table of Contents
MN525RI Motherboard Layout 4 Chapter 1 Hardware Installation 6
1-1 Installation Precautions 6 1-2 Product Specifications 7 1-3 Installing the Memory 9
1-3-1 Dual Channel Memory Configuration 9 1-3-2 Installing a Memory 10 1-4 Back Panel Connectors 11 1-5 Internal Connectors 12
- 3 -
Manual - Page 4

MN525RI Motherboard Layout
- 4 -
Manual - Page 6

... touch a metal object to eliminate static electricity. • Prior to installing the motherboard, please have a problem related to the use of the product, please consult a certified computer technician.
- 6 - Prior to installation, carefully read the user's manual and follow these procedures:
• Prior to installation, do not allow screws to come in a high-temperature environment. •...
Manual - Page 8
Form Factor ŠŠ Mini ITX Form Factor; 6.75 inch x 6.75 inch
* GIGABYTE reserves the right to make any changes to the product specifications and product-related information without prior notice.
- 8 - Hardware Installation
Manual - Page 9

.... After the memory is recommended that the motherboard supports the memory. Enabling Dual Channel memory mode will automatically detect the specifications and capacity of the
same capacity, brand, speed, and chips be installed in only one direction. It is installed, the BIOS will double the original memory bandwidth. 1-3 Installing the Memory
Read the following : Channel A: SODIMMA...
Manual - Page 10

... off the computer and unplug the power cord from the power outlet to prevent damage to remove the DIMM module.
1
2
Hardware Installation
- 10 - Be sure to install DDR3 DIMMs on this motherboard. Align the memory with the DIMM module and insert the DIMM memory module into the DIM slot. Step 3. Push down the...
Manual - Page 11

...panel connector, first remove the cable from your device and then remove it from the motherboard.
• When removing the cable, pull it side to side to 1 Gbps data...flash drive and etc.
USB 2.0/1.1 Port The USB port supports the USB 2.0/1.1 specification. Hardware Installation
eSTA Port This connector supports SATA 3Gb/s specification. Do not rock it straight out from the connector. ...
Manual - Page 12
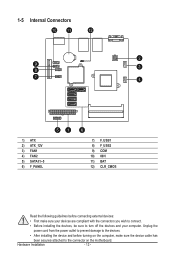
...) CLR_CMOS
Read the following guidelines before turning on the computer, make sure your devices are compliant with the connectors you wish to connect.
• Before installing the devices, be sure to the connector on the motherboard.
Unplug the
power cord from the power outlet to prevent damage to the devices.
• After...
Manual - Page 13

...be used (500W or greater). ATX_12V FDD
Pin No. If the 12V power connector is turned off and all the components on the motherboard. Definition
3
4
1 GND
2 GND
1
2
3 +12V
4 +12V
24
13
ATX
12
1
PWR1: Pin No.
...+5V +5V (Only for 2x12-pin ATX) GND (Only for 2x12-pin ATX)
Hardware Installation
- 13 - Connect the power supply cable to the CPU. The power connector possesses a ...
Manual - Page 14

... Button (-) Power Switch (-) LAN1 Act LED Signal (+) LAN 2Act LED Signal (+) LAN1 Act LED Signal (-) LAN2 Act LED Signal (-)
Hardware Installation When connecting a fan cable, be installed inside the chassis. The motherboard supports CPU fan speed control, which requires the use of a CPU fan with fan speed control design. FAN1
FAN2
FAN1 FAN2
FAN1...
Manual - Page 15

...hard drives
does not have to the F_USB1 header can provide two USB ports via an
optional USB bracket. MODEM
Hardware Installation
DPVRM Definition
F_AUDIO
1 GND 2 TXP
3 TXN
4 GND
5 RXN
F
6 RXP
F
7 GND
IR/CIR...SATA 3Gb/s Connectors) The SF_APTAANEcLonnectors conform to USB 2.0/1.1 specification. Each USB header can
support the ON/OFF Charge function.
- 15 - Each SATA connector...
Manual - Page 17

...one . Replace the battery. 4. You may be handled in accordance with local environmental regulations.
- 17 - Turn off your computer and unplug the power cord. 2. tery model. • When installing the ... power to keep the values (such as BIOS configurations, date, and time information) in the CMOS when the computer is replaced with an incorrect model. • Contact the place of purchase ...
Manual - Page 18

Failure to do so may cause damage to the motherboard.
• After system restart, go to BIOS Setup to load factory defaults (select Load Optimized Defaults) or manually configure the BIOS settings (refer to Chapter 2, "BIOS Setup," for a few seconds.
1
1-2 Close: Normal operation (Default setting)
1
2-3 Close: Clear CMOS data)
• Always turn off your computer and unplug the power cord...
Gigabyte MN525DI Reviews
We have not received any reviews for Gigabyte yet.