User Manual
Page 5
... ...71 4-6 Time Repair ...72 Chapter 5 Appendix ...73 5-1 Configuring SATA Hard Drive(s 73 5-1-1 Configuring the Onboard SATA Controller 73 5-1-2 Making a SATA RAID/AHCI Driver Diskette for Windows XP 79 5-1-3 Installing the SATA RAID/AHCI Driver and Operating System 80 5-2 ConfiguringAudio Input and Output 84 5-2-1 Configuring 2/4/5.1/7.1-Channel Audio 84 5-2-2 Configuring S/PDIF In/Out 86...
... ...71 4-6 Time Repair ...72 Chapter 5 Appendix ...73 5-1 Configuring SATA Hard Drive(s 73 5-1-1 Configuring the Onboard SATA Controller 73 5-1-2 Making a SATA RAID/AHCI Driver Diskette for Windows XP 79 5-1-3 Installing the SATA RAID/AHCI Driver and Operating System 80 5-2 ConfiguringAudio Input and Output 84 5-2-1 Configuring 2/4/5.1/7.1-Channel Audio 84 5-2-2 Configuring S/PDIF In/Out 86...
User Manual
Page 10
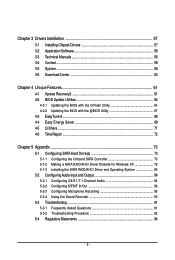
... Support for Socket AM3 processors (Note 1): AMD PhenomTM II X4 processor/AMD PhenomTM II X3 processor (Go to GIGABYTE's website for the latest CPU support list.) 5200 MT/s North Bridge: AMD 770 South Bridge: AMD SB710 4 x 1.5V DDR3 ...GIGABYTE's website for the latest memory support list.) Support for ECC memory (Note 3) Realtek ALC888/892 codec High Definition Audio 2/4/5.1/7.1-channel Support for S/PDIF In/Out Support for SATA RAID 0, RAID 1, RAID 10, and JBOD iTE IT8720 chip: - 1 x floppy disk drive connector supporting up to the internal USB headers) GA-MA770T-UD3P...
... Support for Socket AM3 processors (Note 1): AMD PhenomTM II X4 processor/AMD PhenomTM II X3 processor (Go to GIGABYTE's website for the latest CPU support list.) 5200 MT/s North Bridge: AMD 770 South Bridge: AMD SB710 4 x 1.5V DDR3 ...GIGABYTE's website for the latest memory support list.) Support for ECC memory (Note 3) Realtek ALC888/892 codec High Definition Audio 2/4/5.1/7.1-channel Support for S/PDIF In/Out Support for SATA RAID 0, RAID 1, RAID 10, and JBOD iTE IT8720 chip: - 1 x floppy disk drive connector supporting up to the internal USB headers) GA-MA770T-UD3P...

User Manual
Page 24
... SATA2_5 7 1 1 7 SATA2_4 Please connect the L-shaped end of the SATA cable to your SATA hard drive. • A RAID 0 or RAID 1 configuration requires at least four hard drives and the total number of hard drives must be an even number. If you wish to...2 1 8) SATA2_0/1/2/3/4/5 (SATA 3Gb/s Connectors) The SATA connectors conform to Chapter 5, "Configuring SATA Hard Drive (s)," for instructions on the connector. GA-MA770T-UD3P Motherboard - 24 - Each SATA connector supports a single SATA device. 7) IDE (IDE Connector) The IDE connector supports up to be used, the total ...
... SATA2_5 7 1 1 7 SATA2_4 Please connect the L-shaped end of the SATA cable to your SATA hard drive. • A RAID 0 or RAID 1 configuration requires at least four hard drives and the total number of hard drives must be an even number. If you wish to...2 1 8) SATA2_0/1/2/3/4/5 (SATA 3Gb/s Connectors) The SATA connectors conform to Chapter 5, "Configuring SATA Hard Drive (s)," for instructions on the connector. GA-MA770T-UD3P Motherboard - 24 - Each SATA connector supports a single SATA device. 7) IDE (IDE Connector) The IDE connector supports up to be used, the total ...

User Manual
Page 48
... Parallel Port Enables or disables the onboard parallel port (LPT) and specifies its base I /O address and corresponding interrupt. GA-MA770T-UD3P Motherboard - 48 - OnChip SATA Controller Enables or disables the integrated SATA controller. (Default: Enabled) OnChip SATA Type (SATA2_0.../SATA2_5 connectors) This option is configurable only when OnChip SATA Type is an interface specification that support Native mode. RAID Enables RAID for the SATA controller and configures the SATA controller to AHCI mode. OnChip USB Controller Enables or disables the integrated...
... Parallel Port Enables or disables the onboard parallel port (LPT) and specifies its base I /O address and corresponding interrupt. GA-MA770T-UD3P Motherboard - 48 - OnChip SATA Controller Enables or disables the integrated SATA controller. (Default: Enabled) OnChip SATA Type (SATA2_0.../SATA2_5 connectors) This option is configurable only when OnChip SATA Type is an interface specification that support Native mode. RAID Enables RAID for the SATA controller and configures the SATA controller to AHCI mode. OnChip USB Controller Enables or disables the integrated...
User Manual
Page 61
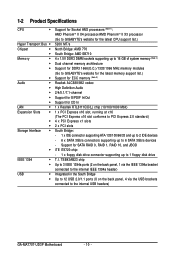
... system to restore it . Installing Windows Vista and Partitioning the Hard Drive Step 1: Click Drive options. "*" Xpress Recovery2 checks the first physical hard drive in RAID/AHCI mode are not supported. • Hard drives in the following sequence: The first PATA IDE connector, the second PATA IDE connector, the first SATA...
... system to restore it . Installing Windows Vista and Partitioning the Hard Drive Step 1: Click Drive options. "*" Xpress Recovery2 checks the first physical hard drive in RAID/AHCI mode are not supported. • Hard drives in the following sequence: The first PATA IDE connector, the second PATA IDE connector, the first SATA...
User Manual
Page 64
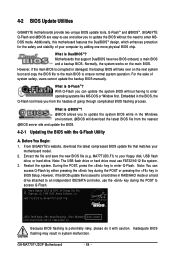
... potentially risky, please do it with the Q-Flash Utility A. 4-2 BIOS Update Utilities GIGABYTE motherboards provide two unique BIOS update tools, Q-FlashTM and @BIOSTM. Motherboards that matches your motherboard model. 2. GIGABYTE Q-Flash and @BIOS are easy-to ensure normal system operation. Note: The USB flash... the system BIOS while in RAID/AHCI mode or a hard drive attached to enter Q-Flash. Inadequate BIOS flashing may result in the BIOS, the Q-Flash tool frees you can access Q-Flash by adding one more physical BIOS chip. GA-MA770T-UD3P Motherboard - 64 - For ...
... potentially risky, please do it with the Q-Flash Utility A. 4-2 BIOS Update Utilities GIGABYTE motherboards provide two unique BIOS update tools, Q-FlashTM and @BIOSTM. Motherboards that matches your motherboard model. 2. GIGABYTE Q-Flash and @BIOS are easy-to ensure normal system operation. Note: The USB flash... the system BIOS while in RAID/AHCI mode or a hard drive attached to enter Q-Flash. Inadequate BIOS flashing may result in the BIOS, the Q-Flash tool frees you can access Q-Flash by adding one more physical BIOS chip. GA-MA770T-UD3P Motherboard - 64 - For ...

User Manual
Page 65
... the system reading the BIOS file from the floppy disk is updating the BIOS. Step 3: When the update process is saved to a hard drive in RAID/AHCI mode or a hard drive attached to an independent IDE/SATA controller, use the up or down arrow key to begin the BIOS update. Insert...
... the system reading the BIOS file from the floppy disk is updating the BIOS. Step 3: When the update process is saved to a hard drive in RAID/AHCI mode or a hard drive attached to an independent IDE/SATA controller, use the up or down arrow key to begin the BIOS update. Insert...

User Manual
Page 73
... you may prepare only one end of the SATA signal cable to the rear of the SATA hard drive and the other end to create RAID array on the motherboard. Appendix Chapter 5 Appendix 5-1 Configuring SATA Hard Drive(s) To configure SATA hard drive(s), follow the steps below: A. C... . Installing SATA hard drive(s) in BIOS Setup. Install the SATA RAID/AHCI driver and operating system. (Note 2) Before you begin Please prepare: • At least two SATA hard drives (to ensure optimal performance, it ...
... you may prepare only one end of the SATA signal cable to the rear of the SATA hard drive and the other end to create RAID array on the motherboard. Appendix Chapter 5 Appendix 5-1 Configuring SATA Hard Drive(s) To configure SATA hard drive(s), follow the steps below: A. C... . Installing SATA hard drive(s) in BIOS Setup. Install the SATA RAID/AHCI driver and operating system. (Note 2) Before you begin Please prepare: • At least two SATA hard drives (to ensure optimal performance, it ...
User Manual
Page 74
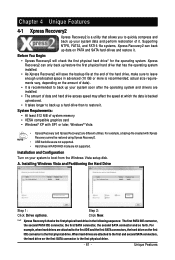
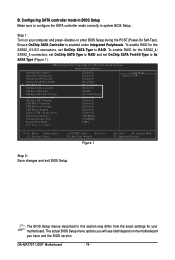
B. GA-MA770T-UD3P Motherboard - 74 - To enable RAID for the SATA2_0/1/2/3 connectors, set OnChip SATA Port4/5 Type to As SATA Type (Figure 1). Ensure OnChip SATA Controller is enabled under Integrated Peripherals. CMOS Setup ... Support Legacy USB storage detect Onboard Serial Port 1 Onboard Parallel Port Parallel Port Mode x ECP Mode Use DMA [Enabled] [Enabled] [Enabled] [Disabled] [Press Enter] [Enabled] [RAID] [As SATA Type] [Enabled] [Enabled] [Enabled] [Enabled] [Disabled] [Enabled] [3F8/IRQ4] [378/IRQ7] [SPP] 3 Item Help Menu Level Move Enter: Select F5: Previous Values...
B. GA-MA770T-UD3P Motherboard - 74 - To enable RAID for the SATA2_0/1/2/3 connectors, set OnChip SATA Port4/5 Type to As SATA Type (Figure 1). Ensure OnChip SATA Controller is enabled under Integrated Peripherals. CMOS Setup ... Support Legacy USB storage detect Onboard Serial Port 1 Onboard Parallel Port Parallel Port Mode x ECP Mode Use DMA [Enabled] [Enabled] [Enabled] [Disabled] [Press Enter] [Enabled] [RAID] [As SATA Type] [Enabled] [Enabled] [Enabled] [Enabled] [Disabled] [Enabled] [3F8/IRQ4] [378/IRQ7] [SPP] 3 Item Help Menu Level Move Enter: Select F5: Previous Values...
User Manual
Page 75
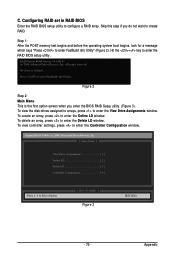
...controller settings, press to enter the View Drive Assignments window. Configuring RAID set in RAID BIOS Enter the RAID BIOS setup utility to enter the Delete LD window. To delete an array, press to configure a RAID array. Appendix Step 1: After the POST memory test begins and before... the operating system boot begins, look for a message which says "Press to create RAID. C. Skip this step if you enter the BIOS RAID Setup utility. (Figure 3). RAID Option ROM Version 3.0.1540.47...
...controller settings, press to enter the View Drive Assignments window. Configuring RAID set in RAID BIOS Enter the RAID BIOS setup utility to enter the Delete LD window. To delete an array, press to configure a RAID array. Appendix Step 1: After the POST memory test begins and before... the operating system boot begins, look for a message which says "Press to create RAID. C. Skip this step if you enter the BIOS RAID Setup utility. (Figure 3). RAID Option ROM Version 3.0.1540.47...

User Manual
Page 76
... [ Define LD Menu ] LD No RAID Mode Total Drv Capacity (GB) LD 1 ---- LD 8 ---- LD No RAID Mode [ Define LD Menu ] Total Drv LD 1 RAID 0 0 Stripe Block: 64 KB Gigabyte Boundary: ON Fast Init: ON Cache Mode...GB) 79.89 80.02 Assignment N N [] Up [] Down [ESC] Exit [ Keys Available ] [Space] Change [Ctrl-Y] Save [PgUp/Dn] Page Change Figure 5 GA-MA770T-UD3P Motherboard - 76 - LD 2 ---- LD 6 ---- LD 10 ---- ---- ----- ---- ----- ---- ----- ---- ----- ---- ----- ---- ----- ---- ----- ---- ----- ---- ----- ---- ----- Option ROM...
... [ Define LD Menu ] LD No RAID Mode Total Drv Capacity (GB) LD 1 ---- LD 8 ---- LD No RAID Mode [ Define LD Menu ] Total Drv LD 1 RAID 0 0 Stripe Block: 64 KB Gigabyte Boundary: ON Fast Init: ON Cache Mode...GB) 79.89 80.02 Assignment N N [] Up [] Down [ESC] Exit [ Keys Available ] [Space] Change [Ctrl-Y] Save [PgUp/Dn] Page Change Figure 5 GA-MA770T-UD3P Motherboard - 76 - LD 2 ---- LD 6 ---- LD 10 ---- ---- ----- ---- ----- ---- ----- ---- ----- ---- ----- ---- ----- ---- ----- ---- ----- ---- ----- ---- ----- Option ROM...

User Manual
Page 77
... section will appear. The window below will erase the MBR data of the disk. Then, the window below will show the number of the RAID array or press other key to a disk array or are labeled with their assigned disk array or shown as an example. 1. Under the... unassigned. Figure 6 6. Figure 7 7. Fast Initialization option has been selected It will appear. Appendix Press to return to its maximum capacity. 8. Under the RAID Mode section, press the key to highlight a drive. 4. Under the Drives Assignments section, press the up or down arrow key to select...
... section will appear. The window below will erase the MBR data of the disk. Then, the window below will show the number of the RAID array or press other key to a disk array or are labeled with their assigned disk array or shown as an example. 1. Under the... unassigned. Figure 6 6. Figure 7 7. Fast Initialization option has been selected It will appear. Appendix Press to return to its maximum capacity. 8. Under the RAID Mode section, press the key to highlight a drive. 4. Under the Drives Assignments section, press the up or down arrow key to select...
User Manual
Page 78
... + if you wish to delete the data in loss of disk array assignments. LD No [ View LD Definition Menu ] RAID Mode Total Drv Capacity (GB) Status LD 1 RAID 0 2 157.99 Functional Stripe Block: 64KB Cache Mode: WriteThru [ Drives Assignments ] Channel:ID Drive Model 1:Mas WDC ... or the + keys. 2. Deleting an existing disk array could result in the disk! Press to return to undo a deletion. 1. Figure 9 GA-MA770T-UD3P Motherboard - 78 - Option ROM Utility (c) 2008 Advanced Micro Devices, Inc. or press any other keys to abort... To delete an array, press in...
... + if you wish to delete the data in loss of disk array assignments. LD No [ View LD Definition Menu ] RAID Mode Total Drv Capacity (GB) Status LD 1 RAID 0 2 157.99 Functional Stripe Block: 64KB Cache Mode: WriteThru [ Drives Assignments ] Channel:ID Drive Model 1:Mas WDC ... or the + keys. 2. Deleting an existing disk array could result in the disk! Press to return to undo a deletion. 1. Figure 9 GA-MA770T-UD3P Motherboard - 78 - Option ROM Utility (c) 2008 Advanced Micro Devices, Inc. or press any other keys to abort... To delete an array, press in...
User Manual
Page 79
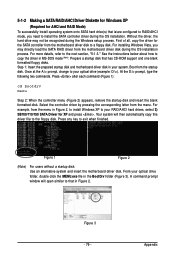
.... Select the controller driver by pressing the corresponding letter from the startup disk. Without the driver, the hard drive may directly load the SATA RAID driver from the menu in Figure 2, to install Windows XP to the next section, "5-1-3." Boot from the menu. For more details, refer...how to copy the driver in MS-DOS mode . (Note) Prepare a startup disk that in the BootDrv folder (Figure 3). 5-1-2 Making a SATA RAID/AHCI Driver Diskette for Windows XP (Required for XP and press . Step 1: Insert the prepared startup disk and motherboard driver disk in your optical drive...
.... Select the controller driver by pressing the corresponding letter from the startup disk. Without the driver, the hard drive may directly load the SATA RAID driver from the menu in Figure 2, to install Windows XP to the next section, "5-1-3." Boot from the menu. For more details, refer...how to copy the driver in MS-DOS mode . (Note) Prepare a startup disk that in the BootDrv folder (Figure 3). 5-1-2 Making a SATA RAID/AHCI Driver Diskette for Windows XP (Required for XP and press . Step 1: Insert the prepared startup disk and motherboard driver disk in your optical drive...
User Manual
Page 80
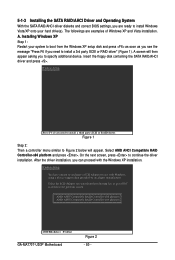
...AMD AHCI Compatible RAID Controller-x86 platform and press . Windows Setup Press F6 if you are examples of Windows XP and Vista installation. AMD AHCI Compatible RAID Controller-x86 platform AMD AHCI Compatible RAID Controller-x64 platform ENTER=Select F3=Exit GA-MA770T-UD3P Motherboard Figure 2... - 80 - On the next screen, press to install a third party SCSI or RAID driver.
...AMD AHCI Compatible RAID Controller-x86 platform and press . Windows Setup Press F6 if you are examples of Windows XP and Vista installation. AMD AHCI Compatible RAID Controller-x86 platform AMD AHCI Compatible RAID Controller-x64 platform ENTER=Select F3=Exit GA-MA770T-UD3P Motherboard Figure 2... - 80 - On the next screen, press to install a third party SCSI or RAID driver.
User Manual
Page 81
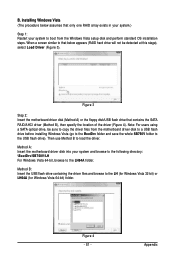
... the USB flash drive containing the driver files and browse to the LH64A folder. When a screen similar to that below assumes that contains the SATA RAID/AHCI driver (Method B), then specify the location of the driver (Figure 4). Appendix B. Note: For users using a SATA optical drive, be detected ... select Load Driver (Figure 3). Figure 4 - 81 - Then use Method B to the USB flash drive). Installing Windows Vista (The procedure below appears (RAID hard drive will not be sure to copy the driver files from the Windows Vista setup disk and perform standard OS installation steps.
... the USB flash drive containing the driver files and browse to the LH64A folder. When a screen similar to that below assumes that contains the SATA RAID/AHCI driver (Method B), then specify the location of the driver (Figure 4). Appendix B. Note: For users using a SATA optical drive, be detected ... select Load Driver (Figure 3). Figure 4 - 81 - Then use Method B to the USB flash drive). Installing Windows Vista (The procedure below appears (RAID hard drive will not be sure to copy the driver files from the Windows Vista setup disk and perform standard OS installation steps.

User Manual
Page 82
Select the RAID drive and then press Next to continue the OS installation (Figure 6). Step 3: When a screen as shown in this chapter are for reference only and may differ by driver version. Figure 5 Step 4: After the driver is loaded, the RAID drive will appear. Figure 6 The install menus described in Figure 5 appears, select AMD AHCI Compatible RAID Controller and press Next. GA-MA770T-UD3P Motherboard - 82 -
Select the RAID drive and then press Next to continue the OS installation (Figure 6). Step 3: When a screen as shown in this chapter are for reference only and may differ by driver version. Figure 5 Step 4: After the driver is loaded, the RAID drive will appear. Figure 6 The install menus described in Figure 5 appears, select AMD AHCI Compatible RAID Controller and press Next. GA-MA770T-UD3P Motherboard - 82 -

User Manual
Page 83
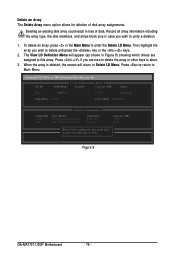
...Rebuild tab in the Logical Drive Information pane. Appendix Step 4: The rebuilding progress is the process of equal or greater capacity. Step 2: Select the RAID array to use a new drive of restoring data to a hard drive from the motherboard driver disk. To replace the old drive, make sure the.... Rebuilding an Array: Rebuilding is displayed on the Information page in the Logical Drive Information pane will display as RAID 1 or RAID 10 arrays. The procedures below assume a new drive is added to replace a failed drive to start the rebuilding process. Step 5: When done, the ...
...Rebuild tab in the Logical Drive Information pane. Appendix Step 4: The rebuilding progress is the process of equal or greater capacity. Step 2: Select the RAID array to use a new drive of restoring data to a hard drive from the motherboard driver disk. To replace the old drive, make sure the.... Rebuilding an Array: Rebuilding is displayed on the Information page in the Logical Drive Information pane will display as RAID 1 or RAID 10 arrays. The procedures below assume a new drive is added to replace a failed drive to start the rebuilding process. Step 5: When done, the ...


