

Manual
Page 1
... of the specifications might be authorized by U.S. Use of their respective owners. patents and other limited viewing uses only unless otherwise authorized by GIGA-BYTE TECHNOLOGY CO., LTD. ("GBT"). NVIDIA® Graphics Accelerator User's Manual Rev. 106 Copyright © 2012 GIGABYTE TECHNOLOGY CO., LTD Copyright by Rovi Corporation. Trademarks Third-party brands and names are the properties of this card. Doing so may appear in any errors or...
... of the specifications might be authorized by U.S. Use of their respective owners. patents and other limited viewing uses only unless otherwise authorized by GIGA-BYTE TECHNOLOGY CO., LTD. ("GBT"). NVIDIA® Graphics Accelerator User's Manual Rev. 106 Copyright © 2012 GIGABYTE TECHNOLOGY CO., LTD Copyright by Rovi Corporation. Trademarks Third-party brands and names are the properties of this card. Doing so may appear in any errors or...
Manual
Page 2
GIGABYTE XTREME ENGINE 10 4. Troubleshooting Tips 13 5. Regulatory Statements 14 Table of Contents 1. Introduction 1 1.1. Hardware Installation 3 2.1. Driver and XTREME ENGINE Installation 5 3.1.2. Minimum System Requirements 1 2. Appendix 14 5.1. Software Installation 5 3.1. Driver and Utility Installation 5 3.1.1. SLI Technology 4 3.
GIGABYTE XTREME ENGINE 10 4. Troubleshooting Tips 13 5. Regulatory Statements 14 Table of Contents 1. Introduction 1 1.1. Hardware Installation 3 2.1. Driver and XTREME ENGINE Installation 5 3.1.2. Minimum System Requirements 1 2. Appendix 14 5.1. Software Installation 5 3.1. Driver and Utility Installation 5 3.1.1. SLI Technology 4 3.

Manual
Page 3
Motherboard with one or above PCI-Express x 16 slot - 2GB system memory (4GB recommended) - 1. Windows® 10 - Introduction 1.1. Optical drive for software installation (CD-ROM or DVD-ROM drive) • Operating System - Windows® 8 - Windows® 7 1 Minimum System Requirements • Hardware -
Motherboard with one or above PCI-Express x 16 slot - 2GB system memory (4GB recommended) - 1. Windows® 10 - Introduction 1.1. Optical drive for software installation (CD-ROM or DVD-ROM drive) • Operating System - Windows® 8 - Windows® 7 1 Minimum System Requirements • Hardware -
Manual
Page 4
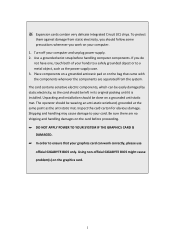
...GIGABYTE BIOS might cause problem(s) on your card. Use a grounded wrist strap before proceeding. ☛ DO NOT APPLY POWER TO YOUR SYSTEM IF THE GRAPHICS CARD IS DAMAGED. ☛ In order to ensure that came with the components whenever the components are no shipping and handling damages on the bag that your computer and unplug power supply.... 2. Place components on a grounded antistatic pad or on the card before handling computer components. Be sure there are separated from static electricity, you work correctly, please use official GIGABYTE BIOS only....
...GIGABYTE BIOS might cause problem(s) on your card. Use a grounded wrist strap before proceeding. ☛ DO NOT APPLY POWER TO YOUR SYSTEM IF THE GRAPHICS CARD IS DAMAGED. ☛ In order to ensure that came with the components whenever the components are no shipping and handling damages on the bag that your computer and unplug power supply.... 2. Place components on a grounded antistatic pad or on the card before handling computer components. Be sure there are separated from static electricity, you work correctly, please use official GIGABYTE BIOS only....

Manual
Page 5
... your graphics card with the PCI Express x16 slot, and press it 's operating to them, or the system will not boot. Step 1. then align your card, remember to connect the power cable to prevent system instability. DVI-I (Dual Link) DVI-D (Dual Link) HDMI Mini HDMI Monitor Monitor D-sub Monitor 3 DisplayPort Monitor Mini DisplayPort Monitor If necessary, remove the cover from this slot; Step 3. Step 2. Connect the appropriate cable to install your computer. Replace...
... your graphics card with the PCI Express x16 slot, and press it 's operating to them, or the system will not boot. Step 1. then align your card, remember to connect the power cable to prevent system instability. DVI-I (Dual Link) DVI-D (Dual Link) HDMI Mini HDMI Monitor Monitor D-sub Monitor 3 DisplayPort Monitor Mini DisplayPort Monitor If necessary, remove the cover from this slot; Step 3. Step 2. Connect the appropriate cable to install your computer. Replace...
Manual
Page 6
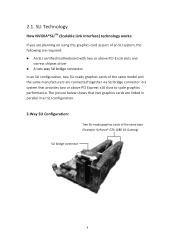
... graphics cards are linked in parallel in an SLI configuration. 2-Way SLI Configuration: Two SLI-ready graphics cards of the same model and the same manufacturers are required: An SLI certified motherboard with two or above PCI Express x16 slots to scale graphics performance. 2.1. SLI Technology How NVIDIA®SLITM (Scalable Link Interface) technology works: If you are planning on using this graphics card as part of an SLI system, the following are connected together via SLI bridge connector...
... graphics cards are linked in parallel in an SLI configuration. 2-Way SLI Configuration: Two SLI-ready graphics cards of the same model and the same manufacturers are required: An SLI certified motherboard with two or above PCI Express x16 slots to scale graphics performance. 2.1. SLI Technology How NVIDIA®SLITM (Scalable Link Interface) technology works: If you are planning on using this graphics card as part of an SLI system, the following are connected together via SLI bridge connector...

Manual
Page 7
... optical drive and execute the setup.exe program.) Step 1: Choose Express Install to install driver and XTREME ENGINE at once, or Customize Install to install them separately. Driver and Utility Installation 3.1.1. Then click the Install item. 5 Driver and XTREME ENGINE Installation After installing the operating system, insert the driver disk into your system has installed DirectX 11 or later version. 2. Make sure your screen 3.1. 3. Software Installation Notice the following guidelines before installing the drivers: 1. First...
... optical drive and execute the setup.exe program.) Step 1: Choose Express Install to install driver and XTREME ENGINE at once, or Customize Install to install them separately. Driver and Utility Installation 3.1.1. Then click the Install item. 5 Driver and XTREME ENGINE Installation After installing the operating system, insert the driver disk into your system has installed DirectX 11 or later version. 2. Make sure your screen 3.1. 3. Software Installation Notice the following guidelines before installing the drivers: 1. First...

Manual
Page 8
Step 3: Click Browse to choose where you'd like GIGABYTE XTREME ENGINE to be installed. If choosing Express Install, the window of XTREME ENGINE installation would appear first as the following picture. Step 2: Click the Next button. And then click the Next button. 6
Step 3: Click Browse to choose where you'd like GIGABYTE XTREME ENGINE to be installed. If choosing Express Install, the window of XTREME ENGINE installation would appear first as the following picture. Step 2: Click the Next button. And then click the Next button. 6
Manual
Page 9
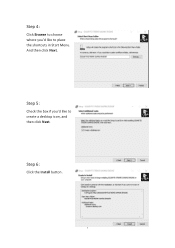
And then click Next. Step 4: Click Browse to choose where you 'd like to create a desktop icon, and then click Next. Step 5: Check the box if you 'd like to place the shortcuts in Start Menu. Step 6: Click the Install button. 7
And then click Next. Step 4: Click Browse to choose where you 'd like to create a desktop icon, and then click Next. Step 5: Check the box if you 'd like to place the shortcuts in Start Menu. Step 6: Click the Install button. 7

Manual
Page 10
Step 8: After installing XTREME ENGINE, the window of NVIDIA Driver would appear. Step 7: Click the Finish button to complete XTREME ENGINE installation. Step 9: Click the AGREE AND CONTINUE button. 8
Step 8: After installing XTREME ENGINE, the window of NVIDIA Driver would appear. Step 7: Click the Finish button to complete XTREME ENGINE installation. Step 9: Click the AGREE AND CONTINUE button. 8

Manual
Page 11
Step 12: Click the Close button, and then restart your computer to complete driver installation. 9 Step 11: Installation begins. Step 10: Check Express (Recommended) and then click the NEXT button.
Step 12: Click the Close button, and then restart your computer to complete driver installation. 9 Step 11: Installation begins. Step 10: Check Express (Recommended) and then click the NEXT button.
Manual
Page 12
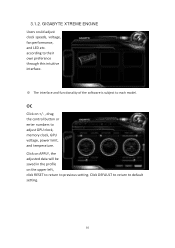
Click DEFAULT to return to adjust GPU clock, memory clock, GPU voltage, power limit, and temperature. OC Click on the upper left, click RESET to return to each model. according to their own preference through this intuitive interface. ※ The interface and functionality of the software is subject to previous setting. GIGABYTE XTREME ENGINE Users could adjust clock speeds, voltage, fan performance, and LED etc. 3.1.2. Click on APPLY, the adjusted data will be saved in the profile on +/- , drag the control button or enter numbers to default setting. 10
Click DEFAULT to return to adjust GPU clock, memory clock, GPU voltage, power limit, and temperature. OC Click on the upper left, click RESET to return to each model. according to their own preference through this intuitive interface. ※ The interface and functionality of the software is subject to previous setting. GIGABYTE XTREME ENGINE Users could adjust clock speeds, voltage, fan performance, and LED etc. 3.1.2. Click on APPLY, the adjusted data will be saved in the profile on +/- , drag the control button or enter numbers to default setting. 10
Manual
Page 13
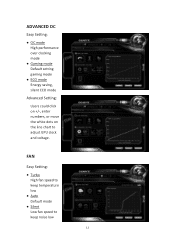
FAN Easy Setting: Turbo High fan speed to keep noise low 11 ADVANCED OC Easy Setting: OC mode High performance over clocking mode Gaming mode Default setting gaming mode ECO mode Energy saving, silent ECO mode Advanced Setting: Users could click on +/-, enter numbers, or move the white dots on the line chart to keep temperature low Auto Default mode Silent Low fan speed to adjust GPU clock and voltage.
FAN Easy Setting: Turbo High fan speed to keep noise low 11 ADVANCED OC Easy Setting: OC mode High performance over clocking mode Gaming mode Default setting gaming mode ECO mode Energy saving, silent ECO mode Advanced Setting: Users could click on +/-, enter numbers, or move the white dots on the line chart to keep temperature low Auto Default mode Silent Low fan speed to adjust GPU clock and voltage.
Manual
Page 14
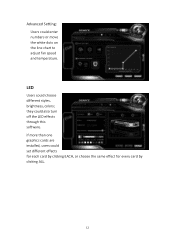
they could set different effects for each card by clicking EACH, or choose the same effect for every card by clicking ALL. 12 If more than one graphics cards are installed, users could also turn off the LED effects through this software. LED Users could enter numbers or move the white dots on the line chart to adjust fan speed and temperature. Advanced Setting: Users could choose different styles, brightness, colors;
they could set different effects for each card by clicking EACH, or choose the same effect for every card by clicking ALL. 12 If more than one graphics cards are installed, users could also turn off the LED effects through this software. LED Users could enter numbers or move the white dots on the line chart to adjust fan speed and temperature. Advanced Setting: Users could choose different styles, brightness, colors;

Manual
Page 15
... monitor's setting using monitor's adjust panel to make the screen looks focused, crisp, and sharp. 13 After getting into Safe Mode, in Device Manager, check whether the driver for the graphics card is securely fastened to the card's display connector. Make sure that the display cable is correct. If you install the graphics driver. Restart your motherboard. When the Windows Advanced Options Menu appears, select Safe Mode and press . Troubleshooting...
... monitor's setting using monitor's adjust panel to make the screen looks focused, crisp, and sharp. 13 After getting into Safe Mode, in Device Manager, check whether the driver for the graphics card is securely fastened to the card's display connector. Make sure that the display cable is correct. If you install the graphics driver. Restart your motherboard. When the Windows Advanced Options Menu appears, select Safe Mode and press . Troubleshooting...

Manual
Page 16
... accurate in all GIGABYTE VGA Cards fulfill European Union regulations for errors or omissions in your "end of life" product: Restriction of must be construed as most of printing. The WEEE Directive specifies the treatment, collection, recycling and disposal of properly. 14 Also note that do not use of our natural resources, GIGABYTE provides the following...
... accurate in all GIGABYTE VGA Cards fulfill European Union regulations for errors or omissions in your "end of life" product: Restriction of must be construed as most of printing. The WEEE Directive specifies the treatment, collection, recycling and disposal of properly. 14 Also note that do not use of our natural resources, GIGABYTE provides the following...

Manual
Page 17
...needed to produce electrical and electronic equipment, minimize the use of landfills for activation of disposal will be disposed of life" product, you with other environmentally friendly actions by understanding and using the energy-saving features of this product...centers for the disposal of "end of life" products, and generally improve our quality of life by disposing of properly. 15 The separate collection and recycling of your waste equipment at the Customer Care number listed in your product's user's manual... disposal service or where you purchased the product for recycling. ...
...needed to produce electrical and electronic equipment, minimize the use of landfills for activation of disposal will be disposed of life" product, you with other environmentally friendly actions by understanding and using the energy-saving features of this product...centers for the disposal of "end of life" products, and generally improve our quality of life by disposing of properly. 15 The separate collection and recycling of your waste equipment at the Customer Care number listed in your product's user's manual... disposal service or where you purchased the product for recycling. ...
Manual
Page 18
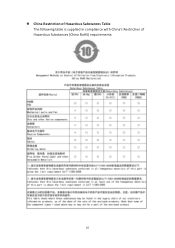
China Restriction of Hazardous Substances Table The following table is supplied in compliance with China's Restriction of Hazardous Substances (China RoHS) requirements: 16
China Restriction of Hazardous Substances Table The following table is supplied in compliance with China's Restriction of Hazardous Substances (China RoHS) requirements: 16
Manual
Page 20
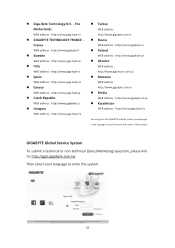
....giga-byte.kz You may go to the GIGABYTE website, select your language to : http://ggts.gigabyte.com.tw Then select your language in the language list at the bottom left corner of the website. GIGABYTE Global Service System To submit a technical or non-technical (Sales/Marketing) question, please link to enter the system. 18 Giga-Byte Technology...
....giga-byte.kz You may go to the GIGABYTE website, select your language to : http://ggts.gigabyte.com.tw Then select your language in the language list at the bottom left corner of the website. GIGABYTE Global Service System To submit a technical or non-technical (Sales/Marketing) question, please link to enter the system. 18 Giga-Byte Technology...


