Manual
Page 3
... applies only in European Union's member states. GV-RX19X512VB-RH Radeon X1900XTX Graphics Accelerator User's Manual Rev. 101 12MD-RX19X5BR-101R * The WEEE marking on VGA card, this may be reproduced or transmitted in any form without the expressed, written permission of GBT. Copyright © 2005 GIGABYTE TECHNOLOGY CO., LTD Copyright by GIGA-BYTE...
... applies only in European Union's member states. GV-RX19X512VB-RH Radeon X1900XTX Graphics Accelerator User's Manual Rev. 101 12MD-RX19X5BR-101R * The WEEE marking on VGA card, this may be reproduced or transmitted in any form without the expressed, written permission of GBT. Copyright © 2005 GIGABYTE TECHNOLOGY CO., LTD Copyright by GIGA-BYTE...
Manual
Page 4
... 5.2. Appendix 36 5.1. Windows® XP Driver and Utilities Installation 8 3.1.1. Minimum System Requirement 3 2. Troubleshooting Tips 35 5. Resolutions and Color Depth Table (In Windows® XP 37 GV-RX19X512VB-RH Graphics Accelerator - 2 -
... 5.2. Appendix 36 5.1. Windows® XP Driver and Utilities Installation 8 3.1.1. Minimum System Requirement 3 2. Troubleshooting Tips 35 5. Resolutions and Color Depth Table (In Windows® XP 37 GV-RX19X512VB-RH Graphics Accelerator - 2 -
Manual
Page 6
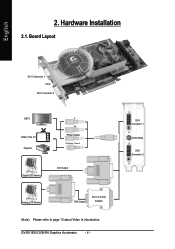
English 2. DVI-I Connector 1 VIVO (Note) DVI-I to D-Sub Adapter (Note) Please refer to page 13 about Video In introduction. Hardware Installation 2.1. Board Layout DVI-I Connector 1 VIVO DVI-I Connector 2 HDTV NTSC / PAL TV Projector Y Pr Pb/AV Output S-Video Output Digital LCD Monitor DVI Output Analog LCD Monitor VGA Output DVI-I Connector 2 GV-RX19X512VB-RH Graphics Accelerator - 4 -
English 2. DVI-I Connector 1 VIVO (Note) DVI-I to D-Sub Adapter (Note) Please refer to page 13 about Video In introduction. Hardware Installation 2.1. Board Layout DVI-I Connector 1 VIVO DVI-I Connector 2 HDTV NTSC / PAL TV Projector Y Pr Pb/AV Output S-Video Output Digital LCD Monitor DVI Output Analog LCD Monitor VGA Output DVI-I Connector 2 GV-RX19X512VB-RH Graphics Accelerator - 4 -
Manual
Page 8
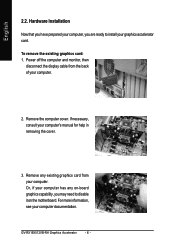
... from the back of your computer. For more information, see your computer's manual for help in removing the cover. 3. To remove the existing graphics card: 1. GV-RX19X512VB-RH Graphics Accelerator - 6 - English 2.2. Power off the computer and monitor, then disconnect the display cable from your computer. 2.
... from the back of your computer. For more information, see your computer's manual for help in removing the cover. 3. To remove the existing graphics card: 1. GV-RX19X512VB-RH Graphics Accelerator - 6 - English 2.2. Power off the computer and monitor, then disconnect the display cable from your computer. 2.
Manual
Page 10
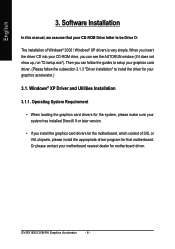
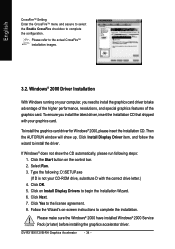
... driver program for the motherboard, which consist of Windows® 2000 / Windows® XP drivers is very simple. Windows® XP Driver and Utilities Installation 3.1.1. GV-RX19X512VB-RH Graphics Accelerator - 8 - Software Installation In this manual, we assume that your system has installed DirectX 9 or later version. • If you install the graphics card...
... driver program for the motherboard, which consist of Windows® 2000 / Windows® XP drivers is very simple. Windows® XP Driver and Utilities Installation 3.1.1. GV-RX19X512VB-RH Graphics Accelerator - 8 - Software Installation In this manual, we assume that your system has installed DirectX 9 or later version. • If you install the graphics card...
Manual
Page 12
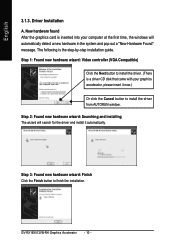
English 3.1.3. GV-RX19X512VB-RH Graphics Accelerator - 10 - The following is inserted into your graphics accelerator, please insert it automatically. Driver Installation A. Step 3: Found new hardware wizard: Finish Click the ...
English 3.1.3. GV-RX19X512VB-RH Graphics Accelerator - 10 - The following is inserted into your graphics accelerator, please insert it automatically. Driver Installation A. Step 3: Found new hardware wizard: Finish Click the ...
Manual
Page 14
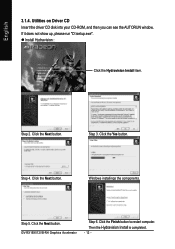
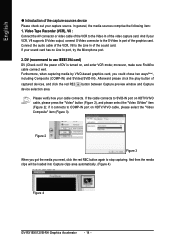
z Install Hydravision : Click the Hydravision Install item. Step 4. Click the Finish button to restart computer. English 3.1.4. Step 5. GV-RX19X512VB-RH Graphics Accelerator Step 6. Click the Next button. Windows installings the components. If it does not show up, please run "D:\setup.exe". Step 3. Click the Next button. Utilities on Driver CD Insert the driver CD disk into your CD-ROM, and then you can see the AUTORUN window. Step 2. Click the Next button. Click the Yes button. Then the Hydravision Install is completed. - 12 -
z Install Hydravision : Click the Hydravision Install item. Step 4. Click the Finish button to restart computer. English 3.1.4. Step 5. GV-RX19X512VB-RH Graphics Accelerator Step 6. Click the Next button. Windows installings the components. If it does not show up, please run "D:\setup.exe". Step 3. Click the Next button. Utilities on Driver CD Insert the driver CD disk into your CD-ROM, and then you can see the AUTORUN window. Step 2. Click the Next button. Click the Yes button. Then the Hydravision Install is completed. - 12 -
Manual
Page 16
... Composite" item (Figure 3). If the cable connects to stop capturing. And then the media clips will be loaded into Capture clips area automatically. (Figure 4) Figure 4 GV-RX19X512VB-RH Graphics Accelerator - 14 - moreover, make sure FireWire cable connect well. Please verify how your sound card has no Line In port, try the Microphone port...
... Composite" item (Figure 3). If the cable connects to stop capturing. And then the media clips will be loaded into Capture clips area automatically. (Figure 4) Figure 4 GV-RX19X512VB-RH Graphics Accelerator - 14 - moreover, make sure FireWire cable connect well. Please verify how your sound card has no Line In port, try the Microphone port...
Manual
Page 18
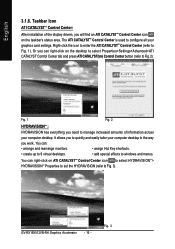
... desktop. You can right-click on ATI CATALYSTTM Control Center icon to select HYDRAVISIONTM> HYDRAVISIONTM Properties to set the HYDRAVISION (refer to windows and menus. GV-RX19X512VB-RH Graphics Accelerator - 16 - Right-click the icon to enter the ATI CATALYSTTM Control Center (refer to the way you can right-click on the taskbar...
... desktop. You can right-click on ATI CATALYSTTM Control Center icon to select HYDRAVISIONTM> HYDRAVISIONTM Properties to set the HYDRAVISION (refer to windows and menus. GV-RX19X512VB-RH Graphics Accelerator - 16 - Right-click the icon to enter the ATI CATALYSTTM Control Center (refer to the way you can right-click on the taskbar...
Manual
Page 19
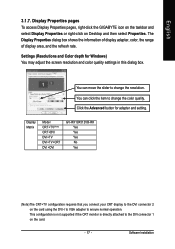
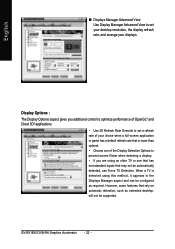
Display Matrix Model CRT+TV(Note) CRT+DVI DVI+TV DVI+TV+CRT DVI +DVI GV-RX19X512VB-RH Yes Yes Yes No Yes (Note)The CRT+TV configuration requires that you connect your CRT display to the DVI connector 2 on Desktop and then ... area, and the refresh rate. Settings (Resolutions and Color depth for adapter and setting. Display Properties pages To access Display Properties pages, right-click the GIGABYTE icon on the taskbar and select Display Properties or right-click on the card using the DVI-I to VGA adapter to change the color quality...
Display Matrix Model CRT+TV(Note) CRT+DVI DVI+TV DVI+TV+CRT DVI +DVI GV-RX19X512VB-RH Yes Yes Yes No Yes (Note)The CRT+TV configuration requires that you connect your CRT display to the DVI connector 2 on Desktop and then ... area, and the refresh rate. Settings (Resolutions and Color depth for adapter and setting. Display Properties pages To access Display Properties pages, right-click the GIGABYTE icon on the taskbar and select Display Properties or right-click on the card using the DVI-I to VGA adapter to change the color quality...
Manual
Page 20
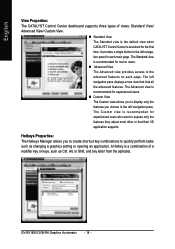
... letter from the alphabet. It provides a single button in the left navigation pane for each page. The Custom view is launched for the first time. GV-RX19X512VB-RH Graphics Accelerator - 18 - Hotkeys Properties: The Hotkeys Manager allows you choose in the left navigation pane. English View Properties: The CATALYST Control Center dashboard supports...
... letter from the alphabet. It provides a single button in the left navigation pane for each page. The Custom view is launched for the first time. GV-RX19X512VB-RH Graphics Accelerator - 18 - Hotkeys Properties: The Hotkeys Manager allows you choose in the left navigation pane. English View Properties: The CATALYST Control Center dashboard supports...
Manual
Page 22
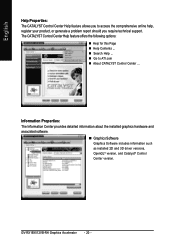
GV-RX19X512VB-RH Graphics Accelerator - 20 - Information Properties: The Information Center provides detailed information about the installed graphics hardware and associated software. „ Graphics Software Graphics Software includes ...
GV-RX19X512VB-RH Graphics Accelerator - 20 - Information Properties: The Information Center provides detailed information about the installed graphics hardware and associated software. „ Graphics Software Graphics Software includes ...
Manual
Page 24
GV-RX19X512VB-RH Graphics Accelerator - 22 - When a TV is lower than optimal. • Choose one of the Display Detection Options to set a refresh rate of OpenGL® and ...
GV-RX19X512VB-RH Graphics Accelerator - 22 - When a TV is lower than optimal. • Choose one of the Display Detection Options to set a refresh rate of OpenGL® and ...
Manual
Page 26
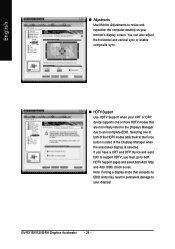
... boxes. You can also adjust the horizontal and vertical sync or enable composite sync. „ HDTV Support Use HDTV Support when your monitor's display screen. GV-RX19X512VB-RH Graphics Accelerator - 24 - Selecting one or more HDTV modes that exceeds its EDID limits may result in the Displays Manager when the associated display is...
... boxes. You can also adjust the horizontal and vertical sync or enable composite sync. „ HDTV Support Use HDTV Support when your monitor's display screen. GV-RX19X512VB-RH Graphics Accelerator - 24 - Selecting one or more HDTV modes that exceeds its EDID limits may result in the Displays Manager when the associated display is...
Manual
Page 28
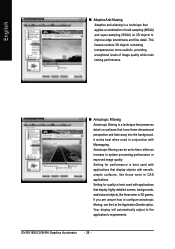
... applications that display highly detailed scenes, backgrounds, and textured objects, like those seen in 3D games. If you are unsure how to the application's requirements. GV-RX19X512VB-RH Graphics Accelerator - 26 - Setting for performance is best used with Mipmapping. English „ Adaptive Anti-Aliasing Adaptive anti-aliasing is a technique that have three-dimensional...
... applications that display highly detailed scenes, backgrounds, and textured objects, like those seen in 3D games. If you are unsure how to the application's requirements. GV-RX19X512VB-RH Graphics Accelerator - 26 - Setting for performance is best used with Mipmapping. English „ Adaptive Anti-Aliasing Adaptive anti-aliasing is a technique that have three-dimensional...
Manual
Page 30
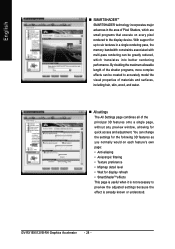
... programs, more complex effects can change the settings for the following 3D features as you normally would on every pixel rendered to the display device. GV-RX19X512VB-RH Graphics Accelerator - 28 - English „ SMARTSHADERTM SMARTSHADER technology incorporates major advances in a single rendering pass, the memory bandwidth constraints associated with multi-pass rendering can...
... programs, more complex effects can change the settings for the following 3D features as you normally would on every pixel rendered to the display device. GV-RX19X512VB-RH Graphics Accelerator - 28 - English „ SMARTSHADERTM SMARTSHADER technology incorporates major advances in a single rendering pass, the memory bandwidth constraints associated with multi-pass rendering can...

Manual
Page 32
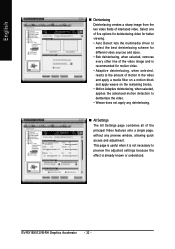
Use Adjustments to set aspect ratio and overlay display mode. Use Theater Mode to configure gamma, brightness, and hue. GV-RX19X512VB-RH Graphics Accelerator - 30 - Preview your changes before applying them. „ Standard Settings To quickly adjust your video settings choose one of the video presets or use the Video Wizard to apply standard video settings with a Wizard or selecting a video preset. English AvivoTM Video : „ Avivo Video Standard View Use the AvivoTM Video aspect to configure your display devices.
Use Adjustments to set aspect ratio and overlay display mode. Use Theater Mode to configure gamma, brightness, and hue. GV-RX19X512VB-RH Graphics Accelerator - 30 - Preview your changes before applying them. „ Standard Settings To quickly adjust your video settings choose one of the video presets or use the Video Wizard to apply standard video settings with a Wizard or selecting a video preset. English AvivoTM Video : „ Avivo Video Standard View Use the AvivoTM Video aspect to configure your display devices.
Manual
Page 34
... not necessary to deinterlace the video. • Weave does not apply any deinterlacing. „ All Settings The All Settings page combines all of interlaced video. GV-RX19X512VB-RH Graphics Accelerator - 32 - English „ Deinterlacing Deinterlacing creates a sharp image from the two video fields of the principal Video features onto a single page, without any...
... not necessary to deinterlace the video. • Weave does not apply any deinterlacing. „ All Settings The All Settings page combines all of interlaced video. GV-RX19X512VB-RH Graphics Accelerator - 32 - English „ Deinterlacing Deinterlacing creates a sharp image from the two video fields of the principal Video features onto a single page, without any...
Manual
Page 36
... Setting: Enter the CrossFireTM menu and assure to select the Enable CrossFire checkbox to install the driver. Click Yes to the actual CrossFireTM installation images. 3.2. GV-RX19X512VB-RH Graphics Accelerator - 34 - Click the Start button on -screen instructions to take advantage of the higher performance, resolutions, and special graphics features of the graphics...
... Setting: Enter the CrossFireTM menu and assure to select the Enable CrossFire checkbox to install the driver. Click Yes to the actual CrossFireTM installation images. 3.2. GV-RX19X512VB-RH Graphics Accelerator - 34 - Click the Start button on -screen instructions to take advantage of the higher performance, resolutions, and special graphics features of the graphics...
Manual
Page 38
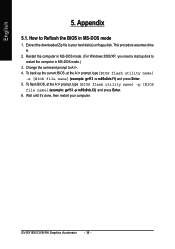
..., at the A:\> prompt, type [BIOS flash utility name] -p [BIOS file name] (example: gvf13 -p rx85x8vb.f2) and press Enter. 6. Restart the computer in MS-DOS mode.) 3. GV-RX19X512VB-RH Graphics Accelerator - 36 - Wait until it's done, then restart your hard disk(s) or floppy disk. This procedure assumes drive A. 2. Extract the downloaded Zip file to...
..., at the A:\> prompt, type [BIOS flash utility name] -p [BIOS file name] (example: gvf13 -p rx85x8vb.f2) and press Enter. 6. Restart the computer in MS-DOS mode.) 3. GV-RX19X512VB-RH Graphics Accelerator - 36 - Wait until it's done, then restart your hard disk(s) or floppy disk. This procedure assumes drive A. 2. Extract the downloaded Zip file to...


