Manual
Page 3
... omissions that may void the warranty of this VGA card Due to update the information contained herein. GV-RX16T256V-RH Radeon X1600XT Graphics Accelerator User's Manual Rev. 101 12MD-RX16T2VR-101R * The WEEE marking on VGA card, this may appear in this document nor does the author make a commitment to rapid change in technology, some of the specifications might be out of date before publication of their respective owners.
... omissions that may void the warranty of this VGA card Due to update the information contained herein. GV-RX16T256V-RH Radeon X1600XT Graphics Accelerator User's Manual Rev. 101 12MD-RX16T2VR-101R * The WEEE marking on VGA card, this may appear in this document nor does the author make a commitment to rapid change in technology, some of the specifications might be out of date before publication of their respective owners.

Manual
Page 4
...Driver Installation 38 4. English Table of Contents 1. Hardware Installation 6 3. Appendix 40 5.1. Hardware Installation 4 2.1. Board Layout 4 2.2. Utilities on Driver CD 12 3.1.5. Introduction 3 1.1. Minimum System Requirement 3 2. How to Reflash the BIOS 40 5.1.1. Taskbar Icon ...18 3.1.7. DirectX Installation ...9 3.1.3. Resolutions and Color Depth Table (In Windows® XP 41 GV-RX16T256V-RH Graphics Accelerator - 2 - Software Installation 8 3.1. Reflash BIOS in Windows mode 40 5.2. Operating System Requirement 8 3.1.2. Display Properties...
...Driver Installation 38 4. English Table of Contents 1. Hardware Installation 6 3. Appendix 40 5.1. Hardware Installation 4 2.1. Board Layout 4 2.2. Utilities on Driver CD 12 3.1.5. Introduction 3 1.1. Minimum System Requirement 3 2. How to Reflash the BIOS 40 5.1.1. Taskbar Icon ...18 3.1.7. DirectX Installation ...9 3.1.3. Resolutions and Color Depth Table (In Windows® XP 41 GV-RX16T256V-RH Graphics Accelerator - 2 - Software Installation 8 3.1. Reflash BIOS in Windows mode 40 5.2. Operating System Requirement 8 3.1.2. Display Properties...

Manual
Page 6
Board Layout DVI-I Connector 1 VIVO DVI-I Connector 2 HDTV NTSC / PAL TV Projector Y Pr Pb/AV Output S-Video Output Digital LCD Monitor DVI Output Analog LCD Monitor VGA Output DVI-I Connector 2 GV-RX16T256V-RH Graphics Accelerator - 4 - Hardware Installation 2.1. English 2. DVI-I Connector 1 VIVO (Note) DVI-I to D-Sub Adapter (Note) Please refer to page 15 about Video In introduction.
Board Layout DVI-I Connector 1 VIVO DVI-I Connector 2 HDTV NTSC / PAL TV Projector Y Pr Pb/AV Output S-Video Output Digital LCD Monitor DVI Output Analog LCD Monitor VGA Output DVI-I Connector 2 GV-RX16T256V-RH Graphics Accelerator - 4 - Hardware Installation 2.1. English 2. DVI-I Connector 1 VIVO (Note) DVI-I to D-Sub Adapter (Note) Please refer to page 15 about Video In introduction.

Manual
Page 8
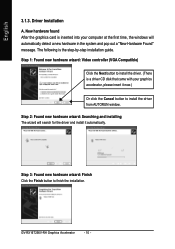
... ready to disable it on -board graphics capability, you may need to install your computer documentation. Remove the computer cover. For more information, see your graphics accelerator card. English 2.2. Or, if your computer's manual for help in removing the cover. 3. GV-RX16T256V-RH Graphics Accelerator - 6 - If necessary, consult your computer has any existing graphics card from the back of your computer. Power off the computer and monitor, then disconnect the display cable...
... ready to disable it on -board graphics capability, you may need to install your computer documentation. Remove the computer cover. For more information, see your graphics accelerator card. English 2.2. Or, if your computer's manual for help in removing the cover. 3. GV-RX16T256V-RH Graphics Accelerator - 6 - If necessary, consult your computer has any existing graphics card from the back of your computer. Power off the computer and monitor, then disconnect the display cable...

Manual
Page 9
... the PCI Express x 16 slot. Connect a flat panel To Flat Panel Display 9-Pin for detailed instructions. - 7 - Please refer to fasten the card in firmly until the card is fully seated. * Please make sure that the gold edge connectors of the graphics card drivers. Hardware Installation Warning! then align your graphics card; Replace the screw to next chapter for VIVO Connect a VGA monitor via DVI-I to D-sub adapter You are now ready to proceed with the PCI Express...
... the PCI Express x 16 slot. Connect a flat panel To Flat Panel Display 9-Pin for detailed instructions. - 7 - Please refer to fasten the card in firmly until the card is fully seated. * Please make sure that the gold edge connectors of the graphics card drivers. Hardware Installation Warning! then align your graphics card; Replace the screw to next chapter for VIVO Connect a VGA monitor via DVI-I to D-sub adapter You are now ready to proceed with the PCI Express...
Manual
Page 10
GV-RX16T256V-RH Graphics Accelerator - 8 - Windows® XP Driver and Utilities Installation 3.1.1. Software Installation In this manual, we assume that motherboard. Then you can follow the subsection 3.1.3 "Driver installation" to be Drive D: The installation of SIS, or VIA chipsets, please install the appropriate driver program for motherboard driver. Operating System Requirement • When loading the graphics card drivers for the system, please make sure your graphics card driver. (Please follow the guides to setup your system has installed DirectX 9.0C or later version. &#...
GV-RX16T256V-RH Graphics Accelerator - 8 - Windows® XP Driver and Utilities Installation 3.1.1. Software Installation In this manual, we assume that motherboard. Then you can follow the subsection 3.1.3 "Driver installation" to be Drive D: The installation of SIS, or VIA chipsets, please install the appropriate driver program for motherboard driver. Operating System Requirement • When loading the graphics card drivers for the system, please make sure your graphics card driver. (Please follow the guides to setup your system has installed DirectX 9.0C or later version. &#...
Manual
Page 12
... driver and install it now.) Or click the Cancel button to install the driver from AUTORUN window. English 3.1.3. New hardware found After the graphics card is the step-by-step installation guide. Step 2: Found new hardware wizard: Searching and installing The wizard will automatically detect a new hardware in the system and pop out a "New Hardware Found" message. Step 1: Found new hardware wizard: Video controller (VGA Compatible) Click the Next button to finish the installation. GV-RX16T256V-RH Graphics Accelerator - 10 - Driver Installation...
... driver and install it now.) Or click the Cancel button to install the driver from AUTORUN window. English 3.1.3. New hardware found After the graphics card is the step-by-step installation guide. Step 2: Found new hardware wizard: Searching and installing The wizard will automatically detect a new hardware in the system and pop out a "New Hardware Found" message. Step 1: Found new hardware wizard: Video controller (VGA Compatible) Click the Next button to finish the installation. GV-RX16T256V-RH Graphics Accelerator - 10 - Driver Installation...

Manual
Page 13
Click the Express or Custom icon. Software Installation Then the driver installation is completed. - 11 - Driver installation (Autorun Window) Insert the driver CD disk into your CD-ROM, and then you can see the AUTORUN window. Click the Next button. Click the Finish button to restart computer. When autorun window show up , click the Install Display Drivers (Radeon X1600 Series) item. Step 5. Click the Install Display Drivers (Radeon X1600 Series) item. Step 2. English...
Click the Express or Custom icon. Software Installation Then the driver installation is completed. - 11 - Driver installation (Autorun Window) Insert the driver CD disk into your CD-ROM, and then you can see the AUTORUN window. Click the Next button. Click the Finish button to restart computer. When autorun window show up , click the Install Display Drivers (Radeon X1600 Series) item. Step 5. Click the Install Display Drivers (Radeon X1600 Series) item. Step 2. English...
Manual
Page 14
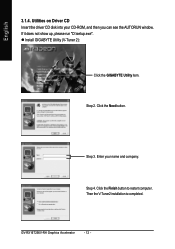
English 3.1.4. Step 3. Then the V-Tuner2 installation is completed. Step 2. Click the Next button. Enter your CD-ROM, and then you can see the AUTORUN window. Click the Finish button to restart computer. Utilities on Driver CD Insert the driver CD disk into your name and company. GV-RX16T256V-RH Graphics Accelerator - 12 - If it does not show up, please run "D:\setup.exe". z Install GIGABYTE Utility (V-Tuner 2): Click the GIGABYTE Utility item. Step 4.
English 3.1.4. Step 3. Then the V-Tuner2 installation is completed. Step 2. Click the Next button. Enter your CD-ROM, and then you can see the AUTORUN window. Click the Finish button to restart computer. Utilities on Driver CD Insert the driver CD disk into your name and company. GV-RX16T256V-RH Graphics Accelerator - 12 - If it does not show up, please run "D:\setup.exe". z Install GIGABYTE Utility (V-Tuner 2): Click the GIGABYTE Utility item. Step 4.
Manual
Page 18
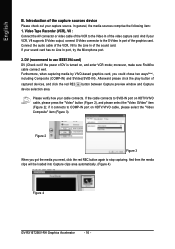
... VCR, V8 supports S-Video output, connect S-Video connector to the S-Video In port of the video capture card. Connect the audio cable of the VCR, V8 to stop capturing. And then the media clips will be loaded into Capture clips area automatically. (Figure 4) Figure 4 GV-RX16T256V-RH Graphics Accelerator - 16 - English B. Introduction of the sound card. If your cable connects. Figure 2 Figure 3 When you got the media you could chose two ways(Note), including Composite (COMP...
... VCR, V8 supports S-Video output, connect S-Video connector to the S-Video In port of the video capture card. Connect the audio cable of the VCR, V8 to stop capturing. And then the media clips will be loaded into Capture clips area automatically. (Figure 4) Figure 4 GV-RX16T256V-RH Graphics Accelerator - 16 - English B. Introduction of the sound card. If your cable connects. Figure 2 Figure 3 When you got the media you could chose two ways(Note), including Composite (COMP...

Manual
Page 20
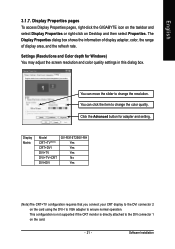
... click the "Display Properties" item, and then click Settings. Click "Advanced" after clicking Settings. Taskbar Icon After installation of the graphics card's enhanced and other information. Click the appropriate tab to GIGABYTE website for updated information about the graphics accelerator, latest drivers, and other functions. Right-click the icon. You can link to change your display settings. GV-RX16T256V-RH Graphics Accelerator - 18 - Right-clicking this icon opens the GIGABYTE control panel, showing...
... click the "Display Properties" item, and then click Settings. Click "Advanced" after clicking Settings. Taskbar Icon After installation of the graphics card's enhanced and other information. Click the appropriate tab to GIGABYTE website for updated information about the graphics accelerator, latest drivers, and other functions. Right-click the icon. You can link to change your display settings. GV-RX16T256V-RH Graphics Accelerator - 18 - Right-clicking this icon opens the GIGABYTE control panel, showing...
Manual
Page 22
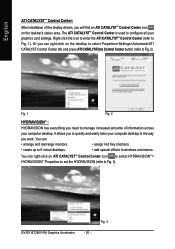
... CATALYST(tm) Control Center button (refer to Fig. 2). You can : • arrange and rearrange monitors. • assign Hot Key shortcuts. • create up to 9 virtual desktops. • add special effects to windows and menus. GV-RX16T256V-RH Graphics Accelerator - 20 - It allows you to Fig. 1). Fig. 3 Right-click the icon to enter the ATI CATALYSTTM Control Center (refer to quickly and easily tailor your graphics card settings...
... CATALYST(tm) Control Center button (refer to Fig. 2). You can : • arrange and rearrange monitors. • assign Hot Key shortcuts. • create up to 9 virtual desktops. • add special effects to windows and menus. GV-RX16T256V-RH Graphics Accelerator - 20 - It allows you to Fig. 1). Fig. 3 Right-click the icon to enter the ATI CATALYSTTM Control Center (refer to quickly and easily tailor your graphics card settings...
Manual
Page 23
...+CRT DVI+DVI GV-RX16T256V-RH Yes Yes Yes No Yes (Note)The CRT+TV configuration requires that you connect your CRT display to the DVI connector 2 on the card using the DVI-I to VGA adapter to the DVI connector 1 on Desktop and then select Properties. Click the Advanced button for Windows) You may adjust the screen resolution and color quality settings in this dialog box. Software Installation You can click the item to change the color quality. This configuration is not supported if the CRT monitor...
...+CRT DVI+DVI GV-RX16T256V-RH Yes Yes Yes No Yes (Note)The CRT+TV configuration requires that you connect your CRT display to the DVI connector 2 on the card using the DVI-I to VGA adapter to the DVI connector 1 on Desktop and then select Properties. Click the Advanced button for Windows) You may adjust the screen resolution and color quality settings in this dialog box. Software Installation You can click the item to change the color quality. This configuration is not supported if the CRT monitor...

Manual
Page 24
... View The Standard view is the default view when CATALYST Control Center is recommended for the first time. GV-RX16T256V-RH Graphics Accelerator - 22 - The Standard view is launched for novice users. „ Advanced View The Advanced view provides access to the advanced features on each main page. Hotkeys Properties: The Hotkeys Manager allows you choose in the left navigation pane for experienced users who want to quickly perform...
... View The Standard view is the default view when CATALYST Control Center is recommended for the first time. GV-RX16T256V-RH Graphics Accelerator - 22 - The Standard view is launched for novice users. „ Advanced View The Advanced view provides access to the advanced features on each main page. Hotkeys Properties: The Hotkeys Manager allows you choose in the left navigation pane for experienced users who want to quickly perform...
Manual
Page 26
... about the installed graphics hardware and associated software. „ Graphics Software Graphics Software includes information such as installed 2D and 3D driver versions, OpenGL® version, and Catalyst® Control Center version. GV-RX16T256V-RH Graphics Accelerator - 24 - The CATALYST Control Center Help feature offers the following options: „ Help for this Page „ Help Contents ... „ Search Help ... „ Go to access the comprehensive online help, register your product, or generate a problem report should you require technical support.
... about the installed graphics hardware and associated software. „ Graphics Software Graphics Software includes information such as installed 2D and 3D driver versions, OpenGL® version, and Catalyst® Control Center version. GV-RX16T256V-RH Graphics Accelerator - 24 - The CATALYST Control Center Help feature offers the following options: „ Help for this Page „ Help Contents ... „ Search Help ... „ Go to access the comprehensive online help, register your product, or generate a problem report should you require technical support.
Manual
Page 28
... to set your desktop resolution, the display refresh rate, and arrange your displays. When a TV is lower than optimal. • Choose one that has non-standard inputs that rely on automatic detection, such as extended desktop, will not be configured as required. GV-RX16T256V-RH Graphics Accelerator - 26 - English „ Displays Manager Advanced View Use Display Manager Advanced View to set a refresh rate of your choice when a full-screen application or game has a default refresh rate that...
... to set your desktop resolution, the display refresh rate, and arrange your displays. When a TV is lower than optimal. • Choose one that has non-standard inputs that rely on automatic detection, such as extended desktop, will not be configured as required. GV-RX16T256V-RH Graphics Accelerator - 26 - English „ Displays Manager Advanced View Use Display Manager Advanced View to set a refresh rate of your choice when a full-screen application or game has a default refresh rate that...

Manual
Page 34
With support for up to accurately model the visual properties of materials and surfaces, including hair, skin, wood, and water. „ All settings The All Settings page combines all of the principal 3D features onto a single page, without any preview window, allowing for display refresh • SmartShaderTM effects This page is useful when it is already known or understood. GV-RX16T256V-RH Graphics Accelerator - 32...
With support for up to accurately model the visual properties of materials and surfaces, including hair, skin, wood, and water. „ All settings The All Settings page combines all of the principal 3D features onto a single page, without any preview window, allowing for display refresh • SmartShaderTM effects This page is useful when it is already known or understood. GV-RX16T256V-RH Graphics Accelerator - 32...
Manual
Page 40
... automatically, please run following : D:\SETUP.exe (If D is not your graphics card. GV-RX16T256V-RH Graphics Accelerator - 38 - Click OK. 5. Click on your computer, you install the latest driver, insert the Installation CD that shipped with your CD-ROM drive, substitute D with the correct drive letter.) 4. Please make sure the Windows® 2000 have installed Windows® 2000 Service Pack (or later) before installing the graphics accelerator driver. English 3.2. Click Install Display Driver item, and...
... automatically, please run following : D:\SETUP.exe (If D is not your graphics card. GV-RX16T256V-RH Graphics Accelerator - 38 - Click OK. 5. Click on your computer, you install the latest driver, insert the Installation CD that shipped with your CD-ROM drive, substitute D with the correct drive letter.) 4. Please make sure the Windows® 2000 have installed Windows® 2000 Service Pack (or later) before installing the graphics accelerator driver. English 3.2. Click Install Display Driver item, and...

Manual
Page 41
... experience problems. Contact your dealer or Gigabyte for the graphics card is securely fastened to the card's display connector. „ Make sure that the monitor and computer are plugged in and receiving power. „ If necessary, disable any built-in graphics capabilities on your computer. For more assistance, use the Troubleshooting Guide located in graphics to be disabled or to the monitor's manual.) - 39 - After getting into Safe Mode...
... experience problems. Contact your dealer or Gigabyte for the graphics card is securely fastened to the card's display connector. „ Make sure that the monitor and computer are plugged in and receiving power. „ If necessary, disable any built-in graphics capabilities on your computer. For more assistance, use the Troubleshooting Guide located in graphics to be disabled or to the monitor's manual.) - 39 - After getting into Safe Mode...
Manual
Page 42
... disk (or floppy disk). Update BIOS NOT through the Internet a. GV-RX16T256V-RH Graphics Accelerator - 40 - Reflash BIOS in the lower-right corner of @VGA flash BIOS utility. 2. After installing the display drivers, you . (@VGA will find a GIGABYTE the Taskbar. Download the BIOS ZIP file for your card from GIGABYTE website and extract it 's done, then restart your hard disk (or floppy disk). Change the command prompt to Reflash the BIOS 5.1.1. To flash BIOS, at the A:\> prompt, type[BIOS flash utility name] -s [BIOS...
... disk (or floppy disk). Update BIOS NOT through the Internet a. GV-RX16T256V-RH Graphics Accelerator - 40 - Reflash BIOS in the lower-right corner of @VGA flash BIOS utility. 2. After installing the display drivers, you . (@VGA will find a GIGABYTE the Taskbar. Download the BIOS ZIP file for your card from GIGABYTE website and extract it 's done, then restart your hard disk (or floppy disk). Change the command prompt to Reflash the BIOS 5.1.1. To flash BIOS, at the A:\> prompt, type[BIOS flash utility name] -s [BIOS...


