
Manual
Page 5
... any errors or omissions that is prohibited. GV-RX155128D-RH/ GV-RX155256DE-RH RadeonTM X1550 Graphics Accelerator User's Manual Rev. 102 12MD-RX1551DR-102R * The WEEE marking on VGA card, this may void the warranty of this VGA card Due to update the information contained herein. No part of this manual may appear in this document nor does the author make a commitment to rapid change in technology, some of the specifications might...
... any errors or omissions that is prohibited. GV-RX155128D-RH/ GV-RX155256DE-RH RadeonTM X1550 Graphics Accelerator User's Manual Rev. 102 12MD-RX1551DR-102R * The WEEE marking on VGA card, this may void the warranty of this VGA card Due to update the information contained herein. No part of this manual may appear in this document nor does the author make a commitment to rapid change in technology, some of the specifications might...

Manual
Page 6
... Installation 11 3.1. DirectX Installation ...12 3.1.3. Appendix 39 5.1. How to Reflash the BIOS 39 5.1.1. Resolutions and Color Depth Table (In Windows® XP 40 GV-RX155128D(256DE)-RH Graphics Accelerator - 2 - Board Layout 4 2.2. Operating System Requirement 11 3.1.2. Windows® 2000 Driver Installation 37 4. Troubleshooting Tips 38 5. Reflash BIOS in MS-DOS mode 39 5.1.2. Features ...3 1.2. Introduction 3 1.1. Taskbar Icon ...17 3.1.6. Hardware Installation 6 3. Driver Installation ...13 3.1.4. Utilities on Driver CD 15 3.1.5. Display Properties...
... Installation 11 3.1. DirectX Installation ...12 3.1.3. Appendix 39 5.1. How to Reflash the BIOS 39 5.1.1. Resolutions and Color Depth Table (In Windows® XP 40 GV-RX155128D(256DE)-RH Graphics Accelerator - 2 - Board Layout 4 2.2. Operating System Requirement 11 3.1.2. Windows® 2000 Driver Installation 37 4. Troubleshooting Tips 38 5. Reflash BIOS in MS-DOS mode 39 5.1.2. Features ...3 1.2. Introduction 3 1.1. Taskbar Icon ...17 3.1.6. Hardware Installation 6 3. Driver Installation ...13 3.1.4. Utilities on Driver CD 15 3.1.5. Display Properties...
Manual
Page 7
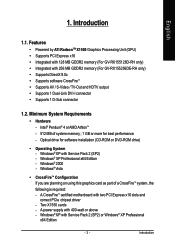
...A power supply with Service Pack 2 (SP2) - Introduction 1.1. Minimum System Requirements • Hardware - Windows® Vista • CrossFireTM Configuration If you are planning on using this graphics card as part of system memory ; 1 GB or more for software installation (CD-ROM or DVD-ROM drive) • Operating System - A CrossFireTM certified motherboard with 256 MB GDDR2 memory (For GV-RX155256DE-RH only) • Supports DirectX 9.0c • Supports software CrossFireTM • Supports AV / S-Video / TV-Out and HDTV output • Supports 1 Dual-Link DVI-I connector...
...A power supply with Service Pack 2 (SP2) - Introduction 1.1. Minimum System Requirements • Hardware - Windows® Vista • CrossFireTM Configuration If you are planning on using this graphics card as part of system memory ; 1 GB or more for software installation (CD-ROM or DVD-ROM drive) • Operating System - A CrossFireTM certified motherboard with 256 MB GDDR2 memory (For GV-RX155256DE-RH only) • Supports DirectX 9.0c • Supports software CrossFireTM • Supports AV / S-Video / TV-Out and HDTV output • Supports 1 Dual-Link DVI-I connector...
Manual
Page 10
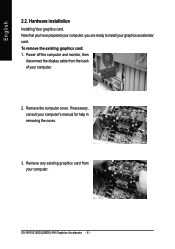
To remove the existing graphics card: 1. If necessary, consult your graphics accelerator card. Remove the computer cover. Remove any existing graphics card from the back of your computer. English 2.2. Power off the computer and monitor, then disconnect the display cable from your computer. 2. GV-RX155128D(256DE)-RH Graphics Accelerator - 6 - Hardware installation Installing Your graphics card. Now that you have prepared your computer, you are ready to install your computer's manual for help in removing the cover. 3.
To remove the existing graphics card: 1. If necessary, consult your graphics accelerator card. Remove the computer cover. Remove any existing graphics card from the back of your computer. English 2.2. Power off the computer and monitor, then disconnect the display cable from your computer. 2. GV-RX155128D(256DE)-RH Graphics Accelerator - 6 - Hardware installation Installing Your graphics card. Now that you have prepared your computer, you are ready to install your computer's manual for help in removing the cover. 3.

Manual
Page 11
... To Flat Panel Display You are now ready to proceed with a DVI-I connector, you can connect a flat panel display to next chapter for detailed instructions. - 7 - If necessary, remove the metal cover from the slot; then align your graphics card came with the installation of the graphics card is fully seated. * Please make sure that the gold edge connectors of the graphics card driver. If your graphics card with the PCI Express x16...
... To Flat Panel Display You are now ready to proceed with a DVI-I connector, you can connect a flat panel display to next chapter for detailed instructions. - 7 - If necessary, remove the metal cover from the slot; then align your graphics card came with the installation of the graphics card is fully seated. * Please make sure that the gold edge connectors of the graphics card driver. If your graphics card with the PCI Express x16...

Manual
Page 14
... a CrossFire-supported motherboard, users can enable the CrossFire technology simply through the graphics card driver . Figure 1 Step 1: After installing graphics card driver in Windows® XP operating system only. Step 2: When the next confirmation dialog box appears (Figure 3), click Yes to select the Enable CrossFire checkbox (Figure 2). Please do not enable CrossFire in Windows® 2000. From the ATI CATALYST Control Center, enter the CrossFire menu and assure to complete the CrossFire configurations. GV-RX155128D(256DE)-RH Graphics Accelerator - 10...
... a CrossFire-supported motherboard, users can enable the CrossFire technology simply through the graphics card driver . Figure 1 Step 1: After installing graphics card driver in Windows® XP operating system only. Step 2: When the next confirmation dialog box appears (Figure 3), click Yes to select the Enable CrossFire checkbox (Figure 2). Please do not enable CrossFire in Windows® 2000. From the ATI CATALYST Control Center, enter the CrossFire menu and assure to complete the CrossFire configurations. GV-RX155128D(256DE)-RH Graphics Accelerator - 10...
Manual
Page 15
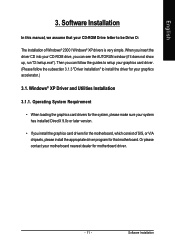
... loading the graphics card drivers for the system, please make sure your system has installed DirectX 9.0c or later version. • If you can follow the guides to setup your graphics card driver. (Please follow the subsection 3.1.3 "Driver installation" to be Drive D: The installation of SIS, or VIA chipsets, please install the appropriate driver program for motherboard driver. - 11 - When you insert the driver CD into your graphics accelerator.) 3.1. Software Installation In this manual, we...
... loading the graphics card drivers for the system, please make sure your system has installed DirectX 9.0c or later version. • If you can follow the guides to setup your graphics card driver. (Please follow the subsection 3.1.3 "Driver installation" to be Drive D: The installation of SIS, or VIA chipsets, please install the appropriate driver program for motherboard driver. - 11 - When you insert the driver CD into your graphics accelerator.) 3.1. Software Installation In this manual, we...

Manual
Page 17
... click the Cancel button to install the driver from AUTORUN window. Step 2: Found new hardware wizard: Searching and installing The wizard will automatically detect a new hardware in the system and pop out a "New Hardware Found" message. Driver Installation A. Step 3: Found new hardware wizard: Finish Click the Finish button to install the driver. (There is the step-by-step installation guide. Step 1: Found new hardware wizard: Video controller (VGA Compatible) Click the Next button to...
... click the Cancel button to install the driver from AUTORUN window. Step 2: Found new hardware wizard: Searching and installing The wizard will automatically detect a new hardware in the system and pop out a "New Hardware Found" message. Driver Installation A. Step 3: Found new hardware wizard: Finish Click the Finish button to install the driver. (There is the step-by-step installation guide. Step 1: Found new hardware wizard: Video controller (VGA Compatible) Click the Next button to...
Manual
Page 18
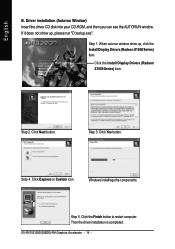
.... Driver installation (Autorun Window) Insert the driver CD disk into your CD-ROM, and then you can see the AUTORUN window. Step 3. GV-RX155128D(256DE)-RH Graphics Accelerator - 14 - Click the Finish button to restart computer. Step 1. Click Yes button. When autorun window show up , click the Install Display Drivers (Radeon X1550 Series) item. Step 2. English B. If it does not show up , please run "D:\setup.exe". Click the Install Display Drivers (Radeon...
.... Driver installation (Autorun Window) Insert the driver CD disk into your CD-ROM, and then you can see the AUTORUN window. Step 3. GV-RX155128D(256DE)-RH Graphics Accelerator - 14 - Click the Finish button to restart computer. Step 1. Click Yes button. When autorun window show up , click the Install Display Drivers (Radeon X1550 Series) item. Step 2. English B. If it does not show up , please run "D:\setup.exe". Click the Install Display Drivers (Radeon...

Manual
Page 20
... wanted After saving the specific value, you may click this button to load the frequency you saved last time The V-Tuner3 clock configuration utility will determine the recommended GPU and memory clock setting your system and then enter "Auto-Optimized" mode The V-Tuner3 clock configuration utility will lock the GPU and memory clock you choose, whether you adjust the working frequency of the graphic engine and video memory (Core Clock and Memory Clock).
... wanted After saving the specific value, you may click this button to load the frequency you saved last time The V-Tuner3 clock configuration utility will determine the recommended GPU and memory clock setting your system and then enter "Auto-Optimized" mode The V-Tuner3 clock configuration utility will lock the GPU and memory clock you choose, whether you adjust the working frequency of the graphic engine and video memory (Core Clock and Memory Clock).

Manual
Page 21
... GIGABYTE website for updated information about the graphics accelerator, latest drivers, and other functions. Taskbar Icon After installation of the graphics card's enhanced and other information. - 17 - You can link to change your display settings. Right-click the icon. Click the VGA Information item into the "VGA Info" and "Color Adjust" tabs. Right-clicking this icon opens the GIGABYTE control panel, showing a menu composed of shortcut of the display drivers...
... GIGABYTE website for updated information about the graphics accelerator, latest drivers, and other functions. Taskbar Icon After installation of the graphics card's enhanced and other information. - 17 - You can link to change your display settings. Right-click the icon. Click the VGA Information item into the "VGA Info" and "Color Adjust" tabs. Right-clicking this icon opens the GIGABYTE control panel, showing a menu composed of shortcut of the display drivers...

Manual
Page 23
Software Installation Or you will find an ATI CATALYSTTM Control Center icon on the desktop to select Properties>Settings>Advanced>ATI CATALYST Control Center tab and press ATI CATALYST(tm) Control Center button (refer to Figure 2). Figure 1 Figure 2 - 19 - English ATI CATALYSTTM Control Center: After installation of the display drivers, you can right-click on the taskbar's status area. Right-click the icon to enter the ATI CATALYSTTM Control Center (refer to configure all your graphics card settings. The ATI CATALYSTTM Control Center is used to Figure 1).
Software Installation Or you will find an ATI CATALYSTTM Control Center icon on the desktop to select Properties>Settings>Advanced>ATI CATALYST Control Center tab and press ATI CATALYST(tm) Control Center button (refer to Figure 2). Figure 1 Figure 2 - 19 - English ATI CATALYSTTM Control Center: After installation of the display drivers, you can right-click on the taskbar's status area. Right-click the icon to enter the ATI CATALYSTTM Control Center (refer to configure all your graphics card settings. The ATI CATALYSTTM Control Center is used to Figure 1).

Manual
Page 24
... CRT+TV configuration requires that you connect your CRT display to the DVI connector on the card using the DVI-I to D-Sub adapter to the D-Sub port on Desktop and then select Properties. Display Properties pages To access Display Properties pages, right-click the GIGABYTE icon on the taskbar and select Display Properties or right-click on the card. This configuration is not supported if the CRT monitor is directly attached to ensure normal operation. GV-RX155128D(256DE)-RH Graphics Accelerator...
... CRT+TV configuration requires that you connect your CRT display to the DVI connector on the card using the DVI-I to D-Sub adapter to the D-Sub port on Desktop and then select Properties. Display Properties pages To access Display Properties pages, right-click the GIGABYTE icon on the taskbar and select Display Properties or right-click on the card. This configuration is not supported if the CRT monitor is directly attached to ensure normal operation. GV-RX155128D(256DE)-RH Graphics Accelerator...

Manual
Page 27
... better quality with a more balanced setting. „ Video Playback Use this option to optimize video playback in Basic and Advanced View provides hardware and software information about the installed graphics card. „ Graphics Software Provides software information including driver version, CATALYST version, Direct 3D version and so on. „ Graphics Hardware Provides hardware information incluing graphics chipset, BIOS version, memory size, core clock and so on the second display. Information Center: The Information Center page in different room environment...
... better quality with a more balanced setting. „ Video Playback Use this option to optimize video playback in Basic and Advanced View provides hardware and software information about the installed graphics card. „ Graphics Software Provides software information including driver version, CATALYST version, Direct 3D version and so on. „ Graphics Hardware Provides hardware information incluing graphics chipset, BIOS version, memory size, core clock and so on the second display. Information Center: The Information Center page in different room environment...

Manual
Page 29
...: A profile applies to restore defaults, change skins, and update the CATALYST Control Center. Software Installation The CATALYST Control Center Preferences page contains the following options: „ Always on Top „ Hide Tooltips „ Hide Toolbar Text „ Hide Splash Screen „ Enable System Tray Menu „ Select a Language ... „ Select a Skin ... „ Restore Factory Defaults ... - 25 - Preferences Properties: The Preferences page helps to a specific graphics card. English Profiles Properties: You can use profiles...
...: A profile applies to restore defaults, change skins, and update the CATALYST Control Center. Software Installation The CATALYST Control Center Preferences page contains the following options: „ Always on Top „ Hide Tooltips „ Hide Toolbar Text „ Hide Splash Screen „ Enable System Tray Menu „ Select a Language ... „ Select a Skin ... „ Restore Factory Defaults ... - 25 - Preferences Properties: The Preferences page helps to a specific graphics card. English Profiles Properties: You can use profiles...
Manual
Page 32
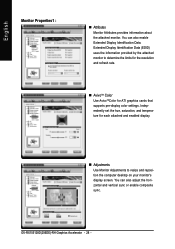
GV-RX155128D(256DE)-RH Graphics Accelerator - 28 - You can also enable Extended Display Identification Data. Independently set the hue, saturation, and temperature for ATI graphics cards that supports per-display color settings. Extended Display Identification Data (EDID) uses the information provided by the attached monitor to determine the limits for the resolution and refresh rate. „ AvivoTM Color Use AvivoTMColor for each attached and enabled display. „ Adjustments Use Monitor Adjustments to resize and reposition the computer desktop on your...
GV-RX155128D(256DE)-RH Graphics Accelerator - 28 - You can also enable Extended Display Identification Data. Independently set the hue, saturation, and temperature for ATI graphics cards that supports per-display color settings. Extended Display Identification Data (EDID) uses the information provided by the attached monitor to determine the limits for the resolution and refresh rate. „ AvivoTM Color Use AvivoTMColor for each attached and enabled display. „ Adjustments Use Monitor Adjustments to resize and reposition the computer desktop on your...

Manual
Page 37
... Interfaces (API). These settings are know which API your 3D application uses, consult the documentation of color by using the Gamma control. To adjust the overall brightness use the Brightness control, and the overall contrast use one of API (Direct3D® or OpenGL®) your 3D application. Software Installation If you want to select settings that use the Contrast control. - 33 - Color : Adjust the overall richness of...
... Interfaces (API). These settings are know which API your 3D application uses, consult the documentation of color by using the Gamma control. To adjust the overall brightness use the Brightness control, and the overall contrast use one of API (Direct3D® or OpenGL®) your 3D application. Software Installation If you want to select settings that use the Contrast control. - 33 - Color : Adjust the overall richness of...
Manual
Page 41
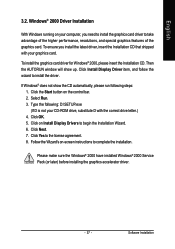
... Start button on -screen instructions to begin the Installation Wizard. 6. Software Installation Windows® 2000 Driver Installation With Windows running on Install Display Drivers to complete the installation. To ensure you need to install the graphics card driver to take advantage of the higher performance, resolutions, and special graphics features of the graphics card. To install the graphics card driver for Windows® 2000, please insert the Installation CD. Click on your graphics card. Follow the Wizard's on the control bar. 2. Click...
... Start button on -screen instructions to begin the Installation Wizard. 6. Software Installation Windows® 2000 Driver Installation With Windows running on Install Display Drivers to complete the installation. To ensure you need to install the graphics card driver to take advantage of the higher performance, resolutions, and special graphics features of the graphics card. To install the graphics card driver for Windows® 2000, please insert the Installation CD. Click on your graphics card. Follow the Wizard's on the control bar. 2. Click...
Manual
Page 42
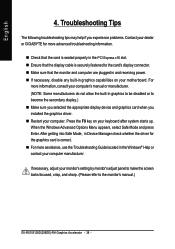
... to the monitor's manual.) GV-RX155128D(256DE)-RH Graphics Accelerator - 38 - Press the F8 key on your computer. Troubleshooting Tips The following troubleshooting tips may help if you experience problems. Contact your dealer or GIGABYTE for the graphics card is securely fastened to become the secondary display.) „ Make sure you selected the appropriate display device and graphics card when you installed the graphics driver. „ Restart your motherboard. After...
... to the monitor's manual.) GV-RX155128D(256DE)-RH Graphics Accelerator - 38 - Press the F8 key on your computer. Troubleshooting Tips The following troubleshooting tips may help if you experience problems. Contact your dealer or GIGABYTE for the graphics card is securely fastened to become the secondary display.) „ Make sure you selected the appropriate display device and graphics card when you installed the graphics driver. „ Restart your motherboard. After...

Manual
Page 43
... drive A. 2. Change the command prompt to Reflash the BIOS 5.1.1. Select the Live Update check box and click Flash. Select the BIOS file from your hard disk(s) or floppy disk. Appendix Extract the downloaded Zip file to select the @VGA utility. Update BIOS NOT through the Internet a. Select the From Local File check box and then click Flash. After installing the display drivers, you need a startup disk to your card from GIGABYTE...
... drive A. 2. Change the command prompt to Reflash the BIOS 5.1.1. Select the Live Update check box and click Flash. Select the BIOS file from your hard disk(s) or floppy disk. Appendix Extract the downloaded Zip file to select the @VGA utility. Update BIOS NOT through the Internet a. Select the From Local File check box and then click Flash. After installing the display drivers, you need a startup disk to your card from GIGABYTE...


