
Manual
Page 4
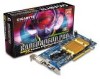
... 5.1.1. Software Installation 8 3.1. Operating System Requirement 8 3.1.2. Troubleshooting Tips 30 5. English Table of Contents 1. Resolutions and Color Depth Table (In Windows® XP 32 GV-R96P256D/GV-R96P128DE Graphics Accelerator - 2 - Utilities on Driver CD ...12 3.1.5. Windows® 2000 Driver Installation 29 4. Reflash BIOS in MS-DOS mode 31 5.1.2. DirectX Installation ...9 3.1.3. Hardware Installation 6 3. Appendix 31 5.1. Board Layout 4 2.2.
... 5.1.1. Software Installation 8 3.1. Operating System Requirement 8 3.1.2. Troubleshooting Tips 30 5. English Table of Contents 1. Resolutions and Color Depth Table (In Windows® XP 32 GV-R96P256D/GV-R96P128DE Graphics Accelerator - 2 - Utilities on Driver CD ...12 3.1.5. Windows® 2000 Driver Installation 29 4. Reflash BIOS in MS-DOS mode 31 5.1.2. DirectX Installation ...9 3.1.3. Hardware Installation 6 3. Appendix 31 5.1. Board Layout 4 2.2.
Manual
Page 7
... packing until it is installed. Place components on a grounded antistatic pad or on your graphics card working correctly, please use official Gigabyte BIOS only. Unpacking and installation should follow some precautions whenever you do not have one, touch both of your hands to a safely ...whenever the components are no shipping and handling damages on the graphics card. - 5 - Turn off your card. Use none official Gigabyte BIOS might cause problem on the card before handling computer components. Inspect the card carton for obvious damage. In order to your computer ...
... packing until it is installed. Place components on a grounded antistatic pad or on your graphics card working correctly, please use official Gigabyte BIOS only. Unpacking and installation should follow some precautions whenever you do not have one, touch both of your hands to a safely ...whenever the components are no shipping and handling damages on the graphics card. - 5 - Turn off your card. Use none official Gigabyte BIOS might cause problem on the card before handling computer components. Inspect the card carton for obvious damage. In order to your computer ...
Manual
Page 22
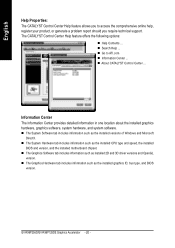
GV-R96P256D/GV-R96P128DE Graphics Accelerator - 20 - Information Center The Information Center provides detailed...„ The System Hardware tab includes information such as the installed CPU type and speed, the installed BIOS and version, and the installed motherboard chipset. „ The Graphics Software tab includes information such as ... OpenGL version. „ The Graphics Hardware tab includes information such as the installed graphics ID, bus type, and BIOS version. The CATALYST Control Center Help feature offers the following options: „ Help Contents ... „ Search Help...
GV-R96P256D/GV-R96P128DE Graphics Accelerator - 20 - Information Center The Information Center provides detailed...„ The System Hardware tab includes information such as the installed CPU type and speed, the installed BIOS and version, and the installed motherboard chipset. „ The Graphics Software tab includes information such as ... OpenGL version. „ The Graphics Hardware tab includes information such as the installed graphics ID, bus type, and BIOS version. The CATALYST Control Center Help feature offers the following options: „ Help Contents ... „ Search Help...
Manual
Page 33
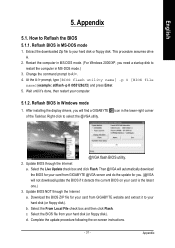
...(or floppy disk). Restart the computer in the lower-right corner @VGA flash BIOS utility. 2. Update BIOS NOT through the Internet a. b. Select the BIOS file from GIGABYTE website and extract it to your card from GIGABYTE @VGA server and do the update for your hard disk or floppy disk. Appendix... 5.1. Wait until it detects the current BIOS on -screen instructions. - 31 - icon in MS-DOS mode. (For Windows 2000/XP, you . (@VGA will find a GIGABYTE of the Taskbar. c. Select the From Local File check box and then click ...
...(or floppy disk). Restart the computer in the lower-right corner @VGA flash BIOS utility. 2. Update BIOS NOT through the Internet a. b. Select the BIOS file from GIGABYTE website and extract it to your card from GIGABYTE @VGA server and do the update for your hard disk or floppy disk. Appendix... 5.1. Wait until it detects the current BIOS on -screen instructions. - 31 - icon in MS-DOS mode. (For Windows 2000/XP, you . (@VGA will find a GIGABYTE of the Taskbar. c. Select the From Local File check box and then click ...

