
Manual
Page 5
... Tips 23 5. How to reflash the BIOS 24 5.2. INTRODUCTION 4 1.1. KEY FEATURES 4 2. English Table of Content WINDOWS® 98 /98SE / WINDOWS® ME / WINDOWS® XP DRIVER AND UTILITIES INSTALLATION 9 3.1.1. Resolutions and Color Depth Table (In Windows XP 26 - 3 - OPERATING SYSTEM REQUIREMENT 9 3.1.2. DIRECTX INSTALLATION 10 3.1.3. Appendix 24 5.1. SOFTWARE INSTALLATION 9 3.1. WINDOWS 2000...
... Tips 23 5. How to reflash the BIOS 24 5.2. INTRODUCTION 4 1.1. KEY FEATURES 4 2. English Table of Content WINDOWS® 98 /98SE / WINDOWS® ME / WINDOWS® XP DRIVER AND UTILITIES INSTALLATION 9 3.1.1. Resolutions and Color Depth Table (In Windows XP 26 - 3 - OPERATING SYSTEM REQUIREMENT 9 3.1.2. DIRECTX INSTALLATION 10 3.1.3. Appendix 24 5.1. SOFTWARE INSTALLATION 9 3.1. WINDOWS 2000...

Manual
Page 7
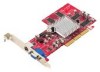
...from static electricity, you should follow some precautions whenever you work on your graphics card working correctly, please use official Gigabyte BIOS only.Use none official gigabyte BIOS might cause problem on the graphics card. - 5 - M In order to a metal object, such as... ctricity, so th e card sho uld b e left in stalled. Use a grounded wriststrap before proceeding. UNPACKING The GV-R9000 package contains the following: l The GV-R9000 Graphics Accelerator l This USER'S MANUAL l The GV-R9000 Driver CD x 1 l Power DVD XP CDx1 l Game CD x 2 l One cable support S-video and AV-Output ...
...from static electricity, you should follow some precautions whenever you work on your graphics card working correctly, please use official Gigabyte BIOS only.Use none official gigabyte BIOS might cause problem on the graphics card. - 5 - M In order to a metal object, such as... ctricity, so th e card sho uld b e left in stalled. Use a grounded wriststrap before proceeding. UNPACKING The GV-R9000 package contains the following: l The GV-R9000 Graphics Accelerator l This USER'S MANUAL l The GV-R9000 Driver CD x 1 l Power DVD XP CDx1 l Game CD x 2 l One cable support S-video and AV-Output ...
Manual
Page 10
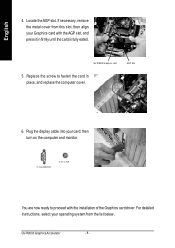
Locate the AGP slot. English 4. then align your Graphics card with the installation of the Graphics card driver. GV-R9000 G raphics card AGP Slot 5. To VGA MON ITOR To TV or VCR You are now ready to fasten the card in firmly until the card ... metal cover from the list below. Replace the screw to proceed with the AGP slot, and press it in place, and replace the computer cover. 6. GV-R9000 GraphicsAccelerator - 8 - then turn on the computer and monitor. Plug the display cable into your operating system from this slot; For detailed instructions, select your ...
Locate the AGP slot. English 4. then align your Graphics card with the installation of the Graphics card driver. GV-R9000 G raphics card AGP Slot 5. To VGA MON ITOR To TV or VCR You are now ready to fasten the card in firmly until the card ... metal cover from the list below. Replace the screw to proceed with the AGP slot, and press it in place, and replace the computer cover. 6. GV-R9000 GraphicsAccelerator - 8 - then turn on the computer and monitor. Plug the display cable into your operating system from this slot; For detailed instructions, select your ...
Manual
Page 11
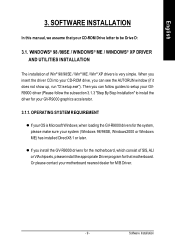
... the motherboard, which consist of Win® 98/98SE / Win® ME / Win® XP drivers is Microsoft Windows, when loading the GV-R9000 drivers for M/B Driver. - 9 - SOFTWARE INSTALLATION In this manual, we assume that motherboard. When you insert the driver CD into your GV-R9000 graphics accelerator. 3.1.1. WINDOWS® 98 /98SE / WINDOWS® ME / WINDOWS® XP...
... the motherboard, which consist of Win® 98/98SE / Win® ME / Win® XP drivers is Microsoft Windows, when loading the GV-R9000 drivers for M/B Driver. - 9 - SOFTWARE INSTALLATION In this manual, we assume that motherboard. When you insert the driver CD into your GV-R9000 graphics accelerator. 3.1.1. WINDOWS® 98 /98SE / WINDOWS® ME / WINDOWS® XP...
Manual
Page 12
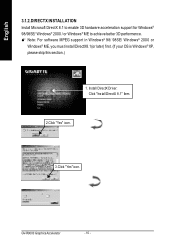
GV-R9000 GraphicsAccelerator - 10 - M Note: For software MPEG support in Windows® 98/ 98SE/ Windows® 2000 or Windows® ME, you must install DirectX8.1(or later) first. (If your OS is Windows® XP, please skip this section.) 1. Install DirectX Driver: Click "Install DirectX 8.1" Item. 2.Click "Yes" icon. 3.Click "Yes" icon. English 3.1.2.DIRECTX INSTALLATION Install Microsoft DirectX 8.1 to enable 3D hardware acceleration support for Windows® 98/98SE/ Windows® 2000 / or Windows® ME to achieve better 3D performence.
GV-R9000 GraphicsAccelerator - 10 - M Note: For software MPEG support in Windows® 98/ 98SE/ Windows® 2000 or Windows® ME, you must install DirectX8.1(or later) first. (If your OS is Windows® XP, please skip this section.) 1. Install DirectX Driver: Click "Install DirectX 8.1" Item. 2.Click "Yes" icon. 3.Click "Yes" icon. English 3.1.2.DIRECTX INSTALLATION Install Microsoft DirectX 8.1 to enable 3D hardware acceleration support for Windows® 98/98SE/ Windows® 2000 / or Windows® ME to achieve better 3D performence.
Manual
Page 14
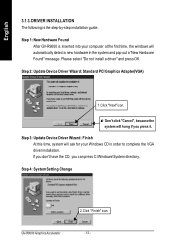
... first time, the windows will automatically detect a new hardware in order to complete the VGA driver installation. Step 4: System Setting Change GV-R9000 GraphicsAccelerator 2.Click "Finish" icon. - 12 - Please select "Do not install a driver" and press OK. Step 3: Update Device Driver Wizard: Finish At this time, system will hang if you can press C:\Windows\System...
... first time, the windows will automatically detect a new hardware in order to complete the VGA driver installation. Step 4: System Setting Change GV-R9000 GraphicsAccelerator 2.Click "Finish" icon. - 12 - Please select "Do not install a driver" and press OK. Step 3: Update Device Driver Wizard: Finish At this time, system will hang if you can press C:\Windows\System...
Manual
Page 15
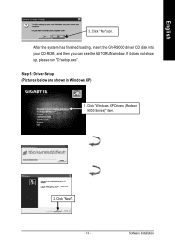
Click "Windows XP Drivers (Radeon 9000 Series)" item. 2.Click "Next". - 13 - Software Installation If it does not show up, please run "D:\setup.exe". Step 5: Driver Setup (Pictures below are shown in Windows XP) 1. After the system has finished loading, insert the GV-R9000 driver CD disk into your CD-ROM, and then you can see the AUTORUN window. English 3..Click "No" icon.
Click "Windows XP Drivers (Radeon 9000 Series)" item. 2.Click "Next". - 13 - Software Installation If it does not show up, please run "D:\setup.exe". Step 5: Driver Setup (Pictures below are shown in Windows XP) 1. After the system has finished loading, insert the GV-R9000 driver CD disk into your CD-ROM, and then you can see the AUTORUN window. English 3..Click "No" icon.
Manual
Page 17
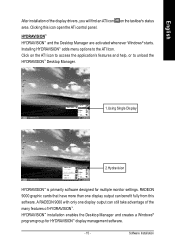
...® program group for multiple monitor settings. A RADEON 9000 with only one display output can still take advantage of the many features of the display drivers, you will find an ATI icon on the ATI icon to access the application's features and help, or to the ATI Icon. Click on the...
...® program group for multiple monitor settings. A RADEON 9000 with only one display output can still take advantage of the many features of the display drivers, you will find an ATI icon on the ATI icon to access the application's features and help, or to the ATI Icon. Click on the...
Manual
Page 18
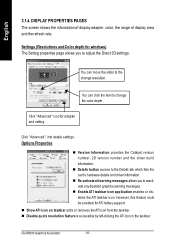
.... Click "Advanced", into details settings: Options Properties n Version Information provides the Catalyst version number, 2D version number and the driver build information. However, this feature must be enabled forATI hotkey support. You can move the slider to the Details tab which ... driver information. Click "Advanced" icon for windows) The Setting properties page allows you to change resolution. n Re-activate all warning messages allows you to adjust the Direct 3D settings. n Show ATI icon on taskbar adds or removes the ATI icon from the taskbar. GV-R9000 ...
.... Click "Advanced", into details settings: Options Properties n Version Information provides the Catalyst version number, 2D version number and the driver build information. However, this feature must be enabled forATI hotkey support. You can move the slider to the Details tab which ... driver information. Click "Advanced" icon for windows) The Setting properties page allows you to change resolution. n Re-activate all warning messages allows you to adjust the Direct 3D settings. n Show ATI icon on taskbar adds or removes the ATI icon from the taskbar. GV-R9000 ...
Manual
Page 20
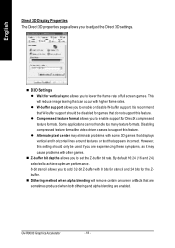
... you to enable or disable W-buffer support. Itis recommend that are sometimes produced when both dithering and alpha blending are enabled. GV-R9000 GraphicsAccelerator - 18 - Disabling compressed texture formatthe video driver ceases to adjust the Direct 3D settings. English Direct 3D Display Properties The Direct 3D properties page allows you to support this...
... you to enable or disable W-buffer support. Itis recommend that are sometimes produced when both dithering and alpha blending are enabled. GV-R9000 GraphicsAccelerator - 18 - Disabling compressed texture formatthe video driver ceases to adjust the Direct 3D settings. English Direct 3D Display Properties The Direct 3D properties page allows you to support this...
Manual
Page 24
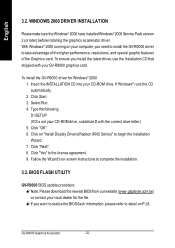
....gigabyte.com.tw) or contact your CD-ROM drive. Click "Next". 8. If Windows® runs the CD automatically. 2. Click "Yes" to complete the installation. 3.3. With Windows® 2000 running on your GV-R9000 graphics card. MIf you need to install the GV-R9000 driver to begin the Installation Wizard. 7. English 3.2. GV-R9000 GraphicsAccelerator - 22 - To install the GV-R9000 driver for...
....gigabyte.com.tw) or contact your CD-ROM drive. Click "Next". 8. If Windows® runs the CD automatically. 2. Click "Yes" to complete the installation. 3.3. With Windows® 2000 running on your GV-R9000 graphics card. MIf you need to install the GV-R9000 driver to begin the Installation Wizard. 7. English 3.2. GV-R9000 GraphicsAccelerator - 22 - To install the GV-R9000 driver for...
Manual
Page 25
... or to the card's display connector. English 4. n Make sure that the monitor and computer are only using one graphics card. n If you installed the graphics driver. In Windows® 98 SE and Windows® Me, press and hold the CTRL key until the Microsoft® Windows® Startup Menu appears on...
... or to the card's display connector. English 4. n Make sure that the monitor and computer are only using one graphics card. n If you installed the graphics driver. In Windows® 98 SE and Windows® Me, press and hold the CTRL key until the Microsoft® Windows® Startup Menu appears on...

