
Manual
Page 2
... do not remove any from without the expressed, written permission of this document nor does it make a commitment to rapid change in technology, some of the specifications might be reproduced or transmitted in this manual may void the warranty of their respective owners. Jul. 03, 2003 Taipei, Taiwan GV-R7032T/GV-R7064T Graphics Accelerator - 2 - English User's Manual Copyright Copyright by Macrovision Corporation and other...
... do not remove any from without the expressed, written permission of this document nor does it make a commitment to rapid change in technology, some of the specifications might be reproduced or transmitted in this manual may void the warranty of their respective owners. Jul. 03, 2003 Taipei, Taiwan GV-R7032T/GV-R7064T Graphics Accelerator - 2 - English User's Manual Copyright Copyright by Macrovision Corporation and other...
Manual
Page 3
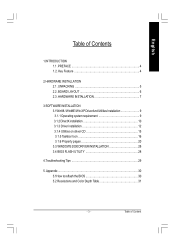
... 6 2.3. Appendix 30 5.1How to reflash the BIOS 30 5.2 Resolutions and Color Depth Table 31 - 3 - Key Feature 4 2.HARDWARE INSTALLATION 2.1. UNPACKING 5 2.2. HARDWARE INSTALLATION 7 3.SOFTWARE INSTALLATION 3.1Win98 / WinME /Win XP DriverAnd Utilities Installation 9 3.1.1 Operating system requirement 9 3.1.2 DirectX installation 10 3.1.3 Driver installation 12 3.1.4 Utilities on driver CD 15 3.1.5 Taskbar Icon 16 3.1.6 Property pages 20 3.3.WINDOWS 2000 DRIVER INSTALLATION 28 3.4 BIOS FLASH UTILITY 28 4.Troubleshooting Tips 29 5. Table of Contents 1.INTRODUCTION...
... 6 2.3. Appendix 30 5.1How to reflash the BIOS 30 5.2 Resolutions and Color Depth Table 31 - 3 - Key Feature 4 2.HARDWARE INSTALLATION 2.1. UNPACKING 5 2.2. HARDWARE INSTALLATION 7 3.SOFTWARE INSTALLATION 3.1Win98 / WinME /Win XP DriverAnd Utilities Installation 9 3.1.1 Operating system requirement 9 3.1.2 DirectX installation 10 3.1.3 Driver installation 12 3.1.4 Utilities on driver CD 15 3.1.5 Taskbar Icon 16 3.1.6 Property pages 20 3.3.WINDOWS 2000 DRIVER INSTALLATION 28 3.4 BIOS FLASH UTILITY 28 4.Troubleshooting Tips 29 5. Table of Contents 1.INTRODUCTION...
Manual
Page 4
... DDR n Silver HeatSink Onboard n Supports DirectX® and OpenGL® n DVD playback with integrated motion compensation and iDCT n Supports 3D resolutions (32-bit color) up to increase effective memory bandwidth and PIXEL TAPESTRY™ for AGP 2X/4X systems) n Support TV-OUT (S and AV connector) Function GV-R7032T/GV-R7064T Graphics Accelerator - 4 - KEY FEATURES n Powered by the ATi RADEON™ 7000 graphics processor and 32 / 64 MB DDR memory; English 1.INTRODUCTION 1.1. GV-R7032T/GV...
... DDR n Silver HeatSink Onboard n Supports DirectX® and OpenGL® n DVD playback with integrated motion compensation and iDCT n Supports 3D resolutions (32-bit color) up to increase effective memory bandwidth and PIXEL TAPESTRY™ for AGP 2X/4X systems) n Support TV-OUT (S and AV connector) Function GV-R7032T/GV-R7064T Graphics Accelerator - 4 - KEY FEATURES n Powered by the ATi RADEON™ 7000 graphics processor and 32 / 64 MB DDR memory; English 1.INTRODUCTION 1.1. GV-R7032T/GV...

Manual
Page 5
... until it is installed. M In order to your graphics card working correctly, please use official Gigabyte BIOS only Use none official gigabyte BIOS might cause problem on the graphics card. - 5 - The operator should be done on the card before handling computer components. UNPACKING The GV-R7032T/GV-R7064T package contains the following: l The GV-R7032T/GV-R7064T graphics accelerator l This USER'S MANUAL l DVD Player software included l CD for obvious damage. M DO NOT APPLY POWER TO YOUR SYSTEM...
... until it is installed. M In order to your graphics card working correctly, please use official Gigabyte BIOS only Use none official gigabyte BIOS might cause problem on the graphics card. - 5 - The operator should be done on the card before handling computer components. UNPACKING The GV-R7032T/GV-R7064T package contains the following: l The GV-R7032T/GV-R7064T graphics accelerator l This USER'S MANUAL l DVD Player software included l CD for obvious damage. M DO NOT APPLY POWER TO YOUR SYSTEM...

Manual
Page 7
... your graphics accelerator card: 1. Power off the computer and monitor, then disconnect the display cable from your graphics accelerator card. For more information, see you may need to install your computer. English 2.3. Or, if your computer has any existing graphics card from the back of your computer, you are ready to disable it on -board graphics capability, you computer documentation. - 7 - Remove any on the motherboard. To install your computer's manual for help...
... your graphics accelerator card: 1. Power off the computer and monitor, then disconnect the display cable from your graphics accelerator card. For more information, see you may need to install your computer. English 2.3. Or, if your computer has any existing graphics card from the back of your computer, you are ready to disable it on -board graphics capability, you computer documentation. - 7 - Remove any on the motherboard. To install your computer's manual for help...

Manual
Page 8
... the computer and monitor. If your operating system from this slot; If necessary, remove the metal cover from the list below ... To VGA Monitor To TV or VCR You are now ready to proceed with a DVI connector, you can connect a flat panel display to the appropriate connector, as shown below . For detailed instructions, select your Graphics card came with the installation of the Graphics card driver. English 4.
... the computer and monitor. If your operating system from this slot; If necessary, remove the metal cover from the list below ... To VGA Monitor To TV or VCR You are now ready to proceed with a DVI connector, you can connect a flat panel display to the appropriate connector, as shown below . For detailed instructions, select your Graphics card came with the installation of the Graphics card driver. English 4.

Manual
Page 9
..., run "D:\setup.exe"). l If you can follow guides to setup your GV-R7032T/GV-R7064T driver (Please follow the subsection 3.1.3 "Step By Step Installation" to be Drive D: Picture below are shown in Windows XP 3.1. English 3.SOFTWARE INSTALLATION In this manual, we assume that mainboard. When you insert the driver CD into your CD-ROM drive, you install the GV-R7032T/GV-R7064T drivers for the mainboard, which consist of Win 98/98SE / Win...
..., run "D:\setup.exe"). l If you can follow guides to setup your GV-R7032T/GV-R7064T driver (Please follow the subsection 3.1.3 "Step By Step Installation" to be Drive D: Picture below are shown in Windows XP 3.1. English 3.SOFTWARE INSTALLATION In this manual, we assume that mainboard. When you insert the driver CD into your CD-ROM drive, you install the GV-R7032T/GV-R7064T drivers for the mainboard, which consist of Win 98/98SE / Win...
Manual
Page 10
... support DirectX 8.1, updating with DirectX 9.0 can upgrade your operating system to what is the up-to its best performance. Installation DirectX Driver Click "Intall Direct 9" Item. 2.Click "I accept the agreement", than click"Next" icon. M Note: For software MPEG support in Windows® 98/ 98SE/ Windows® 2000 / Windows® ME or Windows® XP, you must install DirectX (or later version) first. 1. GV-R7032T/GV-R7064T Graphics Accelerator - 10 - DirectX 9.0 is required for your graphics accelerator hardware...
... support DirectX 8.1, updating with DirectX 9.0 can upgrade your operating system to what is the up-to its best performance. Installation DirectX Driver Click "Intall Direct 9" Item. 2.Click "I accept the agreement", than click"Next" icon. M Note: For software MPEG support in Windows® 98/ 98SE/ Windows® 2000 / Windows® ME or Windows® XP, you must install DirectX (or later version) first. 1. GV-R7032T/GV-R7064T Graphics Accelerator - 10 - DirectX 9.0 is required for your graphics accelerator hardware...

Manual
Page 12
... this time, system will hang if you can press C:\Windows\System directory. Step 2: Update Device Driver Wizard: Standard PCI Graphics Adapter(VGA) 1.Click "Next" icon. GV-R7032T/GV-R7064T Graphics Accelerator - 12 - Please select "Do not install a driver" and press OK. Step 1: New Hardware Found After GV-R7032T/GV-R7064T is the step-by-step installation guide. If you don't have the CD, you press it. Step 4: System Setting Change 2.Click "Finish" icon.
... this time, system will hang if you can press C:\Windows\System directory. Step 2: Update Device Driver Wizard: Standard PCI Graphics Adapter(VGA) 1.Click "Next" icon. GV-R7032T/GV-R7064T Graphics Accelerator - 12 - Please select "Do not install a driver" and press OK. Step 1: New Hardware Found After GV-R7032T/GV-R7064T is the step-by-step installation guide. If you don't have the CD, you press it. Step 4: System Setting Change 2.Click "Finish" icon.
Manual
Page 13
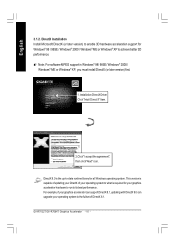
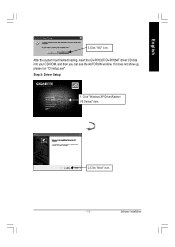
Click "Windows XP Driver(Radeon VE Series)" item. 2.Click "Next" icon. - 13 - Software Installation Step 5: Driver Setup 1. After the system has finished loading, insert the GV-R7032T/GV-R7064T driver CD disk into your CD-ROM, and then you can see the AUTORUN window. If it does not show up, please run "D:\setup.exe". English 3.Click "NO" icon.
Click "Windows XP Driver(Radeon VE Series)" item. 2.Click "Next" icon. - 13 - Software Installation Step 5: Driver Setup 1. After the system has finished loading, insert the GV-R7032T/GV-R7064T driver CD disk into your CD-ROM, and then you can see the AUTORUN window. If it does not show up, please run "D:\setup.exe". English 3.Click "NO" icon.

Manual
Page 16
... "Display Properties" item, and then click Settings. You can link to change your display settings. Click the appropriate tab to GBT website for updated information about the graphics card, latest drivers, and other functions. English 3.1.5 Taskbar Icon After installation of the graphics card's enhanced and other information. GV-R7032T/GV-R7064T Graphics Accelerator - 16 - Click "Advanced" after clickng Settings. Right click the icon. Rightclicking this icon opens the GBT control panel...
... "Display Properties" item, and then click Settings. You can link to change your display settings. Click the appropriate tab to GBT website for updated information about the graphics card, latest drivers, and other functions. English 3.1.5 Taskbar Icon After installation of the graphics card's enhanced and other information. GV-R7032T/GV-R7064T Graphics Accelerator - 16 - Click "Advanced" after clickng Settings. Right click the icon. Rightclicking this icon opens the GBT control panel...
Manual
Page 19
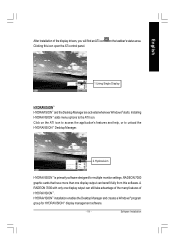
... to the ATI Icon. Software Installation RADEON 7000 graphic cards that have more than one display output can benefit fully from this icon open the ATi control panel. 1.Using Single Display HYDRAVISION™ HYDRAVISION™ and the Desktop Manager are activated whenever Windows® starts. English After installation of HYDRAVISION™ . HYDRAVISION™ installation enables the Desktop Manager and creates a Windows® program group for multiple monitor settings. Click on the...
... to the ATI Icon. Software Installation RADEON 7000 graphic cards that have more than one display output can benefit fully from this icon open the ATi control panel. 1.Using Single Display HYDRAVISION™ HYDRAVISION™ and the Desktop Manager are activated whenever Windows® starts. English After installation of HYDRAVISION™ . HYDRAVISION™ installation enables the Desktop Manager and creates a Windows® program group for multiple monitor settings. Click on the...

Manual
Page 20
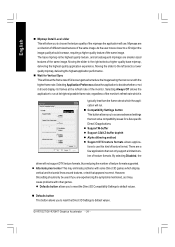
... card's hardware details and driver information. However, this feature must be enabled for adapter and setting. Setting (Resolutions and Color depth for windows) The Setting properties page allows you to reduce the DVI frequency when using high-resolution. GV-R7032T/GV-R7064T Graphics Accelerator - 20 - English 3.1.6.Display Property pages The screen shows the information of display adapter, color, the range of display area . and the refresh rate. Click"Advanced" icon for ATI hotkey support. Options Properties n Version Information provides the Catalyst version number, 2D version number...
... card's hardware details and driver information. However, this feature must be enabled for adapter and setting. Setting (Resolutions and Color depth for windows) The Setting properties page allows you to reduce the DVI frequency when using high-resolution. GV-R7032T/GV-R7064T Graphics Accelerator - 20 - English 3.1.6.Display Property pages The screen shows the information of display adapter, color, the range of display area . and the refresh rate. Click"Advanced" icon for ATI hotkey support. Options Properties n Version Information provides the Catalyst version number, 2D version number...
Manual
Page 22
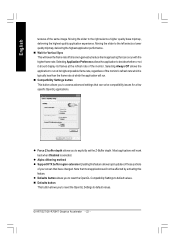
... whether or not it should display its highest possible frame rate, regardless of the monitor's refresh rate which the application will lower the frame rate of your screen that can occur with the higher frame rate. n Defaults button This button allows you to access advanced settings that have changed. GV-R7032T/GV-R7064T Graphics Accelerator - 22 - n Wait for Vertical Sync This will run at its frames at...
... whether or not it should display its highest possible frame rate, regardless of the monitor's refresh rate which the application will lower the frame rate of your screen that can occur with the higher frame rate. n Defaults button This button allows you to access advanced settings that have changed. GV-R7032T/GV-R7064T Graphics Accelerator - 22 - n Wait for Vertical Sync This will run at its frames at...
Manual
Page 24
... higher frame rate. l Support W-buffer l Support 32bit Z-buffer dephth l Alphe dithering method l Support DTX texture formats allows applications to use . By selecting Disabled, the driver will not support DTX texture formats, thus reducing the number of the same image. l Defaults button allows you to reset the Direct 3D Compatibility Settings to default values. n Wait for a few applications that can only support a limited number of texture...
... higher frame rate. l Support W-buffer l Support 32bit Z-buffer dephth l Alphe dithering method l Support DTX texture formats allows applications to use . By selecting Disabled, the driver will not support DTX texture formats, thus reducing the number of the same image. l Defaults button allows you to reset the Direct 3D Compatibility Settings to default values. n Wait for a few applications that can only support a limited number of texture...

Manual
Page 25
... blue display colors. Software Installation The color settings affect all display devices mapped to the view.You can also be apparent within the Full Screen 3D application environment. n Default resets the desktop brightness and color settings to adjust the color settings. n Full Screen 3D Note that changes to increase or decrease the color brightness of the Video Overlay. English Color Properties: The Color Properties is NOT supported in fullscreen mode. (NOTE: Game Gamma is used to the default...
... blue display colors. Software Installation The color settings affect all display devices mapped to the view.You can also be apparent within the Full Screen 3D application environment. n Default resets the desktop brightness and color settings to adjust the color settings. n Full Screen 3D Note that changes to increase or decrease the color brightness of the Video Overlay. English Color Properties: The Color Properties is NOT supported in fullscreen mode. (NOTE: Game Gamma is used to the default...

Manual
Page 26
... video image. GV-R7032T/GV-R7064T Graphics Accelerator - 26 - n Overlay Adjustments l Brightness allows you to adjust the brightness of the video image. Changing these settings might result in the video image. However, there is only one video overlay, which is used to adjust the vividness of any video file type that determine your PC. l Saturation allows you to reset the Overlay settings to the left removes all color...
... video image. GV-R7032T/GV-R7064T Graphics Accelerator - 26 - n Overlay Adjustments l Brightness allows you to adjust the brightness of the video image. Changing these settings might result in the video image. However, there is only one video overlay, which is used to adjust the vividness of any video file type that determine your PC. l Saturation allows you to reset the Overlay settings to the left removes all color...

Manual
Page 27
... copying your graphics card is equipped with a S-Video connector , you can use a second output device (e.q. Using an S-Video cable or the supplied adapter cable, attach one end of your operating desktop extending your desktop to a TV or VCR Turn off your computer and your television (or VCR). Determine if your television (or VCR). - 27 - Software Installation Ensure your desktop on the second device. Here you can enable/disable display devices...
... copying your graphics card is equipped with a S-Video connector , you can use a second output device (e.q. Using an S-Video cable or the supplied adapter cable, attach one end of your operating desktop extending your desktop to a TV or VCR Turn off your computer and your television (or VCR). Determine if your television (or VCR). - 27 - Software Installation Ensure your desktop on the second device. Here you can enable/disable display devices...
Manual
Page 28
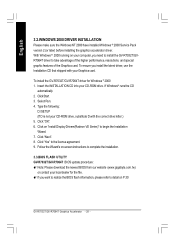
... Wizard's on P.30 GV-R7032T/GV-R7064T Graphics Accelerator - 28 - Click "Yes"to detail on -screen instructions to complete the installation. 3.3.BIOS FLASH UTILITY GV-R7032T/GV-R7064T BIOS update procedure: MNote: Please download the newest BIOS from our website (www.gigabyte.com.tw) or contact your local dealer for Windows ® 2000 1. To install the GV-R7032T/GV-R7064T driver for the file. Select Run. 4. Type the following: D:\SETUP (If D is not your Graphics card. ClickStart. 3. MIf you...
... Wizard's on P.30 GV-R7032T/GV-R7064T Graphics Accelerator - 28 - Click "Yes"to detail on -screen instructions to complete the installation. 3.3.BIOS FLASH UTILITY GV-R7032T/GV-R7064T BIOS update procedure: MNote: Please download the newest BIOS from our website (www.gigabyte.com.tw) or contact your local dealer for Windows ® 2000 1. To install the GV-R7032T/GV-R7064T driver for the file. Select Run. 4. Type the following: D:\SETUP (If D is not your Graphics card. ClickStart. 3. MIf you...

Manual
Page 29
... the display cable is seated properly in and receiving power. Then select the number for Safe Mode, and press Enter. (You can also use the Troubleshooting Guide located in graphics capabilities on the screen. n Make sure that the monitor and computer are only using one graphics card. n If you experience problems. Contact your motherboard. n If necessary, disable any built-in the Windows® Help or contact your monitor's setting by monitor's adjust panel...
... the display cable is seated properly in and receiving power. Then select the number for Safe Mode, and press Enter. (You can also use the Troubleshooting Guide located in graphics capabilities on the screen. n Make sure that the monitor and computer are only using one graphics card. n If you experience problems. Contact your motherboard. n If necessary, disable any built-in the Windows® Help or contact your monitor's setting by monitor's adjust panel...


