Manual
Page 1
... technology, some of the specifications might be reproduced or transmitted in this manual. Doing so may void the warranty of this copyright protection technology must be authorized by Rovi Corporation. patents and other limited viewing uses only unless otherwise authorized by Rovi Corporation, and is intended for any labels on this card. Use of this graphics card. GV-R697OC-1GD/ GV-R695OC-1GD AMD RadeonTM HD6900 Graphics Accelerator User's Manual Rev...
... technology, some of the specifications might be reproduced or transmitted in this manual. Doing so may void the warranty of this copyright protection technology must be authorized by Rovi Corporation. patents and other limited viewing uses only unless otherwise authorized by Rovi Corporation, and is intended for any labels on this card. Use of this graphics card. GV-R697OC-1GD/ GV-R695OC-1GD AMD RadeonTM HD6900 Graphics Accelerator User's Manual Rev...
Manual
Page 4
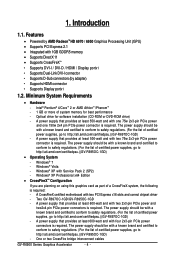
... by AMD RadeonTMHD 6970 / 6950 Graphics Processing Unit (GPU) • Supports PCI Express 2.1 • Integrated with two 2x3-pin PCIe power and two2x4 pin PCIe power connectors is required. Optical drive for best performance - Windows® 7 - Two GV-R697OC-1GD/GV-R695OC-1GD - A power supply that provides at least 600-watt and with 1GB GDDR5 memory • Supports DirectX 11 • Supports CrossFireXTM • Supports DVI-I / DVI-D / HDMI / Display portx1 • Supports Dual-Link DVI-I connector • Supports D-Sub connectors (by adapter) • Supports HDMI connector...
... by AMD RadeonTMHD 6970 / 6950 Graphics Processing Unit (GPU) • Supports PCI Express 2.1 • Integrated with two 2x3-pin PCIe power and two2x4 pin PCIe power connectors is required. Optical drive for best performance - Windows® 7 - Two GV-R697OC-1GD/GV-R695OC-1GD - A power supply that provides at least 600-watt and with 1GB GDDR5 memory • Supports DirectX 11 • Supports CrossFireXTM • Supports DVI-I / DVI-D / HDMI / Display portx1 • Supports Dual-Link DVI-I connector • Supports D-Sub connectors (by adapter) • Supports HDMI connector...
Manual
Page 5
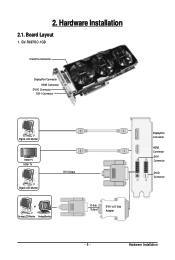
Hardware Installation 2.1. GV-R697OC-1GD CrossFire Connector DisplayPort Connector HDMI Connector DVI-D Connector DVI-I Connector Digital LCD Monitor HDMI TV HDMI TV Digital LCD Monitor DVI Output or Analog LCD Monitor Analog Monitor D-Sub Output DVI-I to D-Sub Adapter DisplayPort Connector HDMI Connector DVI-I Connector DVI-D Connector - 5 - 2. Hardware Installation Board Layout 1.
Hardware Installation 2.1. GV-R697OC-1GD CrossFire Connector DisplayPort Connector HDMI Connector DVI-D Connector DVI-I Connector Digital LCD Monitor HDMI TV HDMI TV Digital LCD Monitor DVI Output or Analog LCD Monitor Analog Monitor D-Sub Output DVI-I to D-Sub Adapter DisplayPort Connector HDMI Connector DVI-I Connector DVI-D Connector - 5 - 2. Hardware Installation Board Layout 1.
Manual
Page 7
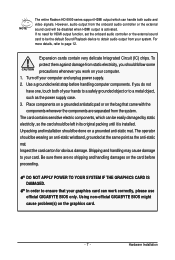
... card should be disabled when HDMI output is installed. Hardware Installation The operator should follow some precautions whenever you do not have one, touch both audio and video signals. However, audio output from your computer. 1. In order to a metal object, such as the anti-static mat. Place components on a grounded antistatic pad or on your system. If you work correctly, please use official GIGABYTE BIOS...
... card should be disabled when HDMI output is installed. Hardware Installation The operator should follow some precautions whenever you do not have one, touch both audio and video signals. However, audio output from your computer. 1. In order to a metal object, such as the anti-static mat. Place components on a grounded antistatic pad or on your system. If you work correctly, please use official GIGABYTE BIOS...

Manual
Page 8
... the display cable into your graphics card, use the DVI-I connector. To connect a DisplayPort monitor to your graphics card. 2.2. Hardware Installation Now that the gold edge connector of the graphics card driver. Replace the screw to install your graphics card, or the system will not boot. Step 3. Step 1. Locate the PCI Express x16 slot. then turn on the computer and monitor. GV-R6900 Series Graphics Accelerator - 8 - Make sure that you have prepared your graphics card, use the HDMI connector. To connect a flat panel display to proceed...
... the display cable into your graphics card, use the DVI-I connector. To connect a DisplayPort monitor to your graphics card. 2.2. Hardware Installation Now that the gold edge connector of the graphics card driver. Replace the screw to install your graphics card, or the system will not boot. Step 3. Step 1. Locate the PCI Express x16 slot. then turn on the computer and monitor. GV-R6900 Series Graphics Accelerator - 8 - Make sure that you have prepared your graphics card, use the HDMI connector. To connect a flat panel display to proceed...
Manual
Page 9
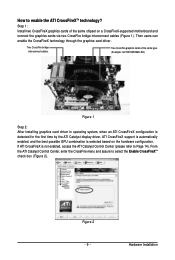
... based on a CrossFireX-supported motherboard and connect the graphics cards via two CrossFire bridge interconnect cables (Figure 1). From the ATI Catalyst Control Center, enter the CrossFire menu and assure to enable the ATI CrossFireXTM technology? Two CrossFire graphics cards of the same chipset on the hardware configuration. Then users can enable the CrossFireX technology through the graphics card driver. Step 1: Install two CrossFireX graphics cards of the same type. (Example: GV-RX195P256D-RH) Figure 1 Step 2: After installing graphics card driver in operating system...
... based on a CrossFireX-supported motherboard and connect the graphics cards via two CrossFire bridge interconnect cables (Figure 1). From the ATI Catalyst Control Center, enter the CrossFire menu and assure to enable the ATI CrossFireXTM technology? Two CrossFire graphics cards of the same chipset on the hardware configuration. Then users can enable the CrossFireX technology through the graphics card driver. Step 1: Install two CrossFireX graphics cards of the same type. (Example: GV-RX195P256D-RH) Figure 1 Step 2: After installing graphics card driver in operating system...
Manual
Page 10
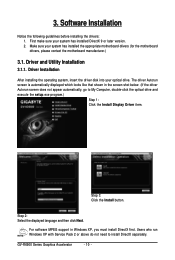
... Windows XP, you must install DirectX first. GV-R6900 Series Graphics Accelerator - 10 - Step 2: Select the displayed language and then click Next. Make sure your optical drive. Step 3: Click the Install button. For software MPEG support in the screen shot below. (If the driver Autorun screen does not appear automatically, go to install DirectX separately. Driver Installation After installing the operating system, insert the driver disk into your system has installed the appropriate motherboard drivers...
... Windows XP, you must install DirectX first. GV-R6900 Series Graphics Accelerator - 10 - Step 2: Select the displayed language and then click Next. Make sure your optical drive. Step 3: Click the Install button. For software MPEG support in the screen shot below. (If the driver Autorun screen does not appear automatically, go to install DirectX separately. Driver Installation After installing the operating system, insert the driver disk into your system has installed the appropriate motherboard drivers...

Manual
Page 13
Configuring Audio Output Configure the default audio output device based upon your needs. Otherwise, select Digital Output Device (SPDIF), which is the onboard audio controller. - 13 - Software Installation Figure 1 Figure 2 Figure 3 Step 2: In the Manage audio devices dialog box, click the Playback tab. Using the picture to the left as the example, to set HDMI audio to Start > Control Panel > Hardware and Sound > Manage audio devices. Step 1: Go to be the default Sound Playback device, select Digital Output Device (HDMI).
Configuring Audio Output Configure the default audio output device based upon your needs. Otherwise, select Digital Output Device (SPDIF), which is the onboard audio controller. - 13 - Software Installation Figure 1 Figure 2 Figure 3 Step 2: In the Manage audio devices dialog box, click the Playback tab. Using the picture to the left as the example, to set HDMI audio to Start > Control Panel > Hardware and Sound > Manage audio devices. Step 1: Go to be the default Sound Playback device, select Digital Output Device (HDMI).
Manual
Page 14
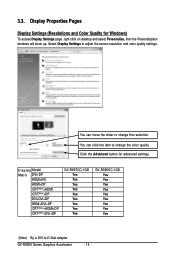
... windows will show up. You can click the item to change the color quality. D i s p l a y Model Matrix DVI+DP HDMI+DVI HDMI+DP CRT(Note)+HDMI CRT(Note)+DP DVI+DVI+DP HDMI+DVI+DP CRT(Note)+HDMI+DP CRT(Note)+DVI+DP GV-R697OC-1GD Yes Yes Yes Yes Yes Yes Yes Yes Yes GV-R695OC-1GD Yes Yes Yes Yes Yes Yes Yes Yes Yes (Note) By a DVI-to adjust the screen resolution and color quality settings. GV-R6900 Series Graphics Accelerator - 14 - 3.3. Display Properties...
... windows will show up. You can click the item to change the color quality. D i s p l a y Model Matrix DVI+DP HDMI+DVI HDMI+DP CRT(Note)+HDMI CRT(Note)+DP DVI+DVI+DP HDMI+DVI+DP CRT(Note)+HDMI+DP CRT(Note)+DVI+DP GV-R697OC-1GD Yes Yes Yes Yes Yes Yes Yes Yes Yes GV-R695OC-1GD Yes Yes Yes Yes Yes Yes Yes Yes Yes (Note) By a DVI-to adjust the screen resolution and color quality settings. GV-R6900 Series Graphics Accelerator - 14 - 3.3. Display Properties...

Manual
Page 15
... Avivo Video Converter, then click Go. Click Next. - 15 - Step 3: In the Output Folder area, select the destination folder where the new file will be converted. This interface provides access to another. To access more settings in Basic View, click Basic, and then click Next. Software Installation ATI Catalyst® Control Center Basic View : The Basic View is the default view when ATI Catalyst Control Center is...
... Avivo Video Converter, then click Go. Click Next. - 15 - Step 3: In the Output Folder area, select the destination folder where the new file will be converted. This interface provides access to another. To access more settings in Basic View, click Basic, and then click Next. Software Installation ATI Catalyst® Control Center Basic View : The Basic View is the default view when ATI Catalyst Control Center is...
Manual
Page 17
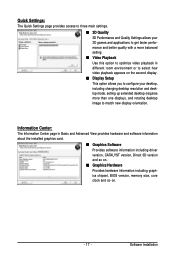
... including driver version, CATALYST version, Direct 3D version and so on. „ Graphics Hardware Provides hardware information including graphics chipset, BIOS version, memory size, core clock and so on the second display. „ Display Setup This option allows you to configure your desktop, including changing desktop resolution and desktop mode, setting up extended desktop (requires more than one display), and rotating desktop image to match new display orientation. Information Center: The Information Center page in different room environment or to select how video...
... including driver version, CATALYST version, Direct 3D version and so on. „ Graphics Hardware Provides hardware information including graphics chipset, BIOS version, memory size, core clock and so on the second display. „ Display Setup This option allows you to configure your desktop, including changing desktop resolution and desktop mode, setting up extended desktop (requires more than one display), and rotating desktop image to match new display orientation. Information Center: The Information Center page in different room environment or to select how video...

Manual
Page 18
... advanced features on each page. GV-R6900 Series Graphics Accelerator - 18 - The left navigation pane. A Hotkey is rec- LYST Control Center is recommended for the first time. The Custom view is launched for experienced users who want to display only the features you choose in the left navi- View Properties: The CATALYST Control Center dashboard supports three types of your ATI graphics card. Refer to the previous...
... advanced features on each page. GV-R6900 Series Graphics Accelerator - 18 - The left navigation pane. A Hotkey is rec- LYST Control Center is recommended for the first time. The Custom view is launched for experienced users who want to display only the features you choose in the left navi- View Properties: The CATALYST Control Center dashboard supports three types of your ATI graphics card. Refer to the previous...

Manual
Page 19
Software Installation Profiles Properties: You can use profiles to create customized environments for your own personal video settings that can be quickly activated manually, through a Hotkey, or by file association. Preferences Properties: The Preferences page helps to a specific graphics card. Define and save your desktop, video, and 3D applications. Note: A profile applies to restore defaults, change skins, and update the Catalyst Control Center. If there is more than one graphics card installed in your computer, you need to...
Software Installation Profiles Properties: You can use profiles to create customized environments for your own personal video settings that can be quickly activated manually, through a Hotkey, or by file association. Preferences Properties: The Preferences page helps to a specific graphics card. Define and save your desktop, video, and 3D applications. Note: A profile applies to restore defaults, change skins, and update the Catalyst Control Center. If there is more than one graphics card installed in your computer, you need to...
Manual
Page 21
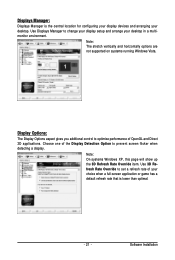
... supported on systems running Windows Vista. Software Installation Use 3D Refresh Rate Override to change your display setup and arrange your desktop. Choose one of the Display Detection Option to optimize performance of your choice when a full-screen application or game has a default refresh rate that is the central location for configuring your display devices and arranging your desktop in a multimonitor environment. Display Options: The Display Options aspect gives you additional control to prevent screen...
... supported on systems running Windows Vista. Software Installation Use 3D Refresh Rate Override to change your display setup and arrange your desktop. Choose one of the Display Detection Option to optimize performance of your choice when a full-screen application or game has a default refresh rate that is the central location for configuring your display devices and arranging your desktop in a multimonitor environment. Display Options: The Display Options aspect gives you additional control to prevent screen...
Manual
Page 22
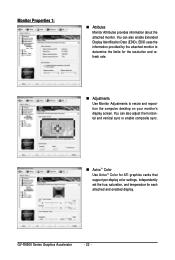
... monitor. Independently set the hue, saturation, and temperature for ATI graphics cards that support per-display color settings. You can also adjust the horizontal and vertical sync or enable composite sync. „ AvivoTM Color Use AvivoTM Color for each attached and enabled display. GV-R6900 Series Graphics Accelerator - 22 - You can also enable Extended Display Identification Data (EDID). EDID uses the information provided by the attached monitor to determine the limits for the resolution and refresh rate. „ Adjustments Use Monitor Adjustments...
... monitor. Independently set the hue, saturation, and temperature for ATI graphics cards that support per-display color settings. You can also adjust the horizontal and vertical sync or enable composite sync. „ AvivoTM Color Use AvivoTM Color for each attached and enabled display. GV-R6900 Series Graphics Accelerator - 22 - You can also enable Extended Display Identification Data (EDID). EDID uses the information provided by the attached monitor to determine the limits for the resolution and refresh rate. „ Adjustments Use Monitor Adjustments...

Manual
Page 23
... application. Your display will automatically adjust to the application's requirements. „ Adaptive Anti-Aliasing Adaptive anti-aliasing is a rendering technique designed to remove jagged edges, shimmering, and pixelation problems that applies a combination of multi-sampling (MSAA) and super-sampling (SSAA) on 3D objects to improve edge smoothness and fine detail. Software Installation 3D: „ Standard Settings The Standard Settings page provides...
... application. Your display will automatically adjust to the application's requirements. „ Adaptive Anti-Aliasing Adaptive anti-aliasing is a rendering technique designed to remove jagged edges, shimmering, and pixelation problems that applies a combination of multi-sampling (MSAA) and super-sampling (SSAA) on 3D objects to improve edge smoothness and fine detail. Software Installation 3D: „ Standard Settings The Standard Settings page provides...
Manual
Page 25
... documentation of your 3D application uses, and you know which type of these APIs. To adjust the overall brightness use the Brightness control, and the overall contrast use one of API (Direct 3D or OpenGL your 3D application. This page is useful when it is not necessary to preview the adjusted settings because the effect is not supported on systems running Windows Vista. Software Installation...
... documentation of your 3D application uses, and you know which type of these APIs. To adjust the overall brightness use the Brightness control, and the overall contrast use one of API (Direct 3D or OpenGL your 3D application. This page is useful when it is not necessary to preview the adjusted settings because the effect is not supported on systems running Windows Vista. Software Installation...

Manual
Page 27
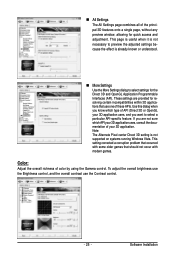
... with video overlay support. The bar determines how the two interlaced video fields are converted into a noninterlaced form. This page is useful when it is not necessary to change the way you connect two monitors. „ All Settings The All Settings page combines all of the principal Video features onto a single page, without any preview window, allowing quick access and adjustment. Extended Desktop Mode is...
... with video overlay support. The bar determines how the two interlaced video fields are converted into a noninterlaced form. This page is useful when it is not necessary to change the way you connect two monitors. „ All Settings The All Settings page combines all of the principal Video features onto a single page, without any preview window, allowing quick access and adjustment. Extended Desktop Mode is...
Manual
Page 28
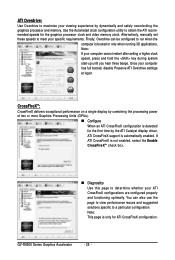
... and safely overclocking the graphics processor and memory. If ATI CrossFireX is not enabled, select the Enable CrossFireXTM check box. „ Diagnostics Use this page to a particular configuration. You can be configured to meet your specific requirements. Note: This page is only for the graphics processor clock and video memory clock. ATI Overdrive: Use Overdrive to maximize your viewing experience by the ATI Catalyst display driver, ATI CrossFireX support is automatically enabled. Note: If...
... and safely overclocking the graphics processor and memory. If ATI CrossFireX is not enabled, select the Enable CrossFireXTM check box. „ Diagnostics Use this page to a particular configuration. You can be configured to meet your specific requirements. Note: This page is only for the graphics processor clock and video memory clock. ATI Overdrive: Use Overdrive to maximize your viewing experience by the ATI Catalyst display driver, ATI CrossFireX support is automatically enabled. Note: If...
Manual
Page 29
...; Restart your motherboard. Troubleshooting Tips If necessary, adjust your keyboard after system starts up. Press on your monitor's setting using monitor's adjust panel to make the screen look focused, crisp, and sharp. (Please refer to become the secondary display.) „ Make sure you selected the appropriate display device and graphics card when you install the graphics driver. „ For more assistance, use the Troubleshooting Guide located in the Windows Help or...
...; Restart your motherboard. Troubleshooting Tips If necessary, adjust your keyboard after system starts up. Press on your monitor's setting using monitor's adjust panel to make the screen look focused, crisp, and sharp. (Please refer to become the secondary display.) „ Make sure you selected the appropriate display device and graphics card when you install the graphics driver. „ For more assistance, use the Troubleshooting Guide located in the Windows Help or...


