
Manual
Page 5
... engineering or disassembly is intended for the recycling of with user's other household waste and must be authorized by GIGA-BYTE TECHNOLOGY CO., LTD. ("GBT"). GV-NX86T512H/ GV-NX86T256H/ GV-NX86T256H-ZL GeForce™ 8600 GT Graphics Accelerator User's Manual Rev. 102 12MD-NX86T2H-102R * The WEEE marking on VGA card, this may appear in this... rapid change in technology, some of the specifications might be out of date before publication of GBT. Use of their respective owners. Copyright © 2007 GIGABYTE TECHNOLOGY CO., LTD Copyright by Macrovision, and is prohibited.
... engineering or disassembly is intended for the recycling of with user's other household waste and must be authorized by GIGA-BYTE TECHNOLOGY CO., LTD. ("GBT"). GV-NX86T512H/ GV-NX86T256H/ GV-NX86T256H-ZL GeForce™ 8600 GT Graphics Accelerator User's Manual Rev. 102 12MD-NX86T2H-102R * The WEEE marking on VGA card, this may appear in this... rapid change in technology, some of the specifications might be out of date before publication of GBT. Use of their respective owners. Copyright © 2007 GIGABYTE TECHNOLOGY CO., LTD Copyright by Macrovision, and is prohibited.

Manual
Page 6
... Installation 5 2.1. Windows® XP Driver Installation 12 3.1.1. Display Properties Pages 17 3.1.6. Operating System Requirement 12 3.1.2. Resolutions and Color Depth Table (In Windows® XP 35 GV-NX86T256H(-ZL)/512H Graphics Accelerator - 2 - Board Layout 5 2.2. DirectX Installation ...13 3.1.3. Taskbar Icon ...16 3.1.5. Introduction 3 1.1.
... Installation 5 2.1. Windows® XP Driver Installation 12 3.1.1. Display Properties Pages 17 3.1.6. Operating System Requirement 12 3.1.2. Resolutions and Color Depth Table (In Windows® XP 35 GV-NX86T256H(-ZL)/512H Graphics Accelerator - 2 - Board Layout 5 2.2. DirectX Installation ...13 3.1.3. Taskbar Icon ...16 3.1.5. Introduction 3 1.1.

Manual
Page 7
... Processing Unit (GPU) • Supports PCI Express x16 • Integrated with 256 MB GDDR3 memory (For GV-NX86T256H/GV-NX86T256H-ZL only) • Integrated with 450-watt is recommended • Operating System - Windows® XP with Service Pack 2 (SP2) - GIGABYTE TECHNOLOGY). - 3 - English 1. Introduction 1.1. Intel® Pentium® 4 or AMD AthlonTM - 128 MB of system memory; 2 GB...
... Processing Unit (GPU) • Supports PCI Express x16 • Integrated with 256 MB GDDR3 memory (For GV-NX86T256H/GV-NX86T256H-ZL only) • Integrated with 450-watt is recommended • Operating System - Windows® XP with Service Pack 2 (SP2) - GIGABYTE TECHNOLOGY). - 3 - English 1. Introduction 1.1. Intel® Pentium® 4 or AMD AthlonTM - 128 MB of system memory; 2 GB...

Manual
Page 8
A power supply with two PCI Express x16 slots and correct PCIe chipset driver - An SLITM bridge connector GV-NX86T256H(-ZL)/512H Graphics Accelerator - 4 - An SLITM certified motherboard with 1000-watt or above is required: - Two GV-NX86T256H/GV-NX86T256H-ZL/GV-NX86T512H - English • SLITM Configuration If you are planning on using this graphics card as part of an SLITM system, the following is recommended -
A power supply with two PCI Express x16 slots and correct PCIe chipset driver - An SLITM bridge connector GV-NX86T256H(-ZL)/512H Graphics Accelerator - 4 - An SLITM certified motherboard with 1000-watt or above is required: - Two GV-NX86T256H/GV-NX86T256H-ZL/GV-NX86T512H - English • SLITM Configuration If you are planning on using this graphics card as part of an SLITM system, the following is recommended -

Manual
Page 12
Remove any existing graphics card from the back of your graphics accelerator card. GV-NX86T256H(-ZL)/512H Graphics Accelerator - 8 - Remove the computer cover. If necessary, consult your computer. Hardware Installation Installing Your graphics card. Power off the computer and monitor, then disconnect the display cable from your computer's manual for help in removing the cover. 3. English 2.2. To remove the existing graphics card: 1. Now that you have prepared your computer, you are ready to install your computer. 2.
Remove any existing graphics card from the back of your graphics accelerator card. GV-NX86T256H(-ZL)/512H Graphics Accelerator - 8 - Remove the computer cover. If necessary, consult your computer. Hardware Installation Installing Your graphics card. Power off the computer and monitor, then disconnect the display cable from your computer's manual for help in removing the cover. 3. English 2.2. To remove the existing graphics card: 1. Now that you have prepared your computer, you are ready to install your computer. 2.

Manual
Page 14
English GIGABYTE Video Adapter for Nvidia Graphics Cards AV Out S-Video Out Connect to the AV Out port on the graphics card. GV-NX86T256H(-ZL)/512H Graphics Accelerator - 10 - HDTV Component (Y+Pr+Pb) (1) Connecting HDTV Connect your HDTV cables to the video adapter according to the corresponding color. (Y= Green, Pr= ...
English GIGABYTE Video Adapter for Nvidia Graphics Cards AV Out S-Video Out Connect to the AV Out port on the graphics card. GV-NX86T256H(-ZL)/512H Graphics Accelerator - 10 - HDTV Component (Y+Pr+Pb) (1) Connecting HDTV Connect your HDTV cables to the video adapter according to the corresponding color. (Y= Green, Pr= ...

Manual
Page 16
... version. • If you install the graphics card drivers for the motherboard, which consist of Windows® 2000 / Windows® XP drivers is very simple. GV-NX86T256H(-ZL)/512H Graphics Accelerator - 12 - Windows® XP Driver Installation 3.1.1. Then you can follow the guides to setup your graphics card driver. (Please follow the subsection...
... version. • If you install the graphics card drivers for the motherboard, which consist of Windows® 2000 / Windows® XP drivers is very simple. GV-NX86T256H(-ZL)/512H Graphics Accelerator - 12 - Windows® XP Driver Installation 3.1.1. Then you can follow the guides to setup your graphics card driver. (Please follow the subsection...

Manual
Page 18
... click the "Cancel" button to install the driver from AUTORUN window. New hardware found After the graphics card is the step-by-step installation guide. GV-NX86T256H(-ZL)/512H Graphics Accelerator - 14 - English 3.1.3.
... click the "Cancel" button to install the driver from AUTORUN window. New hardware found After the graphics card is the step-by-step installation guide. GV-NX86T256H(-ZL)/512H Graphics Accelerator - 14 - English 3.1.3.

Manual
Page 20
Taskbar Icon After installation of the graphics accelerator from here. You can adjust the properties of the display drivers, you will find a NVIDIA icon area. GV-NX86T256H(-ZL)/512H Graphics Accelerator - 16 - Click this icon to open the control panel. on the taskbar's status Right click the icon. English 3.1.4.
Taskbar Icon After installation of the graphics accelerator from here. You can adjust the properties of the display drivers, you will find a NVIDIA icon area. GV-NX86T256H(-ZL)/512H Graphics Accelerator - 16 - Click this icon to open the control panel. on the taskbar's status Right click the icon. English 3.1.4.

Manual
Page 22
... Select the view of your GPU and GPU memory to increase your GPU performance. • Assign specific 3D settings to a game so that is launched. GV-NX86T256H(-ZL)/512H Graphics Accelerator - 18 - In the NVIDIA Control Panel, select a category to do the following: • Change the image and rendering settings of your 3D...
... Select the view of your GPU and GPU memory to increase your GPU performance. • Assign specific 3D settings to a game so that is launched. GV-NX86T256H(-ZL)/512H Graphics Accelerator - 18 - In the NVIDIA Control Panel, select a category to do the following: • Change the image and rendering settings of your 3D...

Manual
Page 23
... and rendering. „ Manage 3D Settings (Note) The Manage 3D Settings page enables you to establish default 3D settings to establish a unique set of two GV-NX86T256H/GVNX86T256H-ZL/GV-NX86T512H graphics cards on an SLI-capable motherboard.
... and rendering. „ Manage 3D Settings (Note) The Manage 3D Settings page enables you to establish default 3D settings to establish a unique set of two GV-NX86T256H/GVNX86T256H-ZL/GV-NX86T512H graphics cards on an SLI-capable motherboard.

Manual
Page 24
... using NVIDIA nTune utility, please visit NVIDIA's official web site for more information about nTune. Display A variety of display features enable you connect two monitors. GV-NX86T256H(-ZL)/512H Graphics Accelerator - 20 - English „ Monitor Temperature Levels To monitor the current temperature of your displays.
... using NVIDIA nTune utility, please visit NVIDIA's official web site for more information about nTune. Display A variety of display features enable you connect two monitors. GV-NX86T256H(-ZL)/512H Graphics Accelerator - 20 - English „ Monitor Temperature Levels To monitor the current temperature of your displays.

Manual
Page 26
... you connect two monitors. This is present only in order to support a variety of your desktop to adjust timings for analog CRT and DVI connections. GV-NX86T256H(-ZL)/512H Graphics Accelerator - 22 - You can use the advanced Change Resolution Attributes page to view custom display modes you have rotated your physical display and...
... you connect two monitors. This is present only in order to support a variety of your desktop to adjust timings for analog CRT and DVI connections. GV-NX86T256H(-ZL)/512H Graphics Accelerator - 22 - You can use the advanced Change Resolution Attributes page to view custom display modes you have rotated your physical display and...

Manual
Page 28
... pair function as one tall virtual desktop. Dualview Mode Display Matrix Model CRT+TV CRT+DVI DVI+TV DVI+TV+CRT DVI +DVI CRT+CRT GV-NX86T256H Yes Yes Yes No Yes Yes GV-NX86T256H-ZL Yes Yes Yes No Yes Yes GV-NX86T512H Yes Yes Yes No Yes Yes GV-NX86T256H(-ZL)/512H Graphics Accelerator - 24 -
... pair function as one tall virtual desktop. Dualview Mode Display Matrix Model CRT+TV CRT+DVI DVI+TV DVI+TV+CRT DVI +DVI CRT+CRT GV-NX86T256H Yes Yes Yes No Yes Yes GV-NX86T256H-ZL Yes Yes Yes No Yes Yes GV-NX86T512H Yes Yes Yes No Yes Yes GV-NX86T256H(-ZL)/512H Graphics Accelerator - 24 -

Manual
Page 30
Step 7: Click Finish to preview the selected settings. GV-NX86T256H(-ZL)/512H Graphics Accelerator - 26 - Then click Next. English Step 6: Click the Preview button to apply the new television settings.
Step 7: Click Finish to preview the selected settings. GV-NX86T256H(-ZL)/512H Graphics Accelerator - 26 - Then click Next. English Step 6: Click the Preview button to apply the new television settings.

Manual
Page 32
nView Profiles properties „ This tab contains a record all nView display settings for easy software setup. nView Windows properties „ This tab allows you to control window and dialog box placement when using multiple monitors. GV-NX86T256H(-ZL)/512H Graphics Accelerator - 28 - The setup wizard can also be accessed from this tab. English nView Desktop Management properties „ ThistabcontainsinformationaboutthenViewDesktopManager.
nView Profiles properties „ This tab contains a record all nView display settings for easy software setup. nView Windows properties „ This tab allows you to control window and dialog box placement when using multiple monitors. GV-NX86T256H(-ZL)/512H Graphics Accelerator - 28 - The setup wizard can also be accessed from this tab. English nView Desktop Management properties „ ThistabcontainsinformationaboutthenViewDesktopManager.

Manual
Page 34
nView Hot Keys properties „ This tab lets you can apply to your applications. nView Zoom properties „ This tab provides dynamic zoom functionality on the desktop. Also enables full screen video playback via the video mirroring control button. GV-NX86T256H(-ZL)/512H Graphics Accelerator - 30 - English nView Effects properties „ This tab provides special windows effects that you perform various actions with shortcut keys or key combinations.
nView Hot Keys properties „ This tab lets you can apply to your applications. nView Zoom properties „ This tab provides dynamic zoom functionality on the desktop. Also enables full screen video playback via the video mirroring control button. GV-NX86T256H(-ZL)/512H Graphics Accelerator - 30 - English nView Effects properties „ This tab provides special windows effects that you perform various actions with shortcut keys or key combinations.

Manual
Page 36
... on your computer, you install the latest driver, insert the Installation CD that shipped with your CD-ROM drive, substitute D with the correct drive letter.) 4. GV-NX86T256H(-ZL)/512H Graphics Accelerator - 32 - Windows® 2000 Driver Installation With Windows running on "Install Display Drivers" to begin the Installation Wizard. 6. Type the following steps...
... on your computer, you install the latest driver, insert the Installation CD that shipped with your CD-ROM drive, substitute D with the correct drive letter.) 4. GV-NX86T256H(-ZL)/512H Graphics Accelerator - 32 - Windows® 2000 Driver Installation With Windows running on "Install Display Drivers" to begin the Installation Wizard. 6. Type the following steps...
Manual
Page 38
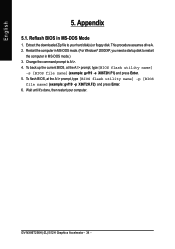
... restart the computer in MS-DOS Mode 1. Wait until it's done, then restart your hard disk(s) or floppy disk. English 5. Appendix 5.1. This procedure assumes drive A. 2. GV-NX86T256H(-ZL)/512H Graphics Accelerator - 34 - To flash BIOS, at the A:\> prompt, type[BIOS flash utility name] -s [BIOS file name] (example: gvf19 -s X86T2H.F1) and press Enter...
... restart the computer in MS-DOS Mode 1. Wait until it's done, then restart your hard disk(s) or floppy disk. English 5. Appendix 5.1. This procedure assumes drive A. 2. GV-NX86T256H(-ZL)/512H Graphics Accelerator - 34 - To flash BIOS, at the A:\> prompt, type[BIOS flash utility name] -s [BIOS file name] (example: gvf19 -s X86T2H.F1) and press Enter...

Manual
Page 40
The actual resolutions supported depend on the monitor you use. GV-NX86T256H(-ZL)/512H Graphics Accelerator - 36 - English Display Refresh Screen Rate Resolution (Hz) 1600 x 1200 60~100 120 1920 x 1080 (16:9) 60~85 100 1920 x 1200 (16:10) 60~85 100 1920 x 1440 60~85 2048 x 1536 60~85 2560 x 1600 60 (Dual-Link) Color Depth (bpp) 8bpp(256 color) Standard mode 3 3 3 3 3 3 3 3 3 16bpp (65K color) High mode 3 3 3 3 3 3 3 3 3 32bpp (16.7M) True mode 3 X 3 X 3 X 3 3 3 * This table is for reference only.
The actual resolutions supported depend on the monitor you use. GV-NX86T256H(-ZL)/512H Graphics Accelerator - 36 - English Display Refresh Screen Rate Resolution (Hz) 1600 x 1200 60~100 120 1920 x 1080 (16:9) 60~85 100 1920 x 1200 (16:10) 60~85 100 1920 x 1440 60~85 2048 x 1536 60~85 2560 x 1600 60 (Dual-Link) Color Depth (bpp) 8bpp(256 color) Standard mode 3 3 3 3 3 3 3 3 3 16bpp (65K color) High mode 3 3 3 3 3 3 3 3 3 32bpp (16.7M) True mode 3 X 3 X 3 X 3 3 3 * This table is for reference only.