Manual
Page 3
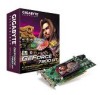
... and must be handed over to update the information contained herein. Trademarks Third-party brands and names are the property of their respective owners. Copyright © 2006 GIGABYTE TECHNOLOGY CO., LTD Copyright by GIGA-BYTE TECHNOLOGY CO., LTD. ("GBT"). GV-NX79X512VB-RH / GV-NX79X512DB-RH / GV-NX79T256DB-RH GeForce™ 7900 GTX / 7900 GT Graphics Accelerator User's Manual Rev. 102 12MD-NX79T2BR-102R * The WEEE marking on VGA card, this may void the warranty of...
... and must be handed over to update the information contained herein. Trademarks Third-party brands and names are the property of their respective owners. Copyright © 2006 GIGABYTE TECHNOLOGY CO., LTD Copyright by GIGA-BYTE TECHNOLOGY CO., LTD. ("GBT"). GV-NX79X512VB-RH / GV-NX79X512DB-RH / GV-NX79T256DB-RH GeForce™ 7900 GTX / 7900 GT Graphics Accelerator User's Manual Rev. 102 12MD-NX79T2BR-102R * The WEEE marking on VGA card, this may void the warranty of...

Manual
Page 4
...to a HDTV 29 5.3. Connecting to Reflash the BIOS 28 5.2. Hardware installation 7 3. Hardware Installation 4 2.1. DirectX installation ...11 3.1.3. Display properties pages 16 3.1.5. Features ...3 1.2. Resolutions and color depth table (In Windows® XP 30 GV-NX79 Series Graphics Accelerator - 2 - Operating system requirement 11 3.1.2. Introduction 3 1.1. Minimum system requirements 3 2. Board layout 4 2.2. Appendix 28 5.1. Win® XP driver and utilities installation 11 3.1.1. Driver installation ...13 3.1.4. Troubleshooting Tips 27 5. Win® 2000...
...to a HDTV 29 5.3. Connecting to Reflash the BIOS 28 5.2. Hardware installation 7 3. Hardware Installation 4 2.1. DirectX installation ...11 3.1.3. Display properties pages 16 3.1.5. Features ...3 1.2. Resolutions and color depth table (In Windows® XP 30 GV-NX79 Series Graphics Accelerator - 2 - Operating system requirement 11 3.1.2. Introduction 3 1.1. Minimum system requirements 3 2. Board layout 4 2.2. Appendix 28 5.1. Win® XP driver and utilities installation 11 3.1.1. Driver installation ...13 3.1.4. Troubleshooting Tips 27 5. Win® 2000...
Manual
Page 5
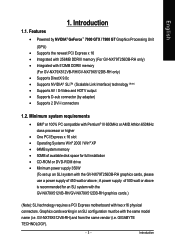
...cards, please use a power supply of 500 watt or above ; Graphics cards working in an SLI configuration must be with 512MB DDRIII memory (For GV-NX79X512VB-RH/GV-NX79X512DB-RH only) • Supports DirectX 9.0c • Supports NVIDIA® SLITM (Scalable Link Interface) technology (Note) • Supports AV / S-Video and HDTV output • Supports D-sub connector (by adapter) • Supports 2 DVI-I connectors 1.2. Introduction GIGABYTE TECHNOLOGY). - 3 - Introduction 1.1. Minimum system requirements • IBM® or 100% PC compatible with Pentium® III 650MHz or AMD...
...cards, please use a power supply of 500 watt or above ; Graphics cards working in an SLI configuration must be with 512MB DDRIII memory (For GV-NX79X512VB-RH/GV-NX79X512DB-RH only) • Supports DirectX 9.0c • Supports NVIDIA® SLITM (Scalable Link Interface) technology (Note) • Supports AV / S-Video and HDTV output • Supports D-sub connector (by adapter) • Supports 2 DVI-I connectors 1.2. Introduction GIGABYTE TECHNOLOGY). - 3 - Introduction 1.1. Minimum system requirements • IBM® or 100% PC compatible with Pentium® III 650MHz or AMD...
Manual
Page 6
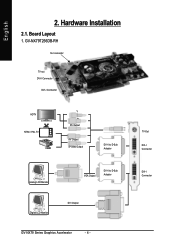
GV-NX79T256DB-RH SLI connector TV-out DVI-I Connector DVI-I Connector HDTV NTSC / PAL TV Y Pr Pb Output AV Output S-Video Output DVI-I to D-Sub Adapter Analog LCD Monitor VGA Output DVI-I Connector Board Layout 1. TV-Out DVI-I Connector DVI-I to D-Sub Adapter Digital LCD Monitor DVI Output GV-NX79 Series Graphics Accelerator - 4 - English 2. Hardware Installation 2.1.
GV-NX79T256DB-RH SLI connector TV-out DVI-I Connector DVI-I Connector HDTV NTSC / PAL TV Y Pr Pb Output AV Output S-Video Output DVI-I to D-Sub Adapter Analog LCD Monitor VGA Output DVI-I Connector Board Layout 1. TV-Out DVI-I Connector DVI-I to D-Sub Adapter Digital LCD Monitor DVI Output GV-NX79 Series Graphics Accelerator - 4 - English 2. Hardware Installation 2.1.

Manual
Page 7
English 2. GV-NX79X512VB-RH/GV-NX79X512DB-RH SLI connector TV-out DVI-I Connector DVI-I Connector HDTV NTSC / PAL TV Y Pr Pb Output AV Output S-Video Output DVI-I to D-Sub Adapter TV-Out DVI-I Connector Analog LCD Monitor Digital LCD Monitor VGA Output DVI-I to D-Sub Adapter DVI-I Connector DVI Output - 5 - Hardware Installation
English 2. GV-NX79X512VB-RH/GV-NX79X512DB-RH SLI connector TV-out DVI-I Connector DVI-I Connector HDTV NTSC / PAL TV Y Pr Pb Output AV Output S-Video Output DVI-I to D-Sub Adapter TV-Out DVI-I Connector Analog LCD Monitor Digital LCD Monitor VGA Output DVI-I to D-Sub Adapter DVI-I Connector DVI Output - 5 - Hardware Installation
Manual
Page 9
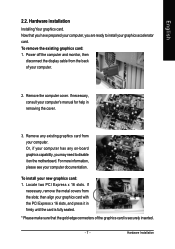
..., you may need to install your new graphics card: 1. then align your computer. Remove any on-board graphics capability, you are ready to disable it in removing the cover. 3. To install your graphics accelerator card. Now that the gold edge connectors of your computer documentation. If necessary, consult your computer has any existing graphics card from your graphics card with the PCI Express x 16 slots, and press it on the motherboard. English...
..., you may need to install your new graphics card: 1. then align your computer. Remove any on-board graphics capability, you are ready to disable it in removing the cover. 3. To install your graphics accelerator card. Now that the gold edge connectors of your computer documentation. If necessary, consult your computer has any existing graphics card from your graphics card with the PCI Express x 16 slots, and press it on the motherboard. English...
Manual
Page 10
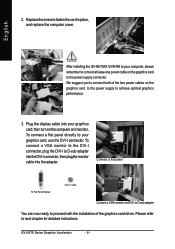
... replace the computer cover. Connect a flat panel To Flat Panel Display To TV / VCR Connect a VGA monitor via DVI-I connector. Plug the display cable into the adapter. To connect a VGA monitor to the DVI-I connector, plug the DVI-I to the power supply connector. Replace the screw to next chapter for detailed instructions. To connect a flat panel directly to your graphics card; GV-NX79 Series Graphics Accelerator - 8 - After installing the GV-NX79X512VB-RH to your computer, please remember to connect at lease one power cable on the graphics card to the power supply...
... replace the computer cover. Connect a flat panel To Flat Panel Display To TV / VCR Connect a VGA monitor via DVI-I connector. Plug the display cable into the adapter. To connect a VGA monitor to the DVI-I connector, plug the DVI-I to the power supply connector. Replace the screw to next chapter for detailed instructions. To connect a flat panel directly to your graphics card; GV-NX79 Series Graphics Accelerator - 8 - After installing the GV-NX79X512VB-RH to your computer, please remember to connect at lease one power cable on the graphics card to the power supply...
Manual
Page 13
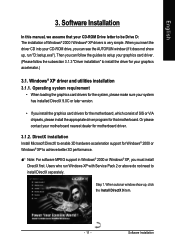
... 3. Software Installation In this manual, we assume that motherboard. Windows® XP driver and utilities installation 3.1.1. Users who run "D:\setup.exe"). Software Installation DirectX installation Install Microsoft DirectX to enable 3D hardware acceleration support for your graphics card driver. (Please follow the subsection 3.1.3 "Driver installation" to install the driver for Windows® 2000 or Windows® XP to setup your graphics accelerator.) 3.1. Or please contact your motherboard nearest dealer for that your CD-ROM drive, you install the graphics card...
... 3. Software Installation In this manual, we assume that motherboard. Windows® XP driver and utilities installation 3.1.1. Users who run "D:\setup.exe"). Software Installation DirectX installation Install Microsoft DirectX to enable 3D hardware acceleration support for your graphics card driver. (Please follow the subsection 3.1.3 "Driver installation" to install the driver for Windows® 2000 or Windows® XP to setup your graphics accelerator.) 3.1. Or please contact your motherboard nearest dealer for that your CD-ROM drive, you install the graphics card...

Manual
Page 15
... out a "New Hardware Found" message. Step 1: Found new hardware wizard: Video controller (VGA Compatible) Click the "Next" button to install the driver. (There is a driver CD disk that came with your computer at the first time, the windows will search for the driver and install it now.) Or click the "Cancel" button to finish the installation. - 13 - New hardware found After the graphics card is the step-by-step installation guide. Software Installation English 3.1.3.
... out a "New Hardware Found" message. Step 1: Found new hardware wizard: Video controller (VGA Compatible) Click the "Next" button to install the driver. (There is a driver CD disk that came with your computer at the first time, the windows will search for the driver and install it now.) Or click the "Cancel" button to finish the installation. - 13 - New hardware found After the graphics card is the step-by-step installation guide. Software Installation English 3.1.3.
Manual
Page 16
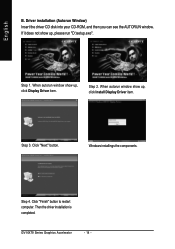
Click "Next" button. Step 4. Then the driver installation is completed. English B. When autorun window show up , please run "D:\setup.exe". Driver installation (Autorun Window) Insert the driver CD disk into your CD-ROM, and then you can see the AUTORUN window. Step 3. Click "Finish" button to restart computer. Step 1. If it does not show up, click Install Display Driver item. Step 2. When autorun window show up , click Display Driver item. GV-NX79 Series Graphics Accelerator - 14 - Windows installings the components.
Click "Next" button. Step 4. Then the driver installation is completed. English B. When autorun window show up , please run "D:\setup.exe". Driver installation (Autorun Window) Insert the driver CD disk into your CD-ROM, and then you can see the AUTORUN window. Step 3. Click "Finish" button to restart computer. Step 1. If it does not show up, click Install Display Driver item. Step 2. When autorun window show up , click Display Driver item. GV-NX79 Series Graphics Accelerator - 14 - Windows installings the components.
Manual
Page 18
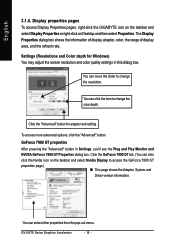
... the GeForce 7900 GT properties page.) „ This page shows the Adapter, System and Driver version information. Click the "Advanced" button for Windows) You may adjust the screen resolution and color quality settings in Settings, you'll see the Plug and Play Monitor and NVIDIA GeForce 7900 GT Properties dialog box. You can move the slider to change the color depth. Display properties pages To access Display Properties pages, right-click the GIGABYTE icon...
... the GeForce 7900 GT properties page.) „ This page shows the Adapter, System and Driver version information. Click the "Advanced" button for Windows) You may adjust the screen resolution and color quality settings in Settings, you'll see the Plug and Play Monitor and NVIDIA GeForce 7900 GT Properties dialog box. You can move the slider to change the color depth. Display properties pages To access Display Properties pages, right-click the GIGABYTE icon...
Manual
Page 19
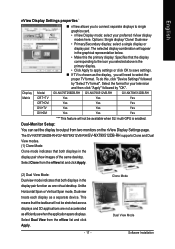
... preferred nView display modes here. Clone Mode Dual View Mode Software Installation English nView Display Settings properties * „ nView allows you will need to select the proper TV format. Display Model GV-NX79T256DB-RH GV-NX79X512VB-RH GV-NX79X512DB-RH Matrix CRT+TV Yes Yes Yes CRT+DVI Yes Yes Yes DVI+TV Yes Yes Yes DVI+DVI Yes Yes Yes "*" This feature will appear in the display pair show images of the same desktop. Select Clone from the nView list and click Apply. (2) Dual View Mode: Dualview mode...
... preferred nView display modes here. Clone Mode Dual View Mode Software Installation English nView Display Settings properties * „ nView allows you will need to select the proper TV format. Display Model GV-NX79T256DB-RH GV-NX79X512VB-RH GV-NX79X512DB-RH Matrix CRT+TV Yes Yes Yes CRT+DVI Yes Yes Yes DVI+TV Yes Yes Yes DVI+DVI Yes Yes Yes "*" This feature will appear in the display pair show images of the same desktop. Select Clone from the nView list and click Apply. (2) Dual View Mode: Dualview mode...
Manual
Page 20
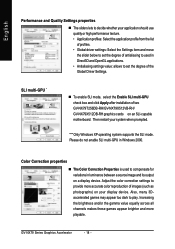
... for variations in luminance between a source image and its output on your system when prompted. "*" Only Windows XP operating system supports the SLI mode. Also, many 3Daccelerated games may appear too dark to provide more playable. Adjust the color correction settings to play. GV-NX79 Series Graphics Accelerator - 18 - SLI multi-GPU * „ To enable SLI mode, select the Enable SLI multi-GPU check box and click Apply after installation of the Global Driver Settings.
... for variations in luminance between a source image and its output on your system when prompted. "*" Only Windows XP operating system supports the SLI mode. Also, many 3Daccelerated games may appear too dark to provide more playable. Adjust the color correction settings to play. GV-NX79 Series Graphics Accelerator - 18 - SLI multi-GPU * „ To enable SLI mode, select the Enable SLI multi-GPU check box and click Apply after installation of the Global Driver Settings.
Manual
Page 21
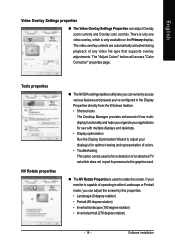
...'ve configured in either Landscape or Portrait mode, you organize your applications for use with multiple displays and desktops. • Display optimization Run the Display Optimization Wizard to adjust your monitor is used to rotate the screen. If your display(s) for optimal viewing and representation of colors. • Troubleshooting This option can be used to force detection of any video file type that supports overlay adjustments. The "Adjust Colors" button will access "Color Correction" properties page. Software Installation...
...'ve configured in either Landscape or Portrait mode, you organize your applications for use with multiple displays and desktops. • Display optimization Run the Display Optimization Wizard to adjust your monitor is used to rotate the screen. If your display(s) for optimal viewing and representation of colors. • Troubleshooting This option can be used to force detection of any video file type that supports overlay adjustments. The "Adjust Colors" button will access "Color Correction" properties page. Software Installation...

Manual
Page 23
... item on all the nView Desktop Manager features. With nView you can set of desktop tools designed to turn on the pop-up multiple desktops to see more productive when using your applications. Access nView properties page: To access the nView properties page, you can click the NVIDIA icon on Desktop, select Properties>Settings>Advanced>GeForce 7900 GT. Double-click Desktop Management to work with your graphics card. Software Installation English 3.1.5. Or right-click...
... item on all the nView Desktop Manager features. With nView you can set of desktop tools designed to turn on the pop-up multiple desktops to see more productive when using your applications. Access nView properties page: To access the nView properties page, you can click the NVIDIA icon on Desktop, select Properties>Settings>Advanced>GeForce 7900 GT. Double-click Desktop Management to work with your graphics card. Software Installation English 3.1.5. Or right-click...
Manual
Page 24
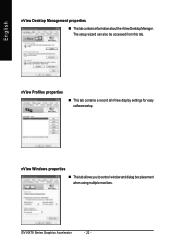
nView Windows properties „ This tab allows you to control window and dialog box placement when using multiple monitors. English nView Desktop Management properties „ ThistabcontainsinformationaboutthenViewDesktopManager. The setup wizard can also be accessed from this tab. GV-NX79 Series Graphics Accelerator - 22 - nView Profiles properties „ This tab contains a record all nView display settings for easy software setup.
nView Windows properties „ This tab allows you to control window and dialog box placement when using multiple monitors. English nView Desktop Management properties „ ThistabcontainsinformationaboutthenViewDesktopManager. The setup wizard can also be accessed from this tab. GV-NX79 Series Graphics Accelerator - 22 - nView Profiles properties „ This tab contains a record all nView display settings for easy software setup.

Manual
Page 25
nView Desktops properties „ This tab allows you to 32 unique desktops. English nView Applications properties „ This tab allows you to create up to control nView settings depending different applications. nView User Interface properties „ This tab allows for customization of the nView user interface. - 23 - Software Installation
nView Desktops properties „ This tab allows you to 32 unique desktops. English nView Applications properties „ This tab allows you to create up to control nView settings depending different applications. nView User Interface properties „ This tab allows for customization of the nView user interface. - 23 - Software Installation
Manual
Page 26
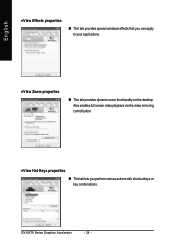
Also enables full screen video playback via the video mirroring control button. nView Hot Keys properties „ This tab lets you can apply to your applications. GV-NX79 Series Graphics Accelerator - 24 - English nView Effects properties „ This tab provides special windows effects that you perform various actions with shortcut keys or key combinations. nView Zoom properties „ This tab provides dynamic zoom functionality on the desktop.
Also enables full screen video playback via the video mirroring control button. nView Hot Keys properties „ This tab lets you can apply to your applications. GV-NX79 Series Graphics Accelerator - 24 - English nView Effects properties „ This tab provides special windows effects that you perform various actions with shortcut keys or key combinations. nView Zoom properties „ This tab provides dynamic zoom functionality on the desktop.
Manual
Page 28
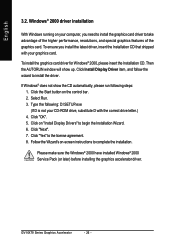
... Service Pack (or later) before installing the graphics accelerator driver. GV-NX79 Series Graphics Accelerator - 26 - Then the AUTORUN window will show the CD automatically, please run following : D:\SETUP.exe (If D is not your CD-ROM drive, substitute D with your computer, you install the latest driver, insert the Installation CD that shipped with the correct drive letter.) 4. Click "OK". 5. Click on -screen instructions to install the driver. Follow the Wizard's on "Install Display Drivers...
... Service Pack (or later) before installing the graphics accelerator driver. GV-NX79 Series Graphics Accelerator - 26 - Then the AUTORUN window will show the CD automatically, please run following : D:\SETUP.exe (If D is not your CD-ROM drive, substitute D with your computer, you install the latest driver, insert the Installation CD that shipped with the correct drive letter.) 4. Click "OK". 5. Click on -screen instructions to install the driver. Follow the Wizard's on "Install Display Drivers...
Manual
Page 29
... power. „ If necessary, disable any built-in the Windows® Help or contact your monitor's setting by monitor's adjust panel to make the screen looks focused, crisp, and sharp. (Please refer to the card's display connector. „ Make sure that the display cable is correct. „ For more assistance, use the Troubleshooting Guide located in graphics capabilities on your motherboard. When the Windows Advanced Options Menu appears, select Safe Mode...
... power. „ If necessary, disable any built-in the Windows® Help or contact your monitor's setting by monitor's adjust panel to make the screen looks focused, crisp, and sharp. (Please refer to the card's display connector. „ Make sure that the display cable is correct. „ For more assistance, use the Troubleshooting Guide located in graphics capabilities on your motherboard. When the Windows Advanced Options Menu appears, select Safe Mode...


