Manual
Page 8
... of Contents 1. Introduction 3 1.1. Hardware installation 8 3. Connecting to Reflash the BIOS 33 5.1.1. Minimum system requirements 3 2. Board layout 4 2.2. Features ...3 1.2. Software Installation 12 3.1. DirectX installation ...12 3.1.3. Driver installation ...14 3.1.4. Taskbar icon ...18 3.1.6. Display properties pages 21 3.1.7. Reflash BIOS in Windows mode 33 5.2. Resolutions and color depth table (In Windows® XP 35 GV-NX76G Series Graphics Accelerator - 2 -
... of Contents 1. Introduction 3 1.1. Hardware installation 8 3. Connecting to Reflash the BIOS 33 5.1.1. Minimum system requirements 3 2. Board layout 4 2.2. Features ...3 1.2. Software Installation 12 3.1. DirectX installation ...12 3.1.3. Driver installation ...14 3.1.4. Taskbar icon ...18 3.1.6. Display properties pages 21 3.1.7. Reflash BIOS in Windows mode 33 5.2. Resolutions and color depth table (In Windows® XP 35 GV-NX76G Series Graphics Accelerator - 2 -
Manual
Page 18
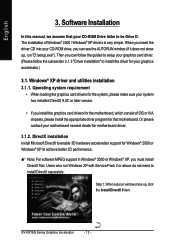
... installation of SIS or VIA chipsets, please install the appropriate driver program for that your motherboard nearest dealer for the motherboard, which consist of Windows® 2000 / Windows® XP drivers is very simple. Software Installation In this manual, we assume that motherboard. Step 1. GV-NX76G Series Graphics Accelerator - 12 - Then you must install DirectX...
... installation of SIS or VIA chipsets, please install the appropriate driver program for that your motherboard nearest dealer for the motherboard, which consist of Windows® 2000 / Windows® XP drivers is very simple. Software Installation In this manual, we assume that motherboard. Step 1. GV-NX76G Series Graphics Accelerator - 12 - Then you must install DirectX...
Manual
Page 20
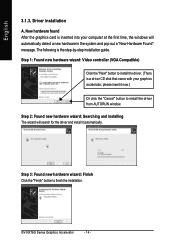
...the installation. The following is a driver CD disk that came with your computer at the first time, the windows will search for the driver and install it now.) Or click the "Cancel" button to install the driver from AUTORUN window. Driver installation A. New hardware found After ...the graphics card is inserted into your graphics accelerator, please insert it automatically. Step 3: Found new hardware wizard: Finish Click the "Finish" button to install the driver. (There is the ...
...the installation. The following is a driver CD disk that came with your computer at the first time, the windows will search for the driver and install it now.) Or click the "Cancel" button to install the driver from AUTORUN window. Driver installation A. New hardware found After ...the graphics card is inserted into your graphics accelerator, please insert it automatically. Step 3: Found new hardware wizard: Finish Click the "Finish" button to install the driver. (There is the ...

Manual
Page 21
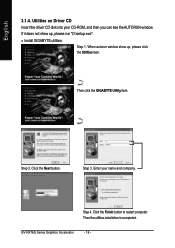
Step 1. Step 3. When autorun window show up, click Install Display Driver item. Windows installings the components. When autorun window show up , please run "D:\setup.exe". Step 4. If it does not show up , click Display Driver item. English B. Step 2. Click "Next" button. Then the driver installation is completed. - 15 - Click "Finish" button to restart computer. Software Installation Driver installation (Autorun Window) Insert the driver CD disk into your CD-ROM, and then you can see the AUTORUN window.
Step 1. Step 3. When autorun window show up, click Install Display Driver item. Windows installings the components. When autorun window show up , please run "D:\setup.exe". Step 4. If it does not show up , click Display Driver item. English B. Step 2. Click "Next" button. Then the driver installation is completed. - 15 - Click "Finish" button to restart computer. Software Installation Driver installation (Autorun Window) Insert the driver CD disk into your CD-ROM, and then you can see the AUTORUN window.
Manual
Page 22
Then click the GIGABYTE Utility item. Click the Finish button to restart computer. Enter your CD-ROM, and then you can see the AUTORUN window. Then the utilities installation is completed. When autorun window show up , please click the Utilities item. Step 3. Click the Next button. GV-NX76G Series Graphics Accelerator - 16 - Utilities on Driver CD Insert the driver CD disk into your name and company. Step 4. If it does not show up , please run "D:\setup.exe". • Install GIGABYTE utilities: Step 1. Step 2. English 3.1.4.
Then click the GIGABYTE Utility item. Click the Finish button to restart computer. Enter your CD-ROM, and then you can see the AUTORUN window. Then the utilities installation is completed. When autorun window show up , please click the Utilities item. Step 3. Click the Next button. GV-NX76G Series Graphics Accelerator - 16 - Utilities on Driver CD Insert the driver CD disk into your name and company. Step 4. If it does not show up , please run "D:\setup.exe". • Install GIGABYTE utilities: Step 1. Step 2. English 3.1.4.
Manual
Page 27
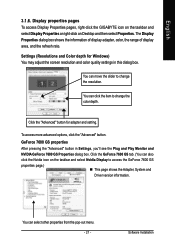
...the GeForce 7600 GS properties page.) „ This page shows the Adapter, System and Driver version information. Software Installation Display properties pages To access Display Properties pages, right-click the GIGABYTE icon on the taskbar and select Display Properties or right-click on the taskbar and ...icon on Desktop and then select Properties. To access more advanced options, click the "Advanced" button. Click the "Advanced" button for Windows) You may adjust the screen resolution and color quality settings in Settings, you'll see the Plug and Play Monitor and NVIDIA GeForce ...
...the GeForce 7600 GS properties page.) „ This page shows the Adapter, System and Driver version information. Software Installation Display properties pages To access Display Properties pages, right-click the GIGABYTE icon on the taskbar and select Display Properties or right-click on the taskbar and ...icon on Desktop and then select Properties. To access more advanced options, click the "Advanced" button. Click the "Advanced" button for Windows) You may adjust the screen resolution and color quality settings in Settings, you'll see the Plug and Play Monitor and NVIDIA GeForce ...
Manual
Page 29
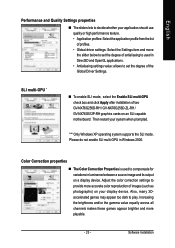
...and/or the gamma value equally across all channels makes these games appear brighter and more accurate color reproduction of the Global Driver Settings. Color Correction properties „ The Color Correction Properties is used in Direct3D and OpenGL applications. • Antialiasing settings...appear too dark to compensate for variations in Windows 2000. SLI multi-GPU * „ To enable SLI mode, select the Enable SLI multi-GPU check box and click Apply after installation of two GV-NX76G256D-RH / GV-NX76G256D-ZL-RH / GV-NX76G512P-RH graphics cards on a display device. Software ...
...and/or the gamma value equally across all channels makes these games appear brighter and more accurate color reproduction of the Global Driver Settings. Color Correction properties „ The Color Correction Properties is used in Direct3D and OpenGL applications. • Antialiasing settings...appear too dark to compensate for variations in Windows 2000. SLI multi-GPU * „ To enable SLI mode, select the Enable SLI multi-GPU check box and click Apply after installation of two GV-NX76G256D-RH / GV-NX76G256D-ZL-RH / GV-NX76G512P-RH graphics cards on a display device. Software ...
Manual
Page 37
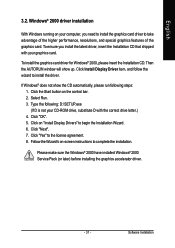
... please run following : D:\SETUP.exe (If D is not your computer, you install the latest driver, insert the Installation CD that shipped with the correct drive letter.) 4. If Windows® does not show up. Click on -screen instructions to complete the installation. Click "Next"..... Type the following steps: 1. Windows® 2000 driver installation With Windows running on the control bar. 2. To ensure you need to install the graphics card driver to begin the Installation Wizard. 6. To install the graphics card driver for Windows® 2000, please insert the Installation...
... please run following : D:\SETUP.exe (If D is not your computer, you install the latest driver, insert the Installation CD that shipped with the correct drive letter.) 4. If Windows® does not show up. Click on -screen instructions to complete the installation. Click "Next"..... Type the following steps: 1. Windows® 2000 driver installation With Windows running on the control bar. 2. To ensure you need to install the graphics card driver to begin the Installation Wizard. 6. To install the graphics card driver for Windows® 2000, please insert the Installation...
Manual
Page 38
.... If necessary, adjust your keyboard after system starts up. Troubleshooting Tips The following troubleshooting tips may help if you installed the graphics driver. „ Restart your motherboard. English 4. For more information, consult your computer's manual or manufacturer. (NOTE: Some manufacturers do ... problems. Contact your dealer or GBT for the graphics card is securely fastened to the monitor's manual.) GV-NX76G Series Graphics Accelerator - 32 - When the Windows Advanced Options Menu appears, select Safe Mode and press Enter. After getting into Safe Mode, in Device...
.... If necessary, adjust your keyboard after system starts up. Troubleshooting Tips The following troubleshooting tips may help if you installed the graphics driver. „ Restart your motherboard. English 4. For more information, consult your computer's manual or manufacturer. (NOTE: Some manufacturers do ... problems. Contact your dealer or GBT for the graphics card is securely fastened to the monitor's manual.) GV-NX76G Series Graphics Accelerator - 32 - When the Windows Advanced Options Menu appears, select Safe Mode and press Enter. After getting into Safe Mode, in Device...
Manual
Page 39
...installing the display drivers, you will not download/update the BIOS if it 's done, then restart your computer. 5.1.2. Right-click to Reflash the BIOS 5.1.1. c. To back up the current BIOS, at the A:\> prompt, type [BIOS flash utility name] -p [BIOS file name] (example: gvf11 -p nx76g256d-rh.f2) and...prompt, type[BIOS flash utility name] -s [BIOS file name] (example: gvf11 -s nx76g256d-rh.f1) and press Enter. 5. d. Restart the computer in MS-DOS mode. (For Windows 2000/XP, you .(@VGA will find a GIGABYTE icon in MS-DOS mode.) 3. English 5. Wait until it detects the current BIOS on ...
...installing the display drivers, you will not download/update the BIOS if it 's done, then restart your computer. 5.1.2. Right-click to Reflash the BIOS 5.1.1. c. To back up the current BIOS, at the A:\> prompt, type [BIOS flash utility name] -p [BIOS file name] (example: gvf11 -p nx76g256d-rh.f2) and...prompt, type[BIOS flash utility name] -s [BIOS file name] (example: gvf11 -s nx76g256d-rh.f1) and press Enter. 5. d. Restart the computer in MS-DOS mode. (For Windows 2000/XP, you .(@VGA will find a GIGABYTE icon in MS-DOS mode.) 3. English 5. Wait until it detects the current BIOS on ...

