Manual
Page 8
... the BIOS 33 5.1.1. Hardware Installation 4 2.1. Operating system requirement 12 3.1.2. nView properties pages 26 3.2. Windows® 2000 driver installation 31 4. How to a HDTV 34 5.3. Display properties pages 21 3.1.7. Appendix 33 5.1. Reflash BIOS in MS-DOS... mode 33 5.1.2. Resolutions and color depth table (In Windows® XP 35 GV-NX76G Series Graphics Accelerator - 2 - Hardware installation 8 3. Driver installation ...14 3.1.4. Utilities on driver CD ...16 3.1.5. Minimum system requirements 3 2. DirectX installation ...12 3.1.3. English Table of...
... the BIOS 33 5.1.1. Hardware Installation 4 2.1. Operating system requirement 12 3.1.2. nView properties pages 26 3.2. Windows® 2000 driver installation 31 4. How to a HDTV 34 5.3. Display properties pages 21 3.1.7. Appendix 33 5.1. Reflash BIOS in MS-DOS... mode 33 5.1.2. Resolutions and color depth table (In Windows® XP 35 GV-NX76G Series Graphics Accelerator - 2 - Hardware installation 8 3. Driver installation ...14 3.1.4. Utilities on driver CD ...16 3.1.5. Minimum system requirements 3 2. DirectX installation ...12 3.1.3. English Table of...

Manual
Page 15
... your graphics card with the installation of the graphics card is fully seated. * Please make sure that the gold edge connectors of the graphics card driver. Please refer to proceed with the PCI Express x16 slot, and press it in place, and replace the computer cover. 3. Locate one PCI Express x16...
... your graphics card with the installation of the graphics card is fully seated. * Please make sure that the gold edge connectors of the graphics card driver. Please refer to proceed with the PCI Express x16 slot, and press it in place, and replace the computer cover. 3. Locate one PCI Express x16...
Manual
Page 18
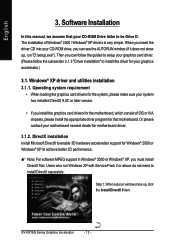
... Installation In this manual, we assume that motherboard. Windows® XP driver and utilities installation 3.1.1. Step 1. When autorun window show up , click the Install DirectX 9 item. GV-NX76G Series Graphics Accelerator - 12 - Operating system requirement • When loading the graphics card drivers for the system, please make sure your motherboard nearest dealer for...
... Installation In this manual, we assume that motherboard. Windows® XP driver and utilities installation 3.1.1. Step 1. When autorun window show up , click the Install DirectX 9 item. GV-NX76G Series Graphics Accelerator - 12 - Operating system requirement • When loading the graphics card drivers for the system, please make sure your motherboard nearest dealer for...
Manual
Page 20
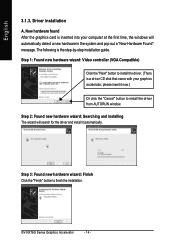
... disk that came with your computer at the first time, the windows will search for the driver and install it now.) Or click the "Cancel" button to install the driver from AUTORUN window. New hardware found After the graphics card is inserted into your graphics accelerator,... please insert it automatically. Step 3: Found new hardware wizard: Finish Click the "Finish" button to install the driver. (There is the step-by-step installation guide. GV-NX76G Series Graphics Accelerator - 14 - Step 1: Found new hardware wizard: Video controller (VGA Compatible) Click the "Next...
... disk that came with your computer at the first time, the windows will search for the driver and install it now.) Or click the "Cancel" button to install the driver from AUTORUN window. New hardware found After the graphics card is inserted into your graphics accelerator,... please insert it automatically. Step 3: Found new hardware wizard: Finish Click the "Finish" button to install the driver. (There is the step-by-step installation guide. GV-NX76G Series Graphics Accelerator - 14 - Step 1: Found new hardware wizard: Video controller (VGA Compatible) Click the "Next...

Manual
Page 21
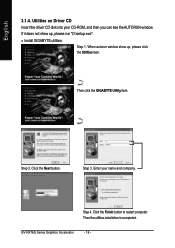
Step 2. Click "Next" button. If it does not show up, click Display Driver item. When autorun window show up , click Install Display Driver item. Step 4. Software Installation Step 1. When autorun window show up , please run "D:\setup.exe". English B. Step 3. Then the driver installation is completed. - 15 - Click "Finish" button to restart computer. Driver installation (Autorun Window) Insert the driver CD disk into your CD-ROM, and then you can see the AUTORUN window. Windows installings the components.
Step 2. Click "Next" button. If it does not show up, click Display Driver item. When autorun window show up , click Install Display Driver item. Step 4. Software Installation Step 1. When autorun window show up , please run "D:\setup.exe". English B. Step 3. Then the driver installation is completed. - 15 - Click "Finish" button to restart computer. Driver installation (Autorun Window) Insert the driver CD disk into your CD-ROM, and then you can see the AUTORUN window. Windows installings the components.
Manual
Page 22
If it does not show up , please run "D:\setup.exe". • Install GIGABYTE utilities: Step 1. Then click the GIGABYTE Utility item. Enter your CD-ROM, and then you can see the AUTORUN window. Step 4. Step 2. Click the Finish button to restart computer. Then the utilities installation is completed. GV-NX76G Series Graphics Accelerator - 16 - English 3.1.4. Utilities on Driver CD Insert the driver CD disk into your name and company. Step 3. Click the Next button. When autorun window show up , please click the Utilities item.
If it does not show up , please run "D:\setup.exe". • Install GIGABYTE utilities: Step 1. Then click the GIGABYTE Utility item. Enter your CD-ROM, and then you can see the AUTORUN window. Step 4. Step 2. Click the Finish button to restart computer. Then the utilities installation is completed. GV-NX76G Series Graphics Accelerator - 16 - English 3.1.4. Utilities on Driver CD Insert the driver CD disk into your name and company. Step 3. Click the Next button. When autorun window show up , please click the Utilities item.
Manual
Page 24
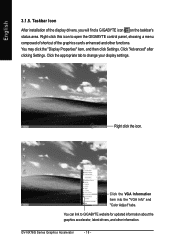
...VGA Info" and "Color Adjust" tabs. Right-click this icon to open the GIGABYTE control panel, showing a menu composed of shortcut of the display drivers, you will find a GIGABYTE icon on the taskbar's status area. You can link to change your display settings....click the "Display Properties" item, and then click Settings. Click the appropriate tab to GIGABYTE website for updated information about the graphics accelerator, latest drivers, and other functions. English 3.1.5. GV-NX76G Series Graphics Accelerator - 18 - Click "Advanced" after clicking Settings. Taskbar Icon After...
...VGA Info" and "Color Adjust" tabs. Right-click this icon to open the GIGABYTE control panel, showing a menu composed of shortcut of the display drivers, you will find a GIGABYTE icon on the taskbar's status area. You can link to change your display settings....click the "Display Properties" item, and then click Settings. Click the appropriate tab to GIGABYTE website for updated information about the graphics accelerator, latest drivers, and other functions. English 3.1.5. GV-NX76G Series Graphics Accelerator - 18 - Click "Advanced" after clicking Settings. Taskbar Icon After...
Manual
Page 26
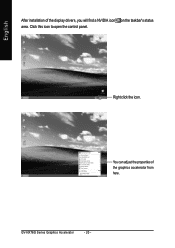
GV-NX76G Series Graphics Accelerator - 20 - Right click the icon. You can adjust the properties of the display drivers, you will find a NVIDIA icon on the taskbar's status area. Click this icon to open the control panel. English After installation of the graphics accelerator from here.
GV-NX76G Series Graphics Accelerator - 20 - Right click the icon. You can adjust the properties of the display drivers, you will find a NVIDIA icon on the taskbar's status area. Click this icon to open the control panel. English After installation of the graphics accelerator from here.
Manual
Page 27
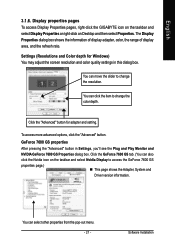
... also click the Nvidia icon on Desktop and then select Properties. Display properties pages To access Display Properties pages, right-click the GIGABYTE icon on the taskbar and select Display Properties or right-click on the taskbar and select Nvidia Display to change the resolution. You...GS tab. (You can click the item to access the GeForce 7600 GS properties page.) „ This page shows the Adapter, System and Driver version information. GeForce 7600 GS properties After pressing the "Advanced" button in this dialog box. Click the "Advanced" button for Windows) You...
... also click the Nvidia icon on Desktop and then select Properties. Display properties pages To access Display Properties pages, right-click the GIGABYTE icon on the taskbar and select Display Properties or right-click on the taskbar and select Nvidia Display to change the resolution. You...GS tab. (You can click the item to access the GeForce 7600 GS properties page.) „ This page shows the Adapter, System and Driver version information. GeForce 7600 GS properties After pressing the "Advanced" button in this dialog box. Click the "Advanced" button for Windows) You...
Manual
Page 29
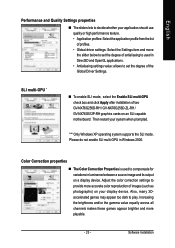
... texture. • Application profiles: Select the application profile from the list of profiles. • Global driver settings: Select the Settings item and move the slider below to set the degree of two GV-NX76G256D-RH / GV-NX76G256D-ZL-RH / GV-NX76G512P-RH graphics cards on an SLI-capable motherboard. Color Correction properties „ The Color Correction Properties is...
... texture. • Application profiles: Select the application profile from the list of profiles. • Global driver settings: Select the Settings item and move the slider below to set the degree of two GV-NX76G256D-RH / GV-NX76G256D-ZL-RH / GV-NX76G512P-RH graphics cards on an SLI-capable motherboard. Color Correction properties „ The Color Correction Properties is...
Manual
Page 37
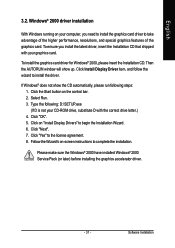
...the license agreement. 8. Click "OK". 5. Click on your graphics card. Windows® 2000 driver installation With Windows running on "Install Display Drivers" to install the driver. Click Install Display Driver item, and follow the wizard to begin the Installation Wizard. 6. Select Run. 3. Software Installation...run following : D:\SETUP.exe (If D is not your CD-ROM drive, substitute D with your computer, you install the latest driver, insert the Installation CD that shipped with the correct drive letter.) 4. Click "Yes" to complete the installation. Type the following...
...the license agreement. 8. Click "OK". 5. Click on your graphics card. Windows® 2000 driver installation With Windows running on "Install Display Drivers" to install the driver. Click Install Display Driver item, and follow the wizard to begin the Installation Wizard. 6. Select Run. 3. Software Installation...run following : D:\SETUP.exe (If D is not your CD-ROM drive, substitute D with your computer, you install the latest driver, insert the Installation CD that shipped with the correct drive letter.) 4. Click "Yes" to complete the installation. Type the following...
Manual
Page 38
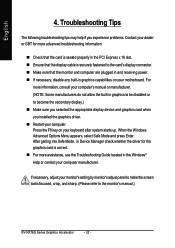
...Safe Mode and press Enter. After getting into Safe Mode, in Device Manager check whether the driver for more assistance, use the Troubleshooting Guide located in graphics capabilities on your monitor's setting by ...keyboard after system starts up. Troubleshooting Tips The following troubleshooting tips may help if you installed the graphics driver. „ Restart your computer manufacturer. For more information, consult your computer's manual or manufacturer. (NOTE... cable is securely fastened to the monitor's manual.) GV-NX76G Series Graphics Accelerator - 32 - English 4.
...Safe Mode and press Enter. After getting into Safe Mode, in Device Manager check whether the driver for more assistance, use the Troubleshooting Guide located in graphics capabilities on your monitor's setting by ...keyboard after system starts up. Troubleshooting Tips The following troubleshooting tips may help if you installed the graphics driver. „ Restart your computer manufacturer. For more information, consult your computer's manual or manufacturer. (NOTE... cable is securely fastened to the monitor's manual.) GV-NX76G Series Graphics Accelerator - 32 - English 4.
Manual
Page 39
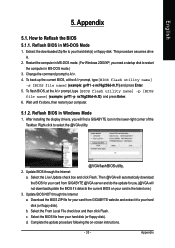
...VGA will not download/update the BIOS if it detects the current BIOS on -screen instructions. - 33 - Select the BIOS file from GIGABYTE website and extract it 's done, then restart your computer. 5.1.2. Complete the update procedure following the on your hard disk(s) or floppy disk... To flash BIOS, at the A:\> prompt, type[BIOS flash utility name] -s [BIOS file name] (example: gvf11 -s nx76g256d-rh.f1) and press Enter. 5. After installing the display drivers, you need a startup disk to Reflash the BIOS 5.1.1. This procedure assumes drive A. 2. Wait until it to your card is ...
...VGA will not download/update the BIOS if it detects the current BIOS on -screen instructions. - 33 - Select the BIOS file from GIGABYTE website and extract it 's done, then restart your computer. 5.1.2. Complete the update procedure following the on your hard disk(s) or floppy disk... To flash BIOS, at the A:\> prompt, type[BIOS flash utility name] -s [BIOS file name] (example: gvf11 -s nx76g256d-rh.f1) and press Enter. 5. After installing the display drivers, you need a startup disk to Reflash the BIOS 5.1.1. This procedure assumes drive A. 2. Wait until it to your card is ...
Manual
Page 40
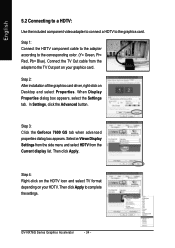
... connect a HDTV to complete the settings. Connect the TV Out cable from the Current display list. Step 2: After installation of the graphics card driver, right-click on your graphics card. Select n-Viewe Display Settings from the side menu and select HDTV from the adapter to the corresponding color. ...(Y= Green, Pr= Red, Pb= Blue). Step 3: Click the Geforce 7600 GS tab when advanced properties dialog box appears. Then click Apply. GV-NX76G Series Graphics Accelerator - 34 - Step 1: Connect the HDTV component cable to the adapter according to the TV Out port on your HDTV.
... connect a HDTV to complete the settings. Connect the TV Out cable from the Current display list. Step 2: After installation of the graphics card driver, right-click on your graphics card. Select n-Viewe Display Settings from the side menu and select HDTV from the adapter to the corresponding color. ...(Y= Green, Pr= Red, Pb= Blue). Step 3: Click the Geforce 7600 GS tab when advanced properties dialog box appears. Then click Apply. GV-NX76G Series Graphics Accelerator - 34 - Step 1: Connect the HDTV component cable to the adapter according to the TV Out port on your HDTV.

