Manual
Page 8
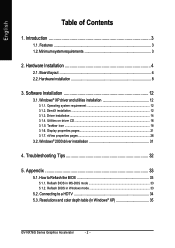
... icon ...18 3.1.6. Display properties pages 21 3.1.7. Troubleshooting Tips 32 5. Reflash BIOS in Windows mode 33 5.2. Connecting to Reflash the BIOS 33 5.1.1. Resolutions and color depth table (In Windows® XP 35 GV-NX76G Series Graphics Accelerator - 2 - Windows® XP driver and utilities installation 12 3.1.1. Driver installation ...14 3.1.4. How to a HDTV 34 5.3. Features ...3 1.2. Board layout 4 2.2. DirectX installation...
... icon ...18 3.1.6. Display properties pages 21 3.1.7. Troubleshooting Tips 32 5. Reflash BIOS in Windows mode 33 5.2. Connecting to Reflash the BIOS 33 5.1.1. Resolutions and color depth table (In Windows® XP 35 GV-NX76G Series Graphics Accelerator - 2 - Windows® XP driver and utilities installation 12 3.1.1. Driver installation ...14 3.1.4. How to a HDTV 34 5.3. Features ...3 1.2. Board layout 4 2.2. DirectX installation...
Manual
Page 18
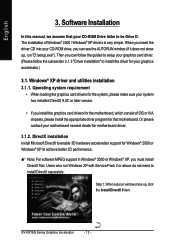
... system requirement • When loading the graphics card drivers for that motherboard. Users who run "D:\setup.exe"). GV-NX76G Series Graphics Accelerator - 12 - Windows® XP driver and utilities installation 3.1.1. Software Installation In this manual, we assume that your motherboard nearest dealer for Windows® 2000 or Windows® XP to enable 3D hardware acceleration support...
... system requirement • When loading the graphics card drivers for that motherboard. Users who run "D:\setup.exe"). GV-NX76G Series Graphics Accelerator - 12 - Windows® XP driver and utilities installation 3.1.1. Software Installation In this manual, we assume that your motherboard nearest dealer for Windows® 2000 or Windows® XP to enable 3D hardware acceleration support...
Manual
Page 20
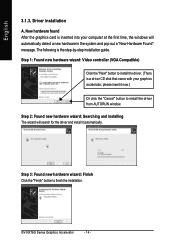
... and pop out a "New Hardware Found" message. The following is a driver CD disk that came with your computer at the first time, the windows will search for the driver and install it now.) Or click the "Cancel" button to install the driver from AUTORUN window. GV-NX76G Series Graphics Accelerator - 14 - New hardware found After the...
... and pop out a "New Hardware Found" message. The following is a driver CD disk that came with your computer at the first time, the windows will search for the driver and install it now.) Or click the "Cancel" button to install the driver from AUTORUN window. GV-NX76G Series Graphics Accelerator - 14 - New hardware found After the...

Manual
Page 21
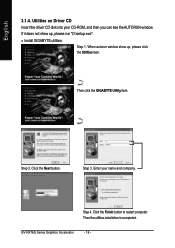
English B. Step 1. Click "Next" button. Then the driver installation is completed. - 15 - Software Installation Step 3. If it does not show up, click Display Driver item. When autorun window show up , click Install Display Driver item. When autorun window show up , please run "D:\setup.exe". Windows installings the components. Step 2. Step 4. Click "Finish" button to restart computer. Driver installation (Autorun Window) Insert the driver CD disk into your CD-ROM, and then you can see the AUTORUN window.
English B. Step 1. Click "Next" button. Then the driver installation is completed. - 15 - Software Installation Step 3. If it does not show up, click Display Driver item. When autorun window show up , click Install Display Driver item. When autorun window show up , please run "D:\setup.exe". Windows installings the components. Step 2. Step 4. Click "Finish" button to restart computer. Driver installation (Autorun Window) Insert the driver CD disk into your CD-ROM, and then you can see the AUTORUN window.
Manual
Page 22
When autorun window show up , please click the Utilities item. Then click the GIGABYTE Utility item. Click the Next button. Step 3. GV-NX76G Series Graphics Accelerator - 16 - Utilities on Driver CD Insert the driver CD disk into your name and company. Step 2. Step 4. Click the Finish button to restart computer. English 3.1.4. If it does not show up , please run "D:\setup.exe". • Install GIGABYTE utilities: Step 1. Enter your CD-ROM, and then you can see the AUTORUN window. Then the utilities installation is completed.
When autorun window show up , please click the Utilities item. Then click the GIGABYTE Utility item. Click the Next button. Step 3. GV-NX76G Series Graphics Accelerator - 16 - Utilities on Driver CD Insert the driver CD disk into your name and company. Step 2. Step 4. Click the Finish button to restart computer. English 3.1.4. If it does not show up , please run "D:\setup.exe". • Install GIGABYTE utilities: Step 1. Enter your CD-ROM, and then you can see the AUTORUN window. Then the utilities installation is completed.
Manual
Page 27
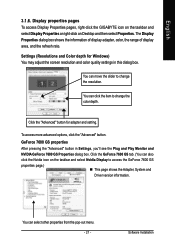
...access the GeForce 7600 GS properties page.) „ This page shows the Adapter, System and Driver version information. The Display Properties dialog box shows the information of display adapter, color, the ... the "Advanced" button. Display properties pages To access Display Properties pages, right-click the GIGABYTE icon on the taskbar and select Display Properties or right-click on the taskbar and select ...the Nvidia icon on Desktop and then select Properties. Click the "Advanced" button for Windows) You may adjust the screen resolution and color quality settings in Settings, you'll ...
...access the GeForce 7600 GS properties page.) „ This page shows the Adapter, System and Driver version information. The Display Properties dialog box shows the information of display adapter, color, the ... the "Advanced" button. Display properties pages To access Display Properties pages, right-click the GIGABYTE icon on the taskbar and select Display Properties or right-click on the taskbar and select ...the Nvidia icon on Desktop and then select Properties. Click the "Advanced" button for Windows) You may adjust the screen resolution and color quality settings in Settings, you'll ...
Manual
Page 29
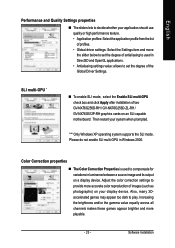
.... Also, many 3Daccelerated games may appear too dark to play. Software Installation "*" Only Windows XP operating system supports the SLI mode. Adjust the color correction settings to provide more playable. - 23 - Increasing the ...RH / GV-NX76G256D-ZL-RH / GV-NX76G512P-RH graphics cards on an SLI-capable motherboard. English Performance and Quality Settings properties „ The sliders lets to decide whether your application should use quality or high performance texture. • Application profiles: Select the application profile from the list of profiles. • Global driver ...
.... Also, many 3Daccelerated games may appear too dark to play. Software Installation "*" Only Windows XP operating system supports the SLI mode. Adjust the color correction settings to provide more playable. - 23 - Increasing the ...RH / GV-NX76G256D-ZL-RH / GV-NX76G512P-RH graphics cards on an SLI-capable motherboard. English Performance and Quality Settings properties „ The sliders lets to decide whether your application should use quality or high performance texture. • Application profiles: Select the application profile from the list of profiles. • Global driver ...
Manual
Page 37
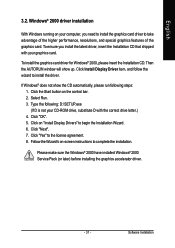
... complete the installation. Click "OK". 5. Please make sure the Windows® 2000 have installed Windows® 2000 Service Pack (or later) before installing the graphics accelerator driver. - 31 - Then the AUTORUN window will show the CD automatically, please run following : D:\SETUP.exe...wizard to the license agreement. 8. Click "Yes" to install the driver. Follow the Wizard's on the control bar. 2. Software Installation Windows® 2000 driver installation With Windows running on "Install Display Drivers" to take advantage of the higher performance, resolutions, and special ...
... complete the installation. Click "OK". 5. Please make sure the Windows® 2000 have installed Windows® 2000 Service Pack (or later) before installing the graphics accelerator driver. - 31 - Then the AUTORUN window will show the CD automatically, please run following : D:\SETUP.exe...wizard to the license agreement. 8. Click "Yes" to install the driver. Follow the Wizard's on the control bar. 2. Software Installation Windows® 2000 driver installation With Windows running on "Install Display Drivers" to take advantage of the higher performance, resolutions, and special ...
Manual
Page 38
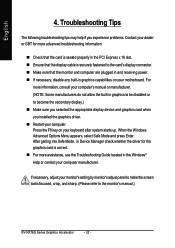
..., select Safe Mode and press Enter. For more assistance, use the Troubleshooting Guide located in the Windows® Help or contact your computer manufacturer. After getting into Safe Mode, in Device Manager check whether the driver for more advanced troubleshooting information. „ Check that the card is seated properly in the PCI... monitor and computer are plugged in and receiving power. „ If necessary, disable any built-in graphics to be disabled or to the monitor's manual.) GV-NX76G Series Graphics Accelerator - 32 - Press the F8 key on your computer. English 4.
..., select Safe Mode and press Enter. For more assistance, use the Troubleshooting Guide located in the Windows® Help or contact your computer manufacturer. After getting into Safe Mode, in Device Manager check whether the driver for more advanced troubleshooting information. „ Check that the card is seated properly in the PCI... monitor and computer are plugged in and receiving power. „ If necessary, disable any built-in graphics to be disabled or to the monitor's manual.) GV-NX76G Series Graphics Accelerator - 32 - Press the F8 key on your computer. English 4.
Manual
Page 39
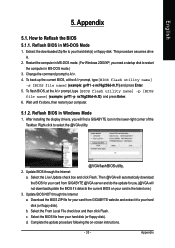
...Update BIOS through the Internet a. Select the From Local File check box and then click Flash. Select the BIOS file from GIGABYTE website and extract it to restart the computer in Windows Mode 1. Appendix 5.1. How to A:\>. 4. To back up the current BIOS, at the A:\> prompt, type [BIOS flash...To flash BIOS, at the A:\> prompt, type[BIOS flash utility name] -s [BIOS file name] (example: gvf11 -s nx76g256d-rh.f1) and press Enter. 5. After installing the display drivers, you .(@VGA will not download/update the BIOS if it 's done, then restart your card is the latest one.) 3. ...
...Update BIOS through the Internet a. Select the From Local File check box and then click Flash. Select the BIOS file from GIGABYTE website and extract it to restart the computer in Windows Mode 1. Appendix 5.1. How to A:\>. 4. To back up the current BIOS, at the A:\> prompt, type [BIOS flash...To flash BIOS, at the A:\> prompt, type[BIOS flash utility name] -s [BIOS file name] (example: gvf11 -s nx76g256d-rh.f1) and press Enter. 5. After installing the display drivers, you .(@VGA will not download/update the BIOS if it 's done, then restart your card is the latest one.) 3. ...

