
Manual
Page 1
... to rapid change in technology, some of the specifications might be reproduced or transmitted in any from without the expressed, written permission of this booklet. The author assumes no responsibility for any labels on VGA card, this manual may void the warranty of GBT. GV-NX68T256DH GeForce™ 6800 GT Graphics Accelerator User's Manual Rev. 101 12MD-NX68T256DH-101 Copyright © 2005 GIGABYTE TECHNOLOGY CO., LTD Copyright by GIGA-BYTE TECHNOLOGY CO...
... to rapid change in technology, some of the specifications might be reproduced or transmitted in any from without the expressed, written permission of this booklet. The author assumes no responsibility for any labels on VGA card, this manual may void the warranty of GBT. GV-NX68T256DH GeForce™ 6800 GT Graphics Accelerator User's Manual Rev. 101 12MD-NX68T256DH-101 Copyright © 2005 GIGABYTE TECHNOLOGY CO., LTD Copyright by GIGA-BYTE TECHNOLOGY CO...
Manual
Page 2
... icon ...15 3.1.6. Troubleshooting Tips 28 5. Resolutions and color depth table (In Windows® XP 30 GV-NX68T256DH Graphics Accelerator - 2 - Utilities on driver CD ...13 3.1.5. How to Reflash the BIOS 29 5.1.1. Features ...3 1.2. DirectX installation ...9 3.1.3. Display properties pages 18 3.1.7. Appendix 29 5.1. Reflash BIOS in MS-DOS mode 29 5.1.2. Software Installation 8 3.1. Hardware installation 6 3. Introduction 3 1.1. Win® XP driver and utilities installation 8 3.1.1. Win® 2000 driver installation 27 4. Reflash BIOS in Windows mode 29 5.2. English...
... icon ...15 3.1.6. Troubleshooting Tips 28 5. Resolutions and color depth table (In Windows® XP 30 GV-NX68T256DH Graphics Accelerator - 2 - Utilities on driver CD ...13 3.1.5. How to Reflash the BIOS 29 5.1.1. Features ...3 1.2. DirectX installation ...9 3.1.3. Display properties pages 18 3.1.7. Appendix 29 5.1. Reflash BIOS in MS-DOS mode 29 5.1.2. Software Installation 8 3.1. Hardware installation 6 3. Introduction 3 1.1. Win® XP driver and utilities installation 8 3.1.1. Win® 2000 driver installation 27 4. Reflash BIOS in Windows mode 29 5.2. English...

Manual
Page 6
Power off the computer and monitor, then disconnect the display cable from the back of your graphics accelerator card: 1. Now that you have prepared your computer, you are ready to disable it in removing the cover. 3. Remove any on the motherboard. Locate the PCI Express x 16 slot. To install your computer. 2. GV-NX68T256DH Graphics Accelerator - 6 - Remove the computer cover. Or, if your computer has any existing graphics card from this...
Power off the computer and monitor, then disconnect the display cable from the back of your graphics accelerator card: 1. Now that you have prepared your computer, you are ready to disable it in removing the cover. 3. Remove any on the motherboard. Locate the PCI Express x 16 slot. To install your computer. 2. GV-NX68T256DH Graphics Accelerator - 6 - Remove the computer cover. Or, if your computer has any existing graphics card from this...

Manual
Page 7
... instructions. - 7 - After installing the GV-NX68T256DH to your computer, please remember to avoid the system unstable problems. 5. Plug the display cable into the adapter. Hardware Installation Please do not push down the heat pipe. We suggest you to your graphics card; To connect a flat panel directly to connect both of the graphics card driver. To connect a VGA monitor to the DVI-I connector, plug the DVI-I to D-sub adapter into the DVI-I connector, then plug the monitor cable into your graphics card, use...
... instructions. - 7 - After installing the GV-NX68T256DH to your computer, please remember to avoid the system unstable problems. 5. Plug the display cable into the adapter. Hardware Installation Please do not push down the heat pipe. We suggest you to your graphics card; To connect a flat panel directly to connect both of the graphics card driver. To connect a VGA monitor to the DVI-I connector, plug the DVI-I to D-sub adapter into the DVI-I connector, then plug the monitor cable into your graphics card, use...
Manual
Page 8
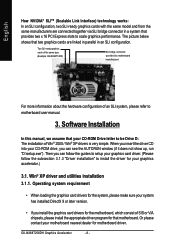
... AUTORUN window (if it does not show up, run "D:\setup.exe"). Win® XP driver and utilities installation 3.1.1. Software Installation In this manual, we assume that your graphics accelerator.) 3.1. Then you install the graphics card drivers for your CD-ROM Drive letter to motherboard user manual. 3. Or please contact your motherboard nearest dealer for that motherboard. Two SLI-ready graphics cards of the same type. (Example: GV-NX66T128D) SLI bridge connector (provided by motherboard manufacturer) For more information about the hardware configuration of...
... AUTORUN window (if it does not show up, run "D:\setup.exe"). Win® XP driver and utilities installation 3.1.1. Software Installation In this manual, we assume that your graphics accelerator.) 3.1. Then you install the graphics card drivers for your CD-ROM Drive letter to motherboard user manual. 3. Or please contact your motherboard nearest dealer for that motherboard. Two SLI-ready graphics cards of the same type. (Example: GV-NX66T128D) SLI bridge connector (provided by motherboard manufacturer) For more information about the hardware configuration of...
Manual
Page 10
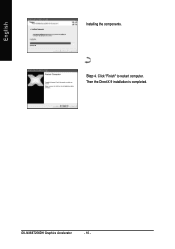
Step 4. Then the DirectX 9 installation is completed. GV-NX68T256DH Graphics Accelerator - 10 - English Installing the components. Click "Finish" to restart computer.
Step 4. Then the DirectX 9 installation is completed. GV-NX68T256DH Graphics Accelerator - 10 - English Installing the components. Click "Finish" to restart computer.
Manual
Page 11
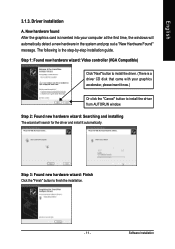
... your graphics accelerator, please insert it automatically. Software Installation Step 1: Found new hardware wizard: Video controller (VGA Compatible) Click "Next" button to install the driver. (There is a driver CD disk that came with your computer at the first time, the windows will search for the driver and install it now.) Or click the "Cancel" button to finish the installation. - 11 - New hardware found After the graphics card is the step-by-step installation guide...
... your graphics accelerator, please insert it automatically. Software Installation Step 1: Found new hardware wizard: Video controller (VGA Compatible) Click "Next" button to install the driver. (There is a driver CD disk that came with your computer at the first time, the windows will search for the driver and install it now.) Or click the "Cancel" button to finish the installation. - 11 - New hardware found After the graphics card is the step-by-step installation guide...

Manual
Page 12
If it does not show up , please run "D:\setup.exe". Step 2. Step 1. Click "Finish" button to restart computer. Driver installation (Autorun Window) Insert the driver CD disk into your CD-ROM, and then you can see the AUTORUN window. Then the driver installation is completed. Click "Install Display Driver" item. Click "Next" button. GV-NX68T256DH Graphics Accelerator - 12 - Step 3. When autorun window show up , click Install Display Driver item. Windows installings the components. English B.
If it does not show up , please run "D:\setup.exe". Step 2. Step 1. Click "Finish" button to restart computer. Driver installation (Autorun Window) Insert the driver CD disk into your CD-ROM, and then you can see the AUTORUN window. Then the driver installation is completed. Click "Install Display Driver" item. Click "Next" button. GV-NX68T256DH Graphics Accelerator - 12 - Step 3. When autorun window show up , click Install Display Driver item. Windows installings the components. English B.
Manual
Page 14
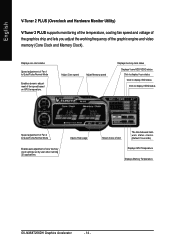
Displays core clock status Speed adjustment of Fan 1 to Quiet/Turbo/Normal Mode Enables auto adjustment of fan speed based on GPU temperature. English V-Tuner 2 PLUS (Overclock and Hardware Monitor Utility) V-Tuner 2 PLUS supports monitoring of the temperature, cooling fan speed and voltage of the graphics chip and lets you adjust the working frequency of skin The time between hardware status checks. (Default: 5 seconds) Displays GPU Temperature Displays Memory Temperature GV-NX68T256DH Graphics Accelerator - 14 - Adjust Core speed Adjust Memory speed Displays memory clock status...
Displays core clock status Speed adjustment of Fan 1 to Quiet/Turbo/Normal Mode Enables auto adjustment of fan speed based on GPU temperature. English V-Tuner 2 PLUS (Overclock and Hardware Monitor Utility) V-Tuner 2 PLUS supports monitoring of the temperature, cooling fan speed and voltage of the graphics chip and lets you adjust the working frequency of skin The time between hardware status checks. (Default: 5 seconds) Displays GPU Temperature Displays Memory Temperature GV-NX68T256DH Graphics Accelerator - 14 - Adjust Core speed Adjust Memory speed Displays memory clock status...
Manual
Page 15
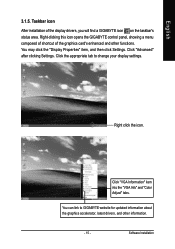
... to change your display settings. Right-clicking this icon opens the GIGABYTE control panel, showing a menu composed of shortcut of the display drivers, you will find a GIGABYTE icon on the taskbar's status area. Click the appropriate tab to GIGABYTE website for updated information about the graphics accelerator, latest drivers, and other functions. Click "Advanced" after clicking Settings. Click "VGA Information" item into the "VGA Info" and "Color Adjust" tabs. Software Installation...
... to change your display settings. Right-clicking this icon opens the GIGABYTE control panel, showing a menu composed of shortcut of the display drivers, you will find a GIGABYTE icon on the taskbar's status area. Click the appropriate tab to GIGABYTE website for updated information about the graphics accelerator, latest drivers, and other functions. Click "Advanced" after clicking Settings. Click "VGA Information" item into the "VGA Info" and "Color Adjust" tabs. Software Installation...
Manual
Page 18
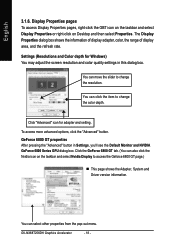
... Windows) You may adjust the screen resolution and color quality settings in Settings, you'll see the Default Monitor and NVIDIA GeForce 6800 Series GPU dialog box. GeForce 6800 GT properties After pressing the "Advanced" button in this dialog box. To access more advanced options, click the "Advanced" button. You can also click the Nvidia icon on Desktop and then select Properties. GV-NX68T256DH Graphics Accelerator - 18 - English 3.1.6. Display Properties pages To access Display Properties...
... Windows) You may adjust the screen resolution and color quality settings in Settings, you'll see the Default Monitor and NVIDIA GeForce 6800 Series GPU dialog box. GeForce 6800 GT properties After pressing the "Advanced" button in this dialog box. To access more advanced options, click the "Advanced" button. You can also click the Nvidia icon on Desktop and then select Properties. GV-NX68T256DH Graphics Accelerator - 18 - English 3.1.6. Display Properties pages To access Display Properties...
Manual
Page 19
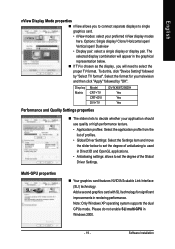
... format for significant improvements in Windows 2000. - 19 - To do not enable SLI multi-GPU in rendering performance. Add a second graphics card with SLI technology for your application should use quality or high performance texture. • Application profiles: Select the application profile from the list of the Global Driver Settings. Software Installation Display Matrix Model CRT+TV CRT+DVI DVI+TV GV-NX68T256DH Yes Yes Yes Performance and Quality Settings properties „ The sliders lets to...
... format for significant improvements in Windows 2000. - 19 - To do not enable SLI multi-GPU in rendering performance. Add a second graphics card with SLI technology for your application should use quality or high performance texture. • Application profiles: Select the application profile from the list of the Global Driver Settings. Software Installation Display Matrix Model CRT+TV CRT+DVI DVI+TV GV-NX68T256DH Yes Yes Yes Performance and Quality Settings properties „ The sliders lets to...
Manual
Page 20
... Desktop Manager provides enhanced nView multidisplay functionality and helps you organize your display device. The "Adjust Colors" button will access "Color Correction" properties page. Overlay Controls properties „ The Overlay Controls Properties can be used to compensate for use with multiple displays and desktops. • My connected TV does not appear in this list This option can adjust Overlay zoom controls and Overlay color controls. Adjust the color correction settings to provide more playable. GV-NX68T256DH Graphics Accelerator...
... Desktop Manager provides enhanced nView multidisplay functionality and helps you organize your display device. The "Adjust Colors" button will access "Color Correction" properties page. Overlay Controls properties „ The Overlay Controls Properties can be used to compensate for use with multiple displays and desktops. • My connected TV does not appear in this list This option can adjust Overlay zoom controls and Overlay color controls. Adjust the color correction settings to provide more playable. GV-NX68T256DH Graphics Accelerator...
Manual
Page 22
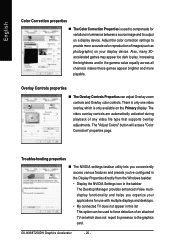
... open application windows on which to run your applications so you can remove infrequently used screens by dragging them from the screen menu to the menu by dragging them individually, or click Restore Defaults. Multiple desktops give you extra desktop areas on one desktop. To return to turn on desktop and choose Properties\Settings\Advanced\GeForce 6800 GT\Desktop Management Click Enable button to normal navigation mode, uncheck...
... open application windows on which to run your applications so you can remove infrequently used screens by dragging them from the screen menu to the menu by dragging them individually, or click Restore Defaults. Multiple desktops give you extra desktop areas on one desktop. To return to turn on desktop and choose Properties\Settings\Advanced\GeForce 6800 GT\Desktop Management Click Enable button to normal navigation mode, uncheck...
Manual
Page 23
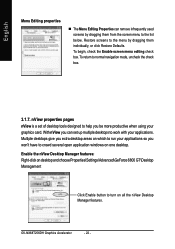
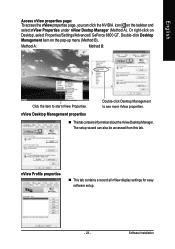
... can click the NVIDIA icon on the taskbar and select nView Properties under nView Destop Manager (Method A). Double-click Desktop Management item on Desktop, select Properties/Settings/Advanced/ GeForce 6800 GT. Method A: Method B: Click the item to see more nView properties. nView Profile properties „ This tab contains a record all nView display settings for easy software setup. - 23 - Software Installation nView Desktop Management properties „ ThistabcontainsinformationaboutthenViewDesktopManager. Or right-click on the pop-up menu (Method...
... can click the NVIDIA icon on the taskbar and select nView Properties under nView Destop Manager (Method A). Double-click Desktop Management item on Desktop, select Properties/Settings/Advanced/ GeForce 6800 GT. Method A: Method B: Click the item to see more nView properties. nView Profile properties „ This tab contains a record all nView display settings for easy software setup. - 23 - Software Installation nView Desktop Management properties „ ThistabcontainsinformationaboutthenViewDesktopManager. Or right-click on the pop-up menu (Method...

Manual
Page 25
nView Effects properties „ This tab provides special windows effects that you can apply to your applications. Also enables full screen video playback via the video mirroring control button. - 25 - nView Zoom properties „ This tab provides dynamic zoom functionality on the desktop. Software Installation English nView User Interface properties „ This tab allows customization of the nView user interface.
nView Effects properties „ This tab provides special windows effects that you can apply to your applications. Also enables full screen video playback via the video mirroring control button. - 25 - nView Zoom properties „ This tab provides dynamic zoom functionality on the desktop. Software Installation English nView User Interface properties „ This tab allows customization of the nView user interface.
Manual
Page 26
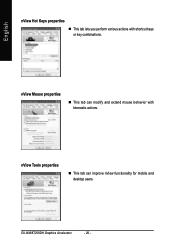
nView Tools properties „ This tab can modify and extend mouse behavior with shortcut keys or key combinations. GV-NX68T256DH Graphics Accelerator - 26 - English nView Hot Keys properties „ This tab lets you perform various actions with kinematic actions. nView Mouse properties „ This tab can improve nView functionality for mobile and desktop users.
nView Tools properties „ This tab can modify and extend mouse behavior with shortcut keys or key combinations. GV-NX68T256DH Graphics Accelerator - 26 - English nView Hot Keys properties „ This tab lets you perform various actions with kinematic actions. nView Mouse properties „ This tab can improve nView functionality for mobile and desktop users.
Manual
Page 27
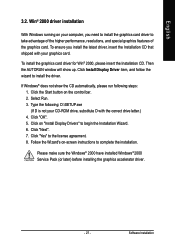
... drive letter.) 4. Click "Next". 7. Win® 2000 driver installation With Windows running on "Install Display Drivers" to complete the installation. English 3.2. To install the graphics card driver for Win® 2000, please insert the Installation CD. Click the Start button on -screen instructions to begin the Installation Wizard. 6. Follow the Wizard's on the control bar. 2. Software Installation Then the AUTORUN window will show the CD automatically, please run following : D:\SETUP.exe (If D is not your graphics card...
... drive letter.) 4. Click "Next". 7. Win® 2000 driver installation With Windows running on "Install Display Drivers" to complete the installation. English 3.2. To install the graphics card driver for Win® 2000, please insert the Installation CD. Click the Start button on -screen instructions to begin the Installation Wizard. 6. Follow the Wizard's on the control bar. 2. Software Installation Then the AUTORUN window will show the CD automatically, please run following : D:\SETUP.exe (If D is not your graphics card...
Manual
Page 28
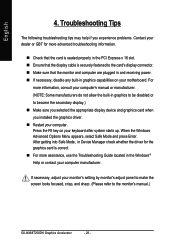
... the card's display connector. „ Make sure that the monitor and computer are plugged in and receiving power. „ If necessary, disable any built-in the PCI Express x 16 slot. „ Ensure that the display cable is securely fastened to the monitor's manual.) GV-NX68T256DH Graphics Accelerator - 28 - After getting into Safe Mode, in Device Manager check whether the driver for more assistance, use the Troubleshooting Guide located in the Windows®...
... the card's display connector. „ Make sure that the monitor and computer are plugged in and receiving power. „ If necessary, disable any built-in the PCI Express x 16 slot. „ Ensure that the display cable is securely fastened to the monitor's manual.) GV-NX68T256DH Graphics Accelerator - 28 - After getting into Safe Mode, in Device Manager check whether the driver for more assistance, use the Troubleshooting Guide located in the Windows®...
Manual
Page 29
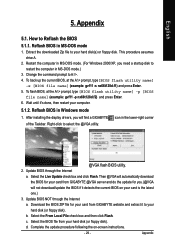
... BIOS on -screen instructions. - 29 - To flash BIOS, at the A:\> prompt, type[BIOS flash utility name] -s [BIOS file name] (example: gvf11 -s nx66t128d.f1) and press Enter. 5. After installing the display drivers, you need a startup disk to your hard disk(s) or floppy disk. Select the Live Update check box and click Flash. c. Complete the update procedure following the on your card is the latest one.) 3. Change the command prompt to Reflash the BIOS 5.1.1. Update BIOS...
... BIOS on -screen instructions. - 29 - To flash BIOS, at the A:\> prompt, type[BIOS flash utility name] -s [BIOS file name] (example: gvf11 -s nx66t128d.f1) and press Enter. 5. After installing the display drivers, you need a startup disk to your hard disk(s) or floppy disk. Select the Live Update check box and click Flash. c. Complete the update procedure following the on your card is the latest one.) 3. Change the command prompt to Reflash the BIOS 5.1.1. Update BIOS...


