Manual
Page 1
... of their respective owners. patents and other limited viewing uses only unless otherwise authorized by U.S. Rovi Product Notice: This product incorporates copyright protection technology that may appear in this document nor does the author make a commitment to rapid change in any form without the expressed, written permission of GBT. NVIDIA® Graphics Accelerator User's Manual Rev. 101 Copyright © 2012 GIGABYTE TECHNOLOGY CO., LTD Copyright by...
... of their respective owners. patents and other limited viewing uses only unless otherwise authorized by U.S. Rovi Product Notice: This product incorporates copyright protection technology that may appear in this document nor does the author make a commitment to rapid change in any form without the expressed, written permission of GBT. NVIDIA® Graphics Accelerator User's Manual Rev. 101 Copyright © 2012 GIGABYTE TECHNOLOGY CO., LTD Copyright by...
Manual
Page 2
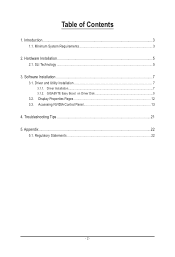
Display Properties Pages 12 3.3. Driver and Utility Installation 7 3.1.1. Minimum System Requirements 3 2. SLI Technology...5 3. Driver Installation...7 3.1.2. Accessing NVIDIA Control Panel 13 4. Regulatory Statements 22 - 2 - Introduction...3 1.1. Hardware Installation 5 2.1. Appendix...22 5.1. Software Installation...7 3.1. GIGABYTE Easy Boost on Driver Disk 9 3.2. Troubleshooting Tips 21 5. Table of Contents 1.
Display Properties Pages 12 3.3. Driver and Utility Installation 7 3.1.1. Minimum System Requirements 3 2. SLI Technology...5 3. Driver Installation...7 3.1.2. Accessing NVIDIA Control Panel 13 4. Regulatory Statements 22 - 2 - Introduction...3 1.1. Hardware Installation 5 2.1. Appendix...22 5.1. Software Installation...7 3.1. GIGABYTE Easy Boost on Driver Disk 9 3.2. Troubleshooting Tips 21 5. Table of Contents 1.

Manual
Page 3
Intel® Pentium® 4 or AMD AthlonTM XP class - 2GB system memory (4GB recommended) - Windows® 7 - Optical drive for software installation (CD-ROM or DVD-ROM drive) • Operating System - Windows® Vista - Minimum System Requirements • Hardware - 1. Windows® XP - 3 - Introduction Introduction 1.1.
Intel® Pentium® 4 or AMD AthlonTM XP class - 2GB system memory (4GB recommended) - Windows® 7 - Optical drive for software installation (CD-ROM or DVD-ROM drive) • Operating System - Windows® Vista - Minimum System Requirements • Hardware - 1. Windows® XP - 3 - Introduction Introduction 1.1.

Manual
Page 4
... be left in its original packing until it is installed. If you work correctly, please use official GIGABYTE BIOS only. NVIDIA Series Graphics Accelerator - 4 - The operator should be wearing an anti-static wristband, grounded at the same point as the power supply case. 3. DO NOT APPLY POWER TO YOUR SYSTEM IF THE GRAPHICS CARD IS DAMAGED. In order to your computer. 1. To protect...
... be left in its original packing until it is installed. If you work correctly, please use official GIGABYTE BIOS only. NVIDIA Series Graphics Accelerator - 4 - The operator should be wearing an anti-static wristband, grounded at the same point as the power supply case. 3. DO NOT APPLY POWER TO YOUR SYSTEM IF THE GRAPHICS CARD IS DAMAGED. In order to your computer. 1. To protect...
Manual
Page 5
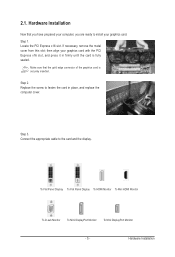
Hardware Installation Now that the gold edge connector of the graphics card is fully seated. To Flat Panel Display To Flat Panel Display To HDMI Monitor To Mini HDMI Monitor To D-sub Monitor To Mini DisplayPort Monitor To Mini DisplayPort Monitor - 5 - If necessary, remove the metal cover from this slot; Step 3. Make sure that you have prepared your computer, you are ready to install your graphics card with the PCI Express x16 slot...
Hardware Installation Now that the gold edge connector of the graphics card is fully seated. To Flat Panel Display To Flat Panel Display To HDMI Monitor To Mini HDMI Monitor To D-sub Monitor To Mini DisplayPort Monitor To Mini DisplayPort Monitor - 5 - If necessary, remove the metal cover from this slot; Step 3. Make sure that you have prepared your computer, you are ready to install your graphics card with the PCI Express x16 slot...

Manual
Page 6
...SLI configuration, two/three SLI-ready graphics cards of the same model and the same manufacturers are connected together via SLI bridge connector in an SLI configuration. SLI Configuration: SLI bridge connector (provided by motherboard manufacturer) Two SLI-ready graphics cards of the same type. (Example: GV-N28-1GH-B) 3-Way SLI Configuration: 3-Way SLI bridge connector (provided by motherboard manufacturer) Two SLI-ready graphics cards of the same type. (Example: GV-N28-1GH-B) NVIDIA Series Graphics Accelerator - 6 - The picture below shows that provides two/three x16 PCI Express...
...SLI configuration, two/three SLI-ready graphics cards of the same model and the same manufacturers are connected together via SLI bridge connector in an SLI configuration. SLI Configuration: SLI bridge connector (provided by motherboard manufacturer) Two SLI-ready graphics cards of the same type. (Example: GV-N28-1GH-B) 3-Way SLI Configuration: 3-Way SLI bridge connector (provided by motherboard manufacturer) Two SLI-ready graphics cards of the same type. (Example: GV-N28-1GH-B) NVIDIA Series Graphics Accelerator - 6 - The picture below shows that provides two/three x16 PCI Express...
Manual
Page 7
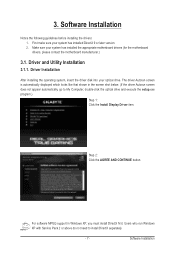
.... Driver and Utility Installation 3.1.1. Users who run Windows XP with Service Pack 2 or above do not need to My Computer, double-click the optical drive and execute the setup.exe program.) Step 1: Click the Install Display Driver item. Driver Installation After installing the operating system, insert the driver disk into your optical drive. For software MPEG support in the screen shot below. (If the driver Autorun screen does not appear automatically, go to install DirectX separately. - 7 - Software Installation 3. Software Installation...
.... Driver and Utility Installation 3.1.1. Users who run Windows XP with Service Pack 2 or above do not need to My Computer, double-click the optical drive and execute the setup.exe program.) Step 1: Click the Install Display Driver item. Driver Installation After installing the operating system, insert the driver disk into your optical drive. For software MPEG support in the screen shot below. (If the driver Autorun screen does not appear automatically, go to install DirectX separately. - 7 - Software Installation 3. Software Installation...

Manual
Page 8
The system is completed. NVIDIA Series Graphics Accelerator - 8 - Then the driver installation is installing the components. Step 5: Click the RESTART NOW button to restart the computer. Step 3: Check the Express then click the NEXT button. Step 4: Check the Install NVIDIA Update then click the NEXT button.
The system is completed. NVIDIA Series Graphics Accelerator - 8 - Then the driver installation is installing the components. Step 5: Click the RESTART NOW button to restart the computer. Step 3: Check the Express then click the NEXT button. Step 4: Check the Install NVIDIA Update then click the NEXT button.
Manual
Page 10
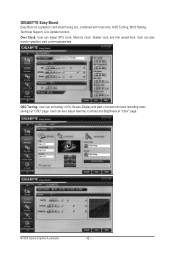
User can adjust GPU clock, Memory clock, Shader clock and Fan speed here. NVIDIA Series Graphics Accelerator - 10 - Over Clock: User can also monitor graphics card current parameters. OSD Turning: User can also adjust Gamma, Contrast and Brightness at "OSD" page. User can set hotkey of On-Screen-Display and path of screen shot and recording video savings at "Color" page. GIGABYTE Easy Boost Easy Boost is a graphics card smart tuning tool, combined with Overclock, OSD Turning, BIOS Setting, Technical Support, Live Update function.
User can adjust GPU clock, Memory clock, Shader clock and Fan speed here. NVIDIA Series Graphics Accelerator - 10 - Over Clock: User can also monitor graphics card current parameters. OSD Turning: User can also adjust Gamma, Contrast and Brightness at "OSD" page. User can set hotkey of On-Screen-Display and path of screen shot and recording video savings at "Color" page. GIGABYTE Easy Boost Easy Boost is a graphics card smart tuning tool, combined with Overclock, OSD Turning, BIOS Setting, Technical Support, Live Update function.
Manual
Page 11
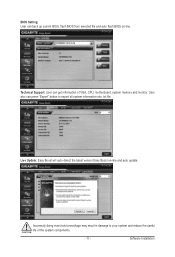
Technical Support: User can back up current BIOS, flash BIOS from selected file and auto flash BIOS on -line and auto update. BIOS Setting: User can get information of the system components. - 11 - Incorrectly doing overclock/overvoltage may result in damage to export all system information into .txt file. Live Update: Easy Boost will auto detect the latest version Easy Boost on -line. Software Installation User also can press "Export" button to your system and reduce the useful life of VGA, CPU, motherboard, system memory and monitor.
Technical Support: User can back up current BIOS, flash BIOS from selected file and auto flash BIOS on -line and auto update. BIOS Setting: User can get information of the system components. - 11 - Incorrectly doing overclock/overvoltage may result in damage to export all system information into .txt file. Live Update: Easy Boost will auto detect the latest version Easy Boost on -line. Software Installation User also can press "Export" button to your system and reduce the useful life of VGA, CPU, motherboard, system memory and monitor.
Manual
Page 12
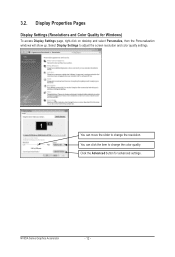
You can click the item to change the resolution. 3.2. NVIDIA Series Graphics Accelerator - 12 - You can move the slider to adjust the screen resolution and color quality settings. Select Display Settings to change the color quality. Click the Advanced button for Windows) To access Display Settings page, right-click on desktop and select Personalize, then the Personalization windows will show up. Display Properties Pages Display Settings (Resolutions and Color Quality for advanced settings.
You can click the item to change the resolution. 3.2. NVIDIA Series Graphics Accelerator - 12 - You can move the slider to adjust the screen resolution and color quality settings. Select Display Settings to change the color quality. Click the Advanced button for Windows) To access Display Settings page, right-click on desktop and select Personalize, then the Personalization windows will show up. Display Properties Pages Display Settings (Resolutions and Color Quality for advanced settings.
Manual
Page 13
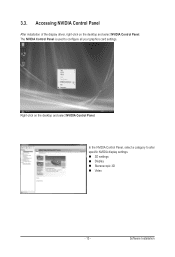
Accessing NVIDIA Control Panel After installation of the display driver, right-click on the desktop and select NVIDIA Control Panel. In the NVIDIA Control Panel, select a category to configure all your graphics card settings. The NVIDIA Control Panel is used to alter specific NVIDIA display settings. 3D settings Display Stereoscopic 3D Video - 13 - 3.3. Software Installation Right-click on the desktop and select NVIDIA Control Panel.
Accessing NVIDIA Control Panel After installation of the display driver, right-click on the desktop and select NVIDIA Control Panel. In the NVIDIA Control Panel, select a category to configure all your graphics card settings. The NVIDIA Control Panel is used to alter specific NVIDIA display settings. 3D settings Display Stereoscopic 3D Video - 13 - 3.3. Software Installation Right-click on the desktop and select NVIDIA Control Panel.
Manual
Page 14
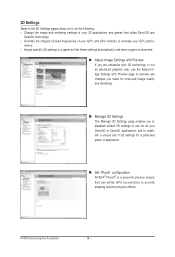
... to establish default 3D settings to use the Adjust Image Settings with Preview page to preview any changes you make for improved image quality and rendering. Manage 3D Settings The Manage 3D Settings page enables you to do the following: • Change the image and rendering settings of your 3D applications and games that can utilize GPU acceleration to increase your GPU and GPU memory to...
... to establish default 3D settings to use the Adjust Image Settings with Preview page to preview any changes you make for improved image quality and rendering. Manage 3D Settings The Manage 3D Settings page enables you to do the following: • Change the image and rendering settings of your 3D applications and games that can utilize GPU acceleration to increase your GPU and GPU memory to...
Manual
Page 15
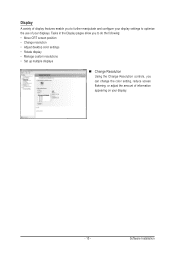
Software Installation Tasks in the Display pages allow you to do the following: • Move CRT screen position • Change resolution • Adjust desktop color settings • Rotate display • Manage custom resolutions • Set up multiple displays Change Resolution Using the Change Resolution controls, you to further manipulate and configure your display settings to optimize the use of information appearing on your displays. Display A variety of display features enable you can change the color setting, reduce screen flickering, or adjust the amount of your...
Software Installation Tasks in the Display pages allow you to do the following: • Move CRT screen position • Change resolution • Adjust desktop color settings • Rotate display • Manage custom resolutions • Set up multiple displays Change Resolution Using the Change Resolution controls, you to further manipulate and configure your display settings to optimize the use of information appearing on your displays. Display A variety of display features enable you can change the color setting, reduce screen flickering, or adjust the amount of your...
Manual
Page 16
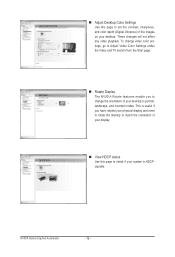
Adjust Desktop Color Settings Use this page to change video color settings, go to Adjust Video Color Settings under the Video and TV section from the Start page. Rotate Display The NVIDIA Rotate features enable you have rotated your physical display and need to rotate the desktop to match the orientation of your display. View HDCP status Use this page to set the contrast, sharpness, and color depth (Digital Vibrance) of your system...
Adjust Desktop Color Settings Use this page to change video color settings, go to Adjust Video Color Settings under the Video and TV section from the Start page. Rotate Display The NVIDIA Rotate features enable you have rotated your physical display and need to rotate the desktop to match the orientation of your display. View HDCP status Use this page to set the contrast, sharpness, and color depth (Digital Vibrance) of your system...
Manual
Page 17
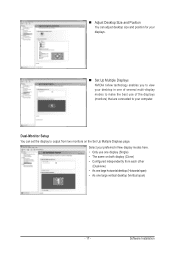
Select your preferred nView display modes here. • Only use of several multi-display modes to make the best use one large vertical desktop (Vertical span) - 17 - Adjust Desktop Size and Position You can set the display to your computer. Dual-Monitor Setup You can adjust desktop size and position for your displays. Set Up Multiple Displays NVIDIA nView technology enables you to view your desktop in one of the displays (monitors) that are connected to output from each other (Dualview...
Select your preferred nView display modes here. • Only use of several multi-display modes to make the best use one large vertical desktop (Vertical span) - 17 - Adjust Desktop Size and Position You can set the display to your computer. Dual-Monitor Setup You can adjust desktop size and position for your displays. Set Up Multiple Displays NVIDIA nView technology enables you to view your desktop in one of the displays (monitors) that are connected to output from each other (Dualview...
Manual
Page 19
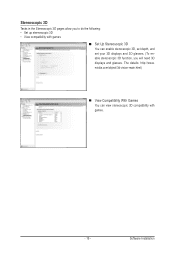
Stereoscopic 3D Tasks in the Stereoscopic 3D pages allow you will need 3D displays and glasses. Software Installation nvidia.com/object/3d-vision-main.html) View Compatibility With Games You can view stereoscopic 3D compatibility with games Set Up Stereoscopic 3D You can enable stereoscopic 3D, set depth, and set your 3D displays and 3D glasses. (To enable stereoscopic 3D function, you to do the following: • Set up stereoscopic 3D • View compatibility with games. - 19 - The details: http://www.
Stereoscopic 3D Tasks in the Stereoscopic 3D pages allow you will need 3D displays and glasses. Software Installation nvidia.com/object/3d-vision-main.html) View Compatibility With Games You can view stereoscopic 3D compatibility with games Set Up Stereoscopic 3D You can enable stereoscopic 3D, set depth, and set your 3D displays and 3D glasses. (To enable stereoscopic 3D function, you to do the following: • Set up stereoscopic 3D • View compatibility with games. - 19 - The details: http://www.
Manual
Page 20
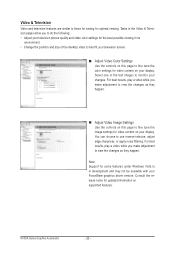
... Settings Use the controls on this page to fine tune the color settings for some features under Windows Vista is in its environment. • Change the position and size of the test images to monitor your display. For best results, play a video while you make adjustment to view the changes as they happen. Video & Television Video and television features are similar to those for analog for updated information on supported...
... Settings Use the controls on this page to fine tune the color settings for some features under Windows Vista is in its environment. • Change the position and size of the test images to monitor your display. For best results, play a video while you make adjustment to view the changes as they happen. Video & Television Video and television features are similar to those for analog for updated information on supported...
Manual
Page 21
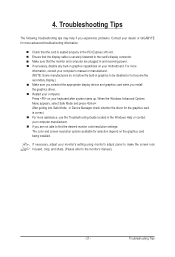
... display device and graphics card when you experience problems. Contact your dealer or GIGABYTE for selection depend on your motherboard. For more advanced troubleshooting information. When the Windows Advanced Options Menu appears, select Safe Mode and press . If you are plugged in graphics to be disabled or to the card's display connector. Troubleshooting Tips The following troubleshooting tips may help if you install the graphics driver. If necessary, adjust your monitor's setting using monitor's adjust panel...
... display device and graphics card when you experience problems. Contact your dealer or GIGABYTE for selection depend on your motherboard. For more advanced troubleshooting information. When the Windows Advanced Options Menu appears, select Safe Mode and press . If you are plugged in graphics to be disabled or to the card's display connector. Troubleshooting Tips The following troubleshooting tips may help if you install the graphics driver. If necessary, adjust your monitor's setting using monitor's adjust panel...
Manual
Page 22
... Customer Care number listed in your product's user's manual and we at the time of Certain Hazardous Substances in a manner that protects human health and the environment. The parts and components have not intended to your effort. Moreover, we will help you purchased the product for any responsibility for RoHS (Restriction of printing. NVIDIA Series Graphics Accelerator - 22 - Waste...
... Customer Care number listed in your product's user's manual and we at the time of Certain Hazardous Substances in a manner that protects human health and the environment. The parts and components have not intended to your effort. Moreover, we will help you purchased the product for any responsibility for RoHS (Restriction of printing. NVIDIA Series Graphics Accelerator - 22 - Waste...


