Manual
Page 3
No part of this manual may be made by any form or by GIGABYTE without GIGABYTE's prior written permission. Example: Changes to the specifications and features in this manual may be reproduced, copied, translated, transmitted, or published in the use of this : "REV:... X.X." Documentation Classifications In order to their respective owners. Check your motherboard looks like this product, GIGABYTE provides the following types of ...
No part of this manual may be made by any form or by GIGABYTE without GIGABYTE's prior written permission. Example: Changes to the specifications and features in this manual may be reproduced, copied, translated, transmitted, or published in the use of this : "REV:... X.X." Documentation Classifications In order to their respective owners. Check your motherboard looks like this product, GIGABYTE provides the following types of ...
Manual
Page 5
Chapter 3 Drivers Installation 61 3-1 Installing Chipset Drivers 61 3-2 Application Software 62 3-3 Technical Manuals 62 3-4 Contact...63 3-5 System...63 3-6 Download Center 64 3-7 New Utilities...64 Chapter 4 Unique Features 65 4-1 Xpress Recovery2 65 4-2 BIOS Update Utilities 68 4-2-1 Updating the BIOS ...
Chapter 3 Drivers Installation 61 3-1 Installing Chipset Drivers 61 3-2 Application Software 62 3-3 Technical Manuals 62 3-4 Contact...63 3-5 System...63 3-6 Download Center 64 3-7 New Utilities...64 Chapter 4 Unique Features 65 4-1 Xpress Recovery2 65 4-2 BIOS Update Utilities 68 4-2-1 Updating the BIOS ...

Manual
Page 6
... IEEE 1394a bracket (Part No. 12CF1-1IE008-0*R) 3.5" Front Panel with 2 USB 3.0/2.0 ports (Part No. 12CR1-FPX582-0*R) - 6 - The box contents are for GA-Z68XP-UD3-iSSD. Box Contents GA-Z68XP-UD3-iSSD or GA-Z68XP-UD3 motherboard Motherboard driver disk User's Manual Quick Installation Guide Four SATA cables I/O Shield One 2-Way SLI bridge connector SSD 20 GB j j Only for reference only and the...
... IEEE 1394a bracket (Part No. 12CF1-1IE008-0*R) 3.5" Front Panel with 2 USB 3.0/2.0 ports (Part No. 12CR1-FPX582-0*R) - 6 - The box contents are for GA-Z68XP-UD3-iSSD. Box Contents GA-Z68XP-UD3-iSSD or GA-Z68XP-UD3 motherboard Motherboard driver disk User's Manual Quick Installation Guide Four SATA cables I/O Shield One 2-Way SLI bridge connector SSD 20 GB j j Only for reference only and the...

Manual
Page 9
..., avoid touching any installation steps or have it on top of the product, please consult a certified computer technician. - 9 - Prior to installation, carefully read the user's manual and follow these procedures: •• Prior to the use of an antistatic pad or within an electrostatic shielding container. •• Before unplugging the...
..., avoid touching any installation steps or have it on top of the product, please consult a certified computer technician. - 9 - Prior to installation, carefully read the user's manual and follow these procedures: •• Prior to the use of an antistatic pad or within an electrostatic shielding container. •• Before unplugging the...

Manual
Page 15
... CPU. Hardware Installation Push down each push pin. Check that the Male and Female push pins are joined closely. (Refer to your CPU cooler installation manual for instructions on installing the cooler.) Step 5: After the installation, check the back of the CPU cooler to the CPU fan header (CPU_FAN) on the...
... CPU. Hardware Installation Push down each push pin. Check that the Male and Female push pins are joined closely. (Refer to your CPU cooler installation manual for instructions on installing the cooler.) Step 5: After the installation, check the back of the CPU cooler to the CPU fan header (CPU_FAN) on the...
Manual
Page 18
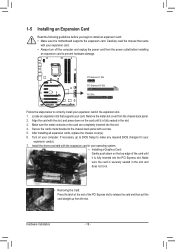
... and then pull the card straight up from the slot. Make sure the card is fully inserted into the PCI Express slot. Carefully read the manual that supports your expansion card. • Always turn off the computer and unplug the power cord from the chassis back panel. 222 Align the card...
... and then pull the card straight up from the slot. Make sure the card is fully inserted into the PCI Express slot. Carefully read the manual that supports your expansion card. • Always turn off the computer and unplug the power cord from the chassis back panel. 222 Align the card...

Manual
Page 19
Two CrossFireX/SLI-ready graphics cards of the two cards. Refer to the manual of your graphics cards for enabling CrossFireX/SLI technology may be needed or not depending on top of identical brand and chip and correct driver - A...) B. Step 3: Plug the display cable into the graphics card on the PCI Express x16 slots. A power supply with sufficient power is recommended (Refer to the manual that came with two PCI Express x16 slots and correct driver - C. C-2. Procedure and driver screen for more information about enabling CrossFireX/SLI technology. - 19 - ...
Two CrossFireX/SLI-ready graphics cards of the two cards. Refer to the manual of your graphics cards for enabling CrossFireX/SLI technology may be needed or not depending on top of identical brand and chip and correct driver - A...) B. Step 3: Plug the display cable into the graphics card on the PCI Express x16 slots. A power supply with sufficient power is recommended (Refer to the manual that came with two PCI Express x16 slots and correct driver - C. C-2. Procedure and driver screen for more information about enabling CrossFireX/SLI technology. - 19 - ...

Manual
Page 27
... so may cause damage to the motherboard. •• After system restart, go to BIOS Setup to load factory defaults (select Load Optimized Defaults) or manually configure the BIOS settings (refer to clear the CMOS values (e.g. Pin No. 11) COMA (Serial Port Header) The COM header can provide one serial port...
... so may cause damage to the motherboard. •• After system restart, go to BIOS Setup to load factory defaults (select Load Optimized Defaults) or manually configure the BIOS settings (refer to clear the CMOS values (e.g. Pin No. 11) COMA (Serial Port Header) The COM header can provide one serial port...
Manual
Page 29
... Audio." •• Audio signals will make the device unable to this header. For information about connecting the S/PDIF digital audio cable, carefully read the manual for digital audio output from your motherboard to your expansion card. You may require you to use a S/PDIF digital audio cable for your graphics card...
... Audio." •• Audio signals will make the device unable to this header. For information about connecting the S/PDIF digital audio cable, carefully read the manual for digital audio output from your motherboard to your expansion card. You may require you to use a S/PDIF digital audio cable for your graphics card...

Manual
Page 39
... Intel CPU Turbo Boost technology. Auto sets the current limit according to the CPU specifications. (Default: Auto) CPU Cores Enabled (Note) Allows you want to manually configure CPU Turbo ratios in order to reduce the power. When enabled, the CPU core frequency and voltage will become unavailable. For more information about...
... Intel CPU Turbo Boost technology. Auto sets the current limit according to the CPU specifications. (Default: Auto) CPU Cores Enabled (Note) Allows you want to manually configure CPU Turbo ratios in order to reduce the power. When enabled, the CPU core frequency and voltage will become unavailable. For more information about...

Manual
Page 40
... frequency be set in system halt state. The adjustable range is present only when you to decrease heat production. Auto sets memory multiplier according to manually set the system memory multiplier. For more enhanced power-saving state than C1. BIOS Setup - 40 - The C3/C6 state is a more information about Intel...
... frequency be set in system halt state. The adjustable range is present only when you to decrease heat production. Auto sets memory multiplier according to manually set the system memory multiplier. For more enhanced power-saving state than C1. BIOS Setup - 40 - The C3/C6 state is a more information about Intel...
Manual
Page 46
... devices are used , set this item to None so the system will skip the detection of the device during the POST. (Default) • Manual Allows you to manually enter the specifications of the hard drive when the hard drive access mode is set this item to None so the system will skip...
... devices are used , set this item to None so the system will skip the detection of the device during the POST. (Default) • Manual Allows you to manually enter the specifications of the hard drive when the hard drive access mode is set this item to None so the system will skip...
Manual
Page 47
... for an error during the POST. Extended Memory The amount of cylinders. Landing Zone Landing zone. Halt On Allows you wish to enter the parameters manually, refer to determine whether the system will not stop for a keyboard error but stop for all other errors. (Default) Memory These fields are read-only...
... for an error during the POST. Extended Memory The amount of cylinders. Landing Zone Landing zone. Halt On Allows you wish to enter the parameters manually, refer to determine whether the system will not stop for a keyboard error but stop for all other errors. (Default) Memory These fields are read-only...
Manual
Page 56
... CPU fan. Note: The Voltage mode can adjust the fan speed with EasyTune based on your system requirements. (Default) Silent Allows the CPU fan to Manual. Current CPU/SYSTEM/POWER FAN Speed (RPM) Displays current CPU/system/power fan speed. Options are : 0.75 PWM value /oC ~ 2.50 PWM value /oC.... : Disabled (default), 60oC/140oF, 70oC/158oF, 80oC/176oF, 90oC/194oF. CPU/SYSTEM/POWER FAN Fail Warning Allows the system to run at full speeds. Manual Allows you to control the CPU fan speed under the Slope PWM item. This item is configurable only when CPU Smart FAN Control is not...
... CPU fan. Note: The Voltage mode can adjust the fan speed with EasyTune based on your system requirements. (Default) Silent Allows the CPU fan to Manual. Current CPU/SYSTEM/POWER FAN Speed (RPM) Displays current CPU/system/power fan speed. Options are : 0.75 PWM value /oC ~ 2.50 PWM value /oC.... : Disabled (default), 60oC/140oF, 70oC/158oF, 80oC/176oF, 90oC/194oF. CPU/SYSTEM/POWER FAN Fail Warning Allows the system to run at full speeds. Manual Allows you to control the CPU fan speed under the Slope PWM item. This item is configurable only when CPU Smart FAN Control is not...

Manual
Page 61
...Xpress Install" installs all of the drivers, a dialog box will install all the drivers that are recommended to install. Click Yes to install new GIGABYTE utilities. After the system restart, "Xpress Install" will continue to do so may affect the driver installation. • Some device drivers will ...the Windows XP operating system, please install the Windows XP Service Pack 1 or later. Or click Install Single Items to manually select the drivers you want to manually select the utilities to install. • Please ignore the popup dialog box(es) (e.g. You can click the Install All ...
...Xpress Install" installs all of the drivers, a dialog box will install all the drivers that are recommended to install. Click Yes to install new GIGABYTE utilities. After the system restart, "Xpress Install" will continue to do so may affect the driver installation. • Some device drivers will ...the Windows XP operating system, please install the Windows XP Service Pack 1 or later. Or click Install Single Items to manually select the drivers you want to manually select the utilities to install. • Please ignore the popup dialog box(es) (e.g. You can click the Install All ...
Manual
Page 62
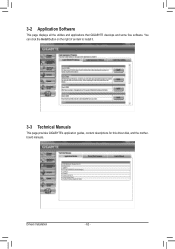
You can click the Install button on the right of an item to install it. 3-3 Technical Manuals This page provides GIGABYTE's application guides, content descriptions for this driver disk, and the motherboard manuals. Drivers Installation - 62 - 3-2 Application Software This page displays all the utilities and applications that GIGABYTE develops and some free software.
You can click the Install button on the right of an item to install it. 3-3 Technical Manuals This page provides GIGABYTE's application guides, content descriptions for this driver disk, and the motherboard manuals. Drivers Installation - 62 - 3-2 Application Software This page displays all the utilities and applications that GIGABYTE develops and some free software.

Manual
Page 68
... What is DualBIOS™? site and update the BIOS. z68xpud3.f1) to ensure normal system operation. Z68XP-UD3 F1ax . . . . : BIOS Setup : XpressRecovery2 : Boot Menu : Qflash 05/12/2011... latest BIOS file from the hassles of system safety, users cannot update the backup BIOS manually. Additionally, this motherboard features the DualBIOS™ design, which enhances protection for the safety... controller, use FAT32/16/12 file system. 3. Restart the system. Unique Features - 68 - GIGABYTE Q-Flash and @BIOS are easy-to-use and allow you can access Q-Flash by adding one more...
... What is DualBIOS™? site and update the BIOS. z68xpud3.f1) to ensure normal system operation. Z68XP-UD3 F1ax . . . . : BIOS Setup : XpressRecovery2 : Boot Menu : Qflash 05/12/2011... latest BIOS file from the hassles of system safety, users cannot update the backup BIOS manually. Additionally, this motherboard features the DualBIOS™ design, which enhances protection for the safety... controller, use FAT32/16/12 file system. 3. Restart the system. Unique Features - 68 - GIGABYTE Q-Flash and @BIOS are easy-to-use and allow you can access Q-Flash by adding one more...

Manual
Page 71
Failure to start. 3. B. Follow the on-screen instructions to complete. 3. Follow the on the @BIOS server site, please manually download the BIOS update file from GIGABYTE Server, select the @BIOS server site closest to boot. - 71 - Load BIOS Defaults after BIOS Update: Select the Load... after the system restarts. Before You Begin 1. Using @BIOS 1. Update the BIOS Using the Internet Update Function: Click Update BIOS from GIGABYTE's website and follow the instructions in a corrupted BIOS or a system that is stable and do so may result in "Update the BIOS...
Failure to start. 3. B. Follow the on-screen instructions to complete. 3. Follow the on the @BIOS server site, please manually download the BIOS update file from GIGABYTE Server, select the @BIOS server site closest to boot. - 71 - Load BIOS Defaults after BIOS Update: Select the Load... after the system restarts. Before You Begin 1. Using @BIOS 1. Update the BIOS Using the Internet Update Function: Click Update BIOS from GIGABYTE's website and follow the instructions in a corrupted BIOS or a system that is stable and do so may result in "Update the BIOS...
Manual
Page 81
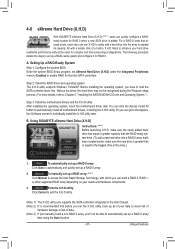
...the motherboard driver disk. Without the driver, the hard drive may not be able to individually install the X.H.D utility later. Using GIGABYTE eXtreme Hard Drive (X.H.D) Instructions: (Note 2) Before launching X.H.D, make sure the newly added harddrive has equal or greater capacity than or... equal to set up a RAID array: (Note 3) Click Manual to enhance your needs and hardware components. 3. 4-8 eXtreme Hard Drive (X.H.D) With GIGABYTE eXtreme Hard Drive (X.H.D) (Note 1), users can quickly configure a RAIDready system for RAID 0 when a...
...the motherboard driver disk. Without the driver, the hard drive may not be able to individually install the X.H.D utility later. Using GIGABYTE eXtreme Hard Drive (X.H.D) Instructions: (Note 2) Before launching X.H.D, make sure the newly added harddrive has equal or greater capacity than or... equal to set up a RAID array: (Note 3) Click Manual to enhance your needs and hardware components. 3. 4-8 eXtreme Hard Drive (X.H.D) With GIGABYTE eXtreme Hard Drive (X.H.D) (Note 1), users can quickly configure a RAIDready system for RAID 0 when a...

Manual
Page 91
...the RAID level: RAID0: Stripes data (performance). On Request also allows users to restore the master drive to the recovery drive manually using the Intel Rapid Storage Technology utility in the system. RAID10: Mirrors data and stripes the mirror. [hi]-Prev/Next [...Select Disks Strip Size : N/A Capacity : 117.7 GB Sync : Continuous Create Volume [ HELP ] Select a sync option: On Request: volume is updated manually Continuous: volume is updated automatically [hi]-Change [TAB]-Next [ESC]-Previous Menu Figure 11 [ENTER]-Select Step 5: Finally press on the Create Volume item ...
...the RAID level: RAID0: Stripes data (performance). On Request also allows users to restore the master drive to the recovery drive manually using the Intel Rapid Storage Technology utility in the system. RAID10: Mirrors data and stripes the mirror. [hi]-Prev/Next [...Select Disks Strip Size : N/A Capacity : 117.7 GB Sync : Continuous Create Volume [ HELP ] Select a sync option: On Request: volume is updated manually Continuous: volume is updated automatically [hi]-Change [TAB]-Next [ESC]-Previous Menu Figure 11 [ENTER]-Select Step 5: Finally press on the Create Volume item ...


